在大家HarmonyOS开发中,Webview组件上添加组件可能是很常见的功能了,HarmonyOS的webview和Android的webwiew存在一点点区别,今天来实现这个功能
-
使用项目布局显示webview搭建和webview加载链接的基本功能
-
解决webview覆盖层不显示问题
-
查看运行效果
基础的webview学习,大家参考如下链接 :
https://developer.harmonyos.com/cn/docs/documentation/doc-guides/ui-java-component-webview-0000001092715158
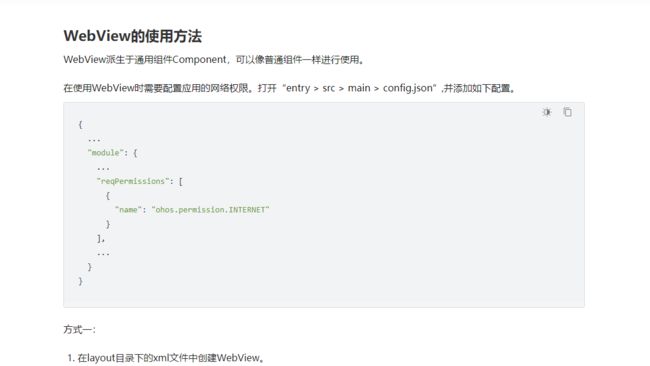
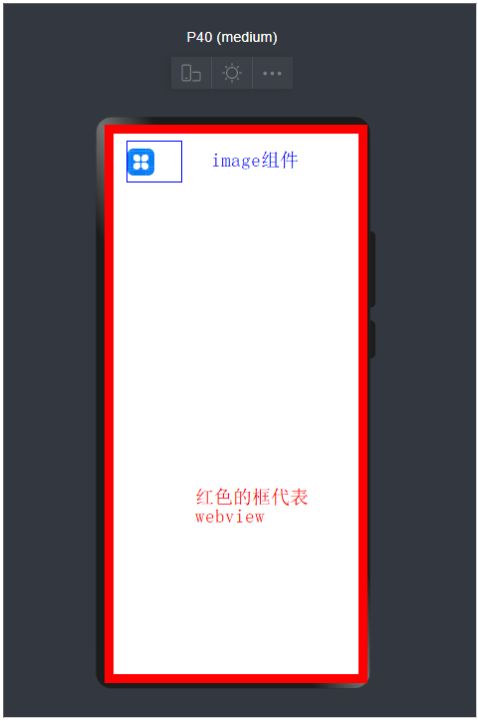
第一步 使用DependentLayout 简单大家一个layout布局界面
Java代码如下:
package com.harmony.alliance.mydemo.slice;
import com.harmony.alliance.mydemo.ResourceTable;
import ohos.aafwk.ability.AbilitySlice;
import ohos.aafwk.content.Intent;
import ohos.agp.components.DirectionalLayout;
import ohos.agp.components.webengine.*;
import ohos.media.image.ImagePacker;
import ohos.media.image.PixelMap;
import ohos.media.image.common.PixelFormat;
import ohos.media.image.common.Size;
import java.io.File;
import java.io.FileOutputStream;
import java.io.IOException;
import java.io.OutputStream;
public class MainAbilitySlice extends AbilitySlice {
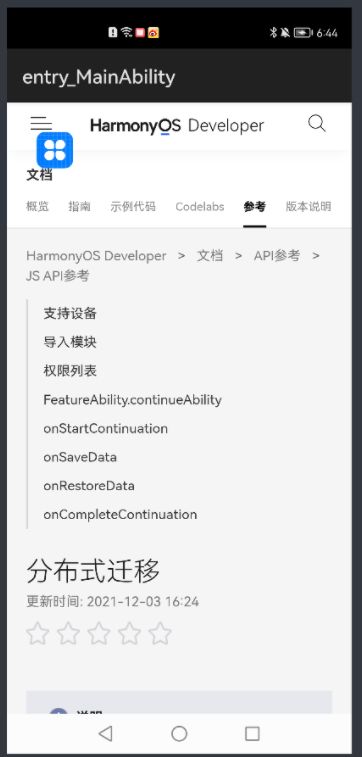
private static final String EXAMPLE_URL = "https://developer.harmonyos.com/cn/docs/documentation/doc-references/js-apis-distributed-migration-0000001050024965";
@Override
public void onStart(Intent intent) {
super.onStart(intent);
super.setUIContent(ResourceTable.Layout_ability_main);
// dl_bottom.requestForceForwardTouchEvent()
WebView webView = (WebView) findComponentById(ResourceTable.Id_webview);
webView.getWebConfig().setJavaScriptPermit(true); // 如果网页需要使用JavaScript,增加此行;如何使用JavaScript下文有详细介绍
webView.getWebConfig().setWebStoragePermit(true);
webView.getWebConfig().setDataAbilityPermit(true);
webView.getWebConfig().setLoadsImagesPermit(true);
webView.getWebConfig().setMediaAutoReplay(true);
webView.getWebConfig().setLocationPermit(true);
webView.getWebConfig().setSecurityMode(WebConfig.SECURITY_SELF_ADAPTIVE);
webView.load(EXAMPLE_URL);
// HiLogUtils.PrintLog("webView.load======>>>"+EXAMPLE_URL);
}
@Override
public void onActive() {
super.onActive();
}
@Override
public void onForeground(Intent intent) {
super.onForeground(intent);
}
}
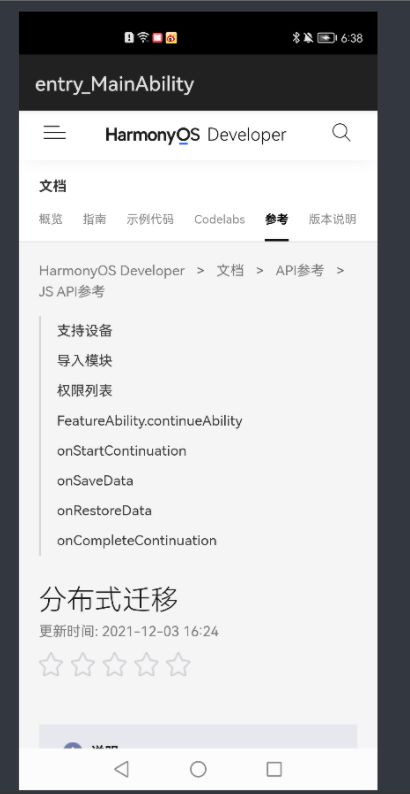
运行效果如下
第二步解决Webview覆盖层不显示的问题
这时候我们发现没有达到我想实现的效果,我们应该怎么解决呢?
2.1我们需要添加如下代码
    private void setWindowBgToAdaptWebView() {

        final String backgroundFileName = "_bg.jpg";

        File file = new File(getContext().getFilesDir(), backgroundFileName);

        if (file.exists()) {

            getWindow().setBackground(file.getPath());

            return;

        }

        PixelMap pixelMap = createBgPixelMap();

        if (pixelMap == null) {

            return;

        }

        ImagePacker imagePacker = ImagePacker.create();

        try (OutputStream outputStream = new FileOutputStream(file)) {

            ImagePacker.PackingOptions options = new ImagePacker.PackingOptions();

            if (!imagePacker.initializePacking(outputStream, options)) {

                return;

            }

            if (!imagePacker.addImage(pixelMap)) {

                return;

            }

            if (imagePacker.finalizePacking() < 0) {

                return;

            }

        } catch (IOException e) {

            e.printStackTrace();

        } finally {

            imagePacker.release();

        }

        getWindow().setBackground(file.getPath());

    }


    private PixelMap createBgPixelMap() {

        final int length = 10;

        PixelMap.InitializationOptions initializationOptions = new PixelMap.InitializationOptions();

        initializationOptions.size = new Size(length, length);

        initializationOptions.pixelFormat = PixelFormat.ARGB_8888;

        initializationOptions.editable = true;

        int[] defaultColors = new int[length * length];

        return PixelMap.create(defaultColors, initializationOptions);

}
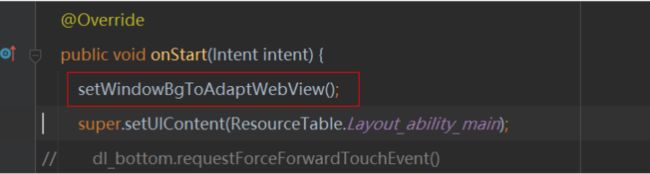
2.2我们要在OnStart的方法添加如下代码
全部代码如下
package com.harmony.alliance.mydemo.slice;


import com.harmony.alliance.mydemo.ResourceTable;

import ohos.aafwk.ability.AbilitySlice;

import ohos.aafwk.content.Intent;

import ohos.agp.components.DirectionalLayout;

import ohos.agp.components.webengine.*;

import ohos.media.image.ImagePacker;

import ohos.media.image.PixelMap;

import ohos.media.image.common.PixelFormat;

import ohos.media.image.common.Size;


import java.io.File;

import java.io.FileOutputStream;

import java.io.IOException;

import java.io.OutputStream;


public class MainAbilitySlice extends AbilitySlice {

    private static final String EXAMPLE_URL = "https://developer.harmonyos.com/cn/docs/documentation/doc-references/js-apis-distributed-migration-0000001050024965";

    @Override

    public void onStart(Intent intent) {

        setWindowBgToAdaptWebView();

        super.setUIContent(ResourceTable.Layout_ability_main);

//        dl_bottom.requestForceForwardTouchEvent()

        WebView webView = (WebView) findComponentById(ResourceTable.Id_webview);

        webView.getWebConfig().setJavaScriptPermit(true);  // 如果网页需要使用JavaScript,增加此行;如何使用JavaScript下文有详细介绍

        webView.getWebConfig().setWebStoragePermit(true);

        webView.getWebConfig().setDataAbilityPermit(true);

        webView.getWebConfig().setLoadsImagesPermit(true);

        webView.getWebConfig().setMediaAutoReplay(true);

        webView.getWebConfig().setLocationPermit(true);

        webView.getWebConfig().setSecurityMode(WebConfig.SECURITY_SELF_ADAPTIVE);

        webView.load(EXAMPLE_URL);

//        HiLogUtils.PrintLog("webView.load======>>>"+EXAMPLE_URL);

    }


    @Override

    public void onActive() {

        super.onActive();

    }


    @Override

    public void onForeground(Intent intent) {

        super.onForeground(intent);

    }


    private void setWindowBgToAdaptWebView() {

        final String backgroundFileName = "_bg.jpg";

        File file = new File(getContext().getFilesDir(), backgroundFileName);

        if (file.exists()) {

            getWindow().setBackground(file.getPath());

            return;

        }

        PixelMap pixelMap = createBgPixelMap();

        if (pixelMap == null) {

            return;

        }

        ImagePacker imagePacker = ImagePacker.create();

        try (OutputStream outputStream = new FileOutputStream(file)) {

            ImagePacker.PackingOptions options = new ImagePacker.PackingOptions();

            if (!imagePacker.initializePacking(outputStream, options)) {

                return;

            }

            if (!imagePacker.addImage(pixelMap)) {

                return;

            }

            if (imagePacker.finalizePacking() < 0) {

                return;

            }

        } catch (IOException e) {

            e.printStackTrace();

        } finally {

            imagePacker.release();

        }

        getWindow().setBackground(file.getPath());

    }


    private PixelMap createBgPixelMap() {

        final int length = 10;

        PixelMap.InitializationOptions initializationOptions = new PixelMap.InitializationOptions();

        initializationOptions.size = new Size(length, length);

        initializationOptions.pixelFormat = PixelFormat.ARGB_8888;

        initializationOptions.editable = true;

        int[] defaultColors = new int[length * length];

        return PixelMap.create(defaultColors, initializationOptions);

    }

}
第三步查看运行效果
这时候我们在看一下运行效果
更多精彩内容,请见华为开发者官方论坛→https://developer.huawei.com/consumer/cn/forum/home?ha_source=sanfang