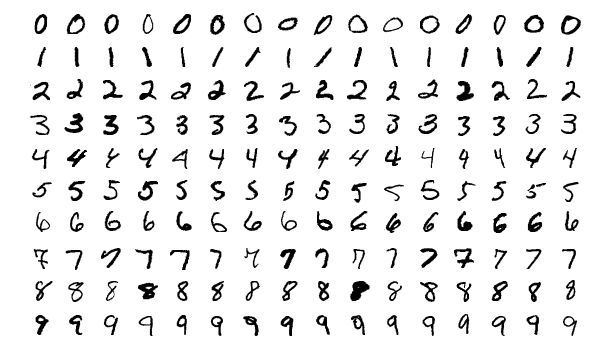
上一讲笔者和大家一起学习了如何使用 Tensorflow 构建一个卷积神经网络模型。本节我们将继续利用 Tensorflow 的便捷性完成 mnist 手写数字数据集的识别实战。mnist 数据集是 Yann Lecun 大佬基于美国国家标准技术研究所构建的一个研究深度学习的手写数字的数据集。mnist 由 70000 张不同人手写的 0-9 10个数字的灰度图组成。本节笔者就和大家一起研究如何利用 Tensorflow 搭建一个 CNN 模型来识别这些手写的数字。
数据导入
mnist 作为标准深度学习数据集,在各大深度学习开源框架中都默认有进行封装。所以我们直接从 Tensorflow 中导入相关的模块即可:
importtensorflowastf
fromtensorflow.examples.tutorials.mnist
importinput_data
# load mnist data
mnist = input_data.read_data_sets('MNIST_data', one_hot=True)
快速搭建起一个简易神经网络模型
数据导入之后即可按照 Tensorflow 的范式创建相应的 Tensor 变量然后创建会话:
# create the session
sess = tf.InteractiveSession()
# create variables and run the session
x = tf.placeholder('float', shape=[None,784])y_ = tf.placeholder('float', shape=[None,10])W = tf.Variable(tf.zeros([784,10]))b = tf.Variable(tf.zeros([10]))sess.run(tf.global_variables_initializer())
定义前向传播过程和损失函数:
# define the net and loss functiony = tf.nn.softmax(tf.matmul(x, W) + b)cross_entropy = -tf.reduce_sum(y_*tf.log(y))
进行模型训练:
# train the model
train_step = tf.train.GradientDescentOptimizer(0.01).minimize(cross_entropy)
foriinrange(1000): batch = mnist.train.next_batch(50) train_step.run(feed_dict={x: batch[0], y_: batch[1]})
使用训练好的模型对测试集进行预测:
# evaluate the model
correct_prediction = tf.equal(tf.argmax(y,1), tf.argmax(y_,1))accuracy = tf.reduce_mean(tf.cast(correct_prediction,"float"))print(accuracy.eval(feed_dict={x: mnist.test.images, y_: mnist.test.labels}))
预测准确率为 0.9,虽然说也是一个很高的准确率了,但对于 mnist 这种标准数据集来说,这样的结果还有很大的提升空间。所以我们继续优化模型结构,为模型添加卷积结构。
搭建卷积神经网络模型
定义初始化模型权重函数:
# initilize the weight
defweight_variable(shape): initial = tf.truncated_normal(shape, stddev=0.1)
returntf.Variable(initial)
defbias_variable(shape): initial = tf.constant(0.1, shape=shape)
returntf.Variable(initial)
定义卷积和池化函数:
# convolutional and pooling
defconv2d(x, W):
returntf.nn.conv2d(x, W, strides=[1,1,1,1], padding='SAME')
def
max_pool_2x2(x):
returntf.nn.max_pool(x, ksize=[1,2,2,1], strides=[1,2,2,1], padding='SAME')
搭建第一层卷积:
# the first convolution layer
W_conv1 = weight_variable([5,5,1,32])b_conv1 = bias_variable([32])x_image = tf.reshape(x, [-1,28,28,1])h_conv1 = tf.nn.relu(conv2d(x_image, W_conv1) + b_conv1)h_pool1 = max_pool_2x2(h_conv1)
搭建第二层卷积:
# the second convolution layer
W_conv2 = weight_variable([5,5,32,64])b_conv2 = bias_variable([64])h_conv2 = tf.nn.relu(conv2d(h_pool1, W_conv2) + b_conv2)h_pool2 = max_pool_2x2(h_conv2)
搭建全连接层:
# dense layer/full_connected layer
W_fc1 = weight_variable([7*7*64,1024])b_fc1 = bias_variable([1024])h_pool2_flat = tf.reshape(h_pool2, [-1,7*7*64])h_fc1 = tf.nn.relu(tf.matmul(h_pool2_flat, W_fc1) + b_fc1)
设置 dropout 防止过拟合:
# dropout to prevent overfitting
keep_prob = tf.placeholder("float")h_fc1_drop = tf.nn.dropout(h_fc1, keep_prob)
对输出层定义 softmax :
# model output
W_fc2 = weight_variable([1024,10])b_fc2 = bias_variable([10])y_conv = tf.nn.softmax(tf.matmul(h_fc1_drop, W_fc2) + b_fc2)
训练模型并进行预测:
# model trainning and evaluating
cross_entropy = -tf.reduce_sum(y_*tf.log(y_conv))train_step = tf.train.AdamOptimizer(1e-4).minimize(cross_entropy)correct_prediction = tf.equal(tf.argmax(y_conv,1), tf.argmax(y_,1))accuracy = tf.reduce_mean(tf.cast(correct_prediction,"float"))sess.run(tf.initialize_all_variables())
foriinrange(20000): batch = mnist.train.next_batch(50)
ifi%100==0: train_accuracy = accuracy.eval(feed_dict={ x:batch[0], y_: batch[1], keep_prob:1.0}) print("step %d, training accuracy %g"%(i, train_accuracy)) train_step.run(feed_dict={x: batch[0], y_: batch[1], keep_prob:0.5})print("test accuracy %g"%accuracy.eval(feed_dict={ x: mnist.test.images, y_: mnist.test.labels, keep_prob:1.0}))
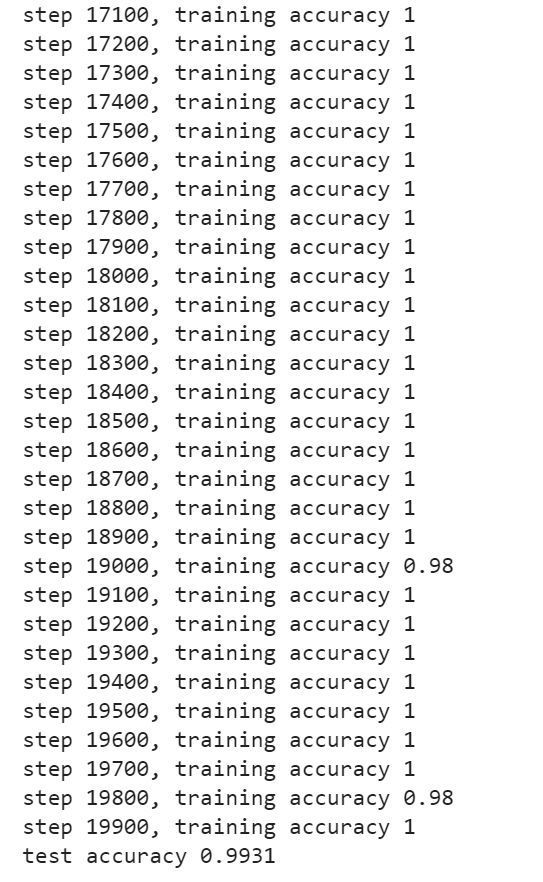
部分迭代过程和预测结果如下:
经过添加两层卷积之后我们的模型预测准确率达到了 0.9931,模型训练的算是比较好了。
注:本深度学习笔记系作者学习 Andrew NG 的 deeplearningai 五门课程所记笔记,其中代码为每门课的课后assignments作业整理而成。


