一、感受运行时
什么是runtime?
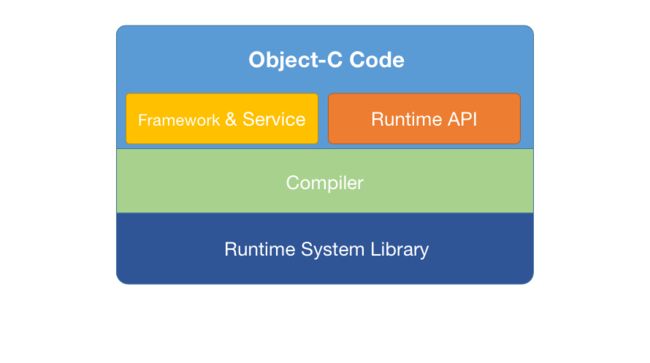
为OC提供运行机制,用C/C++写成的,通过底层的API、OC 源码、调用方法、基础语法、framework、service接口等为OC层面提供的运行制机制。
它也是为面向对象(OOP)提供运行时机制;在运行过程中,让对象找到真正的执行逻辑,包括内存布局(isa的走位指向)。
再来理解下Apple的
从编译时间和链接时间到运行时,Objective-C语言会尽可能多地推迟决策。 只要有可能,它都会动态执行操作,例如创建对象和确定要调用的方法。 因此,该语言不仅需要编译器,还需要运行时系统来执行编译后的代码。 运行时系统充当Objective-C语言的一种操作系统。 这就是使语言有效的原因。 但是,一般情况下,您不需要直接与运行时进行交互。--Apple
值得一说:苹果的文档还是建议阅读,语言障碍可使用Google翻译是很好的方案。
- 与Runtime交互的三种方式
1.通过Objective-C源代码;--[book write]
2.通过Framework & Service的类中定义的方法;--[[Book class] isKindOfClass:[NSObject class]]
3.通过直接调用运行时函数。--objc_msgSendSuper、sel_registerName
Compiler是编译器,即LLVM。比如OC层面的
alloc在LLVM的实现就是objc_alloc.
方法的本质
利用clang指令编译main.m文件得到main.cpp,在之前的OC底层原理03— isa探究中稍稍介绍过获取C++的Clang指令:
// 模拟器sdk路径替换自己的即可
clang -rewrite-objc -fobjc-arc -fobjc-runtime=ios-12.0.0 -isysroot /Applications/Xcode.app/Contents/Developer/Platforms/iPhoneSimulator.platform/Developer/SDKs/iPhoneSimulator12.0.sdk ViewController.m
定义一个类Book,编写两个方法read,write ;其中read实现,write不实现
Book * book = [Book alloc];
[book read];
执行之后,在main.cpp中找寻read,write方法。
// main.cpp
Book * book = ((Book *(*)(id, SEL))(void *)objc_msgSend)((id)objc_getClass("Book"), sel_registerName("alloc"));
((void (*)(id, SEL))(void *)objc_msgSend)((id)book, sel_registerName("read"));
((void (*)(id, SEL))(void *)objc_msgSend)((id)book, sel_registerName("write"));
通过以上,可以知道底层会将方法编译供 objc_msgSend调用,这就是方法的本质:消息的发送(objc_msgSend)。
既然这样我们就可以通过直接调用底层的objc_msgSend来调用方法;我们先导入头文件#import ;为了不报错,我们在target —— Build Setting —— 搜索msgSend, 把 enable strict checking of obc_msgSend calls由YES 改为NO,将严厉的检查机制关掉。
调用方法:
NSSeletorFromString() (OC层) = @seletor()(OC层)= sel_registerName(runtime)
在调用Book类方法后调用objc_msgSend(book,sel_registerName("read"));得到以下的结果
再一次验证方法的本质是通过消息的发送。
对象方法是否能执行父类的实现
定义两个类:Book 和 English ,Book中实现read方法,English中实现write方法
@interface Book : NSObject
-(void)read;
@end
@implementation Book
- (void)read{
    NSLog(@"read some book");
}
@end

@interface English : Book
-(void)write;
@end
@implementation English
-(void)write{
    NSLog(@"write A B C");
}
@end
通过调用以下:
        English * english = [English alloc];
        [english read];

        struct objc_super mysuper;
        mysuper.receiver = English;
        mysuper.super_class = [Book class];

        objc_msgSendSuper(&mysuper, sel_registerName("read"));
执行结果:
子类调用父类方法,这很好理解。消息的发送流程中,消息的接收是english,但是具体的实现,可以执行父类Book中的
read实现。
objc_msgSendSuper方法中有两个参数(struct objc_super *,SEL),其结构体类型是objc_super定义的结构体对象,且需要指定receiver 和 super_class两个属性,源码实现 & 定义如下
/**
 * 将具有简单返回值的消息发送到类实例的超类。
 * @param super A pointer to an \c objc_super data structure. Pass values identifying the
 *  context the message was sent to, including the instance of the class that is to receive the
 *  message and the superclass at which to start searching for the method implementation.
 * @param op A pointer of type SEL. Pass the selector of the method that will handle the message.
 * @param ...
 *   A variable argument list containing the arguments to the method.
 *
 * @return The return value of the method identified by \e op.
 *
 * @see objc_msgSend
 */
OBJC_EXPORT id _Nullable
objc_msgSendSuper(struct objc_super * _Nonnull super, SEL _Nonnull op, ...)
    OBJC_AVAILABLE(10.0, 2.0, 9.0, 1.0, 2.0);
#endif
而objc_super定义是:
/// Specifies the superclass of an instance.
struct objc_super {
    /// Specifies an instance of a class.
    __unsafe_unretained _Nonnull id receiver;

    /// Specifies the particular superclass of the instance to message.
#if !defined(__cplusplus)  &&  !__OBJC2__
    /* For compatibility with old objc-runtime.h header */
    __unsafe_unretained _Nonnull Class class;
#else
    __unsafe_unretained _Nonnull Class super_class;
#endif
    /* super_class is the first class to search */
};
#endif
由上面印证了,对象方法能执行父类的实现 。
但是其底层是怎么找的呢?
基本逻辑是:OC 方法是通过消息中的sel(方法编号),找到函数指针imp,再找到底层汇编执行其内容。
消息接收流程:对象 ->isa -> 方法or类 -> cache_t -> methodlist
objc_msgSend 的汇编流程
objc_msgSend 底层是使用汇编构造的。
因为汇编特性:1)编译速度快 ;2)参数的动态性,易调整。
汇编小补
LSR:逻辑右移
add 加法
b.le :判断上面cmp的值是小于等于执行标号,否则直接往下走
b.eq 等于 执行地址 否则往下
cmp a,b 比较a与b
mov a,b 把b的值送给a
ret 返回主程序
nop无作用,英文“no operation”的简写,意思是“do nothing”(机器码90)
call 调用子程序
je 或jz 若相等则跳(机器码74 或0F84)
jne或jnz 若不相等则跳(机器码75或0F85)
jmp 无条件跳(机器码EB)
jb 若小于则跳
ja 若大于则跳
jg 若大于则跳
jge 若大于等于则跳
jl 若小于则跳
jle 若小于等于则跳
ldr w10 ,[sp] w10 = sp栈内存中的值
pop 出栈
push 压栈
快速查找流程
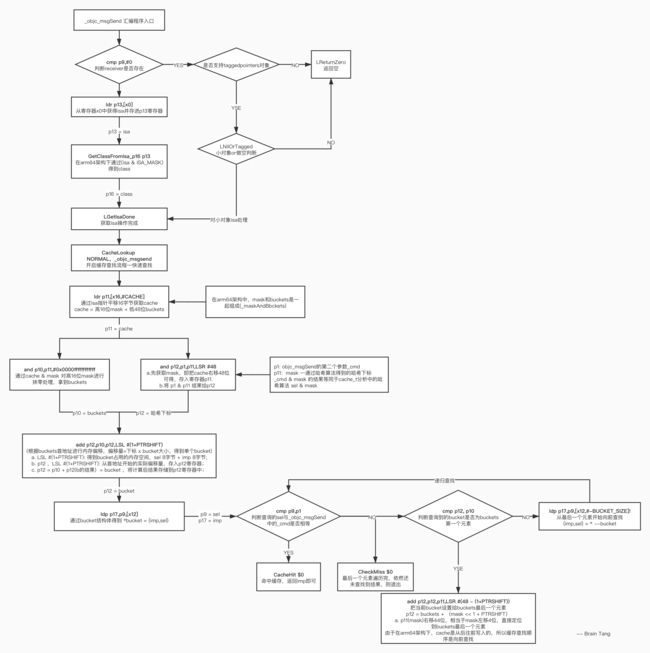
781源码中搜索objc_msgSend,汇编代码就要找.s文件,找到objc-msg-arm64.s,以下是主要的汇编代码:
    // 消息发送:objc_msgSend的汇编入口,获取receiver的isa
    ENTRY _objc_msgSend

    UNWIND _objc_msgSend, NoFrame

    // p0与空做对比,判断receiver是否存在,p0为objc_msgSend的第一个参数(消息接收者receiver,第二个参数是_cmd)
    cmp p0, #0          // 判空检查和标记指针检查
// 是否支持taggedpointers对象
#if SUPPORT_TAGGED_POINTERS
    b.le    LNilOrTagged
#else
    // p0 等于 0 时,直接返回 空
    b.eq    LReturnZero
#endif
   // p0即receiver 肯定存在的流程
    // 从x0寄存器指向的地址中取出 isa,存入 p13寄存器
    ldr p13, [x0]
   // 在64位架构下通过 p16 = isa(p13) & ISA_MASK,拿出shiftcls信息,得到class信息
    GetClassFromIsa_p16 p13
LGetIsaDone:
    // 调用imp或objc_msgSend_uncached
    //如果获取到isa,跳转CacheLookup 执行缓存查找流程(sel-imp的快速查找)
    CacheLookup NORMAL, _objc_msgSend

#if SUPPORT_TAGGED_POINTERS
LNilOrTagged:
    //如果为nil,则返回空
    b.eq    LReturnZero     // nil check

    // tagged
    adrp    x10, _objc_debug_taggedpointer_classes@PAGE
    add x10, x10, _objc_debug_taggedpointer_classes@PAGEOFF
    ubfx    x11, x0, #60, #4
    ldr x16, [x10, x11, LSL #3]
    adrp    x10, _OBJC_CLASS_$___NSUnrecognizedTaggedPointer@PAGE
    add x10, x10, _OBJC_CLASS_$___NSUnrecognizedTaggedPointer@PAGEOFF
    cmp x10, x16
    b.ne    LGetIsaDone

    // ext tagged
    adrp    x10, _objc_debug_taggedpointer_ext_classes@PAGE
    add x10, x10, _objc_debug_taggedpointer_ext_classes@PAGEOFF
    ubfx    x11, x0, #52, #8
    ldr x16, [x10, x11, LSL #3]
    b   LGetIsaDone
// SUPPORT_TAGGED_POINTERS
#endif

LReturnZero: // 不支持taggedpointer对象,或者为空,就返回空:returnZero
    // x0 is already zero
    mov x1, #0
    movi    d0, #0
    movi    d1, #0
    movi    d2, #0
    movi    d3, #0
    ret
    END_ENTRY _objc_msgSend
-
CacheLookup
看定义.macro CacheLookup,跳转至LLookupStart$1
.macro CacheLookup
    //重新启动协议:
    //一旦我们经过LLookupStart $ 1标签,我们可能已经加载了
    //无效的缓存指针或掩码。
    //
    //调用task_restartable_ranges_synchronize()时,
    //(或当有信号到达我们时),直到我们经过LLookupEnd$1,
    //然后我们的电脑将重置为LLookupRecover $ 1
    //跳转到具有以下内容的cache-miss代码路径
    // 要求:
    //
    // GETIMP:
    //缓存未命中只是返回NULL(将x0设置为0)
    //
    // NORMAL和LOOKUP:
    //-x0包含接收者
    //-x1包含选择器
    //-x16包含isa
    //-根据调用约定设置其他寄存器
LLookupStart$1:
    // #define CACHE (2 * __SIZEOF_POINTER__),其中 __SIZEOF_POINTER__表示pointer的大小 ,即 2*8 = 16
    // p1 = SEL, p16 = isa
    //  x16(即isa)中平移16字节得到cache,取出cache 存入p11寄存器; isa(8字节),superClass(8字节),cache(mask高16位 + buckets低48位)
    // p11 = mask|buckets
    ldr p11, [x16, #CACHE]
#if CACHE_MASK_STORAGE == CACHE_MASK_STORAGE_HIGH_16
// arm64--对应cache_t的HIGH_16位宏
    and p10, p11, #0x0000ffffffffffff   // p10 = buckets = cacahe & 0x0000ffffffffffff   把mask高16位抹零,得到buckets 存入p10寄存器,去掉mask,留下buckets
    //  把p11逻辑右移48位得到mask,mask & p1,得到sel-imp的下标index(即搜索下标)
    //  存入p12(cache insert写入时的哈希下标计算是 通过 sel & mask,读取时也需要通过这种方式)
    and p12, p1, p11, LSR #48       // x12 = _cmd & mask
#elif CACHE_MASK_STORAGE == CACHE_MASK_STORAGE_LOW_4
    and p10, p11, #~0xf         // p10 = buckets
    and p11, p11, #0xf          // p11 = maskShift
    mov p12, #0xffff
    lsr p11, p12, p11               // p11 = mask = 0xffff >> p11
    and p12, p1, p11                // x12 = _cmd & mask
#else
#error Unsupported cache mask storage for ARM64.
#endif
    // p12 = buckets + ((_cmd & mask) << (1+PTRSHIFT))
    // PTRSHIFT: arm64-asm.h 中定义 1 << 3 ,二进制 1 左移3位,结果为8.
    //  buckets 是一个数组,要想获得其中某个元素值,利用内存偏移 ,((_cmd & mask ) << (1 + PTRSHIFT)) = 2 <<  4 =  2 ^4 = 16  。(_cmd & mask )  为2,内存偏移相当于找buckets的第三个元素。
    //(_cmd & mask )  : 由于mask= ocuupi - 1= 4-1 = 3,在0,1,2,3 中去取,& 的结果就相当于在取余数,0,1,2,3
    add p12, p10, p12, LSL #(1+PTRSHIFT)
    // 通过取出p12的bucket结构体得到 * bucket = {imp,sel},p9 存sel, p17 存 imp
    ldp p17, p9, [x12]      // {imp, sel} = *bucket
1:  cmp p9, p1          // if (bucket->sel != _cmd)
    b.ne    2f          //     scan more
    CacheHit $0         // call or return imp
2:  // not hit: p12 = not-hit bucket
    CheckMiss $0            // miss if bucket->sel == 0
    cmp p12, p10        // wrap if bucket == buckets
    b.eq    3f
    ldp p17, p9, [x12, #-BUCKET_SIZE]!  // {imp, sel} = *--bucket
    b   1b          // loop
3:  // wrap: p12 = first bucket, w11 = mask
#if CACHE_MASK_STORAGE == CACHE_MASK_STORAGE_HIGH_16
    add p12, p12, p11, LSR #(48 - (1+PTRSHIFT))
                    // p12 = buckets + (mask << 1+PTRSHIFT)
#elif CACHE_MASK_STORAGE == CACHE_MASK_STORAGE_LOW_4
    add p12, p12, p11, LSL #(1+PTRSHIFT)
                    // p12 = buckets + (mask << 1+PTRSHIFT)
#else
#error Unsupported cache mask storage for ARM64.
#endif

      //当缓存损坏时,克隆扫描循环会丢失而不是挂起。
      //缓慢的路径可能会检测到任何损坏并在以后暂停。

    // 再查找一遍缓存()
    // 拿到x12(即p12)bucket中的 imp-sel 分别存入 p17-p9
    ldp p17, p9, [x12]      // {imp, sel} = *bucket

   // 比较 sel 与 p1(传入的参数cmd)
1:  cmp p9, p1          // if (bucket->sel != _cmd)
   //如果不相等,即走到第二步
    b.ne    2f          //     scan more
   // 如果相等 即命中,直接返回imp
    CacheHit $0         // call or return imp

2:  // not hit: p12 = not-hit bucket
   // 如果一直找不到,则CheckMiss
    CheckMiss $0            // miss if bucket->sel == 0
   // 判断p12(下标对应的bucket) 是否 等于 p10(buckets数组第一个元素)-- 表示前面已经没有了,但是还是没有找到
    cmp p12, p10        // wrap if bucket == buckets
    b.eq    3f //如果等于,跳转至第3步
   // 从x12(即p12 buckets首地址)- 实际需要平移的内存大小BUCKET_SIZE,得到得到第二个bucket元素,imp-sel分别存入p17-p9,即向前查找
    ldp p17, p9, [x12, #-BUCKET_SIZE]!  // {imp, sel} = *--bucket
   // 跳转至第1步,继续对比 sel 与 cmd
    b   1b          // loop

LLookupEnd$1:
LLookupRecover$1:
3:  // double wrap
   // 跳转至JumpMiss 因为是normal ,跳转至__objc_msgSend_uncached

    JumpMiss $0
.endmacro

//以下是最后跳转的汇编函数
.macro CacheHit
.if $0 == NORMAL
    TailCallCachedImp x17, x12, x1, x16 // authenticate and call imp
.elseif $0 == GETIMP
    mov p0, p17
    cbz p0, 9f          // don't ptrauth a nil imp
    AuthAndResignAsIMP x0, x12, x1, x16 // authenticate imp and re-sign as IMP
9:  ret             // return IMP
.elseif $0 == LOOKUP
    // No nil check for ptrauth: the caller would crash anyway when they
    // jump to a nil IMP. We don't care if that jump also fails ptrauth.
    AuthAndResignAsIMP x17, x12, x1, x16    // authenticate imp and re-sign as IMP
    ret             // return imp via x17
.else
.abort oops
.endif
.endmacro

.macro CheckMiss
    // miss if bucket->sel == 0
.if $0 == GETIMP
   //如果为GETIMP ,则跳转至 LGetImpMiss
    cbz p9, LGetImpMiss
.elseif $0 == NORMAL
   // 如果为NORMAL ,则跳转至 __objc_msgSend_uncached
    cbz p9, __objc_msgSend_uncached
.elseif $0 == LOOKUP
    //如果为LOOKUP ,则跳转至 __objc_msgLookup_uncached
    cbz p9, __objc_msgLookup_uncached
.else
.abort oops
.endif
.endmacro

.macro JumpMiss
.if $0 == GETIMP
    b   LGetImpMiss
.elseif $0 == NORMAL
    b   __objc_msgSend_uncached
.elseif $0 == LOOKUP
    b   __objc_msgLookup_uncached
.else
.abort oops
.endif
.endmacro
下面是objc_msgSend的汇编流程图

