OpenCV DNN模块黑白图片上色修复
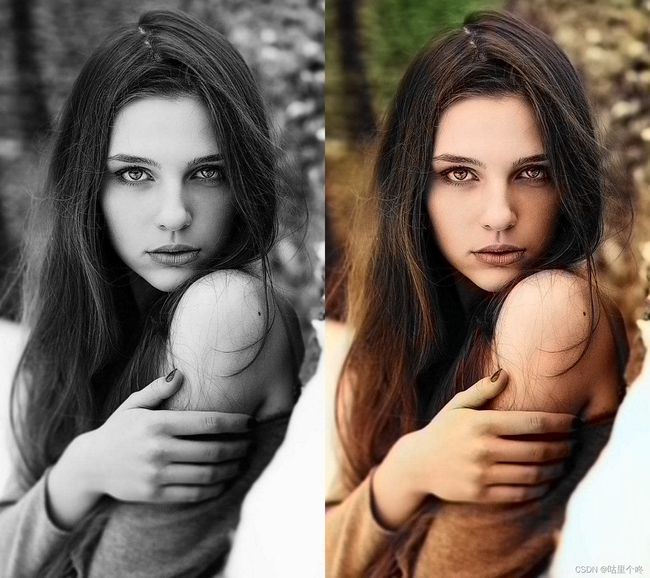
大家新年快乐啊,时隔多日,今天又来给博客添砖加瓦了,话不多说,我们先上效果图吧 
图片左边部分是原始的黑白图像,右边是生产的彩色图片。
这个项目是基于在加利福尼亚大学,伯克利,Richard Zhang,Phillip Isola和Alexei A. Efros开发的研究工作--Colorful Image Colorization
论文地址:https://arxiv.org/pdf/1603.08511.pdf
作者项目github地址:https://github.com/richzhang/colorization/tree/caffe
本人也是在看了之后试了效果的。基于OpenCV DNN模块给黑白老照片上色(附Python/C++源码) (qq.com)![]() https://mp.weixin.qq.com/s/04_UtnP-56MaoOI3d1MSsg
https://mp.weixin.qq.com/s/04_UtnP-56MaoOI3d1MSsg
然后,我这添油加醋的写了一个黑白视频转换为彩色视频的脚本,上代码
import numpy as np
import matplotlib.pyplot as plt
import cv2

print(cv2.__version__)

# Path of our caffemodel, prototxt, and numpy files
prototxt = "./model/colorization_deploy_v2.prototxt"
caffe_model = "./model/colorization_release_v2.caffemodel"
pts_npy = "./model/pts_in_hull.npy"

# Loading our model
net = cv2.dnn.readNetFromCaffe(prototxt, caffe_model)
pts = np.load(pts_npy)

layer1 = net.getLayerId("class8_ab")
print(layer1)
layer2 = net.getLayerId("conv8_313_rh")
print(layer2)
pts = pts.transpose().reshape(2, 313, 1, 1)
net.getLayer(layer1).blobs = [pts.astype("float32")]
net.getLayer(layer2).blobs = [np.full([1, 313], 2.606, dtype="float32")]

video_path = r'./heibai.mp4'
cap = cv2.VideoCapture(video_path)

fps = 24	#保存视频的FPS,可以适当调整
fourcc = cv2.VideoWriter_fourcc(*'XVID')
videoWriter = cv2.VideoWriter('video.avi',fourcc,fps,(1296,486))#最后一个是保存图片的尺寸
i = 0

while cap.isOpened():
    fps = cap.get(cv2.CAP_PROP_FPS)  # 返回视频的fps--帧率
    width = cap.get(cv2.CAP_PROP_FRAME_WIDTH)  # 返回视频的宽
    height = cap.get(cv2.CAP_PROP_FRAME_HEIGHT)  # 返回视频的高
    print('fps:', fps, 'width:', width, 'height:', height)
    ret, ori_frame = cap.read()  # 读取一帧视频

    if ret:
        ori_frame = cv2.cvtColor(ori_frame, cv2.COLOR_BGR2GRAY)
        # Convert image from gray scale to RGB format
        ori_frame = cv2.cvtColor(ori_frame, cv2.COLOR_GRAY2RGB)
        normalized = ori_frame.astype("float32") / 255.0
        # Converting the image into LAB
        lab_image = cv2.cvtColor(normalized, cv2.COLOR_RGB2LAB)
        # Resizing the image
        resized = cv2.resize(lab_image, (224, 224))
        # Extracting the value of L for LAB image
        L = cv2.split(resized)[0]
        L -= 50  # OR we can write L = L - 50

        ######inference######
        net.setInput(cv2.dnn.blobFromImage(L))
        # Finding the values of 'a' and 'b'
        ab = net.forward()[0, :, :, :].transpose((1, 2, 0))
        # Resizing
        ab = cv2.resize(ab, (ori_frame.shape[1], ori_frame.shape[0]))

        # Combining L, a, and b channels
        L = cv2.split(lab_image)[0]
        # Combining L,a,b
        LAB_colored = np.concatenate((L[:, :, np.newaxis], ab), axis=2)

        ## Converting LAB image to RGB
        RGB_colored = cv2.cvtColor(LAB_colored, cv2.COLOR_LAB2RGB)
        # Limits the values in array
        RGB_colored = np.clip(RGB_colored, 0, 1)
        # Changing the pixel intensity back to [0,255],as we did scaling during pre-processing and converted the pixel intensity to [0,1]
        RGB_colored = (255 * RGB_colored).astype("uint8")

        RGB_BGR = cv2.cvtColor(RGB_colored, cv2.COLOR_RGB2BGR)
        finall_image = cv2.hconcat((ori_frame,RGB_BGR))
        videoWriter.write(finall_image)
    else:
        break
cap.release()
videoWriter.release()
可以看到的是,运行这个脚本需要先下载3个文件
为了方便大家运行代码,所以我给大家准备好了这3个文件和测试用的视频,放在百度云盘了。大家自行下载。
链接:https://pan.baidu.com/s/1d7ZDRG8AAWJY8G56tbok2Q
提取码:gudo
好了,最后在展示一下最后合成的视频,上链接
video
video20222161652361
好了,老规矩,上咩咩图。
至此,敬礼,salute!!!!!!


