webpack3已经是各大前端脚手架的标配时,parcel却横空出世,以零配置,多核编译等特性迅速赢得程序员的青睐,webpack4的出现也正是看到了parcel的优点,来了解下吧。
webpack4打包速度
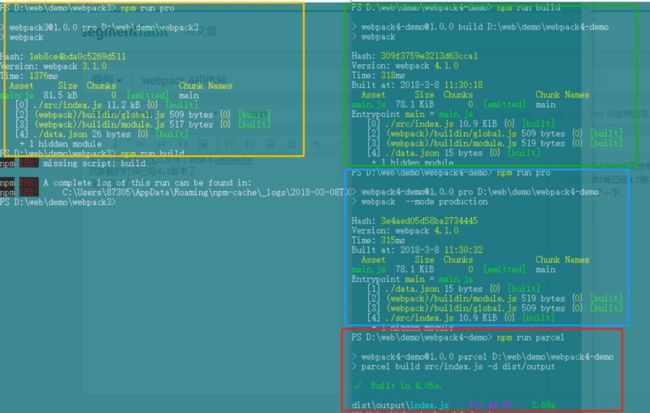
下图所示,黄色为webpack3版本;绿色为我写的配置,跟webpack3基本相似,具体不同下面会介绍;蓝色是webpack4自带的production模式;红色为parcel;
具体大小速度大家可以比较一下,还是很给力的
关于配置方面,webpack4应该说最大的噱头就是零配置了。
webpack4开始
快速初始化配置文件 package.json
npm init -y
// npm i yarn -g
yarn init -y
接下来将 webpack 添加到 package.json => devDependencies
npm install webpack webpack-cli -D
这里需要注意一点,webpack4需要安装webpack cli,跟往常不一样,大家安装好webpack4以后并不能直接使用,会提示你安装webpack cli
安装成功后,创建目录 src/index.js 并添加如下内容 (默认入口为 src)
document.write("Hello webpack4!");
命令行输入:
webpack --mode=development
成功后显示,打开 dist 文件夹会看到 main.js (默认输出到 dist)
Hash: 771a2645c2d430fa3bb4
Version: webpack 4.5.0
Time: 128ms
Built at: 2020-4-10 03:14:23
  Asset      Size  Chunks             Chunk Names
main.js  2.81 KiB    main  [emitted]  main
Entrypoint main = main.js
[./index.js] 34 bytes {main} [built]
--mode 模式 (必选,不然会有 WARNING),是 webpack4 新增的参数选项,默认是 production
- --mode production 生产环境
- 提供 uglifyjs-webpack-plugin 代码压缩
- 不需要定义 new webpack.DefinePlugin({ "process.env.NODE_ENV":
- JSON.stringify("production") }) 默认 production
- 默认开启 NoEmitOnErrorsPlugin -> optimization.noEmitOnErrors, 编译出错时跳过输出,以确保输出资源不包含错误
- 默认开启 ModuleConcatenationPlugin -> optimization.concatenateModules, webpack3 添加的作用域提升(Scope Hoisting)
- --mode development 开发环境
- 使用 eval 构建 module, 提升增量构建速度
- 不需要定义 new webpack.DefinePlugin({ "process.env.NODE_ENV": JSON.stringify("development") }) 默认 development
- 默认开启 NamedModulesPlugin -> optimization.namedModules 使用模块热替换(HMR)时会显示模块的相对路径
接下来创建 dist/index.html 并引入 main.js, 浏览器中打开看内容。
webpack-simple
再创建一个文件 src/content.js, 在 src/index.js 中引入该模块
// content.js
module.exports = 'Looooooooooooooong content!';

// index.js
document.write(`Hello webpack4!${require('./content.js')}`);
再次执行 webpack --mode=development 完了打开 index.html
// 内容
Hello webpack4!Looooooooooooooong content!
Demo
快速生成webpack.config.js
使用webpack-cli init初始化,不像以前要自己一点点写。
webpack-cli init

1. Will your application have multiple bundles? No // 单入口 string, 多页面 object
2. Which module will be the first to enter the application? [example: './src/index'] ./src/index // 程序入口
3. What is the location of "app"? [example: "./src/app"] './src/index' // 程序主文件
4. Which folder will your generated bundles be in? [default: dist]: // 输出目录,默认 dist
5. Are you going to use this in production? No // (Yes 第9步默认'config', No 则为 'prod')
6. Will you be using ES2015? Yes // 会添加 ES6 => ES5 的配置
7. Will you use one of the below CSS solutions? CSS // 选一种样式语言,会生成对应的 loader 配置
8. If you want to bundle your CSS files, what will you name the bundle? (press enter to skip) // 回车跳过
9. Name your 'webpack.[name].js?' [default: 'config']: // webpack.config.js

Congratulations! Your new webpack configuration file has been created!
配置生成OK,如下
// webpack.config.js

const webpack = require('webpack');
const path = require('path');
const UglifyJSPlugin = require('uglifyjs-webpack-plugin');

module.exports = {
  entry: './src/index.js',

  output: {
    filename: '[name].bundle.js',
    path: path.resolve(__dirname, 'dist')
  },

  module: {
    rules: [
      {
        test: /\.js$/,
        exclude: /node_modules/,
        loader: 'babel-loader',
        options: {
          presets: ['env']
        }
      },
      {
        test: /\.css$/,
        use: [
          { loader: 'style-loader', options: { sourceMap: true } },
          { loader: 'css-loader' }
        ]
      }
    ]
  },

  plugins: [new UglifyJSPlugin()]
  // 这款插件用于压缩 JS 代码,减少资源体积大小
};
再度执行编译一切OK, 打开 index.html 查看内容
webpack --mode=development

Hash: c30d4f489db4d568ee0b
Version: webpack 4.5.0
Time: 1308ms
Built at: 2020-4-11 04:14:23
Asset      Size  Chunks             Chunk Names
app.38de904fed135db4bf0a.js  1.17 KiB     app  [emitted]  app
Entrypoint app = app.38de904fed135db4bf0a.js
[./src/content.js] 62 bytes {app} [built]
[./src/index.js] 80 bytes {app} [built]
Demo
使用 html-webpack-plugin 创建 html 文件
- 该插件简化了创建 HTML 文件的创建,服务于 webpack bundle。
- 解决的问题:每次编译完成后不用再去手动修改 index.html, 它会与 JS 生成在同一目录 dist 并引入 app.38de904fed135db4bf0a.js。
npm install html-webpack-plugin -D
//yarn add html-webpack-plugin -D
安装完成后,在 webpack.config.js 下配置 更多可选的配置项
// webpack.config.js
+ const HtmlWebpackPlugin = require('html-webpack-plugin');

plugins: [
  new UglifyJSPlugin(),
+ new HtmlWebpackPlugin({
    title: 'webpack-cli'
  }),
]
重新执行 webpack --mode=development, dist 目录就会多个 index.html 并引入了 main.bundle.js.
Webpack4 配置 React 开发环境
上面配置中的 module.rules babel-loader 的应用
babel-loader将 ES6* 代码转化为 ES5 代码
Babel 默认只转换新的 JavaScript 句法 (syntax), 而不转换新的 API, 比如 Iterator、Generator、Set、Maps、Proxy、Reflect、Symbol、Promise 等全局对象,以及一些定义在全局对象上的方法(比如 Object.assign)都不会转码。
举例来说,ES6 在 Array 对象上新增了 Array.from 方法。Babel 就不会转码这个方法。如果想让这个方法运行,必须使用 babel-polyfill,为当前环境提供一个垫片。—— 摘自 阮一峰 Babel 入门教程
添加依赖包
npm install react react-dom babel-preset-react -S
//yarn add react react-dom babel-preset-react -S
babel-preset-react 用于解析 react 的语法;
babel-preset-env 初始化配置时已经安装。它的前身是 babel-preset-es2015/es2016/es2017 以后要用新特性这个包就可以搞定一切。
安装完成,修改 src/index.js 的内容为
import React from 'react';
import { render } from 'react-dom';
render(Hello world!
, document.querySelector('#root'));
把 webpack.config.js module.rules babel-loader 配置 presets 删掉。
在项目根目录新建 .babelrc 文件,内容如下
// .babelrc
{
    "presets": [
        "env",
        "react"
    ]
}

// webpack.config.js
plugins: [
  new HtmlWebpackPlugin({
+   template: './index.html' // 添加模版文件
  }),
]

// index.html


    Webpack4-react16
再次执行 webpack --mode=development, ok!
Demo
实时刷新页面 webpack-dev-server
添加依赖包
npm i webpack-dev-server -D
//yarn add webpack-dev-server -D
打开 package.json 添加构建脚本
-
--open自动打开浏览器并定向至http://localhost:8080/ - 更多配置项
"scripts": {
    "dev": "webpack-dev-server --mode=development --open --hot"
    "//": "webpack-dev-server --mode=development --host 0.0.0.0"
    "//": "使用本机 IP 访问项目 [Your IP]:8080 => 192.168.0.111:8080"
},
执行 yarn dev 或 npm run dev, 自动刷新完成。
注意:根据入口文件,webpack只对js和css的改变进行监听。
模块热替换 Hot Module Replacement
即在不重载页面的情况下,实时替换更新修改的模块。提高开发效率。
本文使用 React, 所以用 react-hot-loader
Webpack HMR 原理解析
npm i react-hot-loader -D
//yarn add react-hot-loader -D
项目根目录下新建文件 .babelrc, 添加内容:
{
+  "plugins": ["react-hot-loader/babel"]
}
在 src 目录下添加文件 App.js
// src/App.js
import React from 'react';
import { hot } from 'react-hot-loader';

const App = () => Hello World!;

export default hot(module)(App)
应用入口引入 App.js
// src/index.js
import React from 'react';
import { render } from 'react-dom';
import App from './App';
render(重新执行 npm run dev 或 yarn dev, 修改下 App.js 的代码,注意看浏览器与 console.
[HMR]  - ./src/App.js
log.js:24 [HMR] App is up to date.
如果 hot(module)(App) 与 render 一个文件则会收到警告
Webpack4 加载 CSS
在 4.x 版本之前,用的是 extract-text-webpack-plugin,不过 [email protected] 不支持使用。
作者推荐使用 mini-css-extract-plugin
npm i mini-css-extract-plugin -D
//yarn add mini-css-extract-plugin -D
配置rules
// module.rules
{
  test: /\.css$/,
  use: [
    MiniCssExtractPlugin.loader,
    {
      loader: 'css-loader',
      options: {

      }
    }
  ]
}

plugins: [
  new MiniCssExtractPlugin({
    filename: "[name].[contenthash].css",
    chunkFilename: "[id].[contenthash].css"
  })
],
按需加载 React 组件
React Loadable 简介
npm i react-loadable
npm i babel-preset-stage-2 -D // for 动态 import() 语法
//yarn add react-loadable
//yarn add babel-preset-stage-2 -D // for 动态 import() 语法
import Loadable from 'react-loadable';

const Loading = () => 'Loading...';
const Home = Loadable({ loader: () => import('./Home'), loading: Loading });
按需加载OK,不过发现个问题,这个 Header 组件被多处调用,样式&JS都存在多次加载。
接下来要做的就是把共用的代码提取出来。
细说splitChunks技术
- 参数说明
webpack4废弃了CommonsChunkPlugin插件,使用optimization.splitChunks和optimization.runtimeChunk来代替,原因可以参考《webpack4:连奏中的进化》一文。关于runtimeChunk参数,有的文章说是提取出入口chunk中的runtime部分,形成一个单独的文件,由于这部分不常变化,可以利用缓存。google开发者社区的博文是这样描述的:
The
runtimeChunkoption is also specified to move webpack's runtime into thevendorschunk to avoid duplication of it in our app code.
splitChunks中默认的代码自动分割要求是下面这样的:
- node_modules中的模块或其他被重复引用的模块
就是说如果引用的模块来自node_modules,那么只要它被引用,那么满足其他条件时就可以进行自动分割。否则该模块需要被重复引用才继续判断其他条件。(对应的就是下文配置选项中的minChunks为1或2的场景)
- 分离前模块最小体积下限(默认30k,可修改)
30k是官方给出的默认数值,它是可以修改的,上一节中已经讲过,每一次分包对应的都是服务端的性能开销的增加,所以必须要考虑分包的性价比。
- 对于异步模块,生成的公共模块文件不能超出5个(可修改)
触发了懒加载模块的下载时,并发请求不能超过5个,对于稍微了解过服务端技术的开发者来说,【高并发】和【压力测试】这样的关键词应该不会陌生。
- 对于入口模块,抽离出的公共模块文件不能超出3个(可修改)
也就是说一个入口文件的最大并行请求默认不得超过3个,原因同上。
- 参数配置
splitChunks的在webpack4.0以上版本中的用法是下面这样的:
module.exports = {
  //...
  optimization: {
    splitChunks: {
      chunks: 'async',//默认只作用于异步模块,为`all`时对所有模块生效,`initial`对同步模块有效
      minSize: 30000,//合并前模块文件的体积
      minChunks: 1,//最少被引用次数
      maxAsyncRequests: 5,
      maxInitialRequests: 3,
      automaticNameDelimiter: '~',//自动命名连接符
      cacheGroups: {
        vendors: {
          test: /[\\/]node_modules[\\/]/,
          minChunks:1,//敲黑板
          priority: -10//优先级更高
        },
        default: {
          test: /[\\/]src[\\/]js[\\/]/
          minChunks: 2,//一般为非第三方公共模块
          priority: -20,
          reuseExistingChunk: true
        }
      },
      runtimeChunk:{
          name:'manifest'
      }
    }
  }
- 代码分割实例
- 单页面应用
单页面应用只有一个入口文件,splitChunks的主要作用是将引用的第三方库拆分出来。从下面的分包结果就可以看出,node_modules中的第三方引用被分离了出来,放在了vendors-main.[hash].js中。
Webpack4 提取公共 CSS&JS
optimization.splitChunks 文档
配置如下
// webpack.config.js
optimization: {
  splitChunks: {
    cacheGroups: {
      commons: {
        name: 'commons',
        priority: 10,
        chunks: 'initial'
      },
      styles: {
        name: 'styles',
        test: /\.css$/,
        chunks: 'all',
        minChunks: 2,
        enforce: true
      }
    }
  }
}
常用参数
- minSize(默认是30000):形成一个新代码块最小的体积
- minChunks(默认是1):在分割之前,这个代码块最小应该被引用的次数(译注:保证代码块复用性,默认配置的策略是不需要多次引用也可以被分割)
- maxInitialRequests(默认是3):一个入口最大的并行请求数
- maxAsyncRequests(默认是5):按需加载时候最大的并行请求数。
- chunks (默认是async) :initial、async和all
- test: 用于控制哪些模块被这个缓存组匹配到。原封不动传递出去的话,它默认会选择所有的模块。可以传递的值类型:RegExp、String和Function
- name(打包的chunks的名字):字符串或者函数(函数可以根据条件自定义名字)
- priority :缓存组打包的先后优先级。
分离第三方库
entry: {
app: './src/index.js',
+ ramda: ['ramda'],// 此处是第三方包
}
new HtmlWebpackPlugin({
template: './index.html',
+ chunks: ['app', 'commons', 'ramda']
})
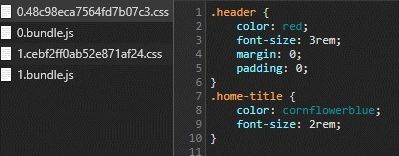
2.e9dc7e430f6a31c868b2.css 45 bytes 2 [emitted]
app.bundle.js 9.6 KiB app [emitted] app
0.decbf5b19337a4ce4aac.css 61 bytes 0 [emitted]
0.bundle.js 4.01 KiB 0 [emitted]
+ ramda.bundle.js 7.99 KiB ramda [emitted] ramda
index.html 393 bytes [emitted]
Antd 定制主题色
添加依赖
yarn add antd
yarn add less less-loader babel-plugin-import -D
添加配置文件
// .babelrc 添加
{
  "plugins": [
    [
      "import",
      {
        "style": true,
        "libraryName": "antd"
      }
    ]
  ]
}
添加rules
// webpack.config.js module.rules 添加

{
  test: /\.less$/,
  use: [
    MiniCssExtractPlugin.loader,
    'css-loader',
    {
      loader: 'less-loader',
      options: {
        sourceMap: true,
        javascriptEnabled: true,
        modifyVars: {
          'primary-color': '#531dab'
        }
      }
    }
  ]
}
autoprefixer 处理浏览器前缀
添加依赖
yarn add autoprefixer postcss-loader -D
项目根目录新建 postcss.config.js
// postcss.config.js

module.exports = {
  plugins: [
    require('autoprefixer')({
      'browsers': ['> 1%', 'last 2 versions']
    })
  ]
};
修改webpack.config.js文件
// webpack.config.js module.rules
{
  test: /\.css$/,
  use: [
    MiniCssExtractPlugin.loader,
    'css-loader',
+   'postcss-loader'
  ]
}
Demo
小结
webpack4虽然零配置也可以使用,但要达到各种工程配置的不同需求,还需要做很多工作,“零配置”并不适合于复杂的工程,只是一个噱头而已-_-。