参考资料
https://spring.io/projects/spring-boot/ 在该链接下可找到 Spring AMQP链接, 可查看相关 Reference Doc 当前文档为: https://docs.spring.io/spring-amqp/docs/2.1.8.RELEASE/reference/html/
实战
- 添加依赖
使用Spring Boot创建项目,并添加如下依赖:
            org.springframework.boot
            spring-boot-starter-amqp
发送消息
-
发送消息到队列 (Producer.java)
import org.springframework.amqp.core.*;
import org.springframework.amqp.rabbit.connection.CachingConnectionFactory;
import org.springframework.amqp.rabbit.core.RabbitAdmin;
import org.springframework.amqp.rabbit.core.RabbitTemplate;

public class Producer {
    private String queueName = "hello.queue";
    private String exchangeName = "hello.exchange";

    public static void main(String[] args) {
        Producer producer = new Producer();
        producer.sendMsg2Queue();
    }
}
sendMsg2Queue() 向指定的队列,发送消息,具体代码如下:
   private void sendMsg2Queue() {
        //创建连接
        CachingConnectionFactory connectionFactory = new CachingConnectionFactory();
        connectionFactory.setHost("localhost");
        connectionFactory.setPort(5672);
        //connectionFactory.setVirtualHost();
        connectionFactory.setUsername("guest");
        connectionFactory.setPassword("guest");
        //connectionFactory.setAddresses("localhost1:5672,localhost2:5672"); //多个地址时使用
        //onnectionFactory.setCacheMode(CachingConnectionFactory.CacheMode.CHANNEL); //缓存类型
        //connectionFactory.setChannelCacheSize(50); //缓存数量
        //connectionFactory.setConnectionLimit(100); //最大连接数
        //connectionFactory.setConnectionTimeout(60000);


        //AmqpAdmin用于声明队列、交换器、绑定
        AmqpAdmin amqpAdmin = new RabbitAdmin(connectionFactory);
        //声明队列:若队列不存在会自动创建队列   (若不声明队列,若队列不存在,则会导致消息发送失败)
        amqpAdmin.declareQueue(new Queue(queueName));

        //AmqpTemplate 用于发送接收消息
        AmqpTemplate amqpTemplate = new RabbitTemplate(connectionFactory);  //AmqpTemplate目前只有RabbitTemplate实现
        amqpTemplate.convertAndSend(queueName, "helloworld");
    }
描述:
- CachingConnectionFactory用于连接管理
- AmqpAdmin 可以声明交换器、队列、绑定 (也可以通过rabbitmq管理WEB界面进行相关的操作)
- AmqpTemplate 可以发送、接收消息。 (异步监听接收消息不是通过AmqpTemplate ,需要通过 容器 方式实现。)
-
发送消息到扇出交换器(FanoutExchange)
FanoutExchange:发送到扇出交换器的消息,可以转发到所有绑定到交换器的队列
       String routingKey = "";

        //AmqpAdmin用于声明交换器、队列、绑定
        AmqpAdmin amqpAdmin = new RabbitAdmin(connectionFactory);
        amqpAdmin.declareExchange(new FanoutExchange(exchangeName));   //
        amqpAdmin.declareQueue(new Queue(queueName + ".1"));
        amqpAdmin.declareQueue(new Queue(queueName + ".2"));
        amqpAdmin.declareBinding(new Binding(queueName + ".1", Binding.DestinationType.QUEUE, exchangeName, routingKey, null));
        amqpAdmin.declareBinding(new Binding(queueName + ".2", Binding.DestinationType.QUEUE, exchangeName, routingKey, null));

        //AmqpTemplate 用于发送接收消息
        AmqpTemplate amqpTemplate = new RabbitTemplate(connectionFactory);  //AmqpTemplate目前只有RabbitTemplate实现
        amqpTemplate.convertAndSend(exchangeName, routingKey, "helloworld");
-
路由交换器(DirectExchange) & 主题交换器(TopicExchange)
- FanoutExchange交换器,routingKey设置为 "" 即可(实际上只要不为 null, 即使绑定的routingKey,与发送消息的routingKey不同也没有关系),所有与交换器绑定的队列均会收到消息。
- DirectExchange交换器,绑定队列时,需要指定routingKey。在向交换器发达消息时也需要指定routingKey,该消息只会转发给对应routingKey的队列。
- TopicExchange交换器,绑定队列时,需要指定routingKey,在routingKey中可以使用通配符(例如hello.# / hello.*)。在发送消息时,需要指定具体的routingKey ( 如 hello.world.q1 / hello.q1) , 这时只有匹配的队列才会收到消息
说明:为了直观,routingKey通常指定为队列名,或队列名通配符。
注意:如果交换器事先存在,请确保交换器的类型正确,否则会异常。
接收消息(同步方式)
RabbitTemplate包含发送,也包含接收API。(略)
接收消息(监听方式)
由于监听器需要长时间运行,因此采用 @Configuration @Bean注解的方式,具体如下:
-
新建ConsumerConfiguration类:
import org.springframework.amqp.core.AmqpAdmin;
import org.springframework.amqp.core.Message;
import org.springframework.amqp.core.MessageListener;
import org.springframework.amqp.core.Queue;
import org.springframework.amqp.rabbit.connection.CachingConnectionFactory;
import org.springframework.amqp.rabbit.connection.ConnectionFactory;
import org.springframework.amqp.rabbit.core.RabbitAdmin;
import org.springframework.amqp.rabbit.listener.SimpleMessageListenerContainer;
import org.springframework.context.annotation.Bean;
import org.springframework.context.annotation.Configuration;

@Configuration
public class ConsumerConfiguration {
    private String queueName = "hello.queue";

    @Bean //连接工厂
    public ConnectionFactory rabbitConnectionFactory() {
        CachingConnectionFactory connectionFactory = new CachingConnectionFactory();
        connectionFactory.setHost("localhost");
        connectionFactory.setPort(5672);
        connectionFactory.setUsername("guest");
        connectionFactory.setPassword("guest");
        return connectionFactory;
    }

// 消息处理
    private MessageListener listener = new MessageListener() {
        @Override
        public void onMessage(Message message) {
            System.out.println("received: " + message);
        }
    };

//    @Bean  //消息监听器实现--用于处理收到的消息
//    public MessageListener listener() {
//        return new MessageListener() {
//            public void onMessage(Message message) {
//                System.out.println("received: " + message);
//            }
//        };
//    }

    @Bean //消息监听器容器
    public SimpleMessageListenerContainer messageListenerContainer() {
        //连接
        ConnectionFactory connectionFactory = rabbitConnectionFactory();

        //声明队列
        AmqpAdmin amqpAdmin = new RabbitAdmin(connectionFactory);
        amqpAdmin.declareQueue(new Queue(queueName));

        //监听器容器
        SimpleMessageListenerContainer container = new SimpleMessageListenerContainer();
        container.setConnectionFactory(connectionFactory);
        container.setQueueNames(queueName);
        container.setMessageListener(listener);     //设置消息监听器
        //container.setMessageListener(listener());     //设置消息监听器
        //container.start();  // 在非Bean方式下使用时,需要start才能监听到消息。
        return container;
    }
}
-
运行监听器
使用Spring Boot创建项目时,会自动生成Application启动类(类名通常为 XxxApplication.java)。代码如下图所示:
@SpringBootApplication
public class DemoApplication {
    public static void main(String[] args) {
        SpringApplication.run(DemoApplication .class, args);
    }
}
该类具有@SpringBootApplication注解。运行该类,即可自动启动监听器。
-
监听多个队列
        container.setQueueNames("queue.1","queue.2");
        container.addQueueNames("queue.3");
-
并行监听
        container.setConcurrentConsumers(5);
        container.setMaxConcurrentConsumers(10);
事务:发送及接收消息事务(AmqpTemplate方式): [TransactionTemplate ]
未使用事务的代码示例
        AmqpTemplate amqpTemplate = new RabbitTemplate(connectionFactory);  //AmqpTemplate目前只有RabbitTemplate实现
        amqpTemplate.convertAndSend(queueName, "helloworld");
使用事务,需要做几点调整:
- 通过TransactionTemplater的execute ()方法,调用事务接口doInTransaction
() 方法
将AmqpTemplate 发送及接收消息的方法,移到doInTransaction
()方法中 - 将AmqpTemplate 类,改为RabbitTemplate类
- 启用事务 rabbitTemplate.setChannelTransacted(true);
启用事务后,doInTransaction方法执行完成后,会自动提交事务;
若通过transactionStatus.setRollbackOnly(),设置了回滚标识 ,会自动回滚。
示例代码如下:
        TransactionTemplate transactionTemplate = new TransactionTemplate(new RabbitTransactionManager(connectionFactory));
        transactionTemplate.execute(new TransactionCallback() {
            @Override
            public String doInTransaction(TransactionStatus transactionStatus) {
                RabbitTemplate rabbitTemplate = new RabbitTemplate(connectionFactory);  //AmqpTemplate目前只有RabbitTemplate实现
                rabbitTemplate.setChannelTransacted(true);  //启用事务
                try {
                    rabbitTemplate.convertAndSend(queueName, "helloworld1");
                    rabbitTemplate.convertAndSend(queueName, "helloworld2");
                } catch (Exception e) {
                    transactionStatus.setRollbackOnly();    //设置回滚标识
                }
                return null;
            }
        });
事务:接收消息(监听方式)事务控制
-
接收消息(监听方式)应答确认
监听方式接收消息的事务控制,需使用应答确认机制。 具体需要做如下调整:
- 启动手动确认模式:container.setAcknowledgeMode(AcknowledgeMode.MANUAL)
- MessageListener接口改为ChannelAwareMessageListener接口,该接口的 onMessage(Message message, Channel channel) throws Exception 若抛出异常,则消息会返回到代理。
代码如下:
@Configuration
public class ConsumerConfiguration {
    private String queueName = "hello.queue";

    @Bean //连接工厂
    public ConnectionFactory rabbitConnectionFactory() {
        CachingConnectionFactory connectionFactory = new CachingConnectionFactory();
        connectionFactory.setHost("localhost");
        connectionFactory.setPort(5672);
        connectionFactory.setUsername("guest");
        connectionFactory.setPassword("guest");
        return connectionFactory;
    }

    @Bean //消息监听器容器
    public SimpleMessageListenerContainer messageListenerContainer() {
        //连接
        ConnectionFactory connectionFactory = rabbitConnectionFactory();

        //声明队列
        AmqpAdmin amqpAdmin = new RabbitAdmin(connectionFactory);
        amqpAdmin.declareQueue(new Queue(queueName));

        //监听器容器
        SimpleMessageListenerContainer container = new SimpleMessageListenerContainer();
        container.setConnectionFactory(connectionFactory);
        container.setAcknowledgeMode(AcknowledgeMode.MANUAL);  //手动确认
        container.setQueueNames(queueName);
        container.setMessageListener(listener);     //设置消息监听器
        return container;
    }

    private RabbitTransactionManager getRabbitTransactionManager(ConnectionFactory connectionFactory) {
        return new RabbitTransactionManager(connectionFactory);
    }

    private ChannelAwareMessageListener listener = new ChannelAwareMessageListener() {
        @Override
        public void onMessage(Message message, Channel channel) throws Exception {
            System.out.println("received: " + message);
            //如果本方法抛出异常,在channel上执行的事务自动回滚,消息会返回代理
        }
    };
}
注意:异常时,消息虽然返回代理,但不会再次发送给消费者处理,直到消费者断开连接后重新连接。
如果需要再次处理,请参见事务管理器
-
事务管理器
定义事务管理器
    private RabbitTransactionManager getRabbitTransactionManager(ConnectionFactory connectionFactory) {
        return new RabbitTransactionManager(connectionFactory);
    }
设置事务管理器
//设置事务管理器
container.setTransactionManager(getRabbitTransactionManager(connectionFactory));
再次运行消息监听:若在消息处理过程中,出现异常,则消息会返回代理。然后消息会再次发送给消费者处理。(若该消息处理始终有异常,则可能不断重复该过程。)
消息处理异常 & 延迟投递重试 解决方案
如前所述 ,如果使用接收消息确认模式,如果消息处理异常,有几种结果:
- 抛出异常,消息返回代理,但不再投递(除非重启消费者)
- 抛出异常,消息返回代理,立即重新投递(可能导致死循环)
- 不抛出异常,即消息不返回代理(丢弃消息)
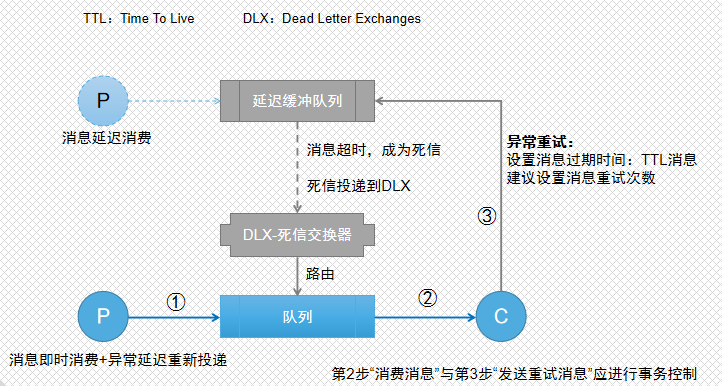
很多业务场景,这几种场景都不是我们需要的,我们希望有异常时,不是立即重试,而是采用延迟重试策略,并控制重试次数。 activemq支持消息延迟投递,但rabbitmq并不支持。但我们可以利用rabbitmq的两处特性,间接实现消息延迟投递。这两个特性是:
- Time To Live(TTL):生存时间:若某个队列没有消耗者,而消息也设置了生存时间,则消息在队列中超时后,消息要么丢弃,要么进入指定的死信队列
- Dead Letter Exchanges(DLX):死信交换器:进入死信队列的消息可以根据路由KEY,路由到指定的队列。
利用这两个属性,即可实现消息的延迟投递,流程如下图所示:
-
消息延迟投递
我们先来实现消息的延迟投递:
- 定义消费队列:hello.queue
- 定义延迟缓冲队列:hello.queue.delay (消息过期后,转发至DLX)
- 定义DLX死信交换器:hello.exchange.DLX
- 绑定:将DLX绑定到消费队列
下面是具体的代码:
@Configuration
public class ConsumerConfiguration {
    private String rabbmitmq_host = "localhost";
    private int rabbmitmq_prot = 5672;
    private String rabbmitmq_user = "guest";
    private String rabbmitmq_password = "guest";

    private String queueName = "hello.queue";
    private String delayQueueName = "hello.queue.delay";
    private String dlxExchangeName = "hello.exchange.DLX";
    private String dlxRoutingKey = "Hello";

    //第1步:定义消费队列
    @Bean
    public Queue helloQueue() {
        return new Queue(queueName, true, false, false);
    }

    //第2步:定义延迟缓冲队列 (消息过期后,转发至DLX)
    @Bean
    public Queue delayQueue() {
        Map params = new HashMap<>();
        // x-dead-letter-exchange 声明了队列里的死信转发到的DLX名称,
        params.put("x-dead-letter-exchange", dlxExchangeName);
        // x-dead-letter-routing-key 声明了这些死信在转发时携带的 routing-key 名称。
        params.put("x-dead-letter-routing-key", dlxRoutingKey);
        //params.put("x-message-ttl", 24 * 60 * 60 * 1000);            //队列TTL:1天(定义消息成为死信的最长时间,一般建议在消息中设置TTL)
        return new Queue(delayQueueName, true, false, false, params);
    }

    //第3步:定义DLX死信交换器
    @Bean
    public DirectExchange dlxExchange() {
        return new DirectExchange(dlxExchangeName);
    }

    //第4步:定义绑定:将DLX消息,路由到消费队列
    @Bean
    public Binding dlxBinding() {
        //DLX收到消息后,会向helloQueue转发;(也可向另一个Exchange转发)
        return BindingBuilder.bind(helloQueue()).to(dlxExchange()).with(dlxRoutingKey);
    }

    @Bean //连接工厂
    public ConnectionFactory rabbitConnectionFactory() {
        CachingConnectionFactory connectionFactory = new CachingConnectionFactory();
        connectionFactory.setHost(rabbmitmq_host);
        connectionFactory.setPort(rabbmitmq_prot);
        connectionFactory.setUsername(rabbmitmq_user);
        connectionFactory.setPassword(rabbmitmq_password);
        return connectionFactory;
    }

    @Bean
    public RabbitAdmin rabbitAdmin() {
        ConnectionFactory connectionFactory = rabbitConnectionFactory();
        //声明队列、交换器、绑定
        RabbitAdmin amqpAdmin = new RabbitAdmin(connectionFactory);
        amqpAdmin.declareQueue(helloQueue());
        amqpAdmin.declareQueue(delayQueue());
        amqpAdmin.declareExchange(dlxExchange());
        amqpAdmin.declareBinding(dlxBinding());
        return amqpAdmin;
    }
}
测试:如果向延迟缓冲队列发送TTL消息(即还有过期时间的消息),该消息过期后,会转发到DLX,DLX将根据路由KEY,将消息路由到指定的消费队列,从而实现消息延迟投递。
-
消息处理异常 & 延迟投递重试
前面演示了消息延迟投递。下面将消息处理异常 与 消息延迟投递进行结合,实现异常时延迟投递重试。
逻辑描述:消息处理过程中
- 如果正常处理,则对消息进行确认。
- 如果有异常,则对消息设置过期时间(以及重试计数),然后发到延迟缓冲队列,再对消息进行确认。
下面添加消息处理代码:
    @Bean //消息监听器容器
    public SimpleMessageListenerContainer messageListenerContainer() {
        //监听器容器
        SimpleMessageListenerContainer container = new SimpleMessageListenerContainer();
        container.setConnectionFactory(rabbitConnectionFactory());
        container.setAcknowledgeMode(AcknowledgeMode.MANUAL);  //手动确认
        container.setQueueNames(queueName);
        container.setMessageListener(listener);     //设置消息监听器
        return container;
    }

    //定义消息监听器
    private ChannelAwareMessageListener listener = new ChannelAwareMessageListener() {
        @Override
        public void onMessage(Message message, Channel channel) throws Exception {
            boolean reQueue = false; //是否重入队列
            try {
                //处理消息
                System.out.println("received: " + message);

                //这里模拟异常
                //throw new Exception("");

                //正常情况下,处理完消息,执行如下手动确认语句
                channel.basicAck(message.getMessageProperties().getDeliveryTag(), reQueue);
            } catch (Exception e) {
                try {
                    System.out.println("消息延迟投递:准备中");
                    sendDelayMsg(channel, message);
                    channel.basicAck(message.getMessageProperties().getDeliveryTag(), reQueue); //确认消息
                    System.out.println("消息延迟投递-已完成!");
                } catch (Exception e2) {
                    channel.basicReject(message.getMessageProperties().getDeliveryTag(), !reQueue);
                    System.out.println("消息拒绝!");
                }
            }
        }
    };

    //发送延迟投递消息
    private void sendDelayMsg(Channel channel, Message message) throws IOException {
        //向延迟缓冲队列发送TTL消息  (如果异常,则会回滚)
        AMQP.BasicProperties basicProperties = new AMQP.BasicProperties().builder()
                .contentEncoding("UTF-8")
                .expiration("60000")
                .build();
        //如果要控制重试次数,可以在消息头中加上自定义属性
        String exchange = "";
        String routingKey = delayQueueName;
        channel.basicPublish(exchange, routingKey, basicProperties, message.getBody());  //发送延迟投递消息
    }
