书接上文,上一讲中我们已经搭建好了Mininet的环境,这一讲中我们来运行几个简单的代码对Mininet有一个大概的认识。本人愚见:Mininet最核心的功能就是能模拟出多台交换机(switch)和终端(host),使科研人员和开发人员快速部署网络,方便做实验验证。所以本讲的核心就是怎么快速创建和管理Mininet网络。
注:本文翻译了mininet官方文档http://mininet.org/sample-workflow/,但做了简化,并加入了自己的实验截图。
Mininet能够快速 create,interact with、customize和shareSDN网络原型,并可以将创建的网络部署到实体硬件上。 本文仅简单介绍Mininet网络从创建到部署的几个步骤,更多细节请参考Mininet walkthrough。
Creating a Network
可以使用命令行创建一个network,例如:
sudo mn --switch ovs --controller ref --topo tree,depth=2,fanout=3
这个命令可以创建一个深度为2的满3叉树network(9个hosts,4个switches),逻辑图如下:
Interacting with a Network
Mininet允许通过CLI(命令行)的方式来管理创建的network。
运行完上面的创建网络的命令,可以看到已经切换到mininet下,接着运行下面的命令,实现了从h2 ping h3,按Ctrl+c停止。
h2 ping h3
任何linux命令或者程序都可以在任意host上单独执行。例如,可以在h2节点开启一个web服务器,从h3节点发出请求,代码如下:
h2 python -m SimpleHTTPServer 80 >& /tmp/http.log &
h3 wget -O - h2
最后可以通过
exit
来退出Mininet的环境。
Customizing a Network
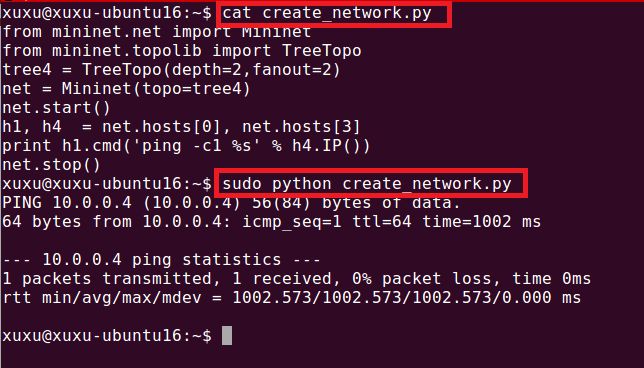
好了,重头戏来了。如果深度定制自己的网络,通过命令行还是比较麻烦。所以,可以通过Mininet的Python API来创建network,例如下面的python脚本:
from mininet.net import Mininet
from mininet.topolib import TreeTopo

tree4 = TreeTopo(depth=2,fanout=2)
net = Mininet(topo=tree4)
net.start()
h1, h4  = net.hosts[0], net.hosts[3]
print h1.cmd('ping -c1 %s' % h4.IP())
net.stop()
该代码创建了一个小型netwotk,具有4个hosts,3个switches,并实现了h1 ping h4。
Sharing a Network
英文原文如下。大体意思就说要做实验的话,可以下载官方的VM镜像,可以被VMware、Xen 、VirtualBox打开,一旦开发出一个SDN网络原型,可以拷贝VM镜像给他人使用,很容易互相分享(打个比喻,有点像word文档,你写完文档可以拷贝给别人,别人在你的基础上更改)。
Mininet is distributed as a virtual machine (VM) image with all dependencies pre-installed, runnable on common virtual machine monitors such as VMware, Xen and VirtualBox. This provides a convenient container for distribution; once a prototype has been developed, the VM image may be distributed to others to run, examine and modify. A complete, compressed Mininet VM is about 1GB. (Mininet can also be installed natively - apt-get install mininet on Ubuntu.) If you are reading a great SIGCOMM (or other) paper about a Software-Defined Network, wouldn’t you like to be able to click, download and run a living, breathing example of the system? If so, consider developing a Mininet version of your own system that you can share with others!
Running on Hardware
英文原文如下。大体意思就是说,通过Mininet创建的网络,可以部署到实体硬件上,以便进行真实的使用、测试。但是,网络中的节点和链路必须对应实际物理设备或物理线路。控制器可以不做修改,因为控制器本来看到的都是逻辑节点和链路,它才不管到底是真的节点还是假的,反正都是逻辑的。这里说个题外话,装过wmware的都知道系统里面会多两个网卡(wmware虚拟出来的),在操作系统看来,这两个网卡和真实的物理网卡没什么区别,都是网卡。
Once a design works on Mininet, it can be deployed on hardware for real-world use, testing and measurement.
To successfully port to hardware on the first try, every Mininet-emulated component must act in the same way as its corresponding physical one. The virtual topology should match the physical one; virtual Ethernet pairs must be replaced by link-level Ethernet connectivity. Hosts emulated as processes should be replaced by hosts with their own OS image. In addition, each emulated OpenFlow switch should be replaced by a physical one configured to point to the controller. However, the controller does not need to change. When Mininet is running, the controller “sees” a physical network of switches, made possible by an interface with well-defined state semantics.


