Python实现带GUI界面的手写数字识别
更多python教程请到友情连接: 菜鸟教程https://www.piaodoo.com
初中毕业读什么技校 http://cntkd.net
茂名一技http://www.enechn.com
ppt制作教程步骤 http://www.tpyjn.cn
兴化论坛http://www.yimoge.cn
电白论坛 http://www.fcdzs.com
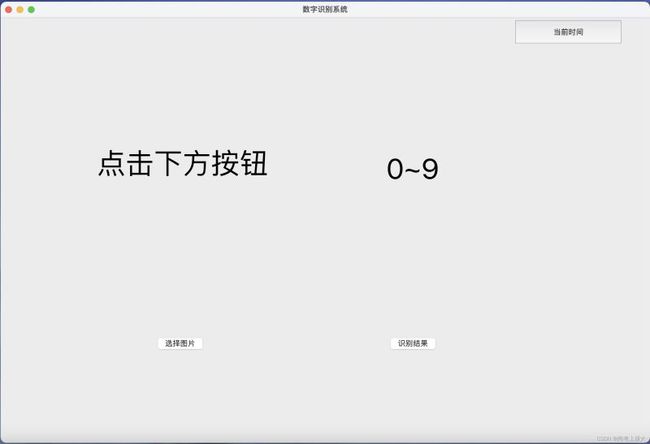
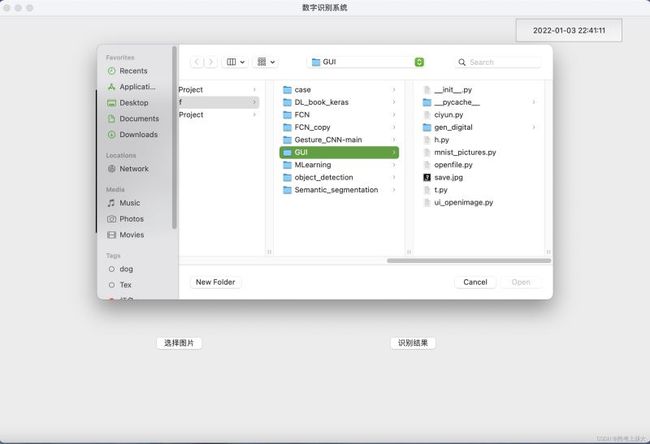
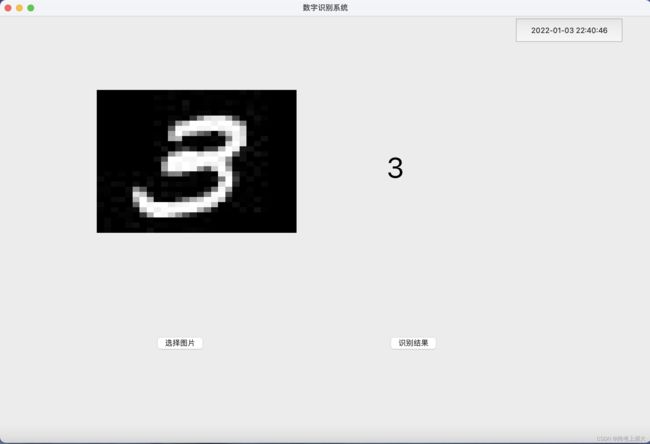
1.效果图
有点low,轻喷
点击选择图片会优先从当前目录查找
2.数据集
这部分我是对MNIST数据集进行处理保存
对应代码:
import tensorflow as tf
import matplotlib.pyplot as plt
import cv2
from PIL import Image
import numpy as np
from scipy import misc
(x_train_all,y_train_all),(x_test,y_test) = tf.keras.datasets.mnist.load_data()
x_valid,x_train = x_train_all[:5000],x_train_all[5000:]
y_valid,y_train = y_train_all[:5000],y_train_all[5000:]
print(x_valid.shape,y_valid.shape)
print(x_train.shape,y_train.shape)
print(x_test.shape,y_test.shape)
#读取单张图片
def show_single_img(img_arr,len=100,path='/Users/zhangcaihui/Desktop/case/jpg/'):
    for i in range(len):#我这种写法会进行覆盖,只能保存10张照片,想保存更多的数据自己看着改
        new_im = Image.fromarray(img_arr[i])  # 调用Image库,数组归一化
        #new_im.show()
        #plt.imshow(img_arr)  # 显示新图片
        label=y_train[i]
        new_im.save(path+str(label)+'.jpg')  # 保存图片到本地
#显示多张图片
def show_imgs(n_rows,n_cols,x_data,y_data):
assert len(x_data) == len(y_data)
assert n_rows * n_cols < len(x_data)
plt.figure(figsize=(n_cols1.4,n_rows1.6))
for row in range(n_rows):
for col in range(n_cols):
index = n_cols * row + col
plt.subplot(n_rows,n_cols,index+1)
plt.imshow(x_data[index],cmap=“binary”,interpolation=“nearest”)
plt.axis(“off”)
plt.show()
#show_imgs(2,2,x_train,y_train)
show_single_img(x_train)
3.关于模型
我保存了了之前训练好的模型,用来加载预测
关于tensorflow下训练神经网络模型:手把手教你,MNIST手写数字识别
训练好的模型model.save(path)即可
4.关于GUI设计
1)排版
#ui_openimage.py
# -*- coding: utf-8 -*-
# from PyQt5 import QtCore, QtGui, QtWidgets
# from PyQt5.QtCore import Qt
import sys,time
from PyQt5 import QtGui, QtCore, QtWidgets
from PyQt5.QtWidgets import *
from PyQt5.QtCore import *
from PyQt5.QtGui import *
class Ui_Form(object):
def setupUi(self, Form):
Form.setObjectName(“Form”)
Form.resize(1144, 750)
self.label_1 = QtWidgets.QLabel(Form)
self.label_1.setGeometry(QtCore.QRect(170, 130, 351, 251))
self.label_1.setObjectName(“label_1”)
self.label_2 = QtWidgets.QLabel(Form)
self.label_2.setGeometry(QtCore.QRect(680, 140, 351, 251))
self.label_2.setObjectName(“label_2”)
self.btn_image = QtWidgets.QPushButton(Form)
self.btn_image.setGeometry(QtCore.QRect(270, 560, 93, 28))
self.btn_image.setObjectName(“btn_image”)
self.btn_recognition = QtWidgets.QPushButton(Form)
self.btn_recognition.setGeometry(QtCore.QRect(680,560,93,28))
self.btn_recognition.setObjectName(“bnt_recognition”)
#显示时间按钮
self.bnt_timeshow = QtWidgets.QPushButton(Form)
self.bnt_timeshow.setGeometry(QtCore.QRect(900,0,200,50))
self.bnt_timeshow.setObjectName(“bnt_timeshow”)
self.retranslateUi(Form)
self.btn_image.clicked.connect(self.slot_open_image)
self.btn_recognition.clicked.connect(self.slot_output_digital)
self.bnt_timeshow.clicked.connect(self.buttonClicked)
self.center()
QtCore.QMetaObject.connectSlotsByName(Form)
def retranslateUi(self, Form): #设置文本填充label、button
    _translate = QtCore.QCoreApplication.translate
    Form.setWindowTitle(_translate("Form", "数字识别系统"))
    self.label_1.setText(_translate("Form", "点击下方按钮"))
    self.label_1.setStyleSheet('font:50px;')
    self.label_2.setText(_translate("Form", "0~9"))
    self.label_2.setStyleSheet('font:50px;')
    self.btn_image.setText(_translate("Form", "选择图片"))
    self.btn_recognition.setText(_translate("From","识别结果"))
    self.bnt_timeshow.setText(_translate("Form","当前时间"))

# 状态条显示时间模块
def buttonClicked(self):  # 动态显示时间
    timer = QTimer(self)
    timer.timeout.connect(self.showtime)
    timer.start()
def showtime(self):
    datetime = QDateTime.currentDateTime()
    time_now = time.strftime('%Y-%m-%d %H:%M:%S', time.localtime())
    #self.statusBar().showMessage(time_now)
    #self.bnt_timeshow.setFont(QtGui.QFont().setPointSize(100))
    self.bnt_timeshow.setText(time_now)

def center(self):#窗口放置中央
    screen = QDesktopWidget().screenGeometry()
    size = self.geometry()
    self.move((screen.width() - size.width()) / 2,
                (screen.height() - size.height()) / 2)


def keyPressEvent(self, e):
    if e.key() == Qt.Key_Escape:
        self.close()
2)直接运行这个文件(调用1)
#ui_main.py
import random
from PyQt5.QtWidgets import QFileDialog
from PyQt5.QtGui import QPixmap
from ui_openimage import Ui_Form
import sys
from PyQt5 import QtWidgets, QtGui
from PyQt5.QtWidgets import QMainWindow, QTextEdit, QAction, QApplication
import os,sys
from PyQt5.QtCore import Qt
import tensorflow
from tensorflow.keras.models import load_model
from tensorflow.keras.datasets import mnist
from tensorflow.keras import models
from tensorflow.keras import layers
from tensorflow.keras.utils import to_categorical
import tensorflow.keras.preprocessing.image as image
import matplotlib.pyplot as plt
import numpy as np
import cv2
import warnings
warnings.filterwarnings(“ignore”)
class window(QtWidgets.QMainWindow,Ui_Form):
def init(self):
super(window, self).init()
self.cwd = os.getcwd()
self.setupUi(self)
self.labels = self.label_1
self.img=None
def slot_open_image(self):
file, filetype = QFileDialog.getOpenFileName(self, ‘打开多个图片’, self.cwd, “*.jpg, *.png, *.JPG, .JPEG, All Files()”)
jpg = QtGui.QPixmap(file).scaled(self.labels.width(), self.labels.height())
self.labels.setPixmap(jpg)
self.img=file
def slot_output_digital(self):
	'''path为之前保存的模型路径'''
    path='/Users/zhangcaihui/PycharmProjects/py38_tf/DL_book_keras/save_the_model.h5'
    model= load_model(path)
    #防止不上传数字照片而直接点击识别
    if self.img==None:
        self.label_2.setText('请上传照片!')
        return
    img = image.load_img(self.img, target_size=(28, 28))
    img = img.convert('L')#转灰度图像
    x = image.img_to_array(img)
    #x = abs(255 - x)
    x = np.expand_dims(x, axis=0)
    print(x.shape)
    x = x / 255.0
    prediction = model.predict(x)
    print(prediction)
    output = np.argmax(prediction, axis=1)
    print("手写数字识别为:" + str(output[0]))
    self.label_2.setText(str(output[0]))
if name == “main”:
app = QtWidgets.QApplication(sys.argv)
my = window()
my.show()
sys.exit(app.exec_())
5.缺点
界面low
只能识别单个数字
其实可以将多数字图片进行裁剪分割,这就涉及到制作数据集了
6.遗留问题
我自己手写的数据照片处理成28281送入网络预测,识别结果紊乱。
反思:自己写的数据是RGB,且一张几KB,图片预处理后,按28*28读入失真太严重了,谁有好的方法可以联系我!!!
其他的水果识别系统,手势识别系统啊,改改直接套!
到此这篇关于Python实现带GUI界面的手写数字识别的文章就介绍到这了,更多相关Python手写数字识别内容请搜索菜鸟教程www.piaodoo.com以前的文章或继续浏览下面的相关文章希望大家以后多多支持菜鸟教程www.piaodoo.com!


