springboot2.0学习
springboot2.0学习
- ——springboot基础入门
-
- 一、使用maven创建web项目并运行
- 二、简化部署打成jar包
- 三、组件添加
- 四、Condition注解判断(条件装配)
- 五、把bean的配置文件加载进容器
- 六、两种配置绑定方式
- 七、自动配置源码分析(springboot最强悍的地方)
- 八、开发小技巧(使用lombok插件)
- ——springboot核心功能
-
- 一、yml配置文件
- 二、静态资源目录与访问路径前缀
- 三、欢迎页和网站访问的小图标
- 四、静态资源分析(源码)
- 五、rest风格(源码)
- 六、请求映射(源码)
- 七、请求处理常用注解
- 八、拦截器
- 九、文件上传
——springboot基础入门
一、使用maven创建web项目并运行
1、网上下载并安装好maven,在settings.xml文件设置为阿里云导入依赖
   <mirrors>
      <mirror>
        <id>nexus-aliyunid>
        <mirrorOf>centralmirrorOf>
        <name>Nexus aliyunname>
        <url>http://maven.aliyun.com/nexus/content/groups/publicurl>
      mirror>
  mirrors>

  <profiles>
         <profile>
              <id>jdk-1.8id>
              <activation>
                <activeByDefault>trueactiveByDefault>
                <jdk>1.8jdk>
              activation>
              <properties>
                <maven.compiler.source>1.8maven.compiler.source>
                <maven.compiler.target>1.8maven.compiler.target>
                <maven.compiler.compilerVersion>1.8maven.compiler.compilerVersion>
              properties>
         profile>
  profiles>
2、创建maven项目

3、 命名,完成!

4、在pom文件导入依赖
<parent>
    <groupId>org.springframework.bootgroupId>
    <artifactId>spring-boot-starter-parentartifactId>
    <version>2.3.4.RELEASEversion>
parent>
<dependencies>
    <dependency>
        <groupId>org.springframework.bootgroupId>
        <artifactId>spring-boot-starter-webartifactId>
    dependency>
dependencies>
5、创建主程序

6、编写helloword业务代码

7、main方法直接运行,即可访问

8、 简化配置,这里设置端口为8888,不用到Tomcat打开一堆conf文档重新设置,boot内置Tomcat,可以直接修改端口号

二、简化部署打成jar包
1、在pom文件导入依赖
<build>
    <plugins>
        <plugin>
            <groupId>org.springframework.bootgroupId>
            <artifactId>spring-boot-maven-pluginartifactId>
        plugin>
    plugins>
build>
2、并在这加入打包jar

3、这里有个bug,需要把maven依赖文件中的settings.xml配置文件默认的mirrors和profiles空标签删除,否则会报错
4、选择clean和package进行打包

5、之后这target文件夹下可以看到一个jar包

6、查看该路径

7、在该路径下运行cmd

8、使用jar命令运行该jar包
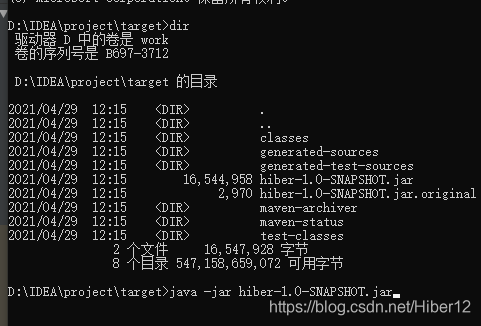
9、运行成功

三、组件添加
@Configuration基本使用Full全模式与Lite轻量级模式
1、如果组件之间存在依赖关系,user的bean调用了pet的bean方法,这两者就产生了依赖,姑且要使用代理bean方法proxyBeanMethods = true全模式。无论调用bean多少次,都始终要先检查容器是否存在该bean,都是使用容器中的bean。
2、如果把代理bean方法proxyBeanMethods = false轻量级模式,加快启动减少判断,则表示bean无论被调用多少次,都会new新的对象,不会去容器取!!!
![]()
// proxyBeanMethods为true,即代理对象检查容器是否存在要寻找的组件,存在则直接在容器中拿。而且对象只生成一次!!!
// proxyBeanMethods为false,代理对象不检查容器是否存在要寻找的组件,可以任意调用该类的方法生成新的对象!!!
@Configuration(proxyBeanMethods = true)
public class MyConfig {


    @Bean
    public User user01(){
        User user = new User();
        user.setUsername("李四");
        user.setAge("18");

        user.setPet(pet01());   //调用下面的pet01方法,设置为用户的宠物.


        return user;
    }

    @Bean
    public Pet pet01(){
        Pet pet = new Pet();
        pet.setName("fish");
        return pet;
    }

}
@SpringBootApplication
public class MainApplication {

    public static void main(String[] args) {
        ConfigurableApplicationContext run = SpringApplication.run(MainApplication.class, args);

        String[] names = run.getBeanDefinitionNames();
        for (String name : names) {
            System.err.println(name);
        }

        //从容器中获取组件
        User user01 = run.getBean("user01", User.class);
        User user02 = run.getBean("user01", User.class);

        //直接从容器中拿到,是同一对象,而不是再重新new的对象
        System.out.println("用户对象是否相同:"+(user01==user02));


        MyConfig myConfig = run.getBean(MyConfig.class);
        User user = myConfig.user01();
        Pet pet = myConfig.pet01();

        System.out.println("用户的宠物是否同一个:"+(user.getPet()==pet));   //用户的宠物是容器中的宠物,因为配置类中proxyBeanMethods代理bean方法 = true
    }
}
3、如果用import注解添加User组件:

4、打印user的组件:

5、结果:

6、可以得出结论:
import添加的组件,默认的是组件的名字,即是全类名com.demo.hiber.bean.User
bean添加的组件,他的名字则是添加bean注解的方法名user01
四、Condition注解判断(条件装配)
Condition注解判断还有众多子注解:

例如ConditionOnBean注解:
1、一般应用在两个组件存在依赖关系,以下有一个例子,如果宠物的组件没有被加载进容器当中,则用户组件也不被加入:

2、如果宠物的组件被加载进容器当中,则用户组件才被加入:

五、把bean的配置文件加载进容器
1、 在以前我们都是这种形式创建bean文件,然后编写一大堆的bean配置。

2、 现在我们使用了springboot,想要把这些配置文件一次性加载进容器,就可以使用注解@ImportResource("classpath:beans.xml"),导入资源,指定类路径既可!!

3、测试获取该组件id,成功把xml的bean配置文件中两个组件haha和hehe加载进容:
![]()

4、这里存在一个bug:就是target文件无缘无故被删除,导出xml配置文件和properties文件找不到!!!一定要注意target文件里是否存在这些文件!!!

六、两种配置绑定方式
第一种:配置绑定:
1、在实体类中使用以下注解:
@Component //注入容器
@ConfigurationProperties(prefix = “mycar”) //前缀为mycar的属性全部绑定

第二种配置绑定:
1、使用@ConfigurationProperties(prefix = "mycar") //前缀为mycar的属性全部绑定
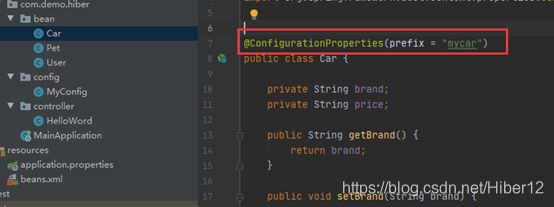
2、@EnableConfigurationProperties(Car.class) //把这个Car这个组件自动注册到容器中
要注意的是,该注解必须应用在@configuration配置注解下

以上两种配置绑定之后,即可在properties文件使用mycar进行绑定属性使用

测试(因为car已经在容器中,可以直接拿来使用,这里直接返回):
@Autowired
Car car;

@RequestMapping("/mycar")
public Car myCar(){
    return car;
}
结果:成功!!!
七、自动配置源码分析(springboot最强悍的地方)
@SpringBootApplication //等于以下三个外层注解SpringBootConfiguration、ComponentScan、EnableAutoConfiguration:

@SpringBootConfiguration   //代表一个配置类
@ComponentScan    //指定扫描哪些spring注解
@EnableAutoConfiguration  //里面有两个注解AutoConfigurationPackage、Import
	@AutoConfigurationPackage  //自动配置包
		@Import({Registrar.class})  //给容器中导入Registrar组件,利用Registrar给容器中导入一系列组件
		//将指定的一个包下的所有组件导入进来?MainApplication所在包下。
	@Import({AutoConfigurationImportSelector.class})
	//1、利用getAutoConfigurationEntry(annotationMetadata);给容器中批量导入一些组件
	//2、调用List configurations = getCandidateConfigurations(annotationMetadata, attributes)获取到所有需要导入到容器中的配置类
	//3、利用工厂加载 Map> loadSpringFactories(@Nullable ClassLoader classLoader);得到所有的组件
	//4、从META-INF/spring.factories位置来加载一个文件。默认扫描我们当前系统里面所有META-INF/spring.factories位置的文件。spring-boot-autoconfigure-2.3.4.RELEASE.jar包里面也有META-INF/spring.factories
@Import({AutoConfigurationImportSelector.class})由该注解导入的一些组件,文件里面写死了spring-boot一启动就要给容器中加载127个场景的所有配置类xxxxAutoConfiguration。
但是按照条件装配规则(@Conditional),最终会按需配置。

1、防止有些用户配置的文件上传解析器命名不符合规范:
@Bean
@ConditionalOnBean(MultipartResolver.class)  //容器中有这个类型组件才加载
@ConditionalOnMissingBean(name = DispatcherServlet.MULTIPART_RESOLVER_BEAN_NAME) //容器中没有这个名字 multipartResolver 的组件才加载
        public MultipartResolver multipartResolver(MultipartResolver resolver) {
            //给@Bean标注的方法传入了对象参数,这个参数的值就会从容器中找。
            //SpringMVC multipartResolver。防止有些用户配置的文件上传解析器不符合规范
            return resolver;  //返回用户自行配置的文件上传解析器
        }
2、SpringBoot默认会在底层配好所有的组件。但是如果用户自己配置了以用户的优先
@Bean
@ConditionalOnMissingBean  //如果没有该组件,我才加载本类添加组件
    public CharacterEncodingFilter characterEncodingFilter() {
}
总结:
1、SpringBoot先加载所有的自动配置类,所有带有这个AutoConfiguration名字的类都是配置类。
2、每个自动配置类按照条件进行生效,默认都会绑定配置文件指定的值。xxxxProperties里面拿。xxxProperties和配置文件进行了绑定
3、生效的配置类就会给容器中装配很多组件
4、只要容器中有这些组件,相当于这些功能就有了
5、定制化配置
6、用户直接自己@Bean替换底层的组件
7、用户去看这个组件是获取的配置文件什么值就去修改。
Springboot开启,就默认加载这些****AutoConfiguration配置类组件导入容器,虽然加载这么多组件,但这些组件生效需要看condition的条件判断。

这些配置类会从 xxxxProperties里面拿值,但如果用户想自定义配置值,可修改 application.properties文件修改默认值!!!

八、开发小技巧(使用lombok插件)
1、引入依赖
<dependency>
	<groupId>org.projectlombokgroupId>
    <artifactId>lombokartifactId>
dependency>
2、老版本的idea,需要搜索安装lombok插件
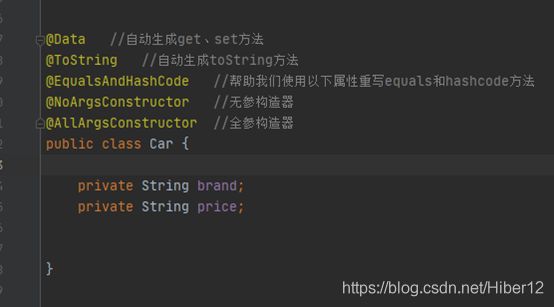
3、就可以使用以下注解简化开发了
@Data   //自动生成get、set方法
@ToString   //自动生成toString方法
@EqualsAndHashCode   //帮助我们使用以下属性重写equals和hashcode方法
@NoArgsConstructor   //无参构造器
@AllArgsConstructor  //全参构造器
——springboot核心功能
一、yml配置文件
我们在类里面进行了属性的判定,再在配置文件中使用,
但是发现软件不给予条件,我们可以添加如下包,让软件进行提示,
但是在插件打包的时候要去掉该插件,因为打jar包之后的该提示依赖没有其他作用,造成浪费。
<dependency>
	<groupId>org.springframework.bootgroupId>
	<artifactId>spring-boot-configuration-processorartifactId>
	<optional>trueoptional>
dependency>


 <build>
        <plugins>
            <plugin>
                <groupId>org.springframework.bootgroupId>
                <artifactId>spring-boot-maven-pluginartifactId>
                <configuration>
                    <excludes>
                        <exclude>
                            <groupId>org.springframework.bootgroupId>
                            <artifactId>spring-boot-configuration-processorartifactId>
                        exclude>
                    excludes>
                configuration>
            plugin>
        plugins>
    build>
1、使用@Component和@ConfigurationProperties进行属性绑定
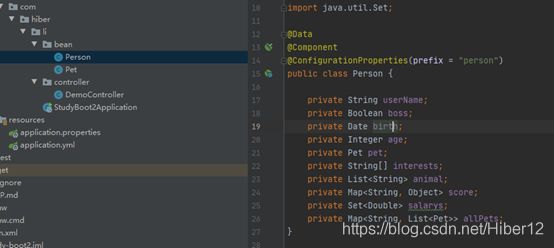
2、就可以在配置文件yml使用属性进行赋值了

3、还有注意的是:在添加属性值的时候,如:
person:
	username: “张三 \n zhangsan”
双引号表示的话,则会换行输出:
张三
zhangsan
person:
	username: ‘张三 \n zhangsan’
单引号表示的话,会被作为字符串输出:
张三\n zhangsan
二、静态资源目录与访问路径前缀
1、静态资源访问
只要静态资源放在默认的类路径下:/static 、/public、/resources、/META-INF/resources,都可直接访问 : 当前项目根路径/ + 静态资源名
可改变默认的静态资源路径(即所有的静态资源必须放在该haha文件夹才可以生效!)
  resources:
    static-locations: [classpath:/haha/]
原理: 静态映射请求为/**,请求进来,先去找Controller看能不能处理,如果不能处理的所有请求又都交给静态资源处理器。静态资源也找不到则响应404页面。
2、静态资源访问路径前缀
默认无前缀,但是这里可以修改前缀,访问某个资源时,必须在前面加res
spring:
  mvc:
    static-path-pattern: /res/**
当前项目 + static-path-pattern + 静态资源名 = 静态资源文件夹下找
(但是如果修改前缀,会直接影响到欢迎页面的访问和小图标的加载!!这是boot的底层bug,注意了!!!!)
3、webjar
自动映射 /webjars/**
https://www.webjars.org/
<dependency>
<groupId>org.webjarsgroupId>
<artifactId>jqueryartifactId>
<version>3.5.1version>
dependency>
访问地址:http://localhost:8080/webjars/jquery/3.5.1/jquery.js 后面地址要按照依赖里面的包路径
三、欢迎页和网站访问的小图标
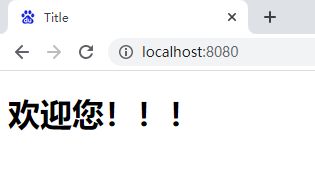
1、直接在静态资源文件中放入该html,直接访问根路径即可打开该页面。

2、直接在static静态资源文件加入ico格式的图标,即可!

四、静态资源分析(源码)
1、SpringBoot启动默认加载xxxAutoConfiguration类(自动配置类),在当初的SpringMVC框架,需要手动配置该类 WebMvcAutoConfiguration。
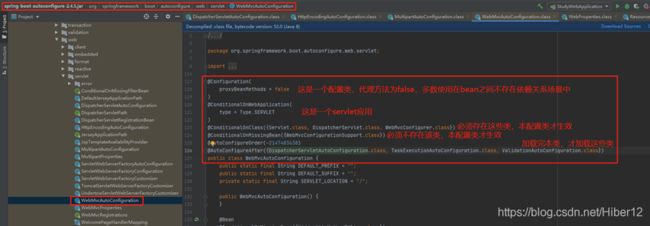
2、给容器配置了
@Configuration(
    proxyBeanMethods = false
)
@Import({WebMvcAutoConfiguration.EnableWebMvcConfiguration.class})
//配置文件的相关属性和xxx进行了绑定。WebMvcProperties==spring.mvc、ResourceProperties==spring.resources
@EnableConfigurationProperties({WebMvcProperties.class, ResourceProperties.class, WebProperties.class})
@Order(0)
public static class WebMvcAutoConfigurationAdapter implements WebMvcConfigurer {

//ResourceProperties resourceProperties 获取和spring.resources绑定的所有的值的对象
//WebMvcProperties mvcProperties 获取和spring.mvc绑定的所有的值的对象
//ListableBeanFactory beanFactory Spring的beanFactory
//HttpMessageConverters 找到所有的HttpMessageConverters
//ResourceHandlerRegistrationCustomizer 找到资源处理器的自定义器
//DispatcherServletPath
//ServletRegistrationBean 给应用注册Servlet、Filter
以下是有参构造器的源码:
public WebMvcAutoConfigurationAdapter(WebProperties webProperties, WebMvcProperties mvcProperties,
      ListableBeanFactory beanFactory, ObjectProvider<HttpMessageConverters> messageConvertersProvider,
      ObjectProvider<ResourceHandlerRegistrationCustomizer> resourceHandlerRegistrationCustomizerProvider,
      ObjectProvider<DispatcherServletPath> dispatcherServletPath,
      ObjectProvider<ServletRegistrationBean<?>> servletRegistrations) {
   this.mvcProperties = mvcProperties;
   this.beanFactory = beanFactory;
   this.messageConvertersProvider = messageConvertersProvider;
   this.resourceHandlerRegistrationCustomizer = resourceHandlerRegistrationCustomizerProvider.getIfAvailable();
   this.dispatcherServletPath = dispatcherServletPath;
   this.servletRegistrations = servletRegistrations;
   this.mvcProperties.checkConfiguration();
}
3、添加资源处理默认规则(即是对静态资源的配置):
以下是资源处理的源码,默认true开启的。False禁用资源,如果禁用,则所有的页面不可访问。


小的红色方框是默认是否禁用静态资源,下方的代码还可以配置缓存,配置缓存时间多长。
addResourceHandler(registry, "/webjars/**", "classpath:/META-INF/resources/webjars/");
如果是访问webjars路径的请求,则去找该路径/META-INF/resources/webjars,静态资源的默认四个位置,如果我们修改了路径,则按照修改之后的路径。

4、进入欢迎页,如果修改了路径,直接访问默认的ip和端口,是找不到页面的。这里就必须正确输入http://localhost:8080/res/index.html才可以访问。如果不修改路径,直接访问默认ip和端口,则可以自动跳转到index首页欢迎!
这里的底层源码算是一个bug了。

五、rest风格(源码)
1、请求映射,因为表单提交只能是get或者post请求!!!这里需要获取表单提交带上的_method方法,包装模式requesWrapper重写了getMethod方法,从而正确映射到对应的方法。
2、rest风格支持(使用HTTP请求方式动词来表示对资源的操作)
以前:/getUser 获取用户 /deleteUser 删除用户 /editUser 修改用户 /saveUser 保存用户
现在: /user GET-获取用户 DELETE-删除用户 PUT-修改用户 POST-保存用户
3、核心Filter;HiddenHttpMethodFilter,用法: 表单method=post,隐藏域 _method=put
4、SpringBoot中手动开启
    @RequestMapping(value = "/user",method = RequestMethod.GET)
    public String getUser(){
        return "GET-张三";
    }

    @RequestMapping(value = "/user",method = RequestMethod.POST)
    public String saveUser(){
        return "POST-张三";
    }


    @RequestMapping(value = "/user",method = RequestMethod.PUT)
    public String putUser(){
        return "PUT-张三";
    }

    @RequestMapping(value = "/user",method = RequestMethod.DELETE)
    public String deleteUser(){
        return "DELETE-张三";
}
5、默认关闭的,需要手动开启!!!
spring:
  mvc:
    hiddenmethod:
      filter:
        enabled: true   #开启页面表单的Rest功能
  @Bean
    @ConditionalOnMissingBean(HiddenHttpMethodFilter.class)
    @ConditionalOnProperty(prefix = "spring.mvc.hiddenmethod.filter", name = "enabled", matchIfMissing = false)
    public OrderedHiddenHttpMethodFilter hiddenHttpMethodFilter() {
        return new OrderedHiddenHttpMethodFilter();
    }
6、自定义filter,把_method 这个名字换成我们自己喜欢的
@Bean
public HiddenHttpMethodFilter hiddenHttpMethodFilter(){
    HiddenHttpMethodFilter methodFilter = new HiddenHttpMethodFilter();
    methodFilter.setMethodParam("_m");
    return methodFilter;
}
7、Rest原理(表单提交要使用REST的时候)
(1)表单提交会带上_method=PUT
(2)请求过来被HiddenHttpMethodFilter拦截
(3)请求是否正常,并且是POST
(4)获取到_method的值。
(5)兼容以下请求;PUT.DELETE.PATCH
(6)原生request(post),包装模式requesWrapper重写了getMethod方法,返回的是传入的值。
(7)过滤器链放行的时候用wrapper。以后的方法调用getMethod是调用requesWrapper的。
8、Rest使用客户端工具,如PostMan直接发送Put、delete等方式请求,无需Filter。
六、请求映射(源码)
——前端发送的请求,spring是如何找到该方法的?
1、 所有的请求过来,都经过需经过DispatcherServlet类,按住Ctrl+h查看该继承树。可以看到DispatcherServlet继承FrameworkServlet,FrameworkServlet继承HttpServletBean,HttpServletBean继承HttpServlet!!!HttpServlet是jdk当中相对底层的源码了。

2、 这样的嵌套继承,主要看子类DispatcherServlet是如何实现找到该方法的?每个请求都会调用doDispatch这个方法。
3、 Ctrl+f在本类中查找doDispatch这个方法,然后定位到getHandler方法,ctrl去到该方法

4、这是getHandler方法,handlerMappings翻译:处理器映射。
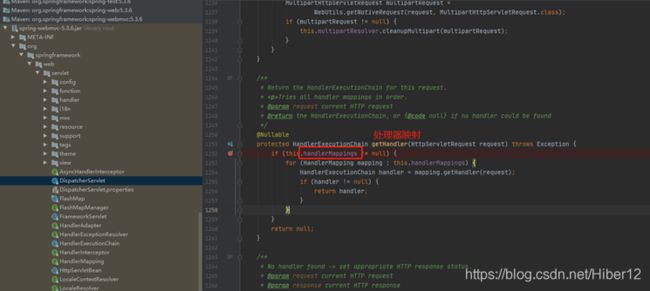
5、所有的请求都在handlerMappings,这里是获取handlerMappings有5条:

6、开始遍历handlerMapping的RequestMappingHandlerMapping,这里保存了所有@RequestMapping 和handler的映射规则。

7、进入该mapping方法
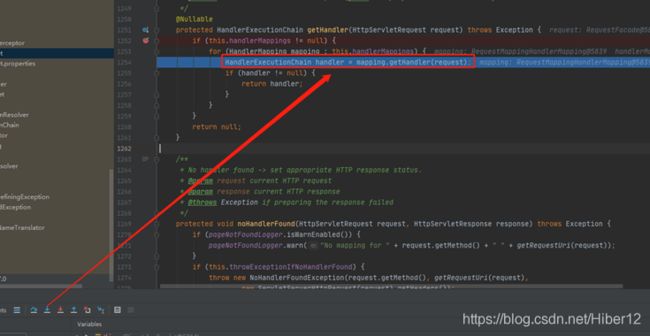
8、再进入该方法

9、再进入该方法

10、再进入该方法

11、获取到该路径的名字,匹配名字有四条
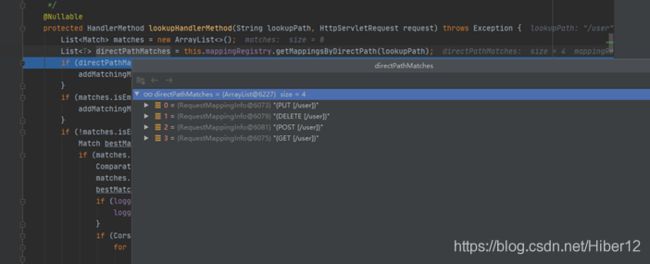
12、进入该方法

13、遍历这个列表,调用方法匹配是哪种请求get、put、delete、post。匹配成功的add进matches列表

14、匹配之后的结果,获取该结果,是在这个包下的这个/user方法去处理该路径的请求

15、遍历之后的结果进行判断。

应用场景:我们需要一些自定义的映射处理,我们也可以自己给容器中放HandlerMapping。自定义 HandlerMapping,例如:我们在做版本更新的时候v1或者v2版本,规定他们去哪个包寻找。这样就不仅仅需要controller层的变化。
七、请求处理常用注解
1、@PathVariable获取路径变量
@GetMapping("/user/{id}/sku/{name}")
public Map<String,Object> getGoods(@PathVariable("id")String id,@PathVariable("name")String name){

    HashMap<String, Object> map = new HashMap<>();
    map.put("user",id);
    map.put("sku",name);
    return map;
}

2、@RequestHeader获取请求头
一个请求过来,会带着请求头,请求头里有许多参数

@GetMapping("/user/{id}/sku/{name}")
public Map<String,Object> getGoods(@PathVariable("id")String id,
                                   @PathVariable("name")String name,
                                   @RequestHeader Map<String,String> header){

    HashMap<String, Object> map = new HashMap<>();
    map.put("user",id);
    map.put("sku",name);
    map.put("header",header);
    return map;
}
3、@RequestParam获取请求链接问号?后的参数
4、@CookieValue获取请求头的cookie
5、@RequestBody获取post请求提交的数据
@PostMapping("/save")
    public Map postMethod(@RequestBody String content){
        Map<String,Object> map = new HashMap<>();
        map.put("content",content);
        return map;
    }
6、@RequestAttribute获取request域属性,和HttpServletRequest request原生的请求获取Attribute一样。
7、@MatrixVariable矩阵变量,默认是关闭的,需要实现WebMvcConfigurer接口,重写configurePathMatch方法,设置UrlPathHelper的RemoveSemicolonContent属性为false,不删除分号;后的内容即可。注意!矩阵变量必须要在url:/user/{path}路径变量才能被解析
@GetMapping("/user/{path}")
public Map goods(@MatrixVariable("id")String id,
                 @MatrixVariable("name") List<String> name,
                 @PathVariable("path")String path){
    HashMap<String, Object> hashMap = new HashMap<>();
    hashMap.put("id",id);
    hashMap.put("name",name);
    hashMap.put("path",path);
    return hashMap;
}
@Configuration
public class WebConfig implements WebMvcConfigurer {   //实现该接口,因为该接口的方法有默认的实现,所以这里不需要重写其所有的方法

    @Override
    public void configurePathMatch(PathMatchConfigurer configurer) {   //只需要重写路径这个方法

        UrlPathHelper urlPathHelper = new UrlPathHelper();

        //UrlPathHelper对象的一个属性removeSemicolonContent默认为true,即是删除分号;后的内容
        urlPathHelper.setRemoveSemicolonContent(false);   //这里设置为false,不删除分号;后的内容
        configurer.setUrlPathHelper(urlPathHelper);   //覆盖原来的对象
    }
}
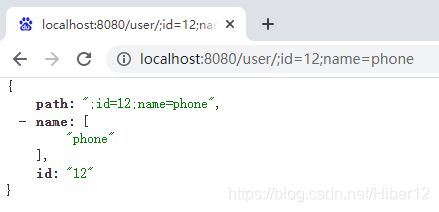
但如果你要获取两个不同的人的年龄age,那么你需要用到pathVar区别两个人:
@GetMapping("/boss/{bossId}/{empId}")
    public Map boss(@MatrixVariable(value = "age",pathVar = "bossId") Integer bossAge,
                    @MatrixVariable(value = "age",pathVar = "empId") Integer empAge){
        Map<String,Object> map = new HashMap<>();

        map.put("bossAge",bossAge);
        map.put("empAge",empAge);
        return map;

    }
八、拦截器
①、拦截器
1、编写一个拦截器实现HandlerInterceptor接口
2、拦截器注册到容器中(实现WebMvcConfigurer的addInterceptors)
3、指定拦截规则【如果是拦截所有,静态资源也会被拦截】
@Slf4j
public class LoginInterceptor implements HandlerInterceptor {

    //目标方法执行之前
    @Override
    public boolean preHandle(HttpServletRequest request, HttpServletResponse response, Object handler) throws Exception {
        String requestURI = request.getRequestURI();
        log.info("preHandle拦截的请求路径是{}",requestURI);
        //登录检查逻辑
        HttpSession session = request.getSession();
        Object loginUser = session.getAttribute("loginUser");
        if(loginUser != null){
            //放行
            return true;
        }
        //拦截住。未登录。跳转到登录页
        request.setAttribute("msg","请先登录");
        request.getRequestDispatcher("/").forward(request,response);
        return false;
}

//目标方法执行完成以后
    @Override
    public void postHandle(HttpServletRequest request, HttpServletResponse response, Object handler, ModelAndView modelAndView) throws Exception {
        log.info("postHandle执行{}",modelAndView);
}

//页面渲染以后
    @Override
    public void afterCompletion(HttpServletRequest request, HttpServletResponse response, Object handler, Exception ex) throws Exception {
        log.info("afterCompletion执行异常{}",ex);
    }
}
②、配置拦截器
1、配置好拦截器要拦截哪些请求
2、把这些配置放在容器中
@Configuration
public class AdminWebConfig implements WebMvcConfigurer {

    @Override
    public void addInterceptors(InterceptorRegistry registry) {
        registry.addInterceptor(new LoginInterceptor())
                .addPathPatterns("/**")  //所有请求都被拦截包括静态资源
                .excludePathPatterns("/","/login","/css/**","/fonts/**","/images/**","/js/**"); //放行的请求
    }
}
③、拦截器原理
1、根据当前请求,找到HandlerExecutionChain【可以处理请求的handler以及handler的所有 拦截器】
2、先来顺序执行 所有拦截器的 preHandle方法
(1)、如果当前拦截器prehandler返回为true。则执行下一个拦截器的preHandle
(2)、如果当前拦截器返回为false。直接 倒序执行所有已经执行了的拦截器的 afterCompletion;
3、如果任何一个拦截器返回false。直接跳出不执行目标方法
4、所有拦截器都返回True。执行目标方法
5、倒序执行所有拦截器的postHandle方法。
6、前面的步骤有任何异常都会直接倒序触发 afterCompletion
7、页面成功渲染完成以后,也会倒序触发 afterCompletion

九、文件上传
@Controller
@Slf4j
public class FileUpload {


    @PostMapping("/fileUpload")
    public String fileUpload(String email,
                             String password,
                             @RequestPart("headerImg") MultipartFile multipartFile,
                             @RequestPart("photos") MultipartFile[] multipartFiles) throws IOException {
        log.info("email是:"+email);
        log.info("密码是:"+password);

        //单个文件上传
        if(!multipartFile.isEmpty()){
            String name = multipartFile.getName();  //前端的命名
            String originalFilename = multipartFile.getOriginalFilename();  //用户上传文件的文件名
            long size = multipartFile.getSize();   //文件大小,单位是字节

            log.info("originalFilename:"+originalFilename);
            log.info("name:"+name);
            log.info("size:"+size);

            //注意!!!是保存在文件夹下,后面需要加多两条斜杆\\
            //注意!!!必须为文件命名
            multipartFile.transferTo(new File("C:\\Users\\94004\\Desktop\\图片服务器\\头像\\"+originalFilename));
        }

        //多个文件上传
        if(multipartFiles.length>0){
            for (MultipartFile file : multipartFiles) {
                String filename = file.getOriginalFilename();
                file.transferTo(new File("C:\\Users\\94004\\Desktop\\图片服务器\\生活照\\"+filename));
            }
        }


        return "success";
    }
}
yaml文件对上传文件进行配置,设置文件上传大小,注意后面单位为MB

注意!!!这里使用了html页面,谨记需要引入thymeleaf依赖,否则找不到页面
<dependency>
    <groupId>org.springframework.bootgroupId>
    <artifactId>spring-boot-starter-thymeleafartifactId>
dependency>
前端页面:
<div>
    <form role="form" action="/fileUpload" method="post" enctype="multipart/form-data">
        <div>
            <label>用户名label>
            <input type="email" name="email">
        div>
        <div>
            <label>密码label>
            <input type="text" name="password">
        div>
        <div>
            <label>头像label>
            <input type="file" name="headerImg">
        div>
        <div>
            <label>生活照label>
            <input type="file" name="photos" multiple>
        div>
        <button type="submit">提交button>
    form>
div>


