Pytorch:卷积神经网络-AlexNet
Pytorch: 深度卷积神经网络-AlexNet
Copyright: Jingmin Wei, Pattern Recognition and Intelligent System, School of Artificial and Intelligence, Huazhong University of Science and Technology
Pytorch教程专栏链接
文章目录
-
-
- Pytorch: 深度卷积神经网络-AlexNet
- @[toc]
-
-
- Reference
- 前言
- 学习特征表示
- AlexNet
- AlexNet 网络结构
- 图像数据准备
- AlexNet 卷积神经网络搭建
- AlexNet 网络训练和预测
文章目录
-
-
- Pytorch: 深度卷积神经网络-AlexNet
- @[toc]
-
-
- Reference
- 前言
- 学习特征表示
- AlexNet
- AlexNet 网络结构
- 图像数据准备
- AlexNet 卷积神经网络搭建
- AlexNet 网络训练和预测
-
-
本教程不商用,仅供学习和参考交流使用,如需转载,请联系本人。
Reference
AlexNet 论文参考链接
前言
在 LeNet 提出后的将近 20 20 20 年里,神经网络一度被其他机器学习方法超越,如支持向量机。虽然 LeNet 可以在早期的小数据集上取得好的成绩,但是在更大的真实数据集上的表现并不尽如人意。一方面,神经网络计算复杂。虽然 20 20 20 世纪 90 90 90 年代也有过一些针对神经网络的加速硬件,但并没有像之后 GPU 那样大量普及。因此,训练一个多通道、多层和有大量参数的卷积神经网络在当年很难完成。另一方面,当年研究者还没有大量深入研究参数初始化和非凸优化算法等诸多领域,导致复杂的神经网络的训练通常较困难。
我们在上一节看到,神经网络可以直接基于图像的原始像素进行分类。这种称为端到端(end-to-end)的方法节省了很多中间步骤。然而,在很长一段时间里更流行的是研究者通过勤劳与智慧所设计并生成的手工特征。这类图像分类研究的主要流程是:
-
获取图像数据集;
-
使用已有的特征提取函数生成图像的特征;
-
使用机器学习模型对图像的特征分类。
当时认为的机器学习部分仅限最后这一步。如果那时候跟机器学习研究者交谈,他们会认为机器学习既重要又优美。优雅的定理证明了许多分类器的性质。机器学习领域生机勃勃、严谨而且极其有用。然而,如果跟计算机视觉研究者交谈,则是另外一幅景象。他们会告诉你图像识别里“不可告人”的现实是:计算机视觉流程中真正重要的是数据和特征。也就是说,使用较干净的数据集和较有效的特征甚至比机器学习模型的选择对图像分类结果的影响更大。
学习特征表示
既然特征如此重要,它该如何表示呢?
我们已经提到,在相当长的时间里,特征都是基于各式各样手工设计的函数从数据中提取的。事实上,不少研究者通过提出新的特征提取函数不断改进图像分类结果。这一度为计算机视觉的发展做出了重要贡献。
然而,另一些研究者则持异议。他们认为特征本身也应该由学习得来。他们还相信,为了表征足够复杂的输入,特征本身应该分级表示。持这一想法的研究者相信,多层神经网络可能可以学得数据的多级表征,并逐级表示越来越抽象的概念或模式。以图像分类为例,并回忆二维卷积层中物体边缘检测的例子。在多层神经网络中,图像的第一级的表示可以是在特定的位置和⻆度是否出现边缘;而第二级的表示说不定能够将这些边缘组合出有趣的模式,如花纹;在第三级的表示中,也许上一级的花纹能进一步汇合成对应物体特定部位的模式。这样逐级表示下去,最终,模型能够较容易根据最后一级的表示完成分类任务。需要强调的是,输入的逐级表示由多层模型中的参数决定,而这些参数都是学出来的。
尽管一直有一群执着的研究者不断钻研,试图学习视觉数据的逐级表征,然而很长一段时间里这些野心都未能实现。这其中有诸多因素值得我们一一分析。
缺失要素一:数据
包含许多特征的深度模型需要大量的有标签的数据才能表现得比其他经典方法更好。限于早期计算机有限的存储和90年代有限的研究预算,大部分研究只基于小的公开数据集。例如,不少研究论文基于加州大学欧文分校(UCI)提供的若干个公开数据集,其中许多数据集只有几百至几千张图像。这一状况在 2010 2010 2010 年前后兴起的大数据浪潮中得到改善。特别是, 2009 2009 2009 年诞生的ImageNet数据集包含了 1000 1000 1000 大类物体,每类有多达数千张不同的图像。这一规模是当时其他公开数据集无法与之相提并论的。ImageNet数据集同时推动计算机视觉和机器学习研究进入新的阶段,使此前的传统方法不再有优势。
缺失要素二:硬件
深度学习对计算资源要求很高。早期的硬件计算能力有限,这使训练较复杂的神经网络变得很困难。然而,通用 GPU 的到来改变了这一格局。很久以来,GPU 都是为图像处理和计算机游戏设计的,尤其是针对大吞吐量的矩阵和向量乘法从而服务于基本的图形变换。值得庆幸的是,这其中的数学表达与深度网络中的卷积层的表达类似。通用 GPU 这个概念在 2001 2001 2001 年开始兴起,涌现出诸如 OpenCL 和 CUDA 之类的编程框架。这使得 GPU 也在 2010 2010 2010 年前后开始被机器学习社区使用。
AlexNet
2012 2012 2012 年,AlexNet 横空出世。这个模型的名字来源于论文第一作者的姓名Alex Krizhevsky。AlexNet 使用了 8 8 8 层卷积神经网络,并以很大的优势赢得了ImageNet 2012 2012 2012 图像识别挑战赛。它首次证明了学习到的特征可以超越手工设计的特征,从而一举打破计算机视觉研究的前状。
AlexNet 网络结构
AlexNet 与 LeNet 的设计理念非常相似,但也有显著的区别。
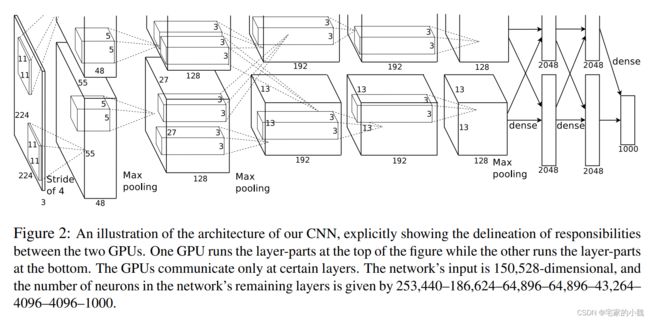
第一,与相对较小的 LeNet 相比,AlexNet 包含 8 8 8 层变换,其中有 5 5 5 层卷积和 2 2 2 层全连接隐藏层,以及 1 1 1 个全连接输出层。下面我们来详细描述这些层的设计。
AlexNet 第一层中的卷积窗口形状是 11 × 1111 × 11 11×1111×11 11×1111×11 。因为 ImageNet 中绝大多数图像的高和宽均比 MNIST 图像的高和宽大 10 10 10 倍以上,ImageNet 图像的物体占用更多的像素,所以需要更大的卷积窗口来捕获物体。第二层中的卷积窗口形状减小到 5 × 5 5×5 5×5 ,之后全采用 3 × 3 3×3 3×3 。此外,第一、第二和第五个卷积层之后都使用了窗口形状为 3 × 3 3×3 3×3 、步幅为 2 2 2 的最大池化层。而且,AlexNet 使用的卷积通道数也大于 LeNet 中的卷积通道数数十倍。
紧接着最后一个卷积层的是两个输出个数为 4096 4096 4096 的全连接层。这两个巨大的全连接层带来将近 1 1 1 GB 的模型参数。由于早期显存的限制,最早的AlexNet使用双数据流的设计使一个 GPU 只需要处理一半模型。幸运的是,显存在过去几年得到了长足的发展,因此通常我们不再需要这样的特别设计了。
第二,AlexNet 将 sigmoid 激活函数改成了更加简单的 ReLU 激活函数。一方面,ReLU 激活函数的计算更简单,例如它并没有 sigmoid 激活函数中的求幂运算。另一方面,ReLU激活函数在不同的参数初始化方法下使模型更容易训练。这是由于当 sigmoid 激活函数输出极接近 0 0 0 或 1 1 1 时,这些区域的梯度几乎为 0 0 0 ,从而造成反向传播无法继续更新部分模型参数;而ReLU激活函数在正区间的梯度恒为 1 1 1 。因此,若模型参数初始化不当,sigmoid 函数可能在正区间得到几乎为 0 0 0 的梯度,从而令模型无法得到有效训练。
第三,AlexNet 通过 Dropout 层来控制全连接层的模型复杂度。而 LeNet 并没有使用。
第四,AlexNet 引入了大量的图像增广,如翻转、裁剪和颜色变化,从而进一步扩大数据集来缓解过拟合。
import numpy as np
import pandas as pd
from sklearn.metrics import accuracy_score, confusion_matrix
import matplotlib.pyplot as plt
import seaborn as sns
import copy
import time
import torch
import torch.nn as nn
from torch.optim import Adam
import torch.utils.data as Data
from torchvision import transforms
from torchvision.datasets import FashionMNIST
# 模型加载选择GPU
device = torch.device("cuda" if torch.cuda.is_available() else "cpu")
# device = torch.device('cpu')
print(device)
print(torch.cuda.device_count())
print(torch.cuda.get_device_name(0))
cuda
1
NVIDIA GeForce GTX 1060 with Max-Q Design
图像数据准备
调用 sklearn 的 datasets 模块的 FashionMNIST 的 API 函数读取。
虽然论文中AlexNet使用ImageNet数据集,但因为ImageNet数据集训练时间较长,我们仍用前面的Fashion-MNIST数据集来演示AlexNet。读取数据的时候我们额外做了一步将图像高和宽扩大到AlexNet使用的图像高和宽 224 224 224 。
# 预处理图像,将图像高和宽扩大到AlexNet使用的图像高和宽224
transform = transforms.Compose([
    transforms.Resize(224),
    transforms.ToTensor()]
)

# 使用 FashionMNIST 数据,准备训练数据集
train_data = FashionMNIST(
    root = './data/FashionMNIST',
    train = True,
    download = False,
    transform = transform,
)

# 定义一个数据加载器
train_loader = Data.DataLoader(
    dataset = train_data,   # 数据集
    batch_size = 64,    # 批量处理的大小
    shuffle = False,   # 不打乱数据
    num_workers = 2,    # 两个进程
)

# 计算 batch 数
print(len(train_loader))

# 为数据添加一个通道维度,并且取值范围归一化
train_data_x = train_data.data.type(torch.FloatTensor) / 255.0
train_data_x = torch.unsqueeze(train_data_x, dim = 1)
train_data_y = train_data.targets # 测试集标签

print(train_data_x.shape)
print(train_data_y.shape)
938
torch.Size([60000, 1, 28, 28])
torch.Size([60000])
上述程序块定义了一个数据加载器,批量的数据块为 64.
接下来我们进行数据可视化分析,将 tensor 数据转为 numpy 格式,然后利用 imshow 进行可视化。
# 获得 batch 的数据

for step, (b_x, b_y) in enumerate(train_loader):
    if step > 0:
        break
# 可视化一个 batch 的图像
batch_x = b_x.squeeze().numpy()
batch_y = b_y.numpy()
label = train_data.classes
label[0] = 'T-shirt'

plt.figure(figsize = (12, 5))
for i in np.arange(len(batch_y)):
    plt.subplot(4, 16, i + 1)
    plt.imshow(batch_x[i, :, :], cmap = plt.cm.gray)
    plt.title(label[batch_y[i]], size = 9)
    plt.axis('off')
    plt.subplots_adjust(wspace = 0.05)
# 预处理图像,将图像高和宽扩大到AlexNet使用的图像高和宽224
transform = transforms.Compose([
    transforms.Resize(224),
    transforms.ToTensor()]
)

# 处理测试集
test_data = FashionMNIST(
    root = './data/FashionMNIST',
    train = False, # 不使用训练数据集
    download = False,
    transform = transform
)


# 定义一个数据加载器
test_loader = Data.DataLoader(
    dataset = test_data,   # 数据集
    batch_size = 64,    # 批量处理的大小
    shuffle = False,   # 不打乱数据
    num_workers = 2,    # 两个进程
)

# 计算 batch 数
print(len(test_loader))

# 为数据添加一个通道维度,并且取值范围归一化
test_data_x = test_data.data.type(torch.FloatTensor) / 255.0
test_data_x = torch.unsqueeze(test_data_x, dim = 1)
test_data_y = test_data.targets # 测试集标签

print(test_data_x.shape)
print(test_data_y.shape)
157
torch.Size([10000, 1, 28, 28])
torch.Size([10000])
AlexNet 卷积神经网络搭建
class AlexNet(nn.Module):
    def __init__(self):
        super(AlexNet, self).__init__()
        self.conv = nn.Sequential(
            nn.Conv2d(1, 96, 11, 4), # in_channels, out_channels, kernel_size, stride, padding
            nn.ReLU(),
            nn.MaxPool2d(3, 2), # kernel_size, stride
            # 减小卷积窗口,使用填充为2来使得输入与输出的高和宽一致,且增大输出通道数
            nn.Conv2d(96, 256, 5, 1, 2),
            nn.ReLU(),
            nn.MaxPool2d(3, 2),
            # 连续3个卷积层,且使用更小的卷积窗口。除了最后的卷积层外,进一步增大了输出通道数。
            # 前两个卷积层后不使用池化层来减小输入的高和宽
            nn.Conv2d(256, 384, 3, 1, 1),
            nn.ReLU(),
            nn.Conv2d(384, 384, 3, 1, 1),
            nn.ReLU(),
            nn.Conv2d(384, 256, 3, 1, 1),
            nn.ReLU(),
            nn.MaxPool2d(3, 2)
        )

        # 这里全连接层的输出个数比LeNet中的大数倍。使用丢弃层来缓解过拟合
        self.fc = nn.Sequential(
            nn.Linear(256 * 5 * 5, 4096),
            nn.ReLU(),
            nn.Dropout(0.5),
            nn.Linear(4096, 4096),
            nn.ReLU(),
            nn.Dropout(0.5),
            # 输出层。由于这里使用Fashion-MNIST,所以用类别数为10,而非论文中的1000
            nn.Linear(4096, 10),
        )

    def forward(self, img):
        feature = self.conv(img)
        output = self.fc(feature.view(img.shape[0], -1))
        return output
# 定义卷积网络对象
myalexnet = AlexNet().to(device)
from torchsummary import summary
summary(myalexnet, input_size=(1, 224, 224), device = 'cuda')
----------------------------------------------------------------
        Layer (type)               Output Shape         Param #
================================================================
            Conv2d-1           [-1, 96, 54, 54]          11,712
              ReLU-2           [-1, 96, 54, 54]               0
         MaxPool2d-3           [-1, 96, 26, 26]               0
            Conv2d-4          [-1, 256, 26, 26]         614,656
              ReLU-5          [-1, 256, 26, 26]               0
         MaxPool2d-6          [-1, 256, 12, 12]               0
            Conv2d-7          [-1, 384, 12, 12]         885,120
              ReLU-8          [-1, 384, 12, 12]               0
            Conv2d-9          [-1, 384, 12, 12]       1,327,488
             ReLU-10          [-1, 384, 12, 12]               0
           Conv2d-11          [-1, 256, 12, 12]         884,992
             ReLU-12          [-1, 256, 12, 12]               0
        MaxPool2d-13            [-1, 256, 5, 5]               0
           Linear-14                 [-1, 4096]      26,218,496
             ReLU-15                 [-1, 4096]               0
          Dropout-16                 [-1, 4096]               0
           Linear-17                 [-1, 4096]      16,781,312
             ReLU-18                 [-1, 4096]               0
          Dropout-19                 [-1, 4096]               0
           Linear-20                   [-1, 10]          40,970
================================================================
Total params: 46,764,746
Trainable params: 46,764,746
Non-trainable params: 0
----------------------------------------------------------------
Input size (MB): 0.19
Forward/backward pass size (MB): 10.17
Params size (MB): 178.39
Estimated Total Size (MB): 188.76
----------------------------------------------------------------
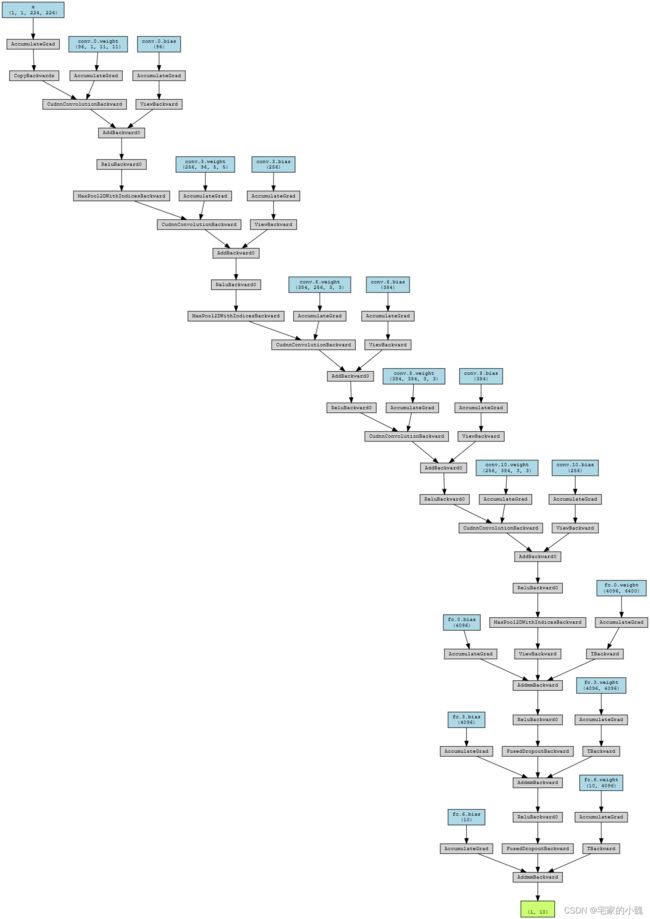
# 输出网络结构
from torchviz import make_dot

x = torch.randn(1, 1, 224, 224).requires_grad_(True)
y = myalexnet(x.to(device))
myCNN_vis = make_dot(y, params=dict(list(myalexnet.named_parameters()) + [('x', x)]))
myCNN_vis
AlexNet 网络训练和预测
训练集整体有 60000 60000 60000 张图像, 938 938 938 个 batch ,使用 70 % 70\% 70% 的 batch 用于模型训练, 30 % 30\% 30% 的用于模型验证
# 定义网络训练过程函数
def train_model(model, traindataloader, train_rate, criterion, optimizer, num_epochs = 25):
    '''
    模型,训练数据集(待切分),训练集百分比,损失函数,优化器,训练轮数
    '''
    # 计算训练使用的 batch 数量
    batch_num = len(traindataloader)
    train_batch_num = round(batch_num * train_rate)
    # 复制模型参数
    best_model_wts = copy.deepcopy(model.state_dict())
    best_acc = 0.0
    train_loss_all = []
    val_loss_all =[]
    train_acc_all = []
    val_acc_all = []
    since = time.time()
    # 训练框架
    for epoch in range(num_epochs):
        print('Epoch {}/{}'.format(epoch, num_epochs - 1))
        print('-' * 10)
        train_loss = 0.0
        train_corrects = 0
        train_num = 0
        val_loss = 0.0
        val_corrects = 0
        val_num = 0
        for step, (b_x, b_y) in enumerate(traindataloader):
            b_x, b_y = b_x.to(device), b_y.to(device)
            if step < train_batch_num:
                model.train()   # 设置为训练模式
                output = model(b_x)
                pre_lab = torch.argmax(output, 1)
                loss = criterion(output, b_y)   # 计算误差损失
                optimizer.zero_grad()   # 清空过往梯度
                loss.backward() # 误差反向传播
                optimizer.step()    # 根据误差更新参数
                train_loss += loss.item() * b_x.size(0)
                train_corrects += torch.sum(pre_lab == b_y.data)
                train_num += b_x.size(0)
            else:
                model.eval()    # 设置为验证模式
                output = model(b_x)
                pre_lab = torch.argmax(output, 1)
                loss = criterion(output, b_y)
                val_loss += loss.cpu().item() * b_x.size(0)
                val_corrects += torch.sum(pre_lab == b_y.data)
                val_num += b_x.size(0)
        # ======================小循环结束========================

        # 计算一个epoch在训练集和验证集上的损失和精度
        train_loss_all.append(train_loss / train_num)
        train_acc_all.append(train_corrects.double().item() / train_num)
        val_loss_all.append(val_loss / val_num)
        val_acc_all.append(val_corrects.double().item() / val_num)
        print('{} Train Loss: {:.4f} Train Acc: {:.4f}'.format(epoch, train_loss_all[-1], train_acc_all[-1]))
        print('{} Val Loss: {:.4f} Val Acc: {:.4f}'.format(epoch, val_loss_all[-1], val_acc_all[-1]))

        # 拷贝模型最高精度下的参数
        if val_acc_all[-1] > best_acc:
            best_acc = val_acc_all[-1]
            best_model_wts = copy.deepcopy(model.state_dict())
        time_use = time.time() - since
        print('Train and Val complete in {:.0f}m {:.0f}s'.format(time_use // 60, time_use % 60))
    # ===========================大循环结束===========================


    # 使用最好模型的参数
    model.load_state_dict(best_model_wts)
    train_process = pd.DataFrame(
        data = {'epoch': range(num_epochs),
                'train_loss_all': train_loss_all,
                'val_loss_all': val_loss_all,
                'train_acc_all': train_acc_all,
                'val_acc_all': val_acc_all})
    return model, train_process
模型的损失和识别精度组成数据表格 train_process 输出,使用 copy.deepcopy() 将模型最优的参数保存在 best_model_wts 中,最终所有的训练结果通过 model.load_state_dict(best_model_wts) 将最优的参数赋给最终的模型
下面对模型和优化器进行训练:
# 模型训练
optimizer = Adam(myalexnet.parameters(), lr = 0.001)   # Adam优化器
criterion = nn.CrossEntropyLoss().to(device)   # 损失函数
myconvnet, train_process = train_model(myalexnet, train_loader, 0.7, criterion, optimizer, num_epochs = 25)
Epoch 0/24
----------
0 Train Loss: 0.6244 Train Acc: 0.7613
0 Val Loss: 0.4161 Val Acc: 0.8475
Train and Val complete in 1m 31s
Epoch 1/24
----------
1 Train Loss: 0.3619 Train Acc: 0.8692
1 Val Loss: 0.3261 Val Acc: 0.8793
Train and Val complete in 3m 2s
Epoch 2/24
----------
2 Train Loss: 0.3161 Train Acc: 0.8831
2 Val Loss: 0.3206 Val Acc: 0.8777
Train and Val complete in 4m 35s
Epoch 3/24
----------
3 Train Loss: 0.2861 Train Acc: 0.8951
3 Val Loss: 0.2735 Val Acc: 0.9012
Train and Val complete in 6m 8s
Epoch 4/24
----------
4 Train Loss: 0.2650 Train Acc: 0.9033
4 Val Loss: 0.2834 Val Acc: 0.8983
Train and Val complete in 7m 39s
Epoch 5/24
----------
5 Train Loss: 0.2474 Train Acc: 0.9084
5 Val Loss: 0.2649 Val Acc: 0.9060
Train and Val complete in 9m 10s
Epoch 6/24
----------
6 Train Loss: 0.2366 Train Acc: 0.9125
6 Val Loss: 0.2709 Val Acc: 0.9062
Train and Val complete in 10m 41s
Epoch 7/24
----------
7 Train Loss: 0.2226 Train Acc: 0.9183
7 Val Loss: 0.2623 Val Acc: 0.9091
Train and Val complete in 12m 12s
Epoch 8/24
----------
8 Train Loss: 0.2098 Train Acc: 0.9231
8 Val Loss: 0.2668 Val Acc: 0.9094
Train and Val complete in 13m 42s
Epoch 9/24
----------
9 Train Loss: 0.2013 Train Acc: 0.9253
9 Val Loss: 0.2691 Val Acc: 0.9088
Train and Val complete in 15m 13s
Epoch 10/24
----------
10 Train Loss: 0.1854 Train Acc: 0.9302
10 Val Loss: 0.2723 Val Acc: 0.9120
Train and Val complete in 16m 44s
Epoch 11/24
----------
11 Train Loss: 0.1791 Train Acc: 0.9341
11 Val Loss: 0.2899 Val Acc: 0.9081
Train and Val complete in 18m 15s
Epoch 12/24
----------
12 Train Loss: 0.1848 Train Acc: 0.9316
12 Val Loss: 0.2694 Val Acc: 0.9080
Train and Val complete in 19m 46s
Epoch 13/24
----------
13 Train Loss: 0.1632 Train Acc: 0.9391
13 Val Loss: 0.2766 Val Acc: 0.9119
Train and Val complete in 21m 17s
Epoch 14/24
----------
14 Train Loss: 0.1735 Train Acc: 0.9371
14 Val Loss: 0.2868 Val Acc: 0.9115
Train and Val complete in 22m 47s
Epoch 15/24
----------
15 Train Loss: 0.1666 Train Acc: 0.9395
15 Val Loss: 0.2784 Val Acc: 0.9117
Train and Val complete in 24m 18s
Epoch 16/24
----------
16 Train Loss: 0.1565 Train Acc: 0.9425
16 Val Loss: 0.2946 Val Acc: 0.9079
Train and Val complete in 25m 49s
Epoch 17/24
----------
17 Train Loss: 0.1516 Train Acc: 0.9439
17 Val Loss: 0.3052 Val Acc: 0.9091
Train and Val complete in 27m 20s
Epoch 18/24
----------
18 Train Loss: 0.1460 Train Acc: 0.9472
18 Val Loss: 0.3012 Val Acc: 0.9096
Train and Val complete in 28m 51s
Epoch 19/24
----------
19 Train Loss: 0.1352 Train Acc: 0.9502
19 Val Loss: 0.3187 Val Acc: 0.9095
Train and Val complete in 30m 21s
Epoch 20/24
----------
20 Train Loss: 0.1427 Train Acc: 0.9495
20 Val Loss: 0.2984 Val Acc: 0.9071
Train and Val complete in 31m 52s
Epoch 21/24
----------
21 Train Loss: 0.1328 Train Acc: 0.9529
21 Val Loss: 0.3173 Val Acc: 0.9100
Train and Val complete in 33m 23s
Epoch 22/24
----------
22 Train Loss: 0.1300 Train Acc: 0.9526
22 Val Loss: 0.3251 Val Acc: 0.9071
Train and Val complete in 34m 53s
Epoch 23/24
----------
23 Train Loss: 0.1286 Train Acc: 0.9542
23 Val Loss: 0.3283 Val Acc: 0.9037
Train and Val complete in 36m 24s
Epoch 24/24
----------
24 Train Loss: 0.1370 Train Acc: 0.9522
24 Val Loss: 0.3292 Val Acc: 0.9050
Train and Val complete in 37m 55s
# 可视化训练过程
plt.figure(figsize = (12, 4))
plt.subplot(1, 2, 1)
plt.plot(train_process.epoch, train_process.train_loss_all, 'ro-', label = 'Train loss')
plt.plot(train_process.epoch, train_process.val_loss_all, 'bs-', label = 'Val loss')
plt.legend()
plt.xlabel('epoch')
plt.ylabel('Loss')

plt.subplot(1, 2, 2)
plt.plot(train_process.epoch, train_process.train_acc_all, 'ro-', label = 'Train acc')
plt.plot(train_process.epoch, train_process.val_acc_all, 'bs-', label = 'Val acc')
plt.legend()
plt.xlabel('epoch')
plt.ylabel('Acc')

plt.show()
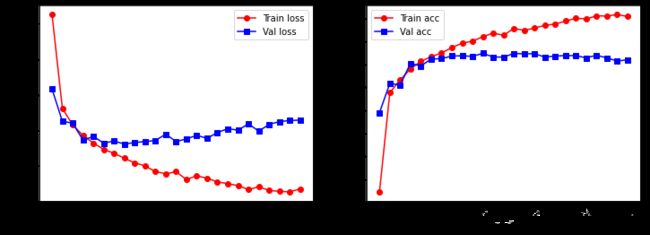
可以看到,在训练的最后阶段,其实网络已经出现了过拟合。
解决此类问题的方法有:提前停止,设置更小的迭代次数,设置更小的学习率,在网络中适度使用 BN 层和 Dropout 层等等。
同时我们计算模型的泛化能力,使用输出的模型在测试集上进行预测:
test_loss = 0.0
test_corrects = 0
test_num = 0
pre_labs = torch.tensor([], dtype=torch.int64).to(device)

for step, (b_x, b_y) in enumerate(test_loader):
    b_x, b_y = b_x.to(device), b_y.to(device)

    myalexnet.eval()    # 设置为验证模式
    output = myalexnet(b_x)
    pre_lab = torch.argmax(output, 1)
    pre_labs = torch.cat([pre_labs, pre_lab], dim=0)
    loss = criterion(output, b_y)
    test_loss += loss.cpu().item() * b_x.size(0)
    test_corrects += torch.sum(pre_lab == b_y.data)
    test_num += b_x.size(0)
# ======================小循环结束========================

# 计算一个epoch在训练集和验证集上的损失和精度
test_loss = test_loss / test_num
test_acc = test_corrects.double().item() / test_num
print(pre_labs.cpu()) # 预测结果
print(test_data_y) # 标签
print('测试集上的预测精度为', test_acc)
tensor([9, 2, 1,  ..., 8, 1, 5])
tensor([9, 2, 1,  ..., 8, 1, 5])
测试集上的预测精度为 0.9033
# 计算测试集上的混淆矩阵并可视化
conf_mat = confusion_matrix(test_data_y, pre_labs.cpu())
df_cm = pd.DataFrame(conf_mat, index = label, columns = label)
heatmap = sns.heatmap(df_cm, annot = True, fmt = 'd', cmap = 'YlGnBu')
heatmap.yaxis.set_ticklabels(heatmap.yaxis.get_ticklabels(), rotation = 0, ha = 'right')
heatmap.xaxis.set_ticklabels(heatmap.xaxis.get_ticklabels(), rotation = 45, ha = 'right')
plt.ylabel('True label')
plt.xlabel('Predicted label')
plt.show()
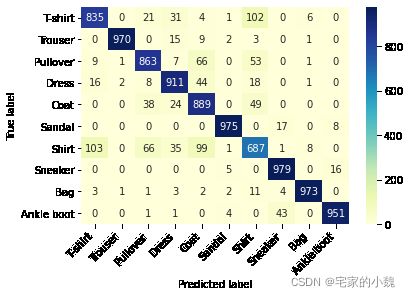
我们发现,最容易预测错误的是 T-shirt 和 Shirt ,相互预测出错的样本量为 103 103 103 个。


