C++和PytorchOnnxRuntime使用方法(附代码)
Pytorch和C++OnnxRuntime使用方法
-
- 写在前面
- Pytoch onnxruntime使用方法
- C++ onnxruntime使用方法
- 写在后面
写在前面
最近有个需求要将Pytorch训练好的模型迁移到C++上去使用,再网上查了一些资料结合上自己的实际情况最终使用onnxruntime迁移成功。借此机会给大家分享一下,若有写的不对的地方请大家批评指正!下面给大家看看运行结果
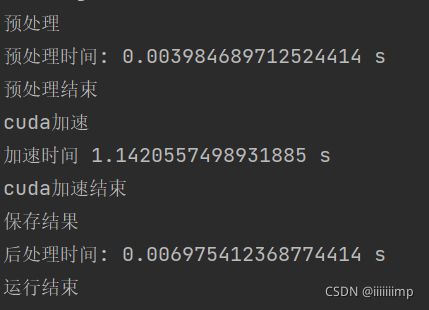
这是Pytorch的onnxruntime运行时间

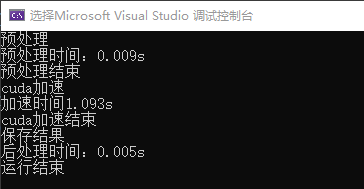
这是C++的onnxruntime运行时间,感觉两者速度是差不多的~可能要大批量数据的时候C++才能体现出它的优势吧。

这是onnx模型运行结果,左边是输入,右边是输出。这里Pytorch和C++的运行结果没有任何区别,因为是同一个onnx模型跑出来的。

代码放在GitHub上的:
https://github.com/hahahappyboy/Pytorch-and-CPP-OnnxRuntime
训练好的模型以及导出的onnx模型在这:
链接:https://pan.baidu.com/s/1m35zq0wqTeaOZ5rj2L2dKA
提取码:iimp
如何使用?
改一下代码中的输入图片路径、模型路径、输出图片路径即可~
下面对一些需要注意的细节做一下解释
Pytoch onnxruntime使用方法
大概步骤就是,先保存训练好的模型,然后将该模型转为onnx模型,使用onnxruntime运行模型即可。具体如何使用可以去看官网和我的GitHub代码,备注写的满详细的。下面对一些需要注意的地方做一些讲解。
1、安装onnxrutime
pip install onnxruntime-gpu
2、 导出onnx模型,详见export_onnx.py文件
需要注意的是最终导出onnx模型时,你的batch_size设为多少,导出的onnx模型就只能接收batch_size大小的图片,比如说这里batch_size为1,表示你之后在用onnx模型时模型的输入只能是[1,3,256,256],不能是[2,3,256,256]。

3、验证导出的onnx模型有没有问题,详见verify_onnx.py
![]()
如果onnx模型输出是你想要的大小那应该就没问题。
4、运行onnx模型,详见run_onnx.py
这个没什么好说的,去官网看看例子就知道了,核心就是这几句代码。
ort_session = onnxruntime.InferenceSession("pix2pixHD_Cartoon_batch1.onnx")
ort_inputs = {ort_session.get_inputs()[0].name: to_numpy(label.unsqueeze(0)).astype(np.float32)}
ort_outs = ort_session.run(None, ort_inputs)
C++ onnxruntime使用方法
重点是C++如何使用onnxruntime,感觉官网给的例子并不是很好。其实个人感觉最难的还是如何进行预处理和后处理,因为C++不像Python那样可以灵活使用矩阵,如果用for循环一个像素一个像素的进行处理,那速度就太慢了~,所以我用到了opencv、libtorch这两个库来对数据进行处理。具体如何使用可以看我放在GitHub上的代码。下面对一些个人感觉比较重要的地方进行解释
1、安装Onnxruntime-Gpu
这里建议安装1.7.1 因为安装最新的版本会报错~

2、Libtorch的安装
参考这篇博客
要注意的是链接器输入添加:
asmjit.lib
c10.lib
caffe2_detectron_ops.lib
caffe2_module_test_dynamic.lib
clog.lib
cpuinfo.lib
dnnl.lib
fbgemm.lib
libprotobuf.lib
libprotobuf-lite.lib
libprotoc.lib
mkldnn.lib
torch.lib
torch_cpu.lib
因为不同版本的libtorch不一样,可能不全需要,保险起见可以全加上
3、将Opencv的Mat对象转为Libtorch的tensor对象这样就方便使用API对图像进行归一化处理
Mat转tensor的代码,需要注意的是torch::kByte要对应cv::Mat img的数据类型
torch::Tensor img_tensor = torch::from_blob(img.data, { img.rows, img.cols, 3 }, torch::kByte);
4、归一化
转为tensor过后进行归一化操作就很简单了而且速度还快,嘿嘿~
std::vector<double> mean = { 0.5,0.5,0.5 };
std::vector<double> std = { 0.5,0.5,0.5 };
tensor = torch::data::transforms::Normalize<>(mean, std)(tensor);
5、构造onnx模型的输入std::vector
个人感觉这是一个难点,之前用for循环一个一个遍历图像放进去的,这样太慢了。后来想到可以用内存拷贝的方法。实现的思路就是将已经预处理好的图像分成RGB三个通道然后reshape成一维向量装入inputVec里。 为什么要分为三个通道装入呢,直接将一张图像reshape后装入inputVec它不香吗?这是因为inputVec向量的输入顺序要求是先R通道的所有像素再G通道的所有像素最后再G通道的所有像素,即要求顺序为RRR->GGG->BBB。如果直接将图像reshape为一维向量则inputVec的顺序为RGB->RGB->RGB。。。。最后结果就不对啦~
核心代码如下:
cv::Mat resultImg(h, w, CV_32FC3);
std::memcpy((void*)resultImg.data, label.data_ptr(), sizeof(float) * label.numel());
//通道分离
std::vector<cv::Mat> channels;
cv::split(resultImg, channels);
cv::Mat blue, green, red;
blue = channels.at(0);
green = channels.at(1);
red = channels.at(2);
//拉平
std::vector<float> inputVec_red = (std::vector<float>)(blue.reshape(1, 1));
std::vector<float> inputVec_green = (std::vector<float>)(green.reshape(1, 1));
std::vector<float> inputVec_blue = (std::vector<float>)(red.reshape(1, 1));
inputVec.insert(inputVec.end(), inputVec_red.begin(), inputVec_red.end());
//装入向量
inputVec.insert(inputVec.end(), inputVec_green.begin(), inputVec_green.end());
inputVec.insert(inputVec.end(), inputVec_blue.begin(), inputVec_blue.end());
这里第二行我是将之前预处理好的tensor转为Mat后再分离通道的,要注意是的是std::memcpy 行中sizeof()中内容,需要修改成c++中内建的数据类型,如果使用torch::kF32或者其他浮点型,会出现数据复制缺失的情况,所以使用的是float。
6、将构造好的输入装入模型得到输出
Ort::Env env = Ort::Env{ ORT_LOGGING_LEVEL_ERROR, "Default" };
Ort::SessionOptions opt;
opt.AppendExecutionProvider_CUDA(cuda_options);
Ort::Session session(env, L".onnx模型的地址", opt);
std::vector<int64_t> inputSize = { batchSize, channels, height, width };
rsize_t inputSizeCount = batchSize * channels * height * width;
auto memoryInfo = Ort::MemoryInfo::CreateCpu(OrtArenaAllocator, OrtMemType::OrtMemTypeDefault);
std::clock_t startTime, endTime;
Ort::Value inputTensor = Ort::Value::CreateTensor<float>(memoryInfo, inputVec.data(), inputSizeCount, inputSize.data(), inputSize.size());
std::vector<Ort::Value>  outputTensors = session.Run(Ort::RunOptions{ nullptr }, inputNames.data(), &inputTensor, inputNames.size(), outputNames.data(), outputNames.size());
float* output = outputTensors[0].GetTensorMutableData<float>();
可以看到输出是一个指针float* output
7、将输出做后处理后转为图像
同理输出的float* 顺序为RRR->GGG->BBB所以如果直接resahpe那是不行滴。所以先构造tensor把三个通道分别提出来,再将三通道进行合并。
torch::Tensor result_r = torch::from_blob(output, { height,width,1 });
torch::Tensor result_g = torch::from_blob(&output[height * width - 1], { height,width,1 });
torch::Tensor result_b = torch::from_blob(&output[height * width * 2 - 1], { height,width,1 });
torch::Tensor result = torch::cat({ result_r, result_g, result_b }, 2);
然后使用API直接进行后处理,这样就很方便。记得转为torch::kU8类型因为后面就要涉及到内存拷贝了
result = result.add(1).div(2).mul(255);
result = result.clamp(0, 255);
result = result.to(torch::kU8);
最后再将tensor转为Mat进行保存
cv::Mat resultImg(height, width, CV_8UC3);
std::memcpy((void*)resultImg.data, result.data_ptr(), sizeof(torch::kU8) * result.numel());
cv::cvtColor(resultImg, resultImg, cv::COLOR_RGB2BGR);
这里我看网上代码有将tensor先permute为HWC后再转为Mat,经过我实验发现其实这一步是多余的,因为permute方法并不会改变tensor数据在内存中的排列方式,对于拷贝内存来说是多余的一步。
写在后面
目前我能想到的地方就这些了,如果错误的地方请多多包含啦~欢迎大家提问!