【图像处理】——图像质量评价指标信噪比(PSNR)和结构相似性(SSIM)(含原理和Python代码)
目录
一、信噪比(PSNR)
1、信噪比的原理与计算公式
2、Python常规代码实现PSNR计算
3、TensorFlow实现PSNR计算
4、skimage实现PSNR计算
5、三种方法计算的结果比较
二、结构相似性(SSIM)
1、结构相似性(SSIM)的原理与计算公式
2、Python常规代码实现SSIM计算
3、TensorFlow实现SSIM计算
(1)调用函数计算SSIM
(2)TensorFlow中ssim完整源代码
(2)实例
三、知识补充
1、tf.io.read_file()
2、tf.image.decode_png()
3、tf.numpy()
一、信噪比(PSNR)
在不同的噪声比例下分别计算PSNR,就能够得到一条信噪比曲线,比较在相同噪声比例下不同图像的信噪比曲线,可以判断出图像质量的优劣
1、信噪比的原理与计算公式
信噪比是衡量去噪后或者加噪后图片的质量,值越大说明滤波效果越好。在图像中,用来评价两幅图像相比质量的好坏,即失真情况,PSNR越高,图像失真越小。

2、Python常规代码实现PSNR计算
import cv2
import tensorflow as tf
from image_gray.image_gray_methods import gray_mean_rgb
import math

def psnr(img1,img2):
    img1_gray = gray_mean_rgb(img1)
    img2_gray = gray_mean_rgb(img2)#灰度化
    h = img1_gray.shape[0]
    w = img1_gray.shape[1]#获得灰度化后的图像矩阵的高宽
    mes = 0
    #逐行计算原图像和噪声图像对应像素值的均差,再进行累加
    for i in range(h):
        for j in range(w):
            mes += (img1_gray[i,j]-img2_gray[i,j])**2
    mes = mes/(h*w)
    psnr = abs(10*math.log10(255/mes))
    return psnr
3、TensorFlow实现PSNR计算
import tensorflow as tf
def tf_psnr(img1,img2,max_value=255):
    '''
    利用TensorFlow求解图像的信噪比
    :param img1: 带有噪声的原始图像
    :param img2: 去噪滤波后的图像
    :param max_value: 最大的灰度值,一般图像为8位的话,则max_value=2**8-1=255
    :return: 返回信噪比常数
    '''
    image1 = tf.io.read_file(img1)  # 读取图片变成的是二进制的张量tensor
    image2 = tf.io.read_file(img2)  # 考验通过变量.numpy()将其变为numpy矩阵
    im1 = tf.image.decode_png(image1)
    im2 = tf.image.decode_png(image2)  # 对读取的二进制图片信息进行解码,解码成tensor量的矩阵
    # im1 = tf.io.decode_png(image1)
    # im2 = tf.io.decode_png(image2)# io模块一样的
    psnr_tensor = tf.image.psnr(im1,im2,max_value)#得到一个tensor常数
    psnr_numpy = psnr_tensor.numpy()#将tensor转换为numpy数据,是一个实常数
    return psnr_numpy
4、skimage实现PSNR计算
from skimage.metrics.simple_metrics import  peak_signal_noise_ratio
from skimage import io
def skimage_psnr(img1,img2,max_val=255):
    image1 = io.imread(img1)  # 读取图片变成的是二进制的张量tensor
    image2 = io.imread(img2)  # 考验通过变量.numpy()将其变为numpy矩阵
    psnr_skimage = peak_signal_noise_ratio(image1,image2)
    return psnr_skimage
5、三种方法计算的结果比较
右边是含有椒盐噪点的图像,左边是经过中值滤波后的图像

if __name__ == '__main__':
    img1 = 'sp_noise.jpg'
    img2 = 'medium_denoise.jpg'
    psnr_value1 = def_psnr(img1,img2)
    psnr_value2 = tf_psnr(img1,img2)
    psnr_value3 = skimage_psnr(img1,img2)
    print("自定义psnr=",psnr_value1)
    print("tensorflow_psnr=",psnr_value2)
    print("skimage_psnr=",psnr_value3)
自定义psnr= 20.220593641797024
tensorflow_psnr= 18.701542
skimage_psnr= 18.72291245011262二、结构相似性(SSIM)
SSIM(结构相似性)-数学公式及Python实现_yuhongbei的博客-CSDN博客
1、结构相似性(SSIM)的原理与计算公式
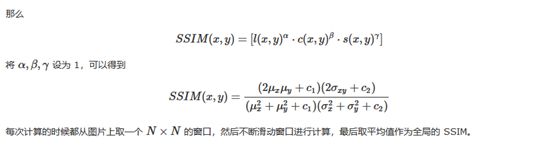
SSIM的输入就是两张图像,我们要得到其相似性的两张图像。其中一张是未经压缩的无失真图像(即ground truth),另一张就是你恢复出的图像。所以,SSIM可以作为super-resolution质量的指标。假设我们输入的两张图像分别是x和y,那么:

2、Python常规代码实现SSIM计算
不再赘述,可以自行编程
3、TensorFlow实现SSIM计算
(1)调用函数计算SSIM
tf.image.ssim(x, y, 255)import tensorflow as tf
def tf_ssim(img1,img2,max_value=255):
'''
利用TensorFlow求解图像的结构相似性ssim
:param img1: 带有噪声的原始图像
:param img2: 去噪滤波后的图像
:param max_value: 最大的灰度值,一般图像为8位的话,则max_value=2**8-1=255
:return: 返回ssim常数
'''
image1 = tf.io.read_file(img1) # 读取图片变成的是二进制的张量tensor
image2 = tf.io.read_file(img2) # 考验通过变量.numpy()将其变为numpy矩阵
im1 = tf.image.decode_png(image1)
im2 = tf.image.decode_png(image2) # 对读取的二进制图片信息进行解码,解码成tensor量的矩阵
# im1 = tf.io.decode_png(image1)
# im2 = tf.io.decode_png(image2)# io模块一样的
ssim_tensor = tf.image.ssim(im1,im2,max_value)#得到一个tensor常数
ssim_numpy = ssim_tensor.numpy()#将tensor转换为numpy数据,是一个实常数
return ssim_numpy(2)TensorFlow中ssim完整源代码
def ssim(img1, img2, max_val):
  """Computes SSIM index between img1 and img2.
  This function is based on the standard SSIM implementation from:
  Wang, Z., Bovik, A. C., Sheikh, H. R., & Simoncelli, E. P. (2004). Image
  quality assessment: from error visibility to structural similarity. IEEE
  transactions on image processing.
  Note: The true SSIM is only defined on grayscale.  This function does not
  perform any colorspace transform.  (If input is already YUV, then it will
  compute YUV SSIM average.)
  Details:
    - 11x11 Gaussian filter of width 1.5 is used.
    - k1 = 0.01, k2 = 0.03 as in the original paper.

  The image sizes must be at least 11x11 because of the filter size.

  Example:
  # Read images from file.
      im1 = tf.decode_png('path/to/im1.png')
      im2 = tf.decode_png('path/to/im2.png')
      # Compute SSIM over tf.uint8 Tensors.
      ssim1 = tf.image.ssim(im1, im2, max_val=255)

      # Compute SSIM over tf.float32 Tensors.
      im1 = tf.image.convert_image_dtype(im1, tf.float32)
      im2 = tf.image.convert_image_dtype(im2, tf.float32)
      ssim2 = tf.image.ssim(im1, im2, max_val=1.0)
      # ssim1 and ssim2 both have type tf.float32 and are almost equal.
    img1: First image batch.
    img2: Second image batch.
    max_val: The dynamic range of the images (i.e., the difference between the
      maximum the and minimum allowed values).
  Returns:
    A tensor containing an SSIM value for each image in batch.  Returned SSIM
    values are in range (-1, 1], when pixel values are non-negative. Returns
    a tensor with shape: broadcast(img1.shape[:-3], img2.shape[:-3]).
  """
   _, _, checks = _verify_compatible_image_shapes(img1, img2)
  with ops.control_dependencies(checks):
    img1 = array_ops.identity(img1)

  # Need to convert the images to float32.  Scale max_val accordingly so that
  # SSIM is computed correctly.
  max_val = math_ops.cast(max_val, img1.dtype)
  max_val = convert_image_dtype(max_val, dtypes.float32)
  img1 = convert_image_dtype(img1, dtypes.float32)
  img2 = convert_image_dtype(img2, dtypes.float32)
  ssim_per_channel, _ = _ssim_per_channel(img1, img2, max_val)
  # Compute average over color channels.
  return math_ops.reduce_mean(ssim_per_channel, [-1])
(2)实例
右边是含有椒盐噪点的图像,左边是经过中值滤波后的图像
if __name__ == '__main__':
    img1 = 'sp_noise.jpg'
    img2 = 'medium_denoise.jpg'
    ssim_value = tf_ssim(img1,img2)
    print("TensorFlow_ssim=",ssim_value)
TensorFlow_ssim= 0.47128722三、知识补充
1、tf.io.read_file()
tf.io.read_file()函数用于读取文件,相当于python的open()函数,常与 tf.io.decode_jpeg() 搭配使用读取图片
tf.io.read_file()读取出来的是二进制数据,要想使用数据就得用 tf.io.decode_jpeg()去解码
参考:https://www.malaoshi.top/show_1EF4VxYA51W2.html
2、tf.image.decode_png()
用于对二进制数据的图片进行解码
参考:
Tensorflow tf.image.decode_image图片解码_菜的真真实实的博客-CSDN博客_decode image
tf.read_file和tf.image.decode_jpeg处理图片(转)_monk1992的博客-CSDN博客
3、tf.numpy()
将tensor变量转换为numpy数据
更多TensorFlow用法可见:《tensorflow》