YOLOV5 网络结构 yaml 文件参数理解
YOLOV5:训练自己数据集
YOLOV5: Mosaic 数据增强
YOLOV5:网络模块理解
文章目录
- 前言
- 一、ymal 文件理解
-
- 1.模型存在地址
- 2. yaml 内容理解
-
- 1.parameters
- 2.anchors
- 3.backbone、head
- 二、模型解析
- 补充:模型 yaml 文件中第四参数解释
- 总结
前言
【个人学习笔记记录,如有错误,欢迎指正】
YOLO-V5 代码仓库地址:https://github.com/ultralytics/yolov5
一、ymal 文件理解
1.模型存在地址
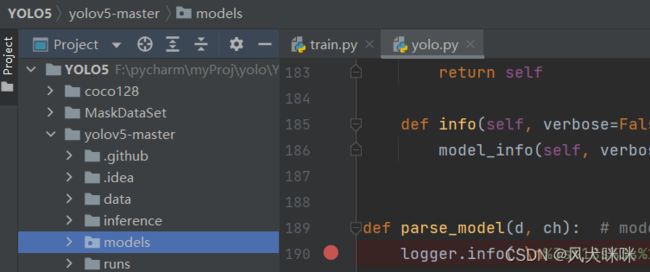
YOLOV5 模型配置文件存放在 modules 文件夹下:这里使用的是 yolov5s.yaml 。
2. yaml 内容理解
yolov5s.yaml 内容理解,这里是官方给出的文件内容。
1.parameters
nc: 2  # number of classes
depth_multiple: 0.33  # model depth multiple
width_multiple: 0.50  # layer channel multiple
【nc】: 类别个数
【depth_multiple】:模型深度超参数(卷积模块的个数)
【width_multiple】:模型宽度超参数(anchors 个数)
2.anchors
anchors:
  - [10,13, 16,30, 33,23]  # P3/8
  - [30,61, 62,45, 59,119]  # P4/16
  - [116,90, 156,198, 373,326]  # P5/32
三个不同尺寸的特征图上,默认 anchors 的高宽值。
3.backbone、head
backbone:
  # [from, number, module, args]
  [[-1, 1, Focus, [64, 3]],  # 0-P1/2
   [-1, 1, Conv, [128, 3, 2]],  # 1-P2/4
   [-1, 3, BottleneckCSP, [128]],
   [-1, 1, Conv, [256, 3, 2]],  # 3-P3/8
   [-1, 9, BottleneckCSP, [256]],
   [-1, 1, Conv, [512, 3, 2]],  # 5-P4/16
   [-1, 9, BottleneckCSP, [512]],
   [-1, 1, Conv, [1024, 3, 2]],  # 7-P5/32
   [-1, 1, SPP, [1024, [5, 9, 13]]],
   [-1, 3, BottleneckCSP, [1024, False]],  # 9]
# YOLOv5 head
head:
  [[-1, 1, Conv, [512, 1, 1]],
   [-1, 1, nn.Upsample, [None, 2, 'nearest']], # 预测层
   [[-1, 6], 1, Concat, [1]],  # cat backbone P4
   [-1, 3, BottleneckCSP, [512, False]],  # 13

   [-1, 1, Conv, [256, 1, 1]],
   [-1, 1, nn.Upsample, [None, 2, 'nearest']],  # 预测层
   [[-1, 4], 1, Concat, [1]],  # cat backbone P3
   [-1, 3, BottleneckCSP, [256, False]],  # 17 (P3/8-small)

   [-1, 1, Conv, [256, 3, 2]],
   [[-1, 14], 1, Concat, [1]],  # cat head P4
   [-1, 3, BottleneckCSP, [512, False]],  # 20 (P4/16-medium)

   [-1, 1, Conv, [512, 3, 2]],
   [[-1, 10], 1, Concat, [1]],  # cat head P5
   [-1, 3, BottleneckCSP, [1024, False]],  # 23 (P5/32-large)

   [[17, 20, 23], 1, Detect, [nc, anchors]],  # Detect(P3, P4, P5)
  ]
主干提取网络的超参数。
每一个列表都含有四个参数,
参数一:该模块的输入特征来自哪一个层
参数二:这个参数乘上模型深度的超参数,就可以控制模型的深度
参数三:每一个具体模块
参数四:后面介绍
【head】是 YOLO 预测用到的模块。
二、模型解析
网络解析代码在 models 文件夹下的 yolo.py 中的 parse_model 函数
parse_model(d, ch):
函数传入的两个参数分别是构建模型的字典和第一个卷积层的输入通道数。
anchors, nc, gd, gw = d['anchors'], d['nc'], d['depth_multiple'], d['width_multiple']
通过键分别取出对应的超参数值。
na = (len(anchors[0]) // 2) if isinstance(anchors, list) else anchors
no = na * (nc + 5)
计算出 anchors 个数和预测层的输出通道数
layers, save, c2 = [], [], ch[-1]
构建网络层列表、(save暂时不知道)、和第一模块的输出的通道数
    for i, (f, n, m, args) in enumerate(d['backbone'] + d['head']):
        m = eval(m) if isinstance(m, str) else m
        for j, a in enumerate(args):
            try:
                args[j] = eval(a) if isinstance(a, str) else a  # eval strings
            except:
                pass

        n = max(round(n * gd), 1) if n > 1 else n  # depth gain
        if m in [Conv, Bottleneck, SPP, DWConv, MixConv2d, Focus, CrossConv, BottleneckCSP, C3]:
            # c1: in_channels, c2: output_channels
            c1, c2 = ch[f], args[0]
            # 将 c2 调整到 8 的整数倍
            c2 = make_divisible(c2 * gw, 8) if c2 != no else c2
            args = [c1, c2, *args[1:]]
            if m in [BottleneckCSP, C3]:
                args.insert(2, n)
                n = 1
        elif m is nn.BatchNorm2d:
            args = [ch[f]]
        elif m is Concat:
            c2 = sum([ch[-1 if x == -1 else x + 1] for x in f])
        elif m is Detect:
            args.append([ch[x + 1] for x in f])
            if isinstance(args[1], int):
                args[1] = [list(range(args[1] * 2))] * len(f)
        else:
            c2 = ch[f]
其中,
【c1】该模块的输入通道数
【c2】该模块的输出通道数
【np】模型参数个数
【ch】模型中各个模块用到的通道数
【m_】模型的模块
c2 = make_divisible(c2 * gw, 8) if c2 != no else c2
【c2】的输出通道数由超参数 width_multiple(gw) 调节(模型的宽度)。
这里的 make_divisible 函数是将 c2 * gw 缩放到离 8 的倍数最近的值。
n = max(round(n * gd), 1) if n > 1 else n
【n】是模块重复的次数由超参数 depth_multiple(gd) 调节(模型的深度)。
m_ = nn.Sequential(*[m(*args) for _ in range(n)]) if n > 1 else m(*args)
具体的层结构解析代码。
具体的层定义在 models 文件夹下的 common.py 文件中。
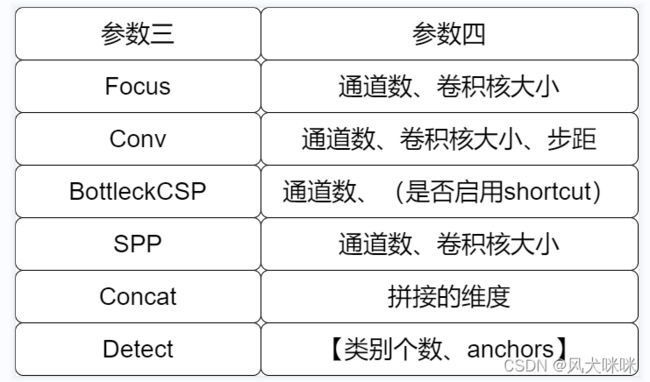
补充:模型 yaml 文件中第四参数解释
这里是对 backbone 和 head 超参数中第四个参数的理解
当第三个参数为 Focus 时,第四个参数中,第一个值为该模块中需要用到的通道数,第二个值为卷积核大小;
当第三个参数为 Conv 时,第四个参数中,第一个值为该模块中需要用到的通道数,第二个值为卷积核大小,第三个参数为步距大小;
当第三个参数为 BottleneckCSP 时,第四个参数中,第一个值是该模块用到的通道数;如果存在第二个参数,第二个参数:是否启用 shortcut 连接
当第三个参数为 SPP时,第四个参数就是 SPP 中需要用到的卷积核大小。
当第三个参数为 nn.Upsample时,就是 torch 中实现的上采样函数。
当第三个参数为 Concat时,第四个参数就是 concat 中拼接的维度。
当第三个参数为 Detect时,第四个参数中,第一个值为类别个数,第二个值为超参数 anchors 的值。
总结
到这里YOLOV5模型解析就完了,总的来说就是对 yaml 文件进行相应的解析。

