利用百度云/Python实现图片人脸融合方法
目录
代码步骤
一、获取token
二、读取图片,转换编码
三、运用百度云人脸识别服务融合图片
四、下载导出图片
五、运行主函数
六、完整代码
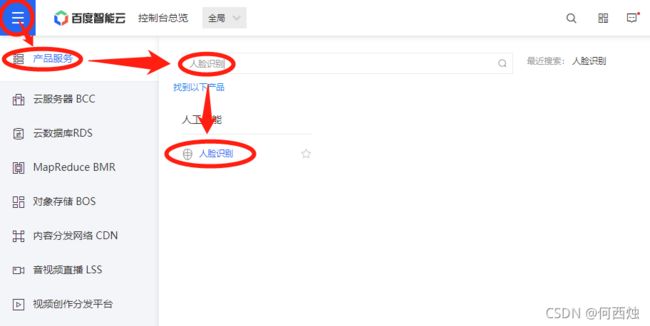
实现人像照片的人脸融合其实有一个十分简易的助手:百度云。登录百度云后点击控制台,按一下步骤进入人脸识别的产品服务:百度智能云官网
进入后创建新人脸识别的应用,我这里已经创立好,这里我们需要API Key和Secret Key:
弄好这些准备工作后,我们打开Pycharm准备代码阶段了。我们需要先导入这三个库:
import requests
import base64
import json
requests模块是用来调用百度云的接口,处理图片;base64用来将图片转换为base64编码;json也是用来编码。
代码步骤
一、获取token
# 获取token
def get_token(client_id, client_secret):
# client_id为官网获取的API Key,client_secret为官网获取的Secret Key.将下行client_id=后的....换为你的API Key,client_secret=后的....换为你的Secret Key
    url = "https://aip.baidubce.com/oauth/2.0/token?grant_type=client_credentials&client_id=....&client_secret=...."
    response = requests.get(url)
    resultJson = response.json()
    return resultJson['access_token']
只需将第4行中的url按照注释做部分修改,获得你百度云人脸识别产品的token
二、读取图片,转换编码
# 根据图片名读取图片,并转换成base64
def read_photo(name):
    with open('%s' % name, 'rb') as f:
        base64_data = base64.b64encode(f.read())
        bd = base64_data.decode()
        return bd
这段不需要针对性修改,是固定的函数模型,利用base64库就可以转换图片编码了,base64相当于是另一种图片格式。
三、运用百度云人脸识别服务融合图片
接下来就是核心步骤了,也是以逸待劳的一步,用百度云的人脸识别+融合服务来完成自己所需。这样不需要自己去写算法而且对于初学者来说百度的算法是远比自己写的精细的。
# 调用百度的接口,实现融合图片
def face_fusion(token, template, target):
    url = 'https://aip.baidubce.com/rest/2.0/face/v1/merge'
    request_url = url + '?access_token=' + token
    params = {
        "image_template": {
            "image": template,
            "image_type": "BASE64",
            "quality_control": "NORMAL"
        },
        "image_target": {
            "image": target,
            "image_type": "BASE64",
            "quality_control": "NORMAL"
        },
        "merge_degree": "HIGH"
    }
    params = json.dumps(params)
    headers = {'content-type': 'application/json'}
    result = requests.post(request_url, data=params, headers=headers).json()
    if result['error_code'] == 0:
        res = result["result"]["merge_image"]
        down_photo(res)
    else:
        print(str(result['error_code'])+result['error_msg'])
这里也是没有什么需要改的,前提是之前获取token的函数是正确的而且运行正常且在前面的,因为这里就用到第一步获取的token。将两个图片一个设置为模板一个设置为目标,也就是一个脸是基底另一个脸是要叠加上去的。
四、下载导出图片
完成融合后要从云上下载回来保存到本地
# 下载融合后图片
def down_photo(data):
    imagedata = base64.b64decode(data)
    file = open('D:\Pics\\result.jpg', "wb")    #路径自己命名如果用\的话注意转义,wb不要修改
    file.write(imagedata)
这函数是导出图片到指定路径,需要注意的是如果用反斜线\的话,注意路径里有\r \n 等,需要\\来转义。'wb'是二进制只写,不要修改,如果原来有这个文件的话会清空重新写入。
到这里基本步骤已经完成,函数已经准备就绪,主程序运行即可。
五、运行主函数
# 主程序
if __name__ == '__main__':
	# 这里的融合用一个男一个女的效果比较不错,所以用boy和girl命名
    # 路径按照自己的图片路径来
    boy = read_photo('D:\Pics\\zr.jpg')
	girl = read_photo('D:\Pics\\cc.jpg')
	token = get_token('....', '....')    # 第一个改为API Key,第二个改为Secret Key
	face_fusion(token, boy, girl)
到这里就完成所有代码模块了,按照以上顺序写入,修改自己对应的部分后运行即可。
六、完整代码
'''
Author:HXZ / Lepus
Date:2021年09月10日
'''

import requests
import base64
import json

# 获取token
def get_token(client_id, client_secret):
# client_id为官网获取的API Key,client_secret为官网获取的Secret Key.将下行client_id=后的....换为你的API Key,client_secret=后的....换为你的Secret Key
    url = "https://aip.baidubce.com/oauth/2.0/token?grant_type=client_credentials&client_id=....&client_secret=...."
    response = requests.get(url)
    resultJson = response.json()
    return resultJson['access_token']

# 根据图片名读取图片,并转换成base64
def read_photo(name):
    with open('%s' % name, 'rb') as f:
        base64_data = base64.b64encode(f.read())
        bd = base64_data.decode()
        return bd


# 调用百度的接口,实现融合图片
def face_fusion(token, template, target):
    url = 'https://aip.baidubce.com/rest/2.0/face/v1/merge'
    request_url = url + '?access_token=' + token
    params = {
        "image_template": {
            "image": template,
            "image_type": "BASE64",
            "quality_control": "NORMAL"
        },
        "image_target": {
            "image": target,
            "image_type": "BASE64",
            "quality_control": "NORMAL"
        },
        "merge_degree": "HIGH"
    }
    params = json.dumps(params)
    headers = {'content-type': 'application/json'}
    result = requests.post(request_url, data=params, headers=headers).json()
    if result['error_code'] == 0:
        res = result["result"]["merge_image"]
        down_photo(res)
    else:
        print(str(result['error_code'])+result['error_msg'])

# 下载融合后图片
def down_photo(data):
    imagedata = base64.b64decode(data)
    file = open('D:\Pics\\result.jpg', "wb")    #修改为自己的路径,'wb'不改
    file.write(imagedata)

# 主程序
if __name__ == '__main__':
	# 这里的融合用一个男一个女的效果比较不错,所以用boy和girl命名
    # 路径按照自己的图片路径来
    boy = read_photo('D:\Pics\\zr.jpg')
	girl = read_photo('D:\Pics\\cc.jpg')
	token = get_token('....', '....')    # 第一个改为API Key,第二个改为Secret Key
	face_fusion(token, boy, girl)
