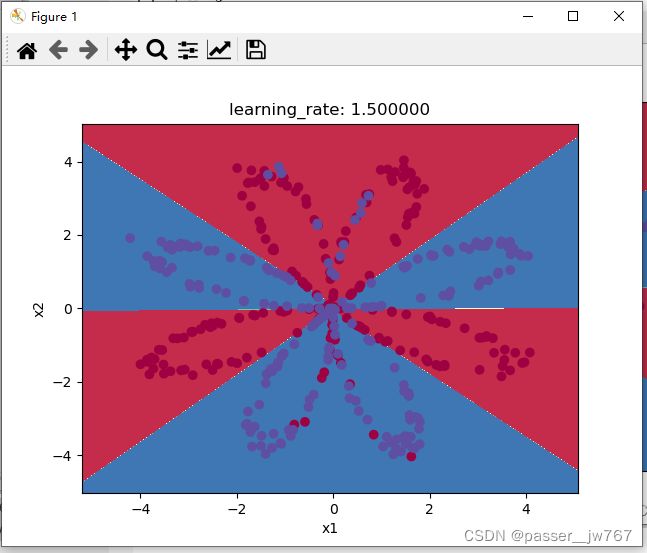
【深度学习】吴恩达深度学习-Course1神经网络与深度学习-第三周浅层神经网络编程
视频链接:【中英字幕】吴恩达深度学习课程第一课 — 神经网络与深度学习
学习链接:
- 【中文】【吴恩达课后编程作业】Course 1 - 神经网络和深度学习 - 第三周作业
- Planar data classification with one hidden layer
- plt.scatter()函数解析(最清晰的解释)
- python中 x[:,0]和x[:,1] 理解和实例解析
- logistics回归之sklearn中的LogisticRegressionCV
- 机器学习 线性回归----Sklearn & fit方法(多种梯度下降方法)
- 吴恩达机器学习课程第三周编程作业逻辑回归plotDecisionBoundary?
- Python sklearn中的.fit与.predict的用法说明
文章目录
- 〇、作业目标
- 一、使用环境
-
- -资料包下载
- 二、库的安装
-
- -安装sklearn
- -planar_utils和testCases的导入
- 三、编程环境的创建
-
- -测试所需的包是否全部安装上
- 四、学习流程
-
- -加载和查看数据集
- -简单的Logistic回归
- -搭建神经网络
-
- 第一步:定义神经网络结构
- 第二步:初始化神经网络模型的参数
- 第三步:循环
-
- 3.1 前向传播
- 3.2 计算损失
- 3.3 反向传播
- 第四步:更新参数
- 第五步:整合
- 第六步:预测
- -正式运行
- -总代码
- 五、拓展
-
- -更改隐藏层结点数量
- -可选问题
-
- 1.当您将tanh激活更改为sigmoid激活函数或ReLU激活函数时会发生什么?
- 2.改变学习率。会发生什么?
- 3.如果我们更改数据集呢?(见下文)
- 六、附录
-
- 1、关于X[0, :]、X[1, :]这种写法
〇、作业目标
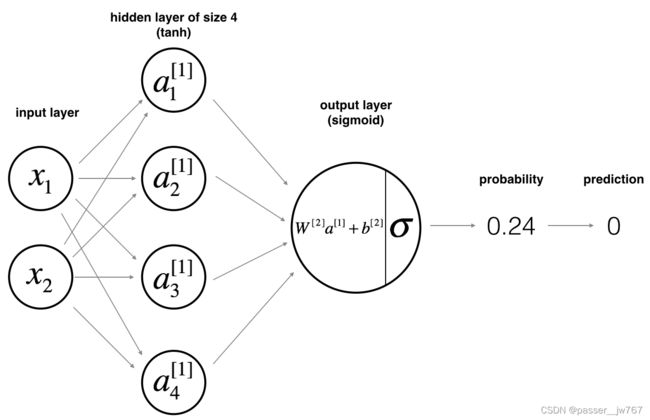
我们要建立一个神经网络,它有一个隐藏层。通过这个作业实现带有隐藏层的平面数据分类。
一、使用环境
这里使用PyCharm+Anaconda进行环境配置。详情可以参考我的上一篇文章:【深度学习】吴恩达深度学习-Course1神经网络与深度学习-第二周神经网络基础编程中的第一大点。
-资料包下载
此处参考学习链接1中作者上传的百度网盘资源
资料下载,提取码:qifu(若失效了请去上边学习链接中看看提取码是否已更新)
二、库的安装
本次作业使用到的库如下:
import numpy as np
import matplotlib.pyplot as plt
from testCases import *
import sklearn
import sklearn.datasets
import sklearn.linear_model
from planar_utils import plot_decision_boundary, sigmoid, load_planar_dataset, load_extra_datasets

#%matplotlib inline #如果你使用用的是Jupyter Notebook的话请取消注释。

np.random.seed(1) #设置一个固定的随机种子,以保证接下来的步骤中我们的结果是一致的。
其中,numpy库与matplotlib详见本文一中所提及链接的“二、库的安装”。
打开Anaconda Powershell Prompt后,请将环境切换到上次所建立的环境下。
使用conda info -e查询你有的环境,使用conda activate xxx(需要打开的环境名称)激活你的环境。
其他库的安装如下:(需要联网查询或下载时,请收起梯子!!要不然挂着梯子会报错)
-安装sklearn
使用以下命令搜索sklearn:
conda search scikit-learn
再使用以下命令安装sklearn:
conda install scikit-learn
-planar_utils和testCases的导入
这两个是一中的资料包里给出来的py文件,只需在写文件时候导入就好了。
三、编程环境的创建
此处使用的是上一次弄好的环境,我将所有的作业都写在上一个作业中弄好的环境下,详见“一、使用环境”中所提及链接的第三点。
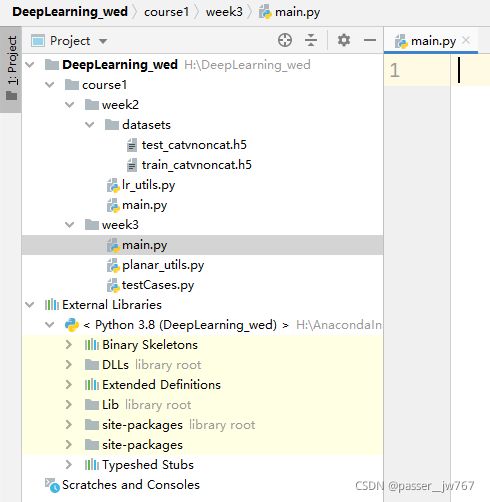
此处我直接打开上一次所建立的环境,继续编程。我的目录结构如下:
-测试所需的包是否全部安装上
还是使用这段代码:
import numpy as np
import matplotlib.pyplot as plt
from testCases import *
import sklearn
import sklearn.datasets
import sklearn.linear_model
from planar_utils import plot_decision_boundary, sigmoid, load_planar_dataset, load_extra_datasets

#%matplotlib inline #如果你使用用的是Jupyter Notebook的话请取消注释。

np.random.seed(1) #设置一个固定的随机种子,以保证接下来的步骤中我们的结果是一致的。
如果你和我用的一样的目录结构,在输入这段程序会出现一点小问题(报红):
![]()
会显示找不到这个文件
请在导入包的部分做如下修改(因为这个from是从这个python项目下边出发进行导入的):
import numpy as np
import matplotlib.pyplot as plt
from course1.week3.testCases import *
import sklearn
import sklearn.datasets
import sklearn.linear_model
from course1.week3.planar_utils import plot_decision_boundary, sigmoid, load_planar_dataset, load_extra_datasets
跑一下,只要没有报错,就说明导入正常。
四、学习流程
-加载和查看数据集
这里的散点图是从planar_utils.py文件中的load_planar_dataset()中加载出来的。
我们首先将类似于花图案的2类数据集加载至变量X、Y中:
X, Y = load_planar_dataset()
把数据集加载完成了,然后使用matplotlib可视化数据集,代码如下:
plt.scatter(X[0, :], X[1, :], c=Y, s=40, cmap=plt.cm.Spectral) #绘制散点图
plt.show()
#原博主提示:第一个语句如出现问题,请使用下面的语句:
#plt.scatter(X[0, :], X[1, :], c=np.squeeze(Y), s=40, cmap=plt.cm.Spectral) #绘制散点图
关于X[0, :]这一类的写法,会在在附录的第一点中解释
对于plt.scatter()函数的用法,详见:plt.scatter()函数解析(最清晰的解释)

通过这个例子,我们可知数据看起来像一朵红色(y = 0)和一些蓝色(y = 1)的数据点的花朵的图案。 我们的目标是建立一个模型来适应这些数据。现在,我们已经有了以下的东西:
X:一个numpy的矩阵,包含了这些数据点的数值
Y:一个numpy的向量,对应着的是X的标签【0 | 1】(红色:0 , 蓝色 :1)
让我们更为仔细的观察这些数据:数据的维度?所包含的数据有多少?使用下面的代码即可知道:
shape_X = X.shape
shape_Y = Y.shape
m = Y.shape[1]  # 数据集的大小
print('The shape of X is: ' + str(shape_X))
print('The shape of Y is: ' + str(shape_Y))
print('I have m = %d training examples!' % (m))
最终得到的结果如下:
The shape of X is: (2, 400)	#X的维度为(2, 400)
The shape of Y is: (1, 400) #Y的维度为(1, 400)
I have m = 400 training examples!	#数据集里有400个数据
-简单的Logistic回归
在构建完整的神经网络之前,先让我们看看逻辑回归在这个问题上的表现如何,我们可以使用sklearn的内置函数来做到这一点, 运行下面的代码来训练数据集上的逻辑回归分类器。
clf = sklearn.linear_model.LogisticRegressionCV()
clf.fit(X.T,Y.T)
我对于上边这段代码的理解是:使用sklearn简化了我们进行Logistic回归需要写的代码。
第一行是初始化一个Logistic回归的实例
第二行是调用fit方法,训练模型找规律
(理解来源:
- logistics回归之sklearn中的LogisticRegressionCV
- 机器学习 线性回归----Sklearn & fit方法(多种梯度下降方法)
)
这里大概会报一个问题:DataConversionWarning: A column-vector y was passed when a 1d array was expected. Please change the shape of y to (n_samples, ), for example using ravel(). y = column_or_1d(y, warn=True),但是没有影响。
你现在可以绘制这些模型的决策边界,代码如下:
plot_decision_boundary(lambda x: clf.predict(x), X, Y)  # 绘制决策边界
plt.title("Logistic Regression")  # 图标题
plt.show()	#展示出图片
LR_predictions = clf.predict(X.T)  # 预测结果
print("逻辑回归的准确性: %d " % float((np.dot(Y, LR_predictions) +
                               np.dot(1 - Y, 1 - LR_predictions)) / float(Y.size) * 100) +
      "% " + "(正确标记的数据点所占的百分比)")
这里对于plot_decision_boundary()函数其实很模糊,我在网上搜索了很多都没有找到能够让我理解它的。目前我看到这个答案下边很多人都说理解了,就先放上来:吴恩达机器学习课程第三周编程作业逻辑回归plotDecisionBoundary?
说一下我对它的理解,我认为就是定义了一个变量x,然后根据X和Y进行分割,最后根据x进行绘制。
对于clf.predict(X.T),就是用训练器数据X拟合分类器模型并对训练器数据X进行预测(参考来源:Python sklearn中的.fit与.predict的用法说明)

因为数据集不是线性可分的,所以逻辑回归的表现不佳,希望我们能使用一个神经网络使之做的更好,现在就来试试!
-搭建神经网络
数学公式:
例如对于x^(i)而言:

为给出所有例子的预测结果,我们可以使用如下的成本函数:

建立整个神经网络模型的方法如下:
- 定义神经网络结构(如输入层单元数量,隐藏层单元数量等)
- 初始化神经网络模型的参数
- 循环:
- 实施前向传播
- 计算损失
- 实施后向传播以得到斜率
- 更新参数(梯度下降)
我们将把1-3步合并到一个叫做nn_model()的函数中,当我们构建好了nn_model()并得到了正确的参数,便可以预测结果。
第一步:定义神经网络结构
定义三个变量:
- n_x:输入层的数量
- n_h:隐藏层的数量(将它设置为4)
- n_y:输出层的数量
提示:使用X和Y的维度来找到n_x和n_y,将隐藏层数量设为4。
# 第一步:定义神经网络结构
def layer_sizes(X, Y):
    """
    :param X:输入的数据集的维度(输入大小,数据集数量)
    :param Y:标签维度(输出大小,数据集数量)
    :return:
    n_x -- the size of the input layer
    n_h -- the size of the hidden layer
    n_y -- the size of the output layer
    """
    n_x = X.shape[0]
    n_h = 4
    n_y = Y.shape[0]

    return n_x, n_h, n_y
第二步:初始化神经网络模型的参数
提示:
- 确保你的参数维度是正确的,如果需要,请参考上边的神经网络图
- 你将使用随机值初始化权重矩阵:
使用np.random.randn(a,b)* 0.01来随机化一个维度大小为(a, b)的矩阵 - 你将使用0来初始化偏移向量:
使用np.zeros((a,b))来随机化一个维度大小为(a, b)且其中元素为0的矩阵
# 第二步:初始化神经网络模型的参数
def initialize_parameters(n_x, n_h, n_y):
    """

    :param n_x:size of the input layer
    :param n_h:size of the hidden layer
    :param n_y:size of the output layer
    :return:
    params -- python dictionary containing your parameters:
                    W1 -- weight matrix of shape (n_h, n_x)
                    b1 -- bias vector of shape (n_h, 1)
                    W2 -- weight matrix of shape (n_y, n_h)
                    b2 -- bias vector of shape (n_y, 1)
    """
    W1 = np.random.randn(n_h, n_x) * 0.01
    b1 = np.zeros((n_h, 1))
    W2 = np.random.randn(n_y, n_h) * 0.01
    b2 = np.zeros((n_y, 1))

	assert (W1.shape == (n_h, n_x))
    assert (b1.shape == (n_h, 1))
    assert (W2.shape == (n_y, n_h))
    assert (b2.shape == (n_y, 1))

    parameters = {"W1": W1,
                  "b1": b1,
                  "W2": W2,
                  "b2": b2}

    return parameters
第三步:循环
3.1 前向传播
- 看懂前边的数学表达式
- 你可以使用
sigmoid()方法。 - 你也可以使用
np.tanh()方法,这是numpy库的一部分。 - 你需要完成以下步骤
···从parameters字典中得到每一个参数
···完成前向传播,计算Z[1],A[1],Z[2],A[2](训练集里面所有例子的预测向量) - 以上的值需要存储在cache中并用于反向传播,cache将会被作为反向传播的输入参数。
# 第三步:循环-前向传播
def forward_propagation(X, parameters):
    """
        Argument:
        X -- input data of size (n_x, m)
        parameters -- python dictionary containing your parameters (output of initialization function)

        Returns:
        A2 -- The sigmoid output of the second activation
        cache -- a dictionary containing "Z1", "A1", "Z2" and "A2"
    """
    W1 = parameters["W1"]
    b1 = parameters["b1"]
    W2 = parameters["W2"]
    b2 = parameters["b2"]

    Z1 = np.dot(W1, X) + b1
    A1 = np.tanh(Z1)
    Z2 = np.dot(W2, A1) + b2
    A2 = sigmoid(Z2)

    assert (A2.shape == (1, X.shape[1]))

    cache = {"Z1": Z1,
             "A1": A1,
             "Z2": Z2,
             "A2": A2}

    return A2, cache
3.2 计算损失
实现计算损失的方法有很多,为了帮助你,我们将向您介绍如何实施:
![]()
(你可以使用np.multiply()和np.sum()或直接使用np.dot())。
def compute_cost(A2, Y, parameters):
    """
       Computes the cross-entropy cost given in equation (13)

       Arguments:
       A2 -- The sigmoid output of the second activation, of shape (1, number of examples)
       Y -- "true" labels vector of shape (1, number of examples)
       parameters -- python dictionary containing your parameters W1, b1, W2 and b2

       Returns:
       cost -- cross-entropy cost given equation (13)
    """
    m = Y.shape[1]

    W1 = parameters["W1"]
    W2 = parameters["W2"]

    logprobs = np.multiply(np.log(A2), Y) + np.multiply((1 - Y), np.log(1 - A2))
    cost = - np.sum(logprobs) / m

    cost = np.squeeze(cost) # 确保成本是我们期望的维度。 E.g., turns [[17]] into 17

    assert (isinstance(cost, float))

    return cost
3.3 反向传播
反向传播通常是深度学习中最难(数学意义)部分,为了帮助你,这里有反向传播的幻灯片, 由于我们正在构建向量化实现,因此我们将需要使用这下面的六个方程:
要计算dZ1,您需要计算 g [ 1 ] ( Z [ 1 ] ) g^{[1]}(Z^{[1]}) g[1](Z[1])。由于 g [ 1 ] ( . ) g^{[1]}(.) g[1](.)是tanh激活函数,如果 a = g [ 1 ] ( z ) a=g^{[1]}(z) a=g[1](z),则 g [ 1 ] ( z ) = 1 − a 2 g^{[1]}(z)=1-a^2 g[1](z)=1−a2。因此,您可以使用(1-np.power(A1,2))计算 g [ 1 ] ( Z [ 1 ] ) g^{[1]}(Z^{[1]}) g[1](Z[1])。
# 第三步:循环-反向传播
def backward_propagation(parameters, cache, X, Y):
    """
    Implement the backward propagation using the instructions above.

    Arguments:
    parameters -- python dictionary containing our parameters
    cache -- a dictionary containing "Z1", "A1", "Z2" and "A2".
    X -- input data of shape (2, number of examples)
    Y -- "true" labels vector of shape (1, number of examples)

    Returns:
    grads -- python dictionary containing your gradients with respect to different parameters
    """
    m = X.shape[1]

    W1 = parameters["W1"]
    W2 = parameters["W2"]

    A1 = cache["A1"]
    A2 = cache["A2"]

    dZ2 = A2 - Y
    dW2 = (1 / m) * np.dot(dZ2, A1.T)
    db2 = (1 / m) * np.sum(dZ2, axis = 1, keepdims = True)
    dZ1 = np.multiply(np.dot(W2.T, dZ2), 1 - np.power(A1, 2))
    dW1 = (1 / m) * np.dot(dZ1, X.T)
    db1 = (1 / m) * np.sum(dZ1, axis = 1, keepdims = True)

    grads = {"dW1": dW1,
             "db1": db1,
             "dW2": dW2,
             "db2": db2}

    return grads
第四步:更新参数
使用梯度下降。你必须使用(dW1、db1、dW2、db2)来更新(W1、b1、W2、b2)。
- θ = θ - αθ
α:学习速率
θ :参数
我们需要选择一个良好的学习速率,我们可以看一下下面这两个图(由Adam Harley提供):

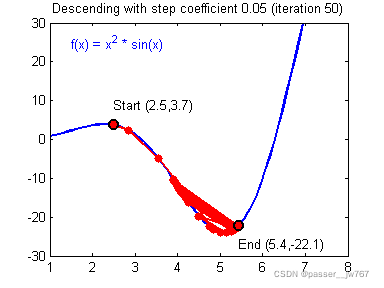
上面两个图分别代表了具有良好学习速率(收敛)和不良学习速率(发散)的梯度下降算法。
# 第四步:更新参数
def update_parameters(parameters, grads, learning_rate=1.2):
    """
    Updates parameters using the gradient descent update rule given above

    Arguments:
    parameters -- python dictionary containing your parameters
    grads -- python dictionary containing your gradients

    Returns:
    parameters -- python dictionary containing your updated parameters
    """
    W1 = parameters["W1"]
    W2 = parameters["W2"]
    b1 = parameters["b1"]
    b2 = parameters["b2"]

    dW1 = grads["dW1"]
    dW2 = grads["dW2"]
    db1 = grads["db1"]
    db2 = grads["db2"]

    W1 = W1 - learning_rate * dW1
    b1 = b1 - learning_rate * db1
    W2 = W2 - learning_rate * dW2
    b2 = b2 - learning_rate * db2

    parameters = {"W1": W1,
                  "b1": b1,
                  "W2": W2,
                  "b2": b2}

    return parameters
第五步:整合
将我们的神经网络模型整合到函数nn_model()中。
注意:神经网络模型必须以正确的顺序使用前面的函数。
# 第五步:整合
def nn_model(X, Y, n_h, num_iterations=10000, print_cost=False):
    """
    Arguments:
    X -- dataset of shape (2, number of examples)
    Y -- labels of shape (1, number of examples)
    n_h -- size of the hidden layer
    num_iterations -- Number of iterations in gradient descent loop
    print_cost -- if True, print the cost every 1000 iterations

    Returns:
    parameters -- parameters learnt by the model. They can then be used to predict.
    """

    np.random.seed(3)
    n_x = layer_sizes(X, Y)[0]
    n_y = layer_sizes(X, Y)[2]

    # 初始化参数
    parameters = initialize_parameters(n_x, n_h, n_y)
    W1 = parameters["W1"]
    W2 = parameters["W2"]
    b1 = parameters["b1"]
    b2 = parameters["b2"]

    for i in range(num_iterations):
        A2, cache = forward_propagation(X, parameters)

        cost = compute_cost(A2, Y, parameters)

        grads = backward_propagation(parameters, cache, X, Y)

        parameters = update_parameters(parameters, grads)

        if print_cost && i % 1000 == 0:
            print("第 %i 次迭代后的损失:%f " % (i, cost))

    return parameters
第六步:预测
通过构建predict()使用您的模型进行预测。使用前向传播来预测结果。
很简单,直接调用前向传播函数获得的A2,若大于0.5视作blue(1),若小于等于0.5视作red(0)
# 第六步:预测
def predict(parameters, X):
    """
    Using the learned parameters, predicts a class for each example in X

    Arguments:
    parameters -- python dictionary containing your parameters
    X -- input data of size (n_x, m)

    Returns
    predictions -- vector of predictions of our model (red: 0 / blue: 1)
    """
    A2, cache = forward_propagation(X, parameters)
    predictions = np.round(A2)

    return predictions
-正式运行
# 建立一个具有n_h维隐藏层的模型
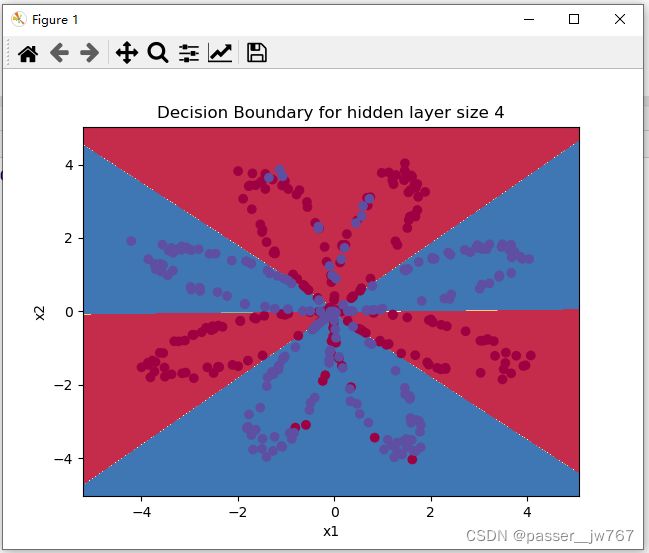
parameters = nn_model(X, Y, n_h=4, num_iterations=10000, print_cost=True)
# 绘制决策边界
plot_decision_boundary(lambda x: predict(parameters, x.T), X, Y)
plt.title("Decision Boundary for hidden layer size " + str(4))
plt.show()

predictions = predict(parameters, X)
print('准确率: %d' % float((np.dot(Y, predictions.T) + np.dot(1 - Y, 1 - predictions.T)) / float(Y.size) * 100) + '%')
Cost after iteration 0: 0.693048
Cost after iteration 1000: 0.288083
Cost after iteration 2000: 0.254385
Cost after iteration 3000: 0.233864
Cost after iteration 4000: 0.226792
Cost after iteration 5000: 0.222644
Cost after iteration 6000: 0.219731
Cost after iteration 7000: 0.217504
Cost after iteration 8000: 0.219427
Cost after iteration 9000: 0.218550
准确率: 90%
-总代码
import numpy as np
import matplotlib.pyplot as plt
from course1.week3.testCases import *
import sklearn
import sklearn.datasets
import sklearn.linear_model
from course1.week3.planar_utils import plot_decision_boundary, sigmoid, load_planar_dataset, load_extra_datasets

#   加载和查看数据集
np.random.seed(1)  # 设置一个固定的随机种子,以保证接下来的步骤中我们的结果是一致的。

X, Y = load_planar_dataset()
# plt.scatter(X[0, :], X[1, :], c=Y, s=40, cmap=plt.cm.Spectral)  # 绘制散点图
# plt.show()
shape_X = X.shape
shape_Y = Y.shape
m = Y.shape[1]  # 数据集的大小
print('The shape of X is: ' + str(shape_X))
print('The shape of Y is: ' + str(shape_Y))
print('I have m = %d training examples!' % (m))


#
# #   简单的logistic回归
# clf = sklearn.linear_model.LogisticRegressionCV()
# clf.fit(X.T, Y.T)
# plot_decision_boundary(lambda x: clf.predict(x), X, Y)  # 绘制决策边界
# plt.title("Logistic Regression")  # 图标题
# plt.show()
# LR_predictions = clf.predict(X.T)  # 预测结果
# print("逻辑回归的准确性: %d " % float((np.dot(Y, LR_predictions) +
#                                np.dot(1 - Y, 1 - LR_predictions)) / float(Y.size) * 100) +
#       "% " + "(正确标记的数据点所占的百分比)")

# 搭建神经网络
# 第一步:定义神经网络结构
def layer_sizes(X, Y):
    """
    :param X:输入的数据集的维度(输入大小,数据集数量)
    :param Y:标签维度(输出大小,数据集数量)
    :return:
    n_x -- the size of the input layer
    n_h -- the size of the hidden layer
    n_y -- the size of the output layer
    """
    n_x = X.shape[0]
    n_h = 4
    n_y = Y.shape[0]

    return n_x, n_h, n_y


# 第二步:初始化神经网络模型的参数
def initialize_parameters(n_x, n_h, n_y):
    """

    :param n_x:size of the input layer
    :param n_h:size of the hidden layer
    :param n_y:size of the output layer
    :return:
    params -- python dictionary containing your parameters:
                    W1 -- weight matrix of shape (n_h, n_x)
                    b1 -- bias vector of shape (n_h, 1)
                    W2 -- weight matrix of shape (n_y, n_h)
                    b2 -- bias vector of shape (n_y, 1)
    """
    np.random.seed(2)

    W1 = np.random.randn(n_h, n_x) * 0.01
    b1 = np.zeros((n_h, 1))
    W2 = np.random.randn(n_y, n_h) * 0.01
    b2 = np.zeros((n_y, 1))

    assert (W1.shape == (n_h, n_x))
    assert (b1.shape == (n_h, 1))
    assert (W2.shape == (n_y, n_h))
    assert (b2.shape == (n_y, 1))

    parameters = {"W1": W1,
                  "b1": b1,
                  "W2": W2,
                  "b2": b2}

    return parameters


# 第三步:循环-前向传播
def forward_propagation(X, parameters):
    """
        Argument:
        X -- input data of size (n_x, m)
        parameters -- python dictionary containing your parameters (output of initialization function)

        Returns:
        A2 -- The sigmoid output of the second activation
        cache -- a dictionary containing "Z1", "A1", "Z2" and "A2"
    """
    W1 = parameters["W1"]
    b1 = parameters["b1"]
    W2 = parameters["W2"]
    b2 = parameters["b2"]

    Z1 = np.dot(W1, X) + b1
    A1 = np.tanh(Z1)
    Z2 = np.dot(W2, A1) + b2
    A2 = sigmoid(Z2)

    assert (A2.shape == (1, X.shape[1]))

    cache = {"Z1": Z1,
             "A1": A1,
             "Z2": Z2,
             "A2": A2}

    return A2, cache


def compute_cost(A2, Y, parameters):
    """
       Computes the cross-entropy cost given in equation (13)

       Arguments:
       A2 -- The sigmoid output of the second activation, of shape (1, number of examples)
       Y -- "true" labels vector of shape (1, number of examples)
       parameters -- python dictionary containing your parameters W1, b1, W2 and b2

       Returns:
       cost -- cross-entropy cost given equation (13)
    """
    m = Y.shape[1]

    W1 = parameters["W1"]
    W2 = parameters["W2"]

    logprobs = np.multiply(np.log(A2), Y) + np.multiply((1 - Y), np.log(1 - A2))
    cost = - np.sum(logprobs) / m

    cost = np.squeeze(cost)  # 确保成本是我们期望的维度。 E.g., turns [[17]] into 17

    assert (isinstance(cost, float))

    return cost


# 第三步:循环-反向传播
def backward_propagation(parameters, cache, X, Y):
    """
    Implement the backward propagation using the instructions above.

    Arguments:
    parameters -- python dictionary containing our parameters
    cache -- a dictionary containing "Z1", "A1", "Z2" and "A2".
    X -- input data of shape (2, number of examples)
    Y -- "true" labels vector of shape (1, number of examples)

    Returns:
    grads -- python dictionary containing your gradients with respect to different parameters
    """
    m = X.shape[1]

    W1 = parameters["W1"]
    W2 = parameters["W2"]

    A1 = cache["A1"]
    A2 = cache["A2"]

    dZ2 = A2 - Y
    dW2 = (1 / m) * np.dot(dZ2, A1.T)
    db2 = (1 / m) * np.sum(dZ2, axis=1, keepdims=True)
    dZ1 = np.multiply(np.dot(W2.T, dZ2), 1 - np.power(A1, 2))
    dW1 = (1 / m) * np.dot(dZ1, X.T)
    db1 = (1 / m) * np.sum(dZ1, axis=1, keepdims=True)

    grads = {"dW1": dW1,
             "db1": db1,
             "dW2": dW2,
             "db2": db2}

    return grads


# 第四步:更新参数
def update_parameters(parameters, grads, learning_rate=1.2):
    """
    Updates parameters using the gradient descent update rule given above

    Arguments:
    parameters -- python dictionary containing your parameters
    grads -- python dictionary containing your gradients

    Returns:
    parameters -- python dictionary containing your updated parameters
    """
    W1 = parameters["W1"]
    W2 = parameters["W2"]
    b1 = parameters["b1"]
    b2 = parameters["b2"]

    dW1 = grads["dW1"]
    dW2 = grads["dW2"]
    db1 = grads["db1"]
    db2 = grads["db2"]

    W1 = W1 - learning_rate * dW1
    b1 = b1 - learning_rate * db1
    W2 = W2 - learning_rate * dW2
    b2 = b2 - learning_rate * db2

    parameters = {"W1": W1,
                  "b1": b1,
                  "W2": W2,
                  "b2": b2}

    return parameters

# 第五步:整合
def nn_model(X, Y, n_h, num_iterations=10000, print_cost=False):
    """
    Arguments:
    X -- dataset of shape (2, number of examples)
    Y -- labels of shape (1, number of examples)
    n_h -- size of the hidden layer
    num_iterations -- Number of iterations in gradient descent loop
    print_cost -- if True, print the cost every 1000 iterations

    Returns:
    parameters -- parameters learnt by the model. They can then be used to predict.
    """

    np.random.seed(3)
    n_x = layer_sizes(X, Y)[0]
    n_y = layer_sizes(X, Y)[2]

    # 初始化参数
    parameters = initialize_parameters(n_x, n_h, n_y)
    W1 = parameters["W1"]
    W2 = parameters["W2"]
    b1 = parameters["b1"]
    b2 = parameters["b2"]

    for i in range(0, num_iterations):
        A2, cache = forward_propagation(X, parameters)

        cost = compute_cost(A2, Y, parameters)

        grads = backward_propagation(parameters, cache, X, Y)

        parameters = update_parameters(parameters, grads)

        if print_cost and i % 1000 == 0:
            print("Cost after iteration %i: %f" % (i, cost))

    return parameters


# 第六步:预测
def predict(parameters, X):
    """
    Using the learned parameters, predicts a class for each example in X

    Arguments:
    parameters -- python dictionary containing your parameters
    X -- input data of size (n_x, m)

    Returns
    predictions -- vector of predictions of our model (red: 0 / blue: 1)
    """
    A2, cache = forward_propagation(X, parameters)
    predictions = np.round(A2)

    return predictions

# 建立一个具有n_h维隐藏层的模型
parameters = nn_model(X, Y, n_h=4, num_iterations=10000, print_cost=True)
# 绘制决策边界
plot_decision_boundary(lambda x: predict(parameters, x.T), X, Y)
plt.title("Decision Boundary for hidden layer size " + str(4))
plt.show()

predictions = predict(parameters, X)
print('准确率: %d' % float((np.dot(Y, predictions.T) + np.dot(1 - Y, 1 - predictions.T)) / float(Y.size) * 100) + '%')
五、拓展
-更改隐藏层结点数量
运行以下代码。可能需要1-2分钟。你将观察到不同隐藏层大小的模型的不同行为。
(将以下代码加在上边代码的合集/总代码即可)
# This may take about 2 minutes to run

plt.figure(figsize=(16, 32))
hidden_layer_sizes = [1, 2, 3, 4, 5, 20, 50]
for i, n_h in enumerate(hidden_layer_sizes):
    plt.subplot(5, 2, i + 1)
    plt.title('Hidden Layer of size %d' % n_h)
    parameters = nn_model(X, Y, n_h, num_iterations=5000)
    plot_decision_boundary(lambda x: predict(parameters, x.T), X, Y)
    predictions = predict(parameters, X)
    accuracy = float((np.dot(Y, predictions.T) + np.dot(1 - Y, 1 - predictions.T)) / float(Y.size) * 100)
    print ("Accuracy for {} hidden units: {} %".format(n_h, accuracy))
(若图片不显示可加plt.show(),但是我跑出来的图非常奇怪,所以这里的图示复制了学习链接2中的。)
运行结果:

Accuracy for 1 hidden units: 67.5 %
Accuracy for 2 hidden units: 67.25 %
Accuracy for 3 hidden units: 90.75 %
Accuracy for 4 hidden units: 90.5 %
Accuracy for 5 hidden units: 91.25 %
Accuracy for 20 hidden units: 90.0 %
Accuracy for 50 hidden units: 90.25 %
解释:
较大的模型(具有更多隐藏单元)能够更好地拟合训练集,直到最终最大的模型过度拟合数据。
最佳隐藏层大小似乎在n_h=5左右。事实上,这里的一个值似乎与数据吻合得很好,但也不会引起明显的过度拟合
-可选问题
1.当您将tanh激活更改为sigmoid激活函数或ReLU激活函数时会发生什么?
这个需要改和导数有关的代码,懒得算,先留个坑吧。。抱歉
2.改变学习率。会发生什么?
请根据上边的提示先进性更改。
# 改变学习率
# 第四步:def update_parameters(parameters, grads, learning_rate=1.2): -> def update_parameters(parameters, grads, learning_rate):
# 第五步:def nn_model(X, Y, n_h, num_iterations=10000, print_cost=False): -> def nn_model(X, Y, n_h, learning_rate, num_iterations=10000, print_cost=False):
# 第五步循环下:parameters = update_parameters(parameters, grads) -> parameters = update_parameters(parameters, grads, learning_rate)
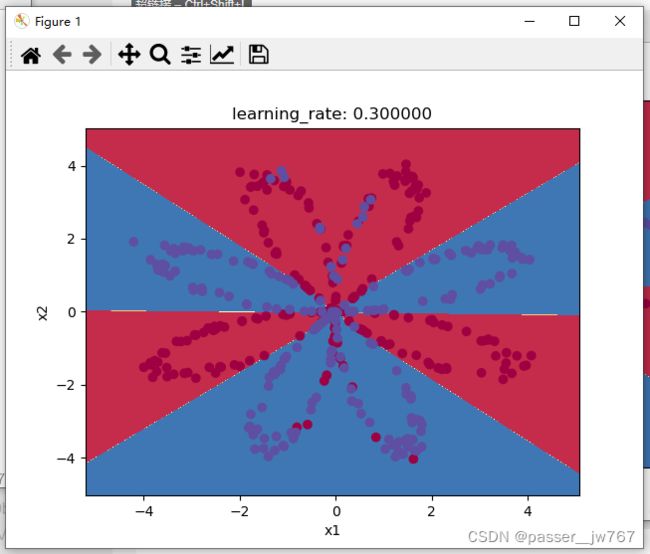
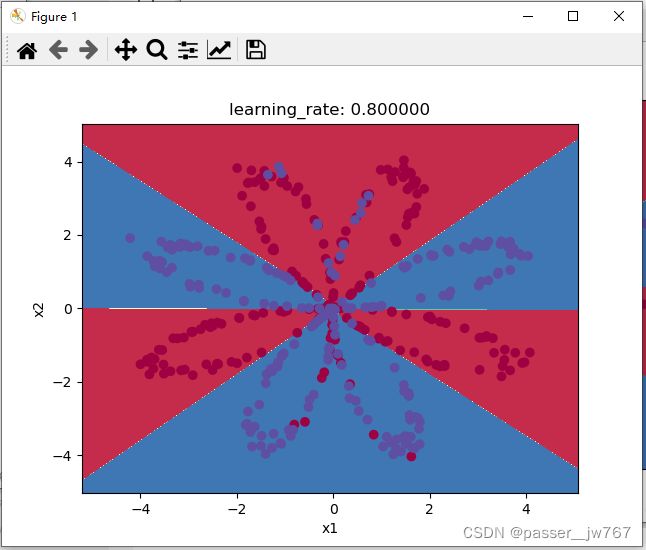
learning_rates = [0.01, 0.05, 0.1, 0.2, 0.25, 0.3, 0.5, 0.8, 1.0, 1.2, 1.5]
for j, learning_rate in enumerate(learning_rates):
    # plt.subplot(5, 2, j + 1)
    plt.title('learning_rate: %f' % learning_rate)
    parameters = nn_model(X, Y, 4, learning_rate, num_iterations=5000)
    plot_decision_boundary(lambda x: predict(parameters, x.T), X, Y)
    predictions = predict(parameters, X)
    accuracy = float((np.dot(Y, predictions.T) + np.dot(1 - Y, 1 - predictions.T)) / float(Y.size) * 100)
    print ("Accuracy for {} learning_rate: {} %".format(learning_rate, accuracy))
不想截了,看打印结果吧:
Accuracy for 0.01 learning_rate: 58.5 %
Accuracy for 0.05 learning_rate: 87.0 %
Accuracy for 0.1 learning_rate: 88.0 %
Accuracy for 0.2 learning_rate: 89.25 %
Accuracy for 0.25 learning_rate: 89.0 %
Accuracy for 0.3 learning_rate: 89.5 %
Accuracy for 0.5 learning_rate: 90.0 %
Accuracy for 0.8 learning_rate: 90.5 %
Accuracy for 1.0 learning_rate: 90.5 %
Accuracy for 1.2 learning_rate: 90.5 %
Accuracy for 1.5 learning_rate: 89.75 %
可以看到,其实0.8的学习率就能达到和1.2几乎一样的效果。
3.如果我们更改数据集呢?(见下文)
数据集变更如下:
# Datasets
noisy_circles, noisy_moons, blobs, gaussian_quantiles, no_structure = load_extra_datasets()

datasets = {"noisy_circles": noisy_circles,
            "noisy_moons": noisy_moons,
            "blobs": blobs,
            "gaussian_quantiles": gaussian_quantiles}

### START CODE HERE ### (choose your dataset)
dataset = "noisy_moons"
### END CODE HERE ###

X, Y = datasets[dataset]
X, Y = X.T, Y.reshape(1, Y.shape[0])

# make blobs binary
if dataset == "blobs":
    Y = Y % 2

# Visualize the data
plt.scatter(X[0, :], X[1, :], c=Y, s=40, cmap=plt.cm.Spectral);
plt.show()
我们只需要在上面跑我们的模型就好了:
parameters = nn_model(X, Y, n_h=4, num_iterations=10000, print_cost=True)
# 绘制决策边界
plot_decision_boundary(lambda x: predict(parameters, x.T), X, Y)
plt.title("Decision Boundary for hidden layer size " + str(4))
plt.show()
Cost after iteration 0: 0.692996
Cost after iteration 1000: 0.312726
Cost after iteration 2000: 0.111779
Cost after iteration 3000: 0.102663
Cost after iteration 4000: 0.098325
Cost after iteration 5000: 0.094951
Cost after iteration 6000: 0.092441
Cost after iteration 7000: 0.090517
Cost after iteration 8000: 0.088960
Cost after iteration 9000: 0.087659
六、附录
1、关于X[0, :]、X[1, :]这种写法
参考来源:python中 x[:,0]和x[:,1] 理解和实例解析
x[m,n]是通过numpy库引用数组或矩阵中的某一段数据集的一种写法
m代表第m维,n代表m维中取第几段特征数据。
通常用法:
x[:,n]或者x[n,:]
x[:,n]表示在全部数组(维)中取第n个数据,直观来说,x[:,n]就是取所有集合的第n个数据。
详细例子可见参考来源
