学习react的生命周期的时候以为会vue差不多, 结果发现还是有差别的, vue3的生命周期则和vue2没什么变化,
这次文章比较长, 比较侧重父子生命周期顺序和react方面, 其中一些图片是引用部分文章的
喜欢就给个赞吧, 该系列还在更新
react
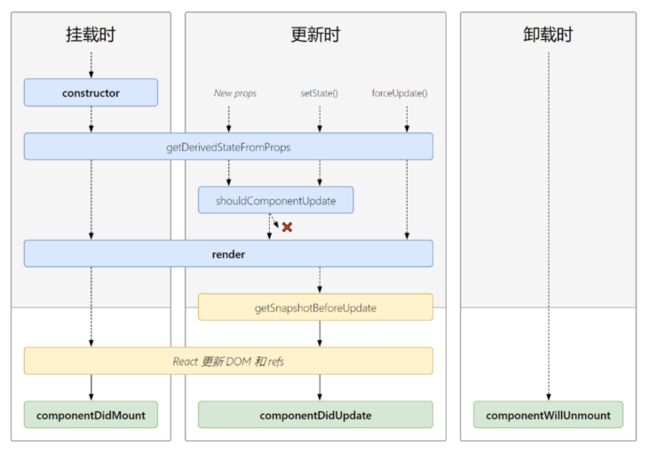
组件生命周期图
生命周期API
| Col1 | Col2 |
|---|---|
| 挂载 | |
| constructor | 组件挂载之前被调用 |
| shouldComponentUpdate(nextProps, nextState) | 在调用 render方法之前调用,在初始化和后续更新都会被调用 |
| render | 方法是class组件中唯一必须实现的方法,用于渲染dom, render()方法必须返回reactDOM |
| componentDidMount | 组件挂载后 (插入DOM树后) 立即调用 |
| 更新 | |
| shouldComponentUpdate(nextProps, nextState) | 组件更新之前调用,可以控制组件是否进行更新, 返回true时组件更新, 返回false则不更新 |
| getSnapshotBeforeUpdate(prevProps, prevState) | 最近一次的渲染输出被提交之前调用。也就是说,在 render 之后,即将对组件进行挂载时调用。 |
| componentDidUpdate(prevProps, prevState, snapshot) | 更新后会被立即调用。首次渲染不会执行, 第三个是“snapshot” 参数传递 |
| 卸载 | |
| componentWillUnmount | 组件即将被卸载或销毁时进行调用。 |
hooks 模拟生命周期
模拟 componentDidMount
useEffect(() => console.log('componentDidMount'), []);模拟shouldComponentUpdate
const MemoChild = React.memo(
    () => {...},
    (prevProps, nextProps) => nextProps.count !== prevProps.count
)
模拟componentDidUpdate
useEffect(() => console.log('mounted or updated'));不仅可以访问 componentDidUpdate,还可以访问componentDidMount,如果只想模拟 componentDidUpdate,
const ref = useRef(true);
useEffect(() => {
  if (ref.current) {
    ref.current = false;
  }
   console.log('componentDidUpdate')
});
模拟componentWillUnmount
useEffect(() => {
  return () => {
    console.log('模拟componentWillUnmount');
  }
}, []);
父子组件生命周期顺序
Parent.tsx
为了更好的说明, Parent.tsx 使用的是hooks写法
const MemoChild = React.memo(
() => {
useEffect(() => console.log("MemoChild. componentDidMount"), []);
console.log("MemoChild, function render");
return memo;
},
() => false
);
function Parent() {
let [show, setShow] = useState(true);
console.log("Parent, function render");
useEffect(() => console.log("Parent. componentDidMount"), []);
useEffect(() => () => console.log("Parent. componentWillUnmount"), []);
useEffect(() => console.log("Parent. show updated"), [show]);
return (
{show ? (
) : (
);
}Child.tsx
Child.tsx使用的是ReactComponent写法
import React from "react";
interface countProp { count2: number;}
interface testState { count: number;}
class Child extends React.Component {
static getDerivedStateFromProps(props: countProp, _state: testState) {
console.log("Child. getDerivedStateFromProps");
return {
count: props.count2,
};
}
constructor(props: countProp) {
super(props);
this.state = {
count: 0,
};
console.log("Child. constructor");
}
componentDidMount() {
this.setState({
count: this.state.count + 123,
});
console.log("Child. componentDidMount");
}
shouldComponentUpdate() {
console.log("Child. shouldComponentUpdate");
return true;
}
getSnapshotBeforeUpdate() {
console.log("Child. getSnapshotBeforeUpdate");
return null;
}
componentDidUpdate(props: any, state: any, snapshot: any) {
console.log("Child. componentDidUpdate");
console.log("snapshot:", snapshot);
}
componentWillUnmount() {
clearInterval(this.timerID);
console.log("Child. componentWillUnmount");
}
render() {
const { children } = this.props;
const { count } = this.state;
console.log("Child. render");
return (
<>
- state: {count}
{children}
);
}
} 顺序
上面渲染到挂载代码打印的顺序
 Parent, function render
 Child. constructor
 Child. getDerivedStateFromProps
 Child. render
 MemoChild, function render
 Child. componentDidMount
 MemoChild. componentDidMount
 Parent. componentDidMount
 Parent. show updated
在Child.tsx中componentDidMount周期中使用到setData, 打印
 Child. getDerivedStateFromProps
 Child. shouldComponentUpdate
 Child. render
 Child. getSnapshotBeforeUpdate
 Child. componentDidUpdate
 snapshot: null
当我们点击parent的按钮, 隐藏Child.tsx, 打印
Parent, function render
MemoChild, function render
Child. componentWillUnmount
Parent. show updated
React总结
组件到挂载期间, 先完成
Parent function > Child(constructor->getDerivedStateFromProps->render) > MemoChild function > componentDidMount (Child->MemoChild->Parent)
通过上面的顺序可以发现, React的周期是按照子组件顺序挂载后, 才挂载Parent
- ==render== 以及 ==render== 之前的生命周期,则 父组件先执行
- ==render== 以及 ==render==之后的声明周期,则子组件先执行,并且是与父组件交替执行
Vue
生命周期图
生命周期API
beforeCreate -> 使用 setup()
created -> 使用 setup()
beforeMount -> onBeforeMount
mounted -> onMounted
beforeUpdate -> onBeforeUpdate
updated -> onUpdated
beforeUnmount -> onBeforeUnmount
unmounted -> onUnmounted
errorCaptured -> onErrorCaptured
renderTracked -> onRenderTracked
renderTriggered -> onRenderTriggered
activated -> onActivated
deactivated -> onDeactivated
onRenderTracked 和 onRenderTriggered
其中新增了两个onRenderTracked 和onRenderTriggered. 提供调试使用
- onRenderTracked(状态跟踪), 当组件第一次渲染时, 我们设置响应值(a)的时候, 并且get(比如html中的 {{a}})获取时触发
onRenderTriggered(状态触发), 改变响应值触发
event 对象属性
- newValue 更新后变量的值
- oldValue 更新前变量的值
target 目前页面中的响应变量和函数
生命周期API
| Col1 | Col2 |
|---|---|
| setup | 在实例初始化之后、挂载之前, 无法获取到dom节点。 |
| beforeMount | 在挂载开始之前被调用:相关的render函数首次被调用 |
| mounted | 在实例挂载完成后被调用,这时候传递给 app.mount 的元素已经被新创建的 vm.$el 替换了 |
| beforeUpdate | 在数据发生改变后,DOM 被更新之前被调用。 |
| updated | 在数据更改导致的虚拟 DOM 重新渲染和更新完毕之后被调用。 |
| activated | 被 keep-alive 缓存的组件激活时调用。即页面显示在屏幕上时 |
| deactivated | deactivated |
| beforeUnmount | 在卸载组件实例之前调用。在这个阶段,实例仍然是完全正常的。 |
| unmounted | 卸载组件实例后调用。 |
| errorCaptured | 在捕获一个来自后代组件的错误时被调用。 |
| renderTracked | 跟踪虚拟 DOM 重新渲染时调用。 |
| renderTriggered | 当虚拟 DOM 重新渲染被触发时调用。 |
父子周期顺序
Parent.vue
{{ count }}
Child.vue
Child {{ count }}
顺序
Parent setup
Parent onRenderTracked {effect: ReactiveEffect, target: RefImpl, type: 'get', key: 'value'}
Parent onRenderTracked {effect: ReactiveEffect, target: RefImpl, type: 'get', key: 'value'}
Child setup
Child onRenderTracked {effect: ReactiveEffect, target: RefImpl, type: 'get', key: 'value'}
Child onMounted
Child onRenderTriggered {effect: ReactiveEffect, target: RefImpl, type: 'set', key: 'value', newValue: 1}
Parent onMounted
Parent onRenderTriggered {effect: ReactiveEffect, target: RefImpl, type: 'set', key: 'value', newValue: 1}
Child onActivated
Parent onActivated
Parent onUpdated
Child updated
vue生命周期总结
Parent setup > Child setup > Child onMounted > Parent onMounted > Child onActivated > Parent onActivated
onActivated更像$nextTick, 所有子组件挂载后才进行, vue 与 react 相似, 都是挂载前父子顺序, 挂载中 则是 子父顺序

