入门GAN实战---生成MNIST手写数据集代码实现pytorch
基础GAN的原理还不懂的,先看:生成式对抗神经网络(GAN)原理给你讲的明明白白
一、加载数据
# 数据归一化
transform = transforms.Compose([
    transforms.ToTensor(),
    transforms.Normalize(0.5, 0.5)
])
# 加载内置数据
train_ds = torchvision.datasets.MNIST('data',   # 当前目录下的data文件夹
                                     train=True,  # train数据
                                     transform=transform,
                                     download=True)

dataloader = torch.utils.data.DataLoader(train_ds, batch_size=64, shuffle=True)- 没有下载过MNIST数据集的直接用上面的代码,会自动下载,下载速度看人品~~~~~
- 有MNIST数据集的,把数据文件放在程序目录下,代码中的‘data’更改为你的文件名,download改为False
- 自行数据下载地址:https://download.csdn.net/download/m0_62128864/85045154?spm=1001.2014.3001.5501
二、创建生成器
# 定义生成器
# 输入是长度为100的噪声(正态分布随机数)
class Generator(nn.Module):
    def __init__(self):
        super(Generator, self).__init__()
        self.gen = nn.Sequential(nn.Linear(100, 256),
                                 nn.ReLU(),
                                 nn.Linear(256, 512),
                                 nn.ReLU(),
                                 nn.Linear(512, 28 * 28),
                                 nn.Tanh()
                                 )


     # 定义前向传播 x表示长度为100的noise输入
    def forward(self, x):
        img = self.gen(x)
        img = img.view(-1, 28, 28)
        return img
输入是长度为100的噪声,由于mnist数据集的手写数字图片是1*28*28,所以生成28*28的图片
linear 1: 100---->256 2:256----->521 3:512----->28*28
三、创建鉴别器
# 定义判别器
# 输入为(1,28,28)的图片 输出为二分类的概率值,使用sigmoid激活
# BCEloss 计算交叉熵损失
# 判别器中推荐使用LeakyReLU
class Discriminator(nn.Module):
    def __init__(self):
        super(Discriminator,self).__init__()
        self.disc = nn.Sequential(nn.Linear(28*28, 512),
                                 nn.LeakyReLU(),
                                 nn.Linear(512, 256),
                                 nn.LeakyReLU(),
                                 nn.Linear(256, 1),
                                 nn.Sigmoid()
        )
    def forward(self, x):
        x = x.view(-1, 28*28)
        x = self.disc(x)
        return x
四、初始化模型
# 初始化模型
device = 'cuda' if torch.cuda.is_available() else 'cpu'
gen = Generator().to(device)
dis = Discriminator().to(device)
五、训练模型,计算损失
# 开始训练
D_loss = []
G_loss = []
# 训练循环
for epoch in range(50):
    d_epoch_loss = 0
    g_epoch_loss = 0
    batch_count = len(dataloader)
    # 对全部的数据集做一次迭代
    for step, (img, _) in enumerate(dataloader):
        img = img.to(device)
        size = img.size(0)
        random_noise = torch.randn(size, 100, device=device)

        d_optim.zero_grad()  # 将上述步骤的梯度归零
        real_output = dis(img)  # 对判别器输入真实的图片,real_output是对真实图片的预测结果
        d_real_loss = loss_function(real_output,
                                    torch.ones_like(real_output)
                                    )
        d_real_loss.backward() #求解梯度

        # 得到判别器在生成图像上的损失
        gen_img = gen(random_noise)
        fake_output = dis(gen_img.detach())  #
        d_fake_loss = loss_function(fake_output,
                                    torch.zeros_like(fake_output))
        d_fake_loss.backward()

        d_loss = d_real_loss + d_fake_loss
        d_optim.step()  # 优化

        # 得到生成器的损失
        g_optim.zero_grad()
        fake_output = dis(gen_img)
        g_loss = loss_function(fake_output,
                               torch.ones_like(fake_output))
        g_loss.backward()
        g_optim.step()
鉴别器和生成器的损失各是什么?
- 能否正确区分生成的图片和真实的图片将作为鉴别器的损失
- 能否生成近似真实的图片并使得鉴别器判别为真将作为生成器的损失
六、完整代码
import torch
import torch.nn as nn
import torch.nn.functional as F
import torch.optim as optim
import numpy as np
import matplotlib.pyplot as plt
import torchvision
from torchvision import transforms

transform = transforms.Compose([
    transforms.ToTensor(),
    transforms.Normalize(0.5, 0.5)
])
# 加载内置数据  做生成只需要图片就行,不需要标签 也不需要测试数据集
train_ds = torchvision.datasets.MNIST('data',   # 当前目录下的data文件夹
                                     train=True,  # train数据
                                     transform=transform,
                                     download=True)

dataloader = torch.utils.data.DataLoader(train_ds, batch_size=64, shuffle=True)


# 定义生成器
# 输入是长度为100的噪声
class Generator(nn.Module):
    def __init__(self):
        super(Generator, self).__init__()
        self.gen = nn.Sequential(nn.Linear(100, 256),  # 输入长度为100
                                 nn.ReLU(),
                                 nn.Linear(256, 512),
                                 nn.ReLU(),
                                 nn.Linear(512, 28 * 28),
                                 nn.Tanh()
                                 )

    def forward(self, x):  # 定义前向传播 x表示长度为100的noise输入
        img = self.gen(x)
        img = img.view(-1, 28, 28)
        return img

# 定义判别器
# 输入为(1,28,28)的图片 输出为二分类的概率值,使用sigmoid激活
# BCEloss 计算交叉熵损失
# 判别器中推荐使用LeakyReLU
class Discriminator(nn.Module):
    def __init__(self):
        super(Discriminator,self).__init__()
        self.disc = nn.Sequential(nn.Linear(28*28, 512),
                                 nn.LeakyReLU(),
                                 nn.Linear(512, 256),
                                 nn.LeakyReLU(),
                                 nn.Linear(256, 1),
                                 nn.Sigmoid()
        )
    def forward(self, x):
        x = x.view(-1, 28*28)
        x = self.disc(x)
        return x

# 初始化模型
device = 'cuda' if torch.cuda.is_available() else 'cpu'
gen = Generator().to(device)
dis = Discriminator().to(device)

# 定义优化器
d_optim = torch.optim.Adam(dis.parameters(), lr=0.0001)
g_optim = torch.optim.Adam(gen.parameters(), lr=0.0001)

# 损失计算函数
loss_function = torch.nn.BCELoss()

# 绘图函数
def gen_img_plot(model, test_input):
    prediction = np.squeeze(model(test_input).detach().cpu().numpy())
    fig = plt.figure(figsize=(4,4))
    for i in range(16):
        plt.subplot(4, 4, i+1)
        plt.imshow((prediction[i] + 1)/2)  # 由于tanh是在-1 1 之间 要恢复道0 1 之间
        plt.axis("off")
    plt.show()
test_input =torch.randn(16, 100, device=device)

# 开始训练
D_loss = []
G_loss = []
# 训练循环
for epoch in range(50):
    d_epoch_loss = 0
    g_epoch_loss = 0
    batch_count = len(dataloader.dataset)
    # 对全部的数据集做一次迭代
    for step, (img, _) in enumerate(dataloader):
        img = img.to(device)  # 上传到设备上
        size = img.size(0)    # 返回img的第一维的大小

        random_noise = torch.randn(size, 100, device=device)

        d_optim.zero_grad()  # 将上述步骤的梯度归零
        real_output = dis(img)  # 对判别器输入真实的图片,real_output是对真实图片的预测结果
        d_real_loss = loss_function(real_output,
                                    torch.ones_like(real_output)
                                    )
        d_real_loss.backward() #求解梯度

        # 得到判别器在生成图像上的损失
        gen_img = gen(random_noise)
        fake_output = dis(gen_img.detach())  # 判别器输入生成的图片,对生成图片的预测结果
        d_fake_loss = loss_function(fake_output,
                                    torch.zeros_like(fake_output))
        d_fake_loss.backward()

        d_loss = d_real_loss + d_fake_loss
        d_optim.step()  # 优化

        # 得到生成器的损失
        g_optim.zero_grad()
        fake_output = dis(gen_img)
        g_loss = loss_function(fake_output,
                               torch.ones_like(fake_output))
        g_loss.backward()
        g_optim.step()

        with torch.no_grad():
            d_epoch_loss += d_loss
            g_epoch_loss += g_loss
    with torch.no_grad():
        d_epoch_loss /= batch_count
        g_epoch_loss /= batch_count
        D_loss.append(d_epoch_loss)
        G_loss.append(g_epoch_loss)
        print('Epoch:', epoch)
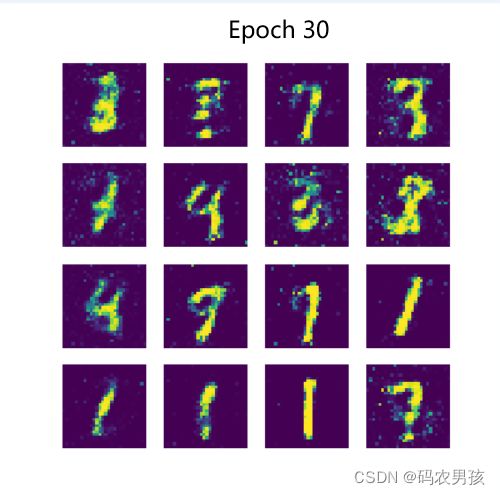
        gen_img_plot(gen, test_input)
