ORBSLAM2在ubuntu20.04上运行,实时单目摄像头(适用高版本的PCL,OpenCV4.2.0等)
在ubuntu20.04系统上利用高版本的OpenCV4.2.0,PCL1.10.0等库搭建ORBSLAM2
前言:
ORBSLAM2是一个众所周知的非常优秀的开源项目,但搭建原始的ORBSLAM2需要较旧版本的PCL,Boost,VTK 等库,如果库版本稍微高一点,编译项目可能就会失败,比如在较高版本的系统环境中,例如ubuntu20.04, OpenCV4.2.0等,这是最烦的地方。同时新版本比较有用的功能就无法使用了,例如OpenCV4.1.0版本以上可以利用CUDA加速来实现特征提取,这是个非常不错的功能,应用到SLAM 项目中可以大大加快运行速度。另外如果需要用到摄像头来实时测试时,还需要配合ROS使用,当然如果是干工程的话推荐ROS来做。本文就是一个简单的对高翔博士ORBSLAM2代码的一些修改和添加,能够运行简单的实时单目摄像头(不需要启动ROS)。
高翔修改后的源代码:
https://github.com/gaoxiang12/ORBSLAM2_with_pointcloud_map.git
修改后的代码(百度云分享,下载该代码即可,上述是最原始的地址):
https://pan.baidu.com/s/1xAwmRWc1eUyoZtgFflY20Q
提取码:2fqj
Github地址:
https://github.com/zouyuelin/ORB_SLAM2_Changed
搭建系统:ubuntu20.04
步骤一:安装ROS
ROS集成了很多SLAM所需的库,在ubuntu20.04的系统上,ROS-Noetic集成了较高版本的库,如OpenCV4.2.0,PCL-1.10.0,以及高版本的Boost、Egien3等,所以只要安装该版本操作系统下的ros,就不需要自己过于麻烦的安装各种库,费时费力甚至还会出现很多错误。下面介绍如何安装ROS:
1、添加 sources.list
sudo sh -c 'echo "deb http://packages.ros.org/ros/ubuntu $(lsb_release -sc) main" > /etc/apt/sources.list.d/ros-latest.list'
2、添加 keys密匙
sudo apt-key adv --keyserver 'hkp://keyserver.ubuntu.com:80' --recv-key C1CF6E31E6BADE8868B172B4F42ED6FBAB17C654
3.更新
sudo apt-get update
4.安装ROS:
sudo apt install ros-noetic-desktop-full
5.配置环境:
echo "source /opt/ros/noetic/setup.bash" >> ~/.bashrc
source ~/.bashrc
步骤二:降低gcc版本(非必须)
查看内核版本:
uname -a
查看操作系统:
lsb_release -a
查看gcc版本:
gcc -v
g++ -v
安装
sudo apt-get install gcc-7 gcc-7-base g++-7
软连接:
sudo ln -s /usr/bin/gcc-7 /usr/bin/gcc
sudo ln -s /usr/bin/g++-7 /usr/bin/g++
再次查看:
gcc -v
g++ -v
步骤三:编译下载的代码(ORBSLAM2_with_pointcloud_map.tar.gz)
解压:
tar xf ORBSLAM2_with_pointcloud_map.tar.gz
进入文件夹,得到两个文件
g2o_with_orbslam2
ORB_SLAM2_opencv4.3

3.1 安装pangolin(如果已安装可以忽略)
git clone https://codechina.csdn.net/mirrors/stevenlovegrove/pangolin.git
cd Pangolin
mkdir build
cd build
cmake -DCPP11_NO_BOOST=1 ..
make -j
sudo make install
Pangolin编译安装出现错误请参考:
https://blog.csdn.net/W_Liur/article/details/80447938?utm_medium=distribute.pc_relevant.none-task-blog-BlogCommendFromMachineLearnPai2-1.control&depth_1-utm_source=distribute.pc_relevant.none-task-blog-BlogCommendFromMachineLearnPai2-1.control
3.2 编译高翔修改的g2o库(可利用VTK构建保存地图—单目无效)
进入文件夹:
cd g2o_with_orbslam2/
cd build/
cmake ..
make -j8
sudo make install

3.3 编译ORBSLAM2
首先编译DBoW,得到
libDBoW2.so
否则编译ORBSLAM2会报错
cd ORB_SLAM2_opencv4.3/Thirdparty/DBoW2/build
cmake ..
make -j8

编译ORBSLAM:
cd ORB_SLAM2_opencv4.3/build
cmake ..
make -j8
编译完成:

步骤四:相机标定(快速标定,利用python-opencv)
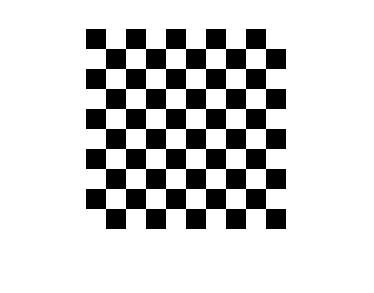
利用这张照片(可以打印在A4纸上)拍摄20张左右的照片

python cameraCalib.py
# -*- coding: utf-8 -*-
import cv2
import numpy as np
import glob

# 设置寻找亚像素角点的参数,采用的停止准则是最大循环次数30和最大误差容限0.001
criteria = (cv2.TERM_CRITERIA_MAX_ITER | cv2.TERM_CRITERIA_EPS, 30, 0.001)

# 获取标定板角点的位置
objp = np.zeros((9 * 9, 3), np.float32)
objp[:, :2] = np.mgrid[0:9, 0:9].T.reshape(-1, 2)  # 将世界坐标系建在标定板上,所有点的Z坐标全部为0,所以只需要赋值x和y

obj_points = []  # 存储3D点
img_points = []  # 存储2D点
size = []        # 图像size

images = glob.glob("*.jpg")
i=0;
for fname in images:
    img = cv2.imread(fname)
    gray = cv2.cvtColor(img, cv2.COLOR_BGR2GRAY)
    size = gray.shape[::-1]
    ret, corners = cv2.findChessboardCorners(gray, (9, 9), None)
    #print(corners)

    if ret:

        obj_points.append(objp)

        corners2 = cv2.cornerSubPix(gray, corners, (11, 11), (-1, -1), criteria)  # 在原角点的基础上寻找亚像素角点
        #print(corners2)
        if [corners2]:
            img_points.append(corners2)
        else:
            img_points.append(corners)
        img = cv2.drawChessboardCorners(img,(9,9),corners2,ret)
        cv2.imshow('img',img)
        cv2.waitKey(500)

cv2.destroyAllWindows()

print(len(img_points))
cv2.destroyAllWindows()

# 标定
#ret, mtx, dist, rvecs, tvecs = cv2.calibrateCamera(obj_points, img_points, size, None, None, cv2.CALIB_ZERO_TANGENT_DIST)
ret, mtx, dist, rvecs, tvecs = cv2.calibrateCamera(obj_points, img_points, size, None, None)
print("ret:", ret)
print("mtx:\n", mtx) # 内参数矩阵
print("dist:\n", dist)  # 畸变系数   distortion cofficients = (k_1,k_2,p_1,p_2,k_3)
print("rvecs:\n", rvecs)  # 旋转向量  # 外参数
print("tvecs:\n", tvecs ) # 平移向量  # 外参数

print("------------------------图像校正-----------------------")

# img = cv2.imread(images[2])
# h, w = img.shape[:2]
# newcameramtx, roi = cv2.getOptimalNewCameraMatrix(mtx,dist,(w,h),1,(w,h))#显示更大范围的图片(正常重映射之后会删掉一部分图像)
# print (newcameramtx)
# print("------------------使用undistort函数-------------------")
# dst = cv2.undistort(img,mtx,dist,None,newcameramtx)
# x,y,w,h = roi
# dst1 = dst[y:y+h,x:x+w]
# cv2.imwrite('calibresult3.jpg', dst1)
# print ("方法一:dst的大小为:", dst1.shape)
得到参数矩阵和畸变参数:

-----------------根据得到的数据--------------------
设置Examples/Monocular/camera1.yaml文件:
%YAML:1.0

#--------------------------------------------------------------------------------------------
# Camera Parameters. Adjust them!
#--------------------------------------------------------------------------------------------

# Camera calibration and distortion parameters (OpenCV)
Camera.fx: 1145.74789
Camera.fy: 1145.01335
Camera.cx: 282.76821
Camera.cy: 251.34913

Camera.k1: -0.19136779
Camera.k2: -0.13956057
Camera.p1: 0.00169598
Camera.p2: 0.00283348
Camera.k3: 0.02942093

# Camera frames per second
Camera.fps: 30.0

# Color order of the images (0: BGR, 1: RGB. It is ignored if images are grayscale)
Camera.RGB: 1

#--------------------------------------------------------------------------------------------
# ORB Parameters
#--------------------------------------------------------------------------------------------

# ORB Extractor: Number of features per image
ORBextractor.nFeatures: 1000

# ORB Extractor: Scale factor between levels in the scale pyramid
ORBextractor.scaleFactor: 1.2

# ORB Extractor: Number of levels in the scale pyramid
ORBextractor.nLevels: 8

# ORB Extractor: Fast threshold
# Image is divided in a grid. At each cell FAST are extracted imposing a minimum response.
# Firstly we impose iniThFAST. If no corners are detected we impose a lower value minThFAST
# You can lower these values if your images have low contrast
ORBextractor.iniThFAST: 20
ORBextractor.minThFAST: 7

#--------------------------------------------------------------------------------------------
# Viewer Parameters
#--------------------------------------------------------------------------------------------
Viewer.KeyFrameSize: 0.05
Viewer.KeyFrameLineWidth: 1
Viewer.GraphLineWidth: 0.9
Viewer.PointSize: 2
Viewer.CameraSize: 0.08
Viewer.CameraLineWidth: 3
Viewer.ViewpointX: 0
Viewer.ViewpointY: -0.7
Viewer.ViewpointZ: -1.8
Viewer.ViewpointF: 500

#--------------------------------------------------------------------------------------------
# PointClout Mapping
#--------------------------------------------------------------------------------------------
PointCloudMapping.Resolution: 0.9
步骤五:运行测试
运行:(先cd到ORB_SLAM2_opencv4.3/文件夹下)
在运行这一步之前,你需要将自己的单目相机标定,并修改 Examples/Monocular/camera1.yaml的文件
cd ORB_SLAM2_opencv4.3/
1.利用自己的相机运行(单目没有弄建图,特征点太稀疏了):
./Examples/Monocular/mono_camera Vocabulary/ORBvoc.txt Examples/Monocular/camera1.yaml
./Examples/Monocular/mono_tum Vocabulary/ORBvoc.txt Examples/Monocular/TUM1.yaml ~/dataset/rgbd_dataset_freiburg1_desk/
运行结果:
3.利用数据集运行(RGB-D):
./Examples/RGB-D/rgbd_tum ./Vocabulary/ORBvoc.txt ./Examples/RGB-D/TUM1.yaml ~/dataset/rgbd_dataset_freiburg1_desk/ ~/dataset/rgbd_dataset_freiburg1_desk/associate.txt
运行结果:
增加的代码剖析:
整个ORBSLAM2是一种模块化的思想,是可以直接上项目测试和使用的;
我们将预处理后的实时图像传递给ORB_SLAM2的实例对象SLAM即可
SLAM.TrackMonocular(im,tframe);
#include整个代码还有很大的优化空间。
参考文献:
中文注释:
https://github.com//PaoPaoRobot/ORB_SLAM2/tree/master/src


