本次作业,你将尝试如何对一张图像去畸变,得到畸变前的图像。
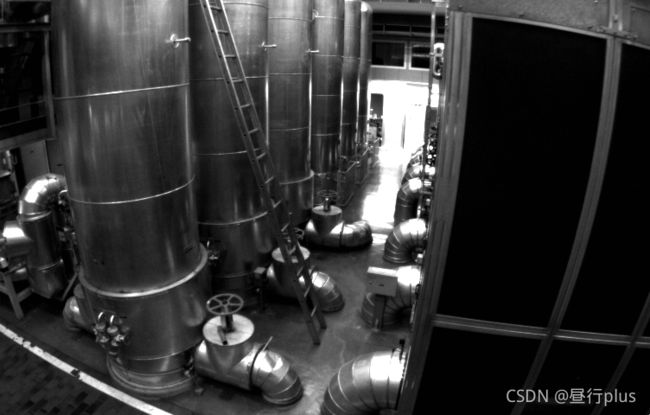
图1: 测试图像
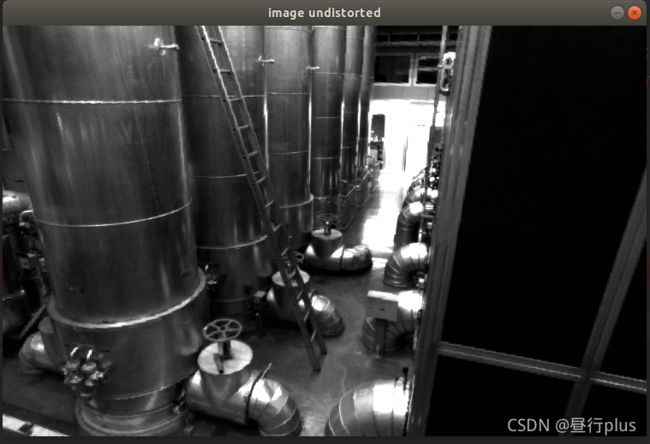
图1 是本次习题的测试图像(code/test.png),来自EuRoC 数据集。可以明显看到实际的柱子、箱子的直线边缘在图像中被扭曲成了曲线。这就是由相机畸变造成的。根据我们在课上的介绍,畸变前后的坐标变换为:
其中x; y 为去畸变后的坐标,xdistorted; ydistroted 为去畸变前的坐标。现给定参数:
以及相机内参
请根据undistort_image.cpp 文件中内容,完成对该图像的去畸变操作。
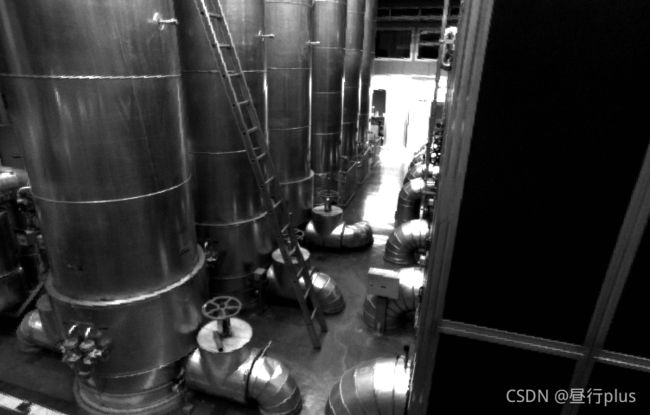
注:本题不要使用OpenCV 自带的去畸变函数,你需要自己理解去畸变的过程。我给你准备的程序中已经有了基本的提示。作为验证,去畸变后图像如图2 所示。如你所见,直线应该是直的。
undistortImage.cpp
//
// Created by daybeha on 23/10/2021.
//
#include
#include
using namespace std;
using namespace cv;
string image_file = "PA4/test.png"; // 请确保路径正确
int main(int argc, char **argv) {
// 本程序需要你自己实现去畸变部分的代码。尽管我们可以调用OpenCV的去畸变,但自己实现一遍有助于理解。
// 畸变参数
double k1 = -0.28340811, k2 = 0.07395907, p1 = 0.00019359, p2 = 1.76187114e-05;
// 内参
double fx = 458.654, fy = 457.296, cx = 367.215, cy = 248.375;
cv::Mat image = cv::imread(image_file, IMREAD_GRAYSCALE); // 图像是灰度图,CV_8UC1
// cv::imshow("img", image);
// cv::waitKey(0);
int rows = image.rows, cols = image.cols;
cv::Mat image_undistort = cv::Mat(rows, cols, CV_8UC1); // 去畸变以后的图
// 计算去畸变后图像的内容
for (int v = 0; v < rows; v++)
for (int u = 0; u < cols; u++) {
// TODO 按照公式,计算点(u,v)对应到畸变图像中的坐标(u_distorted, v_distorted) (~6 lines)
// start your code here
//根据相机内参反算归一化坐标
double x = (u - cx)/fx, y =(v - cy)/fy;
//根据畸变公式计算畸变图像的对应坐标
double r = sqrt(x*x + y*y);
double x_distorted = x*(1 + k1*r*r + k2*pow(r, 4)) + 2*p1*x*y + p2*(r*r + 2*x*x);
double y_distorted = y*(1 + k1*r*r + k2*pow(r, 4)) + p1*(r*r + 2*y*y) + 2*p2*x*y;
double u_distorted = x_distorted * fx + cx;
double v_distorted = y_distorted * fy + cy;
// end your code here
// 赋值 (最近邻插值)
if (u_distorted >= 0 && v_distorted >= 0 && u_distorted < cols && v_distorted < rows) {
image_undistort.at<uchar>(v, u) = image.at<uchar>((int) v_distorted, (int) u_distorted);
} else {
image_undistort.at<uchar>(v, u) = 0;
}
}
// 画图去畸变后图像
cv::imshow("image undistorted", image_undistort);
cv::imshow("image distorted", image);
cv::waitKey(0);
return 0;
}
本题,你需要根据视差计算深度,进而生成点云数据。本题的数据来自Kitti 数据集。
Kitti 中的相机部分使用了一个双目模型。双目采集到左图和右图,然后我们可以通过左右视图恢复出深度。经典双目恢复深度的算法有BM(Block Matching), SGBM(Semi-Global Block Matching)等,但本题不探讨立体视觉内容(那是一个大问题)。我们假设双目计算的视差已经给定,请你根据双目模型,画出图像对应的点云,并显示到Pangolin 中。
理论部分:
1. 推导双目相机模型下,视差与 XYZ 坐标的关系式。请给出由像素坐标加视差u, v, d 推导XY Z与已知XY Z 推导u, v, d 两个关系。
①视差 d 与 XYZ 坐标的关系:
如上图, P L , P R P_L, P_R PL,PR 分别为路标点P在左右相机的投影点, O L , O R O_L, O_R OL,OR分别为左右相机的光圈中心。则 d = u L − u R d = u_L - u_R d=uL−uR
注:按图中定义, u R u_R uR 应为负数。
②像素坐标加视差u, v, d 推导 XYZ:
首先深度 z = f b d z = \frac{fb}{d} z=dfb
相机内参矩阵为K
则 x = u − c x f x z y = v − c y f y z x = \frac{u - c_x}{f_x}z\\y = \frac{v - c_y}{f_y}z x=fxu−cxzy=fyv−cyz
③ XY Z 推导u, v, d:
依旧是相机内参矩阵为K
d = f b z u = f x ∗ x z + c x v = f y ∗ y z + c y d = \frac{fb}{z}\\u = f_x*\frac{x}{z}+c_x\\v = f_y *\frac{y}{z} +c_y d=zfbu=fx∗zx+cxv=fy∗zy+cy
2. 推导在右目相机下该模型将发生什么改变。
个人理解是以 O R O_R OR 为坐标原点,此时 依旧是 u R u_R uR 应为负数。视差 d = u L − u R d = u_L - u_R d=uL−uR不变;
后两问只需保证内参矩阵K与所用相机对应,不在乎使用的是左目还是右目,因此亦不变。
编程部分:
本题给定的左右图见code/left.png 和 code/right.png,视差图亦给定,见code/right.png。双目的参数如下:
且双目左右间距(即基线)为:
请根据以上参数,计算相机数据对应的点云,并显示到Pangolin 中。程序请参考code/disparity.cpp 文件。
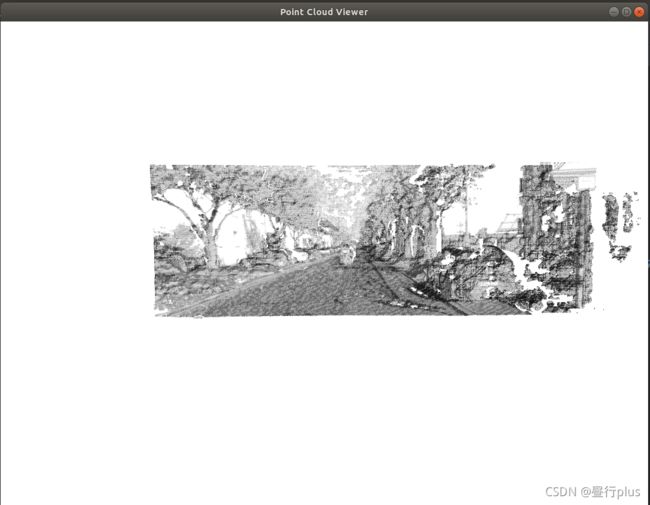
作为验证,生成点云应如图4 所示
disparity.cpp
//
// Created by daybeha on 23/10/2021.
//
#include
#include
#include
#include
#include
using namespace std;
using namespace Eigen;
using namespace cv;
// 文件路径,如果不对,请调整
string left_file = "./left.png";
string right_file = "./right.png";
string disparity_file = "./disparity.png";
// 在panglin中画图,已写好,无需调整
void showPointCloud(const vector<Vector4d, Eigen::aligned_allocator<Vector4d>> &pointcloud);
int main(int argc, char **argv) {
// 内参
double fx = 718.856, fy = 718.856, cx = 607.1928, cy = 185.2157;
// 间距
double b = 0.573;
// 读取图像
cv::Mat left = cv::imread(left_file, IMREAD_GRAYSCALE);
cv::Mat right = cv::imread(right_file, IMREAD_GRAYSCALE);
cv::Mat disparity = cv::imread(disparity_file, IMREAD_GRAYSCALE); // disparty 为CV_8U,单位为像素
// 生成点云
vector<Vector4d, Eigen::aligned_allocator<Vector4d>> pointcloud;
// TODO 根据双目模型计算点云
// 如果你的机器慢,请把后面的v++和u++改成v+=2, u+=2
for (int v = 0; v < left.rows; v++)
for (int u = 0; u < left.cols; u++) {
Vector4d point(0, 0, 0, left.at<uchar>(v, u) / 255.0); // 前三维为xyz,第四维为灰度值
// start your code here (~6 lines)
// 根据双目模型计算 point 的位置
double x = (u - cx) / fx;
double y = (v - cy) / fy;
double depth = fx * b / (disparity.at<uchar>(v, u));
point[0] = x * depth;
point[1] = y * depth;
point[2] = depth;
pointcloud.push_back(point);
// end your code here
}
// 画出点云
showPointCloud(pointcloud);
return 0;
}
void showPointCloud(const vector<Vector4d, Eigen::aligned_allocator<Vector4d>> &pointcloud) {
if (pointcloud.empty()) {
cerr << "Point cloud is empty!" << endl;
return;
}
pangolin::CreateWindowAndBind("Point Cloud Viewer", 1024, 768);
glEnable(GL_DEPTH_TEST);
glEnable(GL_BLEND);
glBlendFunc(GL_SRC_ALPHA, GL_ONE_MINUS_SRC_ALPHA);
pangolin::OpenGlRenderState s_cam(
pangolin::ProjectionMatrix(1024, 768, 500, 500, 512, 389, 0.1, 1000),
pangolin::ModelViewLookAt(0, -0.1, -1.8, 0, 0, 0, 0.0, -1.0, 0.0)
);
pangolin::View &d_cam = pangolin::CreateDisplay()
.SetBounds(0.0, 1.0, pangolin::Attach::Pix(175), 1.0, -1024.0f / 768.0f)
.SetHandler(new pangolin::Handler3D(s_cam));
while (!pangolin::ShouldQuit()) {
glClear(GL_COLOR_BUFFER_BIT | GL_DEPTH_BUFFER_BIT);
d_cam.Activate(s_cam);
glClearColor(1.0f, 1.0f, 1.0f, 1.0f);
glPointSize(2);
glBegin(GL_POINTS);
for (auto &p: pointcloud) {
glColor3f(p[3], p[3], p[3]);
glVertex3d(p[0], p[1], p[2]);
}
glEnd();
pangolin::FinishFrame();
usleep(5000); // sleep 5 ms
}
}
double depth = fx * d / (disparity.at<uchar>(v, u));
因为disparty 为CV_8U,即uchar类型,所以该句中disparity.at(v, u)的类型也一定是uchar
如果你按书上或者GitHub中高翔老师slambook2的代码写成float, 则会有下面的运行结果:
改成double的话就更小:
不过如果选用课本《视觉SLAM十四讲》上的做法:
将直接读取的视差图:
cv::Mat disparity = cv::imread(disparity_file, 0); // disparty 为CV_8U,单位为像素
改为利用左右两图像计算,并且convertTo()第二个参数是CV_32F:
cv::Ptr<cv::StereoSGBM> sgbm = cv::StereoSGBM::create(
0, 96, 9, 8 * 9 * 9, 32 * 9 * 9, 1, 63, 10, 100, 32); // 神奇的参数
cv::Mat disparity_sgbm, disparity;
sgbm->compute(left, right, disparity_sgbm);
disparity_sgbm.convertTo(disparity, CV_32F, 1.0 / 16.0f);
则计算深度时使用的是
double depth = fx * d / (disparity.at<float>(v, u));
因为float
精度更高,所以会有下面更清晰的运行结果(虚拟机结果,双系统没有跑):
在优化中经常会遇到矩阵微分的问题。例如,当自变量为向量x,求标量函数u(x) 对x 的导数时,即为矩阵微分。通常线性代数教材不会深入探讨此事,这往往是矩阵论的内容。我在ppt/目录下为你准备了一份清华研究生课的矩阵论课件(仅矩阵微分部分)。阅读此ppt,回答下列问题:
矩阵微分的重要性质:
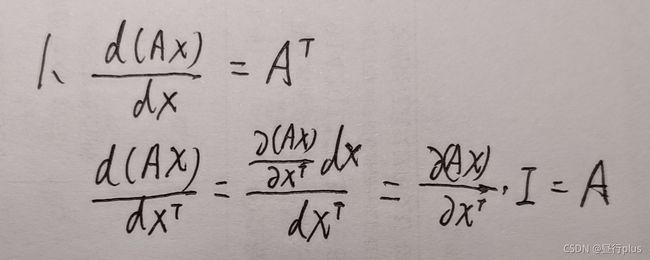
d ( A X ) d X = d ( ( A X ) T ) d X = d ( X T A T ) d X = A T \frac{d(AX)}{dX} = \frac{d((AX)^{T})}{dX} = \frac{d(X^{T}A^{T})}{dX}=A^{T} dXd(AX)=dXd((AX)T)=dXd(XTAT)=AT
本题中你需要自己实现一遍高斯牛顿的迭代过程,求解曲线的参数。设有曲线满足以下方程:
PLus 高斯牛顿法的问题:
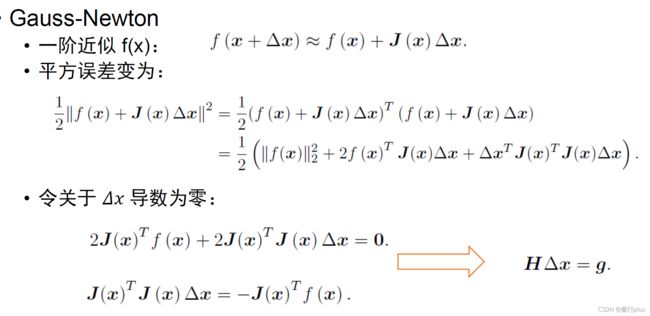
J J T JJ^{T} JJT可能为奇异矩阵或者病态(ill-condition)的情况,此时增量的稳定性较差,导致算法不收敛。
另外畸变假设H矩阵非奇异也非病态,若求出的步长 Δ x \Delta x Δx太大,也会导致采用的局部近似式 f ( x + Δ x ) ≈ f ( x ) + J ( x ) T Δ x f(x+\Delta x)\approx f(x) + J(x)^{T}\Delta x f(x+Δx)≈f(x)+J(x)TΔx 不准确,如此我们甚至无法保证它的迭代收敛,甚至可能另目标函数变大。
gaussnewton.cpp
//
// Created by daybeha on 2021/10/28.
//
#include
#include
#include
#include
using namespace std;
using namespace Eigen;
int main(int argc, char **argv) {
double ar = 1.0, br = 2.0, cr = 1.0; // 真实参数值
double ae = 2.0, be = -1.0, ce = 5.0; // 估计参数值
int N = 100; // 数据点
double w_sigma = 1.0; // 噪声Sigma值
cv::RNG rng; // OpenCV随机数产生器
vector<double> x_data, y_data; // 数据
for (int i = 0; i < N; i++) {
double x = i / 100.0;
x_data.push_back(x);
y_data.push_back(exp(ar*x*x + br*x + cr) + rng.gaussian(w_sigma) );
}
// 开始Gauss-Newton迭代
int iterations = 100; // 迭代次数
double cost = 0, lastCost = 0; // 本次迭代的cost和上一次迭代的cost
chrono::steady_clock::time_point t1 = chrono::steady_clock::now();
for (int iter = 0; iter < iterations; iter++) {
Matrix3d H = Matrix3d::Zero(); // Hessian = J^T J in Gauss-Newton
Vector3d b = Vector3d::Zero(); // bias
cost = 0;
for (int i = 0; i < N; i++) {
double xi = x_data[i], yi = y_data[i]; // 第i个数据点
// start your code here
double error; // 第i个数据点的计算误差
error = yi - exp(ae*xi*xi + be*xi + ce); // 填写计算error的表达式
Vector3d J; // 雅可比矩阵
J[0] = -xi*xi * exp(ae*xi*xi + be*xi + ce); // de/da
J[1] = -xi * exp(ae*xi*xi + be*xi + ce); // de/db
J[2] = -exp(ae*xi*xi + be*xi + ce); // de/dc
H += J * J.transpose(); // GN近似的H
b += -error * J;
// end your code here
cost += error * error;
}
// start your code here
// 求解线性方程 Hx=b,建议用ldlt
Vector3d dx = H.ldlt().solve(b);
// end your code here
if (isnan(dx[0])) {
cout << "result is nan!" << endl;
break;
}
if (iter > 0 && cost > lastCost) {
// 误差增长了,说明近似的不够好
cout << "cost: " << cost << ", last cost: " << lastCost << endl;
break;
}
// 更新abc估计值
// 注:此时a,b,c为变量!
ae += dx[0];
be += dx[1];
ce += dx[2];
lastCost = cost;
cout << "total cost: " << cost <<",\t\tupdate: " << dx.transpose()
<< "\t\testimated params: " << ae << "," << be << "," << ce << endl;
}
chrono::steady_clock::time_point t2 = chrono::steady_clock::now();
chrono::duration<double> time_used = chrono::duration_cast<chrono::duration<double> >(t2-t1);
cout<< "solve time cost = " << time_used.count() << " seconds. " << endl;
cout << "estimated abc = " << ae << ", " << be << ", " << ce << endl;
return 0;
}
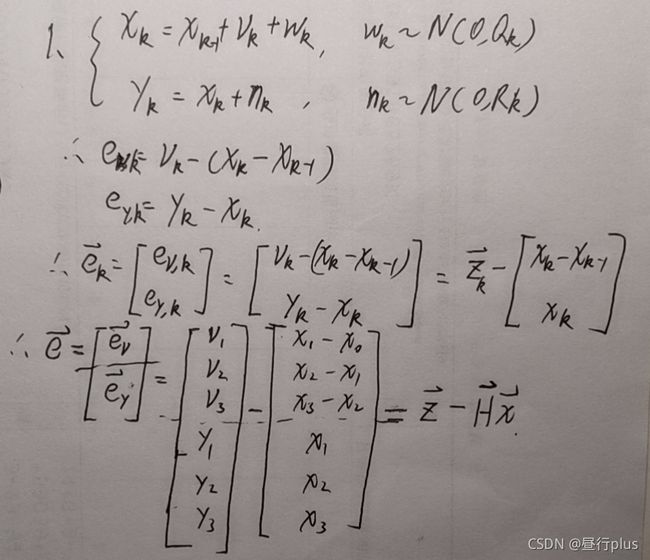
H = [ − 1 1 0 0 0 − 1 1 0 0 0 − 1 1 0 1 0 0 0 0 1 0 0 0 0 1 ] H = \begin{bmatrix} -1& 1 & 0 &0 \\ 0& -1 & 1& 0\\ 0& 0 & -1& 1\\ 0& 1 & 0& 0 \\ 0& 0 & 1& 0\\ 0& 0 & 0& 1 \end{bmatrix} H=⎣⎢⎢⎢⎢⎢⎢⎡−1000001−1010001−1010001001⎦⎥⎥⎥⎥⎥⎥⎤
注:十四讲里前三行“-1”和“1”的位置是反过来的,那个应该是个谬误
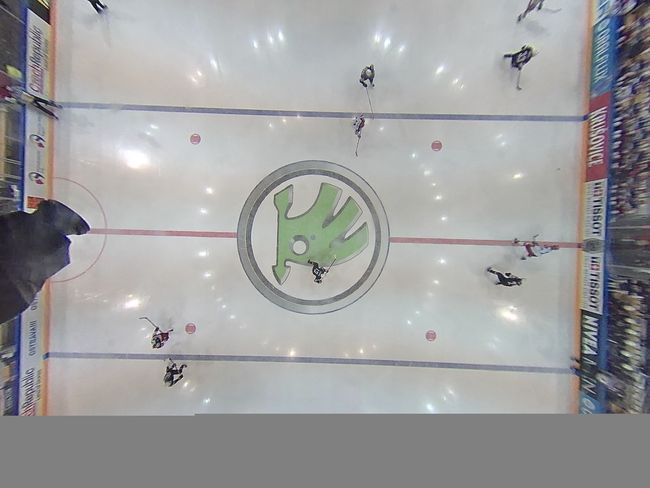
在很多视觉SLAM 的应用里,我们都会选择广角或鱼眼相机作为主要的视觉传感器。与针孔相机不同,鱼眼相机的视野往往可以在150°以上,甚至超过180°。普通的畸变模型在鱼眼相机下工作的并不好,幸好鱼眼相机有自己定义的畸变模型。
请参阅OpenCV Fisheye文档完成以下问题:
1. 请说明鱼眼相机相比于普通针孔相机在SLAM 方面的优势。
答:相比于普通针孔相机,鱼眼相机拥有更宽阔的视野。因此可以确保在一段时间里,尽可能多的视觉特征进入相机视野,从而提高对周围环境的感知能力。
2. 请整理并描述OpenCV 中使用的鱼眼畸变模型(等距投影)是如何定义的,它与上题的畸变模型有何不同。
定义:设P为世界坐标系中坐标X的3D点(存储在矩阵X中)。相机坐标系中P的坐标向量为: X c = R X + T = ( x , y , z ) Xc=RX+T = (x, y, z) Xc=RX+T=(x,y,z)。其中R是旋转矩阵,T是偏移向量;
P的针孔投影坐标为[a, b],其中
a = x z , b = y z r 2 = a 2 + b 2 θ = a t a n ( r ) a = \frac{x}{z} , b = \frac{y}{z} \\ r^2=a^2+b^2\\ θ=atan(r) a=zx,b=zyr2=a2+b2θ=atan(r)
鱼眼畸变模型:
θ d = θ ( 1 + k 1 θ 2 + k 2 θ 4 + k 3 θ 6 + k 4 θ 8 ) θ_d=θ(1+k_1θ^2+k_2θ^4+k_3θ^6+k_4θ^8) θd=θ(1+k1θ2+k2θ4+k3θ6+k4θ8)
记畸变后的点坐标为[x’, y’],其中
x ′ = ( θ d / r ) a , y ′ = ( θ d / r ) b x′=(θ_d/r)a, y′=(θ_d/r)b x′=(θd/r)a,y′=(θd/r)b
最后,转换为像素坐标[u, v], α \alpha α为偏度系数:
u = f x ( x ′ + α y ′ ) + c x , v = f y y ′ + c y u=f_x(x′+\alpha y′)+cx, v=f_yy′+cy u=fx(x′+αy′)+cx,v=fyy′+cy
不同:上题的畸变模型包括了径向和切向两种畸变。本题的鱼眼相机只给出了 θ d θ_d θd 一种畸变类型。
3. 完成fisheye.cpp 文件中的内容。针对给定的图像,实现它的畸变校正。要求:通过手写方式实现,不允许调用OpenCV 的API。
fisheye.cpp
//
// Created by daybeha on 2022/2/2.
//
#include
using namespace std;
using namespace cv;
// 文件路径,如果不对,请调整
std::string input_file = "./fisheye.jpg";
int main(int argc, char **argv) {
// 本程序实现鱼眼的等距投影去畸变模型
// 畸变参数(本例设为零)
double k1 = 0, k2 = 0, k3 = 0, k4 = 0;
// 内参
double fx = 689.21, fy = 690.48, cx = 1295.56, cy = 942.17;
cv::Mat image = cv::imread(input_file);
int rows = image.rows, cols = image.cols;
cv::Mat image_undistort = cv::Mat(rows, cols, CV_8UC3); // 去畸变以后的图
// 计算去畸变后图像的内容
for (int v = 0; v < rows; v++)
for (int u = 0; u < cols; u++) {
double u_distorted = 0, v_distorted = 0;
// TODO 按照公式,计算点(u,v)对应到畸变图像中的坐标(u_distorted,
// v_distorted) (~6 lines)
// start your code here
double a = ((u - cx)/fx)/1;
double b = ((v - cy)/fy)/1;
double r = sqrt(a*a + b*b);
double theta = atan(r);
double theta_d = theta*(1 + k1*pow(theta,2) + k2*pow(theta,4)
+ k3*pow(theta,6) + k4*pow(theta,8));
double x_distorted = (theta_d/r)*a;
double y_distorted = (theta_d/r)*b;
u_distorted = x_distorted*fx + cx;
v_distorted = y_distorted*fy + cy;
// end your code here
// 赋值 (最近邻插值)
if (u_distorted >= 0 && v_distorted >= 0 && u_distorted < cols &&
v_distorted < rows) {
image_undistort.at<cv::Vec3b>(v, u) =
image.at<cv::Vec3b>((int)v_distorted, (int)u_distorted);
} else {
image_undistort.at<cv::Vec3b>(v, u) = 0;
}
}
// 画图去畸变后图像
cv::imshow("image undistorted", image_undistort);
cv::imwrite("fisheye_undist.jpg", image_undistort);
cv::waitKey();
return 0;
}
4. 为什么在这张图像中,我们令畸变参数k1, . . . , k4 = 0,依然可以产生去畸变的效果?
答:取泰勒展开前五项来近似鱼眼模型,k1-k4取0,相当于只近似了第一项,所以说仍然可以完成去畸变的操作。
5. 在鱼眼模型中,去畸变是否带来了图像内容的损失?如何避免这种图像内容上的损失呢?
答:
鱼眼模型的去畸变带来了图像内容的损失。
鱼眼图一般为圆形,边缘的信息被压缩的很密,经过去除畸变后原图中间的部分会被保留的很好,而边缘位置一般都会被拉伸的很严重、视觉效果差,所以通常会进行切除,因此肯定会带来图像内容的损失。增大去畸变时图像的尺寸,或者使用单目相机和鱼眼相机图像进行融合,可以补全丢失的信息。
Opencv学习----Opencv宏定义(CV_8U、CV_8S、CV_16U…)
https://blog.csdn.net/weixin_44218240/article/details/105888149
https://blog.csdn.net/hitljy/article/details/106798632
https://blog.csdn.net/qq_21830903/article/details/95209007
https://github.com/gaoxiang12/slambook2
深蓝学院-视觉SLAM十四讲-第四章作业
视觉slam学习笔记以及课后习题《第四讲相机模型和非线性优化》