pytorch时空数据处理3——ConvLSTM介绍及应用
前言
ConvLSTM最早由《Convolutional LSTM Network: A Machine Learning Approach for Precipitation Nowcasting》论文提出,目的是用于解决降水预报问题。降水预报问题通常被看做时序上的问题,因此被考虑使用LSTM来解决,但是单纯的LSTM不能通过图片来利用空间上的数据特征,因此空间特征在这个LSTM方法中利用是很不充分的。根据以上的描述,论文提出一种ConvLSTM结构,不仅能够建立类似LSTM时序关系,而且可以拥有类似CNN的空间特征提取能力。并且作者通过实验证明了ConvLSTM在获取时空关系上比LSTM有更好的效果。而且ConvLSTM不仅可以预测天气,还能够解决其他时空序列的预测问题。比如视频分类,动作识别等。在本文中我们将在pytorch下利用ConvLSTM完成实验。
LSTM
关于LSTM的介绍和应用请看上一篇文章pytorch时空数据处理1——LSTM介绍及图像分类
ConvLSTM论文翻译与理解
https://www.jianshu.com/p/a82c0ad728f1
ConvLSTM代码理解及应用
原代码链接:ConvLSTM_pytorch
参考资料:
LSTM的参数解释
Pytorch-LSTM输入输出参数
ConvLSTM参数详解(Keras)
1.导入pytorch
import torch
import torch.nn as nn
2.构建ConvLSTMCell
class ConvLSTMCell(nn.Module):
    #这里面全都是数,衡量后面输入数据的维度/通道尺寸
    def __init__(self, input_dim, hidden_dim, kernel_size, bias):

        super(ConvLSTMCell,self).__init__()

        self.input_dim = input_dim
        self.hidden_dim = hidden_dim
        #卷积核为一个数组
        self.kernel_size = kernel_size
        #填充为高和宽分别填充的尺寸
        self.padding_size = kernel_size[0]//2,kernel_size[1]//2
        self.bias = bias
        self.conv = nn.Conv2d(self.input_dim + self.hidden_dim,
                              4 * self.hidden_dim,#4* 是因为后面输出时要切4片
                              self.kernel_size,
                              padding=self.padding_size,
                              bias=self.bias)


    def forward(self,input_tensor,cur_state):

        h_cur,c_cur = cur_state
        combined = torch.cat((input_tensor,h_cur),dim=1)
        combined_conv = self.conv(combined)
        cc_f,cc_i,cc_o,cc_g = torch.split(combined_conv, self.hidden_dim, dim=1)

        #torch.sigmoid(),激活函数--
        #nn.functional中的函数仅仅定义了一些具体的基本操作,
        #不能构成PyTorch中的一个layer
        #torch.nn.Sigmoid()(input)等价于torch.sigmoid(input)
        f = torch.sigmoid(cc_f)
        i = torch.sigmoid(cc_i)
        o = torch.sigmoid(cc_o)
        g = torch.tanh(cc_g)

        #这里的乘是矩阵对应元素相乘,哈达玛乘积
        c_next = f*c_cur + i*g
        h_next = o*nn.Tanh(c_next)

    def  init_hidden(self,batch_size, image_size):
        heigth,weight = image_size
        #返回两个是因为cell的尺寸与h一样
        return(torch.zeros(batch_size, self.hidden_dim, height, width, device=self.conv.weight.device),
               torch.zeros(batch_size, self.hidden_dim, height, width, device=self.conv.weight.device))
在构建ConvLSTMCell时遇到的问题:
(1)模型参数
input_dim:输入特征的维数,每一行输入元素的个数,对应时间序列里每个词向量的长度 ,如果输入是图片的话,就是图像的通道数。
hidden_dim:隐藏层状态的维数,即隐藏层节点的个数
kernel_size:卷积核的尺寸
bias:偏置
(2)forward输入参数
input_tensor:输入图像本身,包括batch_size,h,w
cur_state:包含h,c;这里h,c与输入x(input_tensor)的数据组成成分相同
(3)激活函数的使用区别
torch.nn.Sigmoid()(input)等价于torch.sigmoid(input),nn.functional中的函数仅仅定义了一些具体的基本操作,不能构成PyTorch中的一个layer。orch.nn.Sigmoid()(input)和torch.sigmoid(input)可以视为已经封装好的类,而nn.functional.sigmoid只是一个运算的方法,仅仅执行sigmoid的运算。
具体区别见:torch.sigmoid() 与 torch.nn.Sigmoid() 对比 python
(4)init_hidden初始化返回的参数
batch_size:批量处理的数据量大小
self.hidden_dim:隐藏层节点数
height:图像高
width:图像宽
device=self.conv.weight.device:选择设备
因为初始化返回的hidden与后面使用的hidden数据的组成成分是一样的,又因为后面ht会当作后面层的xt作为输入使用,所以与xt的组成成分应该也是一样的,我照这样理解,得到的以上参数的解释。等我深刻理解以后,回来改正。
3.构建ConvLSTM
class ConvLstm(nn.Module):
    def __init__(self,input_dim,hidden_dim,kernel_size,num_layers,batch_first=False,bias=False,return_all_layers=False):
        super(ConvLstm,self).__init__()

        self.input_dim = input_dim
        self.hidden_dim = hidden_dim
        self.kernel_size = kernel_size
        self.num_layers = num_layers
        self.batch_first = batch_first
        self.bias = bias
        self.return_all_layers = return_all_layers

        #为了储存每一层的参数尺寸
        cell_list = []
        for i in range(0,num_layers):
            #注意这里利用lstm单元得出到了输出h,h再作为下一层的输入,依次得到每一层的数据维度并储存
            cur_input_dim = input_dim if i == 0 else self.hidden_dim[i-1]
            cell_list.append(ConvLSTMCell(input_dim = cur_input_dim,
                                          hidden_dim = self.hidden_dim,
                                          kernel_size = self.kernel_size,
                                          bias = self.bias
                                         ))
        #将上面循环得到的每一层的参数尺寸/维度,储存在self.cell_list中,后面会用到
        #注意这里用了ModuLelist函数,模块化列表
        self.cell_list = nn.ModuleList(cell_list)

    #这里forward有两个输入参数,input_tensor 是一个五维数据
    #(t时间步,b输入batch_ize,c输出数据通道数--维度,h,w图像高乘宽)
    #hidden_state=None 默认刚输入hidden_state为空,等着后面给初始化
    def forward(self,input_tensor,hidden_state=None):
        #先调整一下输出数据的排列
        if not self.batch_first:
            input_tensor = input_tensor.permute(1,0,2,3,4)
        #取出图片的数据,供下面初始化使用
        b,_,_,h,w = input_tensor.size()
        #初始化hidd_state,利用后面和lstm单元中的初始化函数
        hidden_state = self._init_hidden(batch_size=b,image_size=(h, w))

        #储存输出数据的列表
        layer_output_list = []
        layer_state_list = []

        seq_len = input_tensor.size(1)

        #初始化输入数据
        cur_layer_input = input_tensor

        for layer_idx in range(self.num_layers):

            h,c = hidden_state[layer_idx]
            output_inner = []

            for t in range(seq_len):
                #每一个时间步都更新 h,c
                #注意这里self.cell_list是一个模块(容器)
                h,c = self.cell_list[layer_idx](input_tensor=cur_layer_input[:,t,:,:,:],cur_state=[h,c])
                #储存输出,注意这里 h 就是此时间步的输出
                output_inner.append(h)

            #这一层的输出作为下一次层的输入,
            layer_output = torch.stack(output_inner, dim=1)
            cur_layer_input = layer_output

            layer_output_list.append(layer_output)
            #储存每一层的状态h,c
            layer_state_list.append([h,c])

        #选择要输出所有数据,还是输出最后一层的数据
        if not self.return_all_layers:
            layer_output_list = layer_output_list[-1:]
            last_state_list = last_state_list[-1:]

        return layer_output_list, last_state_list

    def _init_hidden(self, batch_size, image_size):
        init_states = []
        for i in range(self.num_layers):
            init_states.append(self.cell_list[i].init_hidden(batch_size, image_size))
        return init_states
在构建ConvLSTM时遇到的问题:
(1)模型参数
input_dim:输入特征维数
hidden_dim:隐藏层状态的维数(隐藏层节点的个数)
kernel_size:卷积核尺寸
num_layers:层,理解为网络深度
batch_first:控制t(时间步长)放在首维还是第二维,官方不推荐我们把batch放在第一维
bias:偏置
return_all_layers:是否返回全部层
(2)forward参数
t:时间步长度(seq_len)
b:batch_size,批量处理的数据量大小
c:通道数(R,G,B)
h:图片高
w:图片宽
(3)_init_hidden(self, batch_size, image_size)
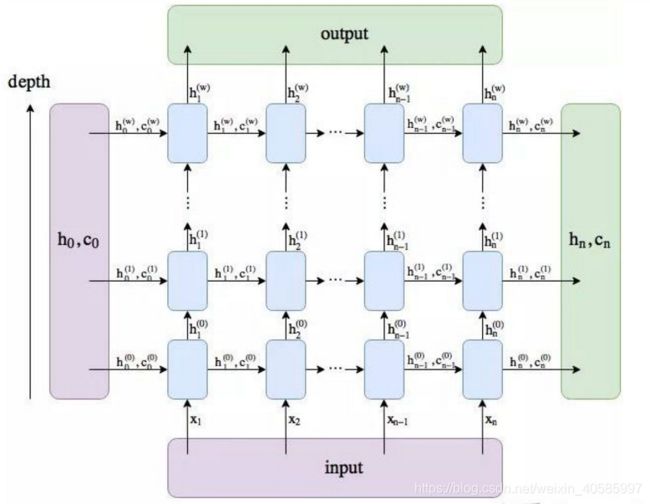
这个函数要调用ConvLSTMCell中的init_hidden函数,最终得到初始的hidden_state,注意每一层的hidden_state初始化都有重新定义,每层输出的h作为x,但在第二层时间步的第一个h还是需要初始化。
插入一张图片方便理解:
end
ConvLSTM应用
https://github.com/Hzzone/Precipitation-Nowcasting
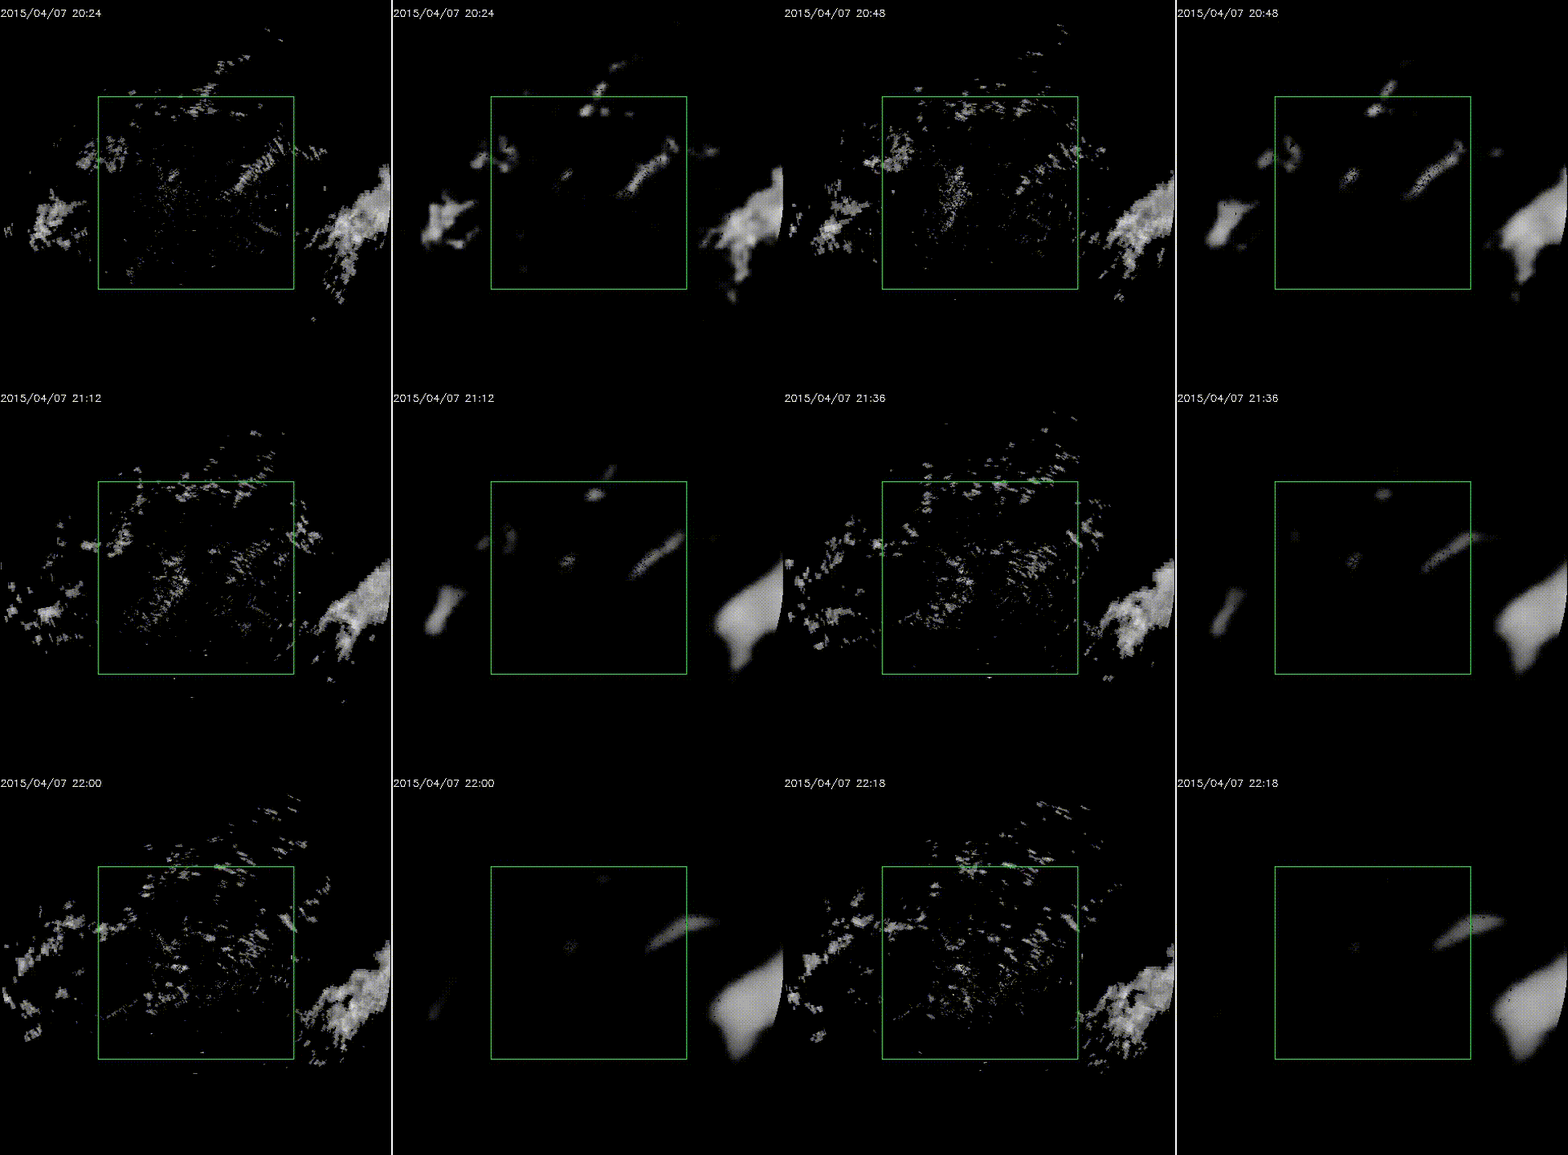
利用RNN(TrajGRU,ConvLSTM)实现了一个基于pytorch的编码器-预报器模型进行降水短时预报。
效果图
