cocos creator 插件开发
Cocos Creator插件开发经验
这里总结一些creator插件开发的一点小经验,先干为敬!我介绍一些哪些是重点的东西,官网上重复的文档我就不搬了
一:背景
二:需要的知识
三:了解一些小概念
四:入门
五:实例
六:积百家之所长
一:背景
1:在开发中如果是creator编辑器所不能触及的地方:
比如自动为一个节点添加很多动画适用于该节点下需要绑定很多的动画场景。
- 又比如在resource下很多资源,在代码里面引用的时候可不可以不写资源的url降低出错的几率,将资源的映射关系放到一个js文件里面,这就涉及到插件的扩展功能了,有了这个js文件之后我们只要引用这个js文件,就可以访问到某个资源的url了这样岂不是很香!嗯嗯,很香走一波。
2:根据项目的定制化流程,项目里面如果套路相对固定可以考虑使用creator的插件打出一套强势的组合拳哈哈
二:需要的知识
身为一个游戏前端,在当前的大前端时代,h5方面的东西还是需要学习点的涉及html5,css3,js,vue.js,node.js,electron的话用到再查文档就行,不需要背些那些方法,会查就行
html5的话很简单看看视频或者书籍就可以快速掌握了,css3的话比较重要的是掌握flex布局,这样在处理对齐啊啥的,你就不会慌了哈哈
三:了解一些小概念:
(一) 插件三问三答
1:package.json是干啥用的?
- 官网上解释的是包描述文件,这里我不想照搬官网的解释了,感兴趣的小伙伴可以自行查阅 官方文档:你的第一个扩展包 · Cocos Creator 简单来说就是程序的主线程是哪个,菜单怎么定义的,版本是多少,这里你会问主线程又是什么鬼,接下来看看主线程是什么东西
- 2:主线程是什么?
- 先来看看一个package.json的一个定义:
{

  "name": "hello-world",

  "version": "0.0.1",

  "description": "一份简单的扩展包",

  "author": "Cocos Creator",

  /** 这只就是主线程那个鬼 */

  "main": "main.js",

  "main-menu": {

    "Packages/Hello World": {

      "message": "hello-world:say-hello"

    }

  }

}- 上面的main.js就是主线程,负责与渲染进程进行通信,你可以理解成main.js其实就是一个服务器,它可以访问到编辑器内数据库内的一些数据例如资源的uuid等等信息,多个渲染进程其实就是一个一个的客户端,这样应该清楚了吧,什么,渲染进程又是啥???
- 3:渲染进程是什么?
- 渲染进程就是一个一个h5页面就是我刚才所说的需要的html5,css3的,这里我们需要vue.js来快速搭建单页面的应用,这也是官方比较推荐的插件开发姿势。
(二):IPC消息
插件开发的时候不得不了解的概念就是IPC消息,主进程和渲染进程之间通信的桥梁就是IPC消息,creator觉得Electron做的IPC消息不是很友好(单向的就不知道该事件是否完成没有回调),creator在此基础上进行了封装,才看到今天creator里面的IPC消息的模样,详细的文档可以查看文档,我这里就不细说了,传送门
(三):creator管理资源的方式Uuid
类似unity的guid,呸呸,完全是抄的哈哈,连meta文件都如出一辙,所以如果想给某一个节点上挂一个节点,或者给某一个节点下的sprite组件添加一个spriteFrame的话就需要使用它的uuid正确加载到creator,然后就可以挂载到对应的组件里面了。注意使用url是没有办法挂到组件上的!!!使用的方法是:
public getRes(uuid: string): Promise {

    return new Promise((resolve,reject) => {

        cc.assetManager.loadAny({

            type: "uuid",

            uuid

        },(err,res) => {

            if(err) {

                reject();

                return;

            }

            if(res) {

                resolve(res);

            }

        })

    })


}
四:入门
1:随便打开一个测试creator工程找到扩展-->创建新扩展插件 -->这里根据需要选择全局和项目专用插件,这里可以先选择项目专用插件测试使用
新建一个页面文件夹比如叫panel,在这下面已经为你新建了个文件叫index.js我们使用vue的时候可以拆分开为三个文件,index.js,index.html,index.css
首先改造index.js:
// panel/index.js, this filename needs to match the one registered in package.json

/*** 渲染线程 */

/** creator内置的第三方包的正确姿势 */

const fs = require("fire-fs");

const path = require("fire-path");

/** 引入项目中的脚本正确姿势 */

const bgCache = Editor.require("packages://autobind/bgCache.js");

Editor.Panel.extend({

  // 读取css文件

  style: fs.readFileSync(Editor.url("packages://autobind/panel/index.css"),'utf-8'),

  // 读取html文件内容

  template: fs.readFileSync(Editor.url("packages://autobind/panel/index.html"),'utf-8'),

  // element and variable binding

  $: {

    btn: '#btn',

    label: '#label',

  },

  // method executed when template and styles are successfully loaded and initialized

  ready () {

    new window.Vue({

      el: this.shadowRoot,

      data: {

        /** 需要挂载的模板数量 */

        mainTemplateCount: 27,


      },

      created() {


      },

      /** 监听talkNum */

      watch: {

        largeLevelNum: (val) => {

          bgCache.configCache.largeLevelNum = val;

        },

        talkNum: (val) => {

          Editor.log("val is ",typeof val);

          bgCache.configCache.talkNum = val;


        },

        mainTemplateCount: (val) => {

          bgCache.configCache.mainTemplateCount = val;

        }

      },

      methods: {

        /*** 开始绑定脚本 */

        startBind() {


        },

        /** 设置isDeleteOrigin属性 */

        setIsDelete(event) {


          // 开始设置状态

          this.isDeleteHorn = event.detail.value;


        },

        setIsDeleteReal(event) {

          this.isDeleteReal = event.detail.value;

        },

        setIsDeletePro(event) {

          this.isDeleteProgress = event.detail.value;

        },

        /** 设置是否改变环节关卡中的进度条的样式默认false */

        setIsChangeProgressInSection(event) {

          this.isChangeProgressInSection = event.detail.value;

        }

      }

    })

  },

  // register your ipc messages here

  messages: {

    'autobind:hello' (event) {

      this.$label.innerText = 'Hello!';

    }

  }

});
上面就是基本的一个vue模板js文件了,一些逻辑就可以自己慢慢的新增加了。
注意点:
A: 引用creator内置的第三方npm包的时候可以直接require,其他的第三方包都需要Editor.require()
另外就是页面的html文件了,组件如果在creatorUIKView里面没有找到合适的组件的话就自己用css3写个组件,官方UIKit地址:UIKIt,感觉还是够用的
2:来个很香很有用的脚本scene-walker.js,比较重要!!!
之所以说他有用是因为它有一个绝招就是有访问assets目录下的脚本的能力,其他脚本是没有这个能力的,例如想在渲染进程里面添加一个节点
let node: cc.Node = new cc.Node();
渲染进程:对不起,我没有这个能力找scene-walker.js吧
另外它可以调用引擎API的能力就是上面的cc.Node,诸如此类
首先在package.json文件里注册它:
{

  "name": "hello-world",

  "version": "0.0.1",

  "description": "一份简单的扩展包",

  "author": "Cocos Creator",

  /** 这只就是主线程那个鬼 */

  "main": "main.js",

  "scene-script": "scene-walker.js"

  "main-menu": {

    "Packages/Hello World": {

      "message": "hello-world:say-hello"

    }

  }

}
3:资源的管理
资源的url由形如:db://assets/path/to/scene.fire,packages://插件名/文件,db://internal,
Creator内置的一些编辑器环境下专用的api
Editor.assetdb.refresh(),Editor.assetdb.move等需要在主线程或者是scene-walker.js文件中使用,其他地方使用有可能报错。
当导入新资源的时候记得刷新一下资源数据库:
Editor.assetdb.refresh();不然的话有可能新增的资源不会显示在编辑器里面。
4:常用API:
(1): 如果想要获取一个资源的uuid怎么办呢:scene-waler.js里面使用
使用Editor.remote.assetdb.urlToUuid(url),这个url就是上面所说的资源的url形式
或者可以反过来Editor.remote.assetdb.uuidToUrl(uuid)的方法获得uuid资源对应的资源路径。
(2): 如果想要获取这个资源是否有依赖的子资源:
Editor.remote.assetdb.isSubAssetByUuid(uuid)
(3): 查询资源的信息:
Editor.assetdb.queryInfoByUuid(uuid,(err,info) => {

        if(err) {

            return;

        }

        if(info) {


        }

})
(4): 根据uuid获得对应的meta文件
let meta = Editor.assetdb.remote.loadMetaByUuid(uuid);
(5): 根据uuid获得资源的路径
let url = Editor.assetdb.remote.uuidtoFsPath(uuid)
(6): 获取选中的节点:
let selectNodeUuid = Editor.Selection.curSelection("node");
let node = cc.engine.getInstanceById(selectNodeUuid);
(7): 如果你给一个场景绑定了几个脚本,这个时候你需要保存这个场景,scene-walker.js如果直接调用保存场景的api场景是保存不成功的,需要单独发送事件到主进程中保存场景类似的操作如下:
if(canvasNode) {
                    // canvasNode.removeComponent(`${compName}Main`);
                    if(!canvasNode.getComponent(`${compName}Main`)) {
                        const mainComp = canvasNode.addComponent(`${compName}Main`);
                        mainComp.rootPrefab = await loadPrefabByUuid(uuid);

                        // 必须主进程去保存场景
                        Editor.Ipc.sendToMain('auto_generate_config:saveScene',err => {
                            if(err.code === 'ETIMEOUT') {
                                Editor.log("超时");
                            }
                            Editor.log("**********保存场景完成,绑定完毕,自动生成项目完毕,奥利给***********");
                        });
                    }

                } else {
                    Editor.log("请切换到主场景界面");
                }
主进程中的代码:
'saveScene' (event,param) {
      Editor.log("主进程中开始保存场景");

      /** 5000是保存场景超时时间 */
      Editor.Ipc.sendToPanel('scene', 'scene:stash-and-save',(err) => {
        if(err.code === 'ETIMEOUT') {

        }
        event.reply('保存场景成功');
      },5000);
    },
(8):根据预制体的uuid加载对应的prefab然后给它绑定一个脚本的操作类似以下这种:
for(let uuidItem of prefabsUuid) {
    const prefab = await loadPrefabByUuid(uuidItem.uuid);
    prefab.data.addComponent(`${compName}SceneUI`);
    prefab.data.addComponent(`${compName}SceneLogic`);

    // 预制体序列化然后才能保存
    const dataItem = prefab.serialize();
    // 更新预制体
    await changePrefabAndSave(uuidItem.url,dataItem);
    prefabs.push(prefab);
}

/**
 * 改变预制体的信息并且保存
 * @param  {string} url 预制体对应的路径
 * @param  {Object | any} prefabData 预制体的数据
 * @param  {Function} callback
 */
 const changePrefabAndSave = (url,prefabData,callback) => {
            if(callback) {
                Editor.assetdb.saveExists(url,prefabData,callback);
            } else {
                return new Promise((resolve,reject) => {
                    Editor.assetdb.saveExists(url,prefabData,(err,res) => {
                        if(err) {
                            reject(new Error('保存资源失败'));
                            return;
                        }

                        resolve(res);

                        callback && callback(res);
                    });
                });
            }

        }
(9):设置一个文件或者文件夹为插件或者bundle
// 修改js文件为插件脚本
        Editor.assetdb.queryMetaInfoByUuid(jsUuid,(err,info) => {
            if(err) {
                Editor.log('err is ',err);
            }

            Editor.log('info is ',info);
            const metaJsonStr = info.json;
            const metaJson = JSON.parse(metaJsonStr);

            metaJson.isPlugin = true;
            metaJson.loadPluginInEditor = true;

            Editor.assetdb.saveMeta(metaJson.uuid,JSON.stringify(metaJson));
        });

        Editor.assetdb.queryMetaInfoByUuid(folderUuid,(err,info) => {
            if(err) {
                Editor.log('err is ',err);
            }

            Editor.log('info is ',info);
            const metaJsonStr = info.json;
            const metaJson = JSON.parse(metaJsonStr);

            metaJson.isBundle = true;
            metaJson.bundleName = bundleName;
            metaJson.priority = 8;
            /** 内联spriteframe */
            metaJson.inlineSpriteFrames = {
                "web-mobile": true
            }

            // 一定要保存一下meta文件才能生效
            Editor.assetdb.saveMeta(metaJson.uuid,JSON.stringify(metaJson));
        });
五:实例: 根据cli生成的项目自动给项目配置(自动给plugins文件夹里面的文件设置为插件脚本,自动给RootNode添加脚本,自动给预制体挂载脚本)
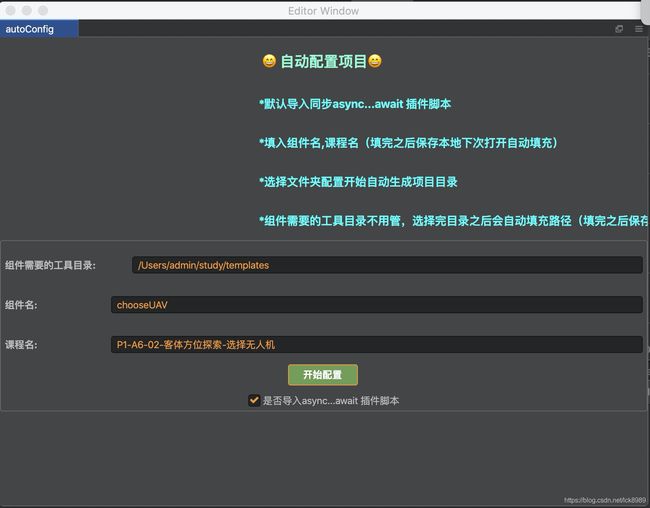
项目截图:
使用方法:第一个选项选择自动配置需要的模板目录位置,这个不用自己填写,点击下面的按钮(默认是选择文件夹开始配置),选择之后按钮的文字变成开始配置,
第二个选项是自己的组件名,这里填写是自动替换项目里面的名字为你设置的当前组件名
第三个选项是该组件对应的课程名,全部配置完成,就可以开始配置了,这样就生成项目了。
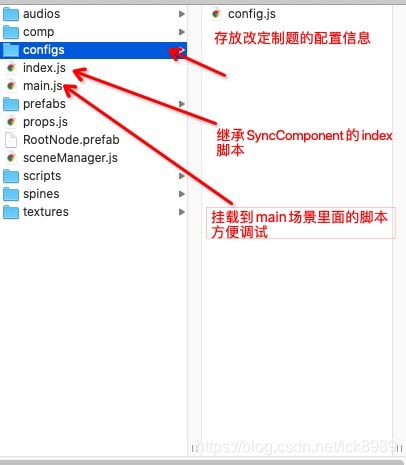
看一下我得templates文件夹的结构:
运行完之后会生成带组件名前缀的文件(脚本,文件夹,预制体名字....)
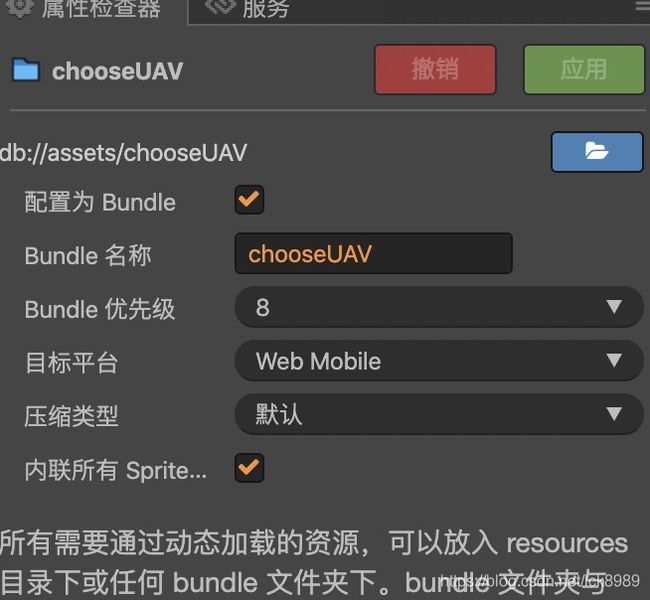
效果一:自动给文件夹设置为bundle:
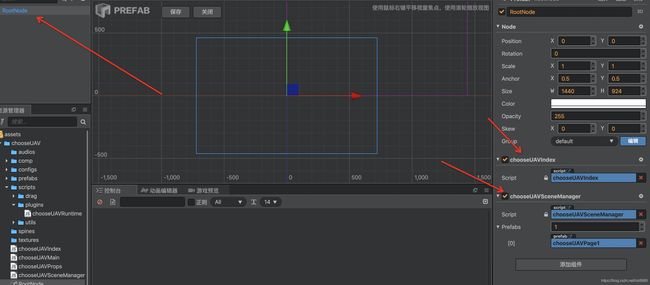
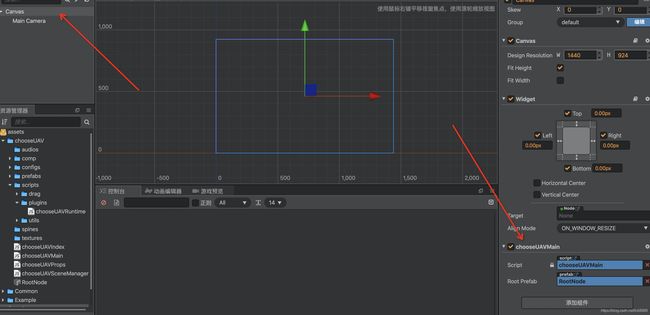
效果二:自动给RootNode加上脚本
sceneManager脚本负责切换场景实际上是直接改变props中的pageIndex,另外给RootNode添加了左右切换的按钮方便调试,
export default cc.Class({
    extends: cc.Component,

    properties: {
        prefabs: [cc.Prefab],
    },

    ctor() {

    },

    start () {
        this.curPage = 0;

        this.curUIScript = null;
        this.curLogicScript = null;
        this.curRootScript = null;

        console.log("当前页是:",QueueUtil._syncComp.props.pageIndex);
        this.runSceneByIndex(QueueUtil._syncComp.props.pageIndex);
        this.curPage = QueueUtil._syncComp.props.pageIndex;

        console.log('uiscript is ',QueueUtil._syncComp.uiScript);
        console.log('logicScript is ',QueueUtil._syncComp.logicScript);
    },

    /**
     * 给场景添加左右切换页面的按钮和当前所在的页面
     */
    addDebugBtns() {
        if(CC_DEBUG) {
            const leftBtnNode = new cc.Node('left');
            leftBtnNode.width = 200;
            leftBtnNode.height = 200;
            const leftBtn = leftBtnNode.addComponent(cc.Button);
            leftBtnNode.addComponent(cc.Sprite);
            leftBtn.transition = cc.Button.Transition.SCALE;
            myUtils.setSpriteNodeByUrl(leftBtnNode,chooseUAVConfig.stableConfig.left,true);

            this.node.addChild(leftBtnNode);

            leftBtnNode.setPosition(cc.v2(-800,0));
            let len = this.node.childrenCount;
            leftBtnNode.setSiblingIndex(len - 1);

            leftBtnNode.on(cc.Node.EventType.TOUCH_END,this.beforePage,this);

            const rightBtnNode = new cc.Node('right');
            rightBtnNode.width = 200;
            rightBtnNode.height = 200;
            rightBtnNode.scaleX = -1;
            const rightBtn = rightBtnNode.addComponent(cc.Button);
            rightBtnNode.addComponent(cc.Sprite);
            rightBtn.transition = cc.Button.Transition.SCALE;

            myUtils.setSpriteNodeByUrl(rightBtnNode,chooseUAVConfig.stableConfig.left,true);

            this.node.addChild(rightBtnNode);

            rightBtnNode.setPosition(cc.v2(800,0));
            len = this.node.childrenCount;
            rightBtnNode.setSiblingIndex(len - 1);
            rightBtnNode.on(cc.Node.EventType.TOUCH_END,this.nextPage,this);

            const pageInfoNode = new cc.Node('pageInfo');
            const pageLable = pageInfoNode.addComponent(cc.Label);
            this.node.addChild(pageInfoNode);
            pageInfoNode.setPosition(cc.v2(800,400));

            pageLable.string = `当前是第${props.pageIndex + 1}页`;
            pageInfoNode.color = new cc.Color(255,0,0,255);
            len = this.node.childrenCount;
            pageInfoNode.setSiblingIndex(len - 1);
            console.log('node is ',this.node);

        }
    },

    runSceneByIndex(index) {
        console.log('运行场景',index);
        if(QueueUtil._syncComp.logicScript) {
            QueueUtil._syncComp.logicScript.clearEvents();
        }

        QueueUtil._syncComp.logicScript = null;
        QueueUtil._syncComp.uiScript = null;

        this.node.removeAllChildren();

        const nextPrefab = this.prefabs[index];
        const nextNode = cc.instantiate(nextPrefab);
        this.node.addChild(nextNode);

        this.curLogicScript = nextNode.getComponent(SceneLogicScript);
        this.curUIScript = nextNode.getComponent(SceneUIScript);

        if(this.node && this.curLogicScript && this.curUIScript) {
            this.curRootScript = this.node.getComponent('chooseUAVIndex');

            this.curUIScript.setLogicScript(this.curLogicScript);
            this.curUIScript.setRootScript(this.curRootScript);

            this.curLogicScript.setUIScript(this.curUIScript);
            this.curLogicScript.setRootScript(this.curRootScript);
        }

        this.addDebugBtns();
        console.log('this.node is ',this.node);

        /** 设置主逻辑脚本引用最新的ui脚本和逻辑脚本 */
        QueueUtil._syncComp.logicScript = this.curLogicScript;
        QueueUtil._syncComp.uiScript = this.curUIScript;

    },

    nextPage() {

        if(this.curPage < this.prefabs.length - 1) {
            this.curPage++;

            QueueUtil._syncComp.props.pageIndex = this.curPage;

            this.runSceneByIndex(this.curPage);
        }
    },

    beforePage() {
        if(this.curPage > 0) {
            this.curPage--;
            // chooseUAVConfig.QueueUtil._syncComp.props.pageIndex = this.curPage;
            QueueUtil._syncComp.props.pageIndex = this.curPage;
            this.runSceneByIndex(this.curPage);
        }
    },

});
效果三:自动给Canvas节点绑定脚本方便调试:
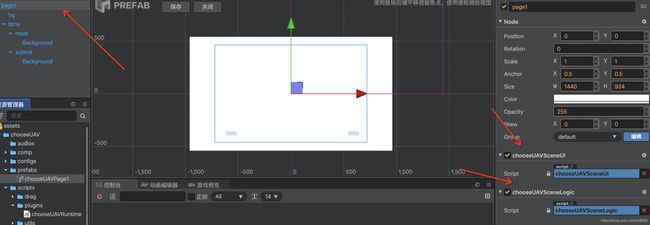
效果四:给prefabs里面的预制体添加一个UI的脚本和逻辑的脚本
效果五: 自动设置脚本文件为插件脚本
六:集百家之所长
最后的最后还是需要多看别人怎么写的插件或者可以看看creator自带的插件,就是creator安装目录下有一些插件,creator本事就是由一个一个插件组成,这个就是我所总结的开发插件的一些小经验,哪里写的不好的还请多指正,希望大家多多分享,这样大家的知识才会1+1>2
