读书笔记-计算机视觉
文章目录
- 1. 图像增广
- 2. 微调
- 3. 目标检测和边界框
-
- 3.1 锚框坐标转换
- 4. 锚框
-
- 4.1 锚框
- 4.2 交并比
- 4.3 将最接近的真实边界框分配给锚框
- 4.4 锚框偏移量归一化
- 4.5 使用真实边界框标记锚框
- 4.6 极大值抑制预测边界框
- 5. 多尺度目标检测
-
- 5.1 多尺度锚框
- 5.2 多尺度检测
- 6. 目标检测数据集
-
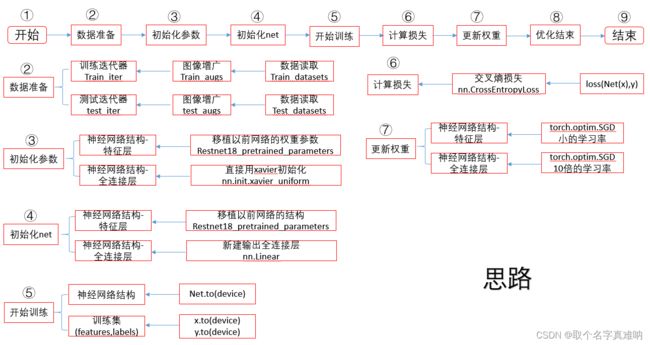
- 6.1 数据集预处理思路
- 6.2 源码
- 6.3 结果
1. 图像增广
- 代码
# -*- coding: utf-8 -*-
# @Project: zc
# @Author: zc
# @File name: Image Augmentation
# @Create time: 2021/12/15 19:16

# 1.导入数据库
import matplotlib.pyplot as plt
import torch
import torchvision
from torch import nn
from d2l import torch as d2l

# 2. 从官网上下载 CIFAR10 的训练数据集
all_images = torchvision.datasets.CIFAR10(train=True, root="../data",
										  download=True)
# 3. 显示 CIFAR10 前32个数据集
d2l.show_images([all_images[i][0] for i in range(32)], 4, 8, scale=0.8)

# 4.训练集数据增强的方式,用 Compose 进行组合
train_augs = torchvision.transforms.Compose([
	torchvision.transforms.RandomHorizontalFlip(),
	torchvision.transforms.ToTensor()])

# 5. 我们不需要对测试集进行数据增强,只需要转换成张量即可
test_augs = torchvision.transforms.Compose([
	torchvision.transforms.ToTensor()])


# 6. 下载 CIFAR10 并将数据转换成 DataLoader
def load_cifar10(is_train, augs, batch_size):
	dataset = torchvision.datasets.CIFAR10(root="../data", train=is_train,
										   transform=augs, download=True)
	dataloader = torch.utils.data.DataLoader(dataset, batch_size=batch_size,
											 shuffle=is_train, num_workers=d2l.get_dataloader_workers())
	return dataloader


# 7.用多 GPU 进行小批量训练
def train_batch_ch13(net, X, y, loss, trainer, devices):
	"""
	:param net: 定义的神经网络
	:param X: 实际的特征 features
	:param y: 实际的标签 label
	:param loss: 损失
	:param trainer: 优化器
	:param devices: 在 GPU 或者 CPU 上训练
	:return: train_loss_sum:训练损失总和;train_acc_sum:训练精度总和
	"""
	"""用多GPU进行小批量训练"""
	if isinstance(X, list):
		# 微调BERT中所需(稍后讨论),在 BERT 中是通过前面几个样本预测后面的字符,所以X输入为列表
		X = [x.to(devices[0]) for x in X]
	else:
		X = X.to(devices[0])  # 如果 X 是单个的值,就直接喂到 GPU 上
	y = y.to(devices[0])  # 将标签 Y 喂到 GPU 上
	net.train()  # 神经网络训练模式,nn.batch_Norm 和 nn.Dropout 不启用
	trainer.zero_grad()  # 将优化器的梯度清零
	pred = net(X)  # 特征 X 通过神经网络得到 pred 预测
	l = loss(pred, y)  # 计算预测 pred 和真实标签 y 之间的差值作为损失值
	l.sum().backward()  # 将损失求和成标量后回传求梯度
	trainer.step()  # 优化器更新权重
	train_loss_sum = l.sum()  # 计算训练损失总和
	train_acc_sum = d2l.accuracy(pred, y)  # 计算训练精度总和
	return train_loss_sum, train_acc_sum  # 返回 训练损失总和,训练精度总和


# 8.用多GPU进行模型训练
def train_ch13(net, train_iter, test_iter, loss, trainer, num_epochs,
			   devices=d2l.try_all_gpus()):
	"""

	:param net:        定义神经网络
	:param train_iter: 定义训练集迭代器
	:param test_iter:  定义测试机迭代器
	:param loss:       定义损失函数,评判预测值和实际值的偏差
	:param trainer:    定义优化器
	:param num_epochs: 定义训练几轮
	:param devices:    定义是在 GPU 还是 CPU 上进行
	:return:
	"""

	timer, num_batches = d2l.Timer(), len(train_iter)  # 定义计时器和批量大小
	animator = d2l.Animator(xlabel='epoch', xlim=[1, num_epochs], ylim=[0, 1],  # 做动画
							legend=['train loss', 'train acc', 'test acc'])
	net = nn.DataParallel(net, device_ids=devices).to(devices[0])  # 定义网络并行
	for epoch in range(num_epochs):  # 开始训练
		# 4个维度:储存训练损失,训练准确度,实例数,特点数
		metric = d2l.Accumulator(4)  # 定义累加器
		for i, (features, labels) in enumerate(train_iter):  # 逐个枚举训练迭代器的(特征,标签)
			timer.start()  # 开始计时
			l, acc = train_batch_ch13(  # 用多 GPU 进行小批量训练
				net, features, labels, loss, trainer, devices)
			metric.add(l, acc, labels.shape[0], labels.numel())  # 动态图增加点
			timer.stop()  # 计时结束
			if (i + 1) % (num_batches // 5) == 0 or i == num_batches - 1:
				animator.add(epoch + (i + 1) / num_batches,
							 (metric[0] / metric[2], metric[1] / metric[3],
							  None))
		test_acc = d2l.evaluate_accuracy_gpu(net, test_iter)  # 将预测值和测试集数据比较计算精度
		animator.add(epoch + 1, (None, None, test_acc))
	print(f'loss {metric[0] / metric[2]:.3f}, train acc '
		  f'{metric[1] / metric[3]:.3f}, test acc {test_acc:.3f}')
	print(f'{metric[2] * num_epochs / timer.sum():.1f} examples/sec on '
		  f'{str(devices)}')


# 9. 定义批量大小,GPU ,神经网络 net=resnet18
batch_size, devices, net = 256, d2l.try_all_gpus(), d2l.resnet18(10, 3)


# 10. 初始化权重,用 xavier 初始化,便于训练
def init_weights(m):
	if type(m) in [nn.Linear, nn.Conv2d]:
		nn.init.xavier_uniform_(m.weight)


# 11. 网络权重初始化
net.apply(init_weights)


# 12. 定义函数,功能是训练网络,运用数据增广 train_augs,test_augs
def train_with_data_aug(train_augs, test_augs, net, lr=0.001):
	"""

	:param train_augs:  训练集的在线数据增广
	:param test_augs:   测试集图像直接转张量,不做
	:param net: 定义神经网络
	:param lr:  设置学习率
	:return:
	"""
	train_iter = load_cifar10(True, train_augs, batch_size)  # 下载cifar10的训练集,转换成 dataloader
	test_iter = load_cifar10(False, test_augs, batch_size)  # 下载cifar10的测试集,转换成 dataloader
	loss = nn.CrossEntropyLoss(reduction="none")  # 定义损失为交叉熵损失
	trainer = torch.optim.Adam(net.parameters(), lr=lr)  # 定义优化器 Adam ,此优化器对学习率不敏感,方便训练
	train_ch13(net, train_iter, test_iter, loss, trainer, 10, devices)  # 用多GPU进行模型训练


# 13.调用函数,开始训练神经网络
train_with_data_aug(train_augs, test_augs, net)

# 14. 显示结果
plt.show()
- 结果
loss 0.168, train acc 0.942, test acc 0.845
826.6 examples/sec on [device(type='cuda', index=0)]
2. 微调
import matplotli.pylot as plt
import os
import torch
import torchvision
from torch import nn
from d2l import torch as d2l

d2l.DATA_HUB['hotdog'] = (d2l.DATA_URL + 'hotdog.zip',
	'fba480ffa8aa7e0febbb511d181409f899b9baa5')
data_dir = d2l.download_extract('hotdog')

train_imgs = torchvision.datasets.ImageFolder(os.path.join(data_dir,'train'))
test_imgs = torchvision.datasets.ImageFlolder(os.path.join(data_dir,'test'))

normalize = torchvision.transforms.Normalize(
[0.485,0.456,0.406],[0.229,0.224,0.225])

train_augs= torchvision.transforms.Compose([
	torchvision.transforms.RandomResizedCrop(224),
	torchvision.transforms.RandomHorizontalFlip(),
	torchvision.transforms.ToTensor(),
	normalize])

test_augs = torchvision.transforms.Compose([
	torchvision.transforms.Resize(256),
	torchvision.transforms.CenterCrop(224),
	torchvision.transforms.ToTensor(),
	normalize])


pretrained_net = torchvision.models.resnet18(pretrained=True)

# finetune_net = 特征层 + 输出层 fc(全连接层=in_features,out_features)


# 步骤1 :将预训练模型中的特征层下载,给一个小的学习率
# 步骤2 :将最后一个全连接层切割掉
# 步骤3 :将最后一个全连接层嫁接到新的全连接层,输出为新的类型数
# 步骤4 :将最后一个全连接层的权重和偏移进行初始化
finetune_net = torchvision.models.resnet18(pretrained=True)
finetune_net.fc = nn.Linear(finetune_net.fc.in_features,2)
nn.init.xavier_uniform_(finetune_net.fc.weight)


# net: 神经网络
# learning_rate:学习率
# batch_size:批量大小
# num_epochs: 整个训练集迭代次数
# param_group:判断是否为最后一个全连接层
def train_fine_tuning(net,learning_rate,batch_size=128,num_epochs=5,
		     param_group=True):
	# 训练迭代器,数据增广train_augs,随机打乱训练集
	train_iter = torch.utils.data.DataLoader(torchvision.datasets.ImageFolder(
		os.path.join(data_dir,'train'),transforms=train_augs),
		batch_size=batch_size,shuffle=True)
	# 测试迭代器,数据增广train_augs,
	test_iter = torch.utils.data.DataLoader(torchvision.datasets.ImageFolder(
		os.path.join(data_dir,'test'),transforms=test_augs),
		batch_size=batch_size)
	# 训练 GPU 或 CPU
	devices = d2l.try_all_gpus()
	# 损失为交叉熵损失,reduction="none"
	loss= nn.CrossEntropyLoss(reduction="none")
	# 判断参数是不是最后一个全连接层,如果param_group=True,就用10倍学习率,
	# 其他为指定学习率 learning_rate,并权重衰减 weight_decay=0.01
	if param_group:
		params_1x = [param for name,param in net.named_parameters()
			if name not in ["fc.weight","fc.bias"]]
		trainer = torch.optim.SGD([{'params':params_1x},
					   {'params':net.fc.parameters(),
					    'lr': learning_rate*10}],
					lr=learning_rate,weight_decay=0.01)
	else:
		trainer = torch.optiom.SGD(net.parameters(),lr=learning_rate,
					   weight_decay=0.001)
	# 开始训练
	d2l.train_ch13(net,train_iter,test_iter,loss,trainer,num_epochs,device)


# 指定神经网络 net=finetune_net,学习率 learning
train_fine_tuning(finetune_net,5e-5)
3. 目标检测和边界框
3.1 锚框坐标转换
- 如图所示

- 方法1:已知两个角的坐标(x1,y1),(x2,y2),来求得中心点坐标(cx,cy),高h,宽w:
c x = ( x 1 + x 2 ) / 2 c_x =(x_1+x_2)/2 cx=(x1+x2)/2
c y = ( y 1 + y 2 ) / 2 c_y = (y_1+y_2)/2 cy=(y1+y2)/2
w = x 2 − x 1 w = x_2-x_1 w=x2−x1
h = y 2 − y 1 h=y_2-y_1 h=y2−y1 - 方法2:已知中心点坐标(cx,cy),高h,宽w,来求得两个角的坐标(x1,y1),(x2,y2);
x 1 = c x − w / 2 x_1 = c_x-w/2 x1=cx−w/2
x 2 = c x + w / 2 x_2 = c_x +w/2 x2=cx+w/2
y 1 = c y − h / 2 y_1 = c_y-h/2 y1=cy−h/2
y 2 = c y + h / 2 y_2 = c_y+h/2 y2=cy+h/2 - 代码如下:
# 1.导入相关数据数据库
import torch
import torchvision
from d2l import torch as d2l
import matplotlib.pyplot as plt


# 2.中心坐标 -> 边缘坐标
def box_corner_to_center(boxes):
	"""Convert from (upper-left, lower-right) to (center, width, height)."""
	x1, y1, x2, y2 = boxes[:, 0], boxes[:, 1], boxes[:, 2], boxes[:, 3]
	cx = (x1 + x2) / 2
	cy = (y1 + y2) / 2
	w = x2 - x1
	h = y2 - y1
	boxes = torch.stack((cx, cy, w, h), axis=-1) # 堆叠在一起
	return boxes


# 3.边缘坐标 -> 中心坐标
def box_center_to_corner(boxes):
	"""Convert from (center, width, height) to (upper-left, lower-right)."""
	cx, cy, w, h = boxes[:, 0], boxes[:, 1], boxes[:, 2], boxes[:, 3]
	x1 = cx - 0.5 * w
	y1 = cy - 0.5 * h
	x2 = cx + 0.5 * w
	y2 = cy + 0.5 * h
	boxes = torch.stack((x1, y1, x2, y2), axis=-1) # 堆叠在一起
	return boxes
4. 锚框
4.1 锚框
- 生成成以每个像素为中⼼具有不同形状的锚框
- 代码
# 1.导入相关数据库
import matplotlib.pyplot as plt
import torch
from d2l import torch as d2l


# 2.生成以每个像素为中心具有不同形状的锚框
# in_height:高;in_width:宽
# size:缩放比;ratios:宽高比
# 一般组合为:
# 定义一个大小S_1,遍历所有的ratios;
# 定义一个宽高比ratios,遍历所有的缩放比例s
# 所有的组合一共为 num_sizes+num_ratios-1
# data:输入的图像
# size:缩放比例
# ratios: 宽高比


def multibox_prior(data,size,ratios):
	# 获取图片的高,宽
	in_height,in_width = data.shape[-2:]
	# 获取设备CPU或GPU,缩放比size张量集,宽高比ratio张量集大小
	device,num_sizes,num_ratios = data.device,len(sizes),len(ratios)
	# 得到所有的组合 s+r-1
	boxes_per_pixel = (num_sizes+num_ratios-1)
	# 将列表转换成张量
	size_tensor = torch.tensor(size,device=device)
	ratio_tensor = torch.tensor(ratios,device=device)

	# 因为每个像素的高,宽各为 1
	offset_h,offset_w = 0.5,0.5
	setps_h = 1.0 /in_height	# 在 y 轴上缩放步长
	setps_w = 1.0 /in_width		# 在 x 轴上缩放步长

	# 生成锚框的所有中心点
	# 将每个像素的值加上0.5后除以总长得到中心缩放后的点坐标
	# 公式:(in_height+offset_h)/steps_h

	center_h = (torch.arange(in_height,device=device)+offset_h)*steps_h
	center_w = (torch.arange(in_width,device=device)+offset_w)*steps_w

	# 根据中心点获取网格,并将张量变成一串
	shift_y,shift_x = torch.meshgrid(center_h,center_w)
	shift_y,shift_x = shift_y.reshape(-1),shift_x.reshape(-1)

	# 生成"boxes_per_pixel"个高和宽
	# 之后用于创建锚框的四角坐标(xmin,xmax,ymin,ymax)
	w = torch.cat((size_tensor*torch.sqrt(ratio_tensor[0]),
		       size[0]*torch.sqrt(ratio_tensor[1:])))\
		       *in_height / in_width
	h = torch.cat((size_tensor / torch.sqrt(ratio_tensor[0]),
		       sizes[0]/torch.sqrt(ratio_tensor[1:])))

	# 除以2来获得半高和半宽
	anchor_manipulations = torch.stack((-w,-h,w,h).T.repeat(
					    in_heigth*in_width,1)/2)

	# 每个中心点都将有"boxes_per_pixel"个锚框
	# 所以生成含所有锚框中心的网络,重复了"boxes_per_pixel"次
	# unsqueeze(0)在第0中插入一个新的维度
	# repeat_interleave 重复函数
	out_grid = torch.stack([shift_x,shift_y,shift_x,shift_y],
		    dim=1).repeat_interleave(boxes_per_pixel,dim=0)
	output = out_grid + anchor_manipulations
	return output.unsqueeze(0)
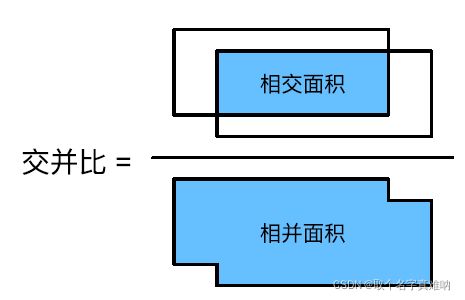
4.2 交并比
# 1.导入相关库
import torch
from d2l import torch as d2l


# 2. 定义计算交并比

def box_iou(boxes1, boxes2):
	"""
	function: 计算两个锚框或边缘框列表中成对的交并比
	:param box1: (x1,x2,y1,y2);左上坐标(x1,y1);右下坐标(x2,y2)
	:param box2: (x1,x2,y1,y2);左上坐标(x1,y1);右下坐标(x2,y2)
	:return:交并比
	"""
	# box_area = (x2-x1)*(y2-y1)
	box_area = lambda boxes: ((boxes[:, 2] - boxes[:, 0]) *
							  (boxes[:, 3] - boxes[:, 1]))
	# boxes1,boxes2,areas1,areas2的形状:
	# boxes1:(boxes1的数量,4),[x1,y1,x2,y2]
	# boxes2:(boxes2的数量,4),[x1,y1,x2,y2]
	# areas1:(boxes1的数量,), [area1,]
	# areas2:(boxes2的数量,)[area2,]
	areas1 = box_area(box1)
	areas2 = box_area(box2)
	# boxes1[:,None,:2] 取前面两个坐标值;boxes2[:,:2]:取坐标的后两个
	# 计算交集的inter_upperlefts左上点,inter_lowerrights右下点
	# 张量中用 None 可以对张量新增一个维度,这里是在第 1 维增加
	inter_upperlefts = torch.max(boxes1[:, None, :2], boxes2[:, :2])
	inter_lowerrights = torch.min(boxes1[:, None, 2:], boxes2[:, 2:])
	# inters:差值取正 如果值小于0,则元素值为0
	inters = (inter_lowerrights - inter_upperlefts).clamp(min=0)
	# 计算交集的面积
	inter_areas = inters[:, :, 0] * inters[:, :, 1]
	# 计算并集 并集 = 面积1 + 面积2 - 交集
	union_areas = areas1[:, None] + areas2 - inter_areas
	# 返回交并比
	return inter_areas / union_areas
4.3 将最接近的真实边界框分配给锚框
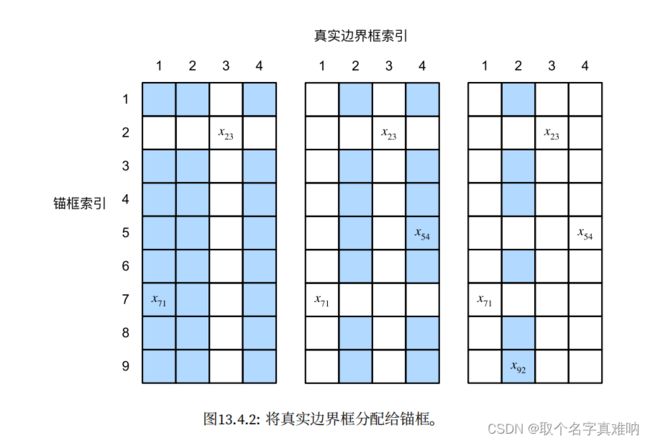
在目标检测中,我们需要将每个锚框看作成一个训练样本,我们随机生成锚框,锚框包含类别和偏移量。这样我们就可以通过偏移量,将数据集中的真实的边界框通过偏移量分配给锚框,注意这里是将最接近的真实边界框分配给锚框,注意分配的方向。
-
原理
让我们⽤⼀个具体的例⼦来说明上述算法。如 图13.4.2(左)所⽰,假设矩阵X中的最⼤值为x23,我们将真实边界框B3分配给锚框A2。然后,我们丢弃矩阵第2⾏和第3列中的所有元素,在剩余元素(阴影区域)中找到最⼤的x71,然后将真实边界框B1分配给锚框A7。接下来,如 图13.4.2(中)所⽰,丢弃矩阵第7⾏和第1列中的所有元素,在剩余元素(阴影区域)中找到最⼤的x54,然后将真实边界框B4分配给锚框A5。最后,如图13.4.2(右)所⽰,丢弃矩阵第5⾏和第4列中的所有元素,在剩余元素(阴影区域)中找到最⼤的x92,然后将真实边界框B2分配给锚框A9。之后,我们只需要遍历剩余的锚框A1, A3, A4, A6, A8,然后根据阈值确定是否为它们分配真实边界框。

-
代码
def assign_anchor_to_bbox(ground_truth, anchors, device, iou_threshould=0.5):
	"""
	function : 将最接近的真实边界框分配给锚框
	:param ground_truth: 人工标注的边界框
	:param anchors: 随机生成的锚框
	:param device: GPU 或 CPU
	:param iou_threshould: 交并比设置,如果大于此值通过
	:return: anchors_bbox_map
	"""
	# 获得锚框的数量和真实标签框的数量
	num_anchors, num_gt_boxes = anchors.shape[0], ground_truth.shape[0]
	# 计算随机锚框与真实标签框的交并比
	# 位于第 i 行和第 j 列的元素 x_ij 是锚框 i 和 真实边界框 j 的 IoU
	jaccard = box_iou(anchors, ground_truth)
	# 对于每个锚框,分配的真实边界框的张量,我们先用 -1 填充
	anchors_bbox_map = torch.full((num_anchors,), -1, dtype=torch.long,
								  device=device)
	# 根据阈值,决定是否分配真实边界框,获得最大的 jaccard 的锚框
	# max_ious :最大的交并比值;indices :该行最大交并比值对应的序号
	max_ious, indices = torch.max(jaccard, dim=1)
	# 找到 max_ious 中 大于0.5 的锚框,获得索引值,变成行向量;
	# 两两一对[行数a,索引a,...行数j,索引j,]
	# anc_i 存储索引值
	anc_i = torch.nonzero(max_ious >= 0.5).reshape(-1)
	# box_j 存储对应索引值
	box_j = indices[max_ious >= 0.5]
	# 得到映射
	anchors_bbox_map[anc_i] = box_j
	# 列 cols 表示锚框数
	col_discard = torch.full((num_anchors,), -1)
	# 行 rows 表示真实边框数
	row_discard = torch.full((num_gt_boxes,), -1)
	for _ in range(num_gt_boxes):
		# 开始计算得到最大jaccard
		max_idx = torch.argmax(jaccard)
		box_idx = (max_idx % num_gt_boxes).long()
		anc_idx = (max_idx / num_gt_boxes).long()
		# 根据锚框来找到边框
		anchors_bbox_map[anc_idx] = box_idx
		# 将列丢掉
		jaccard[:, box_idx] = col_discard
		# 将行丢掉
		jaccard[anc_idx, :] = row_discard
	return anchors_bbox_map
4.4 锚框偏移量归一化
当我们得到了锚框时,获得了锚框的类别和偏移量,锚框A的偏移量将根据B和A中心坐标的相对位置以及这两个框的相对大小进行标记。我们定义框A和B,中心坐标分别为
A : ( x a , y a , w a , h a ) ; B : ( x b , y b , w b , h b ) A:(x_a,y_a,w_a,h_a);B:(x_b,y_b,w_b,h_b) A:(xa,ya,wa,ha);B:(xb,yb,wb,hb)
- 我们将 A 相对于B的偏移量标记为:
( x b − x a w a − μ x σ x , y b − y a h a − μ y σ y , log w b w a − μ w σ w , log h b h a − μ h σ h ) (\frac{\frac{x_b-x_a}{w_a}-\mu_x}{\sigma_x},\frac{\frac{y_b-y_a}{h_a}-\mu_y}{\sigma_y},\frac{\log\frac{w_b}{w_a}-\mu_w}{\sigma_w},\frac{\log\frac{h_b}{h_a}-\mu_h}{\sigma_h}) (σxwaxb−xa−μx,σyhayb−ya−μy,σwlogwawb−μw,σhloghahb−μh) - 代码
import torch
from d2l import torch as d2l


def offset_box(anchors, asigned_bb, eps=le - 6):
	"""
	function:对锚框偏移量进行转换
	:param anchors: 锚框
	:param asigned_bb:被分配的边框
	:param eps: 防止除零
	:return: 防止偏移
	"""
	# 将锚框变成(x_1,x_2,w_1,h_1)
	c_anc = d2l.box_corner_to_center(anchors)
	# 将边缘框变成(x_1,x_2,w_1,h_1)
	c_asigned_bb = d2l.box_corner_to_center(asigned_bb)
	# 坐标,高宽归一化
	offset_xy = 10 * (c_asigned_bb[:, :2] - c_anc[:, :2]) / c_anc[:, 2:]
	offset_wh = 5 * torch.log(eps + c_asigned_bb[:, 2:] / c_anc[:, 2:])
	# 将(坐标,高宽)拼接
	offset = torch.cat([offset_xy, offset_wh], axis=1)
	return offset
4.5 使用真实边界框标记锚框
- 类别数:[用户指定的类别 + 1];1表示的背景类,如果没有识别就为背景类
- 代码
def multibox_target(anchors, labels):
	"""
	function : 使用真实边界框标记锚框
	:param anchors: 锚框; [batch_size,x_1,y_1,x_2,y_2]
	:param labels: 标签 [batch_size,labels,x_1,y_1,x_2,y_2]
	:return:bbox_offset[边缘框的偏移], bbox_mask[边缘框的掩码], class_labels[标签类别]
	"""
	# 定义批量大小和锚框,
	# anchors.squeeze 表示:如果第 0 维大小为 1 ,则移除
	batch_size, anchors = labels.shape[0], anchors.squeeze(0)
	# 创建变量列表
	batch_offset, batch_mask, batch_class_labels = [], [], []
	# device = GPU,设置锚框大小
	device, num_anchors = anchors.device, anchors.shape[0]
	for i in range(batch_size):
		# 获取第 i 个 批量的标签 labels
		label = labels[i, :, :]
		# 将最接近的真实边界框分配给锚框
		anchors_bbox_map = assign_anchor_to_bbox(label[:, 1:], anchors, device)
		# 获得真实边缘框的掩码mask ,如果 anchors_bbox_map >=0 则为1,否则为 0
		bbox_mask = ((anchors_bbox_map >= 0).float().unsqueeze(-1)).repeat(1, 4)
		# 将类标签和分配的边界框坐标初始化为零
		class_labels = torch.zeros(num_anchors, dtype=torch.long, device=device)
		assigned_bb = torch.zeros((num_anchors, 4), dtype=torch.float32, device=device)
		# 使用真实边界框来标记锚框的类别
		# 如果一个锚框没有被分配,我们标签机其为背景(值为零)
		indices_true = torch.nonzero(anchors_bbox_map >= 0)
		bb_idx = anchors_bbox_map[indices_true]
		class_labels[indices_true] = label[bb_idx, 0].long() + 1
		assigned_bb[indices_true] = label[bb_idx, 1:]
		# 偏移量转换
		offset = offset_boxes(anchors, assigned_bb) * bbox_mask
		batch_offset.append(offset.reshape(-1))
		batch_mask.append(bbox_mask.reshape(-1))
		batch_class_labels.append(class_labels)
	bbox_offset = torch.stack(batch_offset)
	bbox_mask = torch.stack(batch_mask)
	class_labels = torch.stack(batch_class_labels)
	return (bbox_offset, bbox_mask, class_labels)
4.6 极大值抑制预测边界框
非极大值抑制(non_maximum suppression,NMS)的出现是为了解决在预测中,如果我们对于同样一个目标进行多次预测时,我们需要将多个预测的目标进行求最大的那个目标,这样我们就需要使用非机制抑制.这种技术在目标检测中经常用到。
- offset_inverse
根据带有预测偏移量的锚框来预测边界框
def offset_inverse(anchors, offset_preds):
	"""
	function: 根据带有预测偏移量的锚框来预测边界框
	锚框 + 预测偏移量  ->预测-> 预测边界框
	我们有一堆的锚框,我们需要通过跟标注的边缘框的距离来预测
	这些锚框属于那个类别的锚框
	:param anchors: 锚框 [x_1,y_1,x_2,y_2]
	:param offset_preds: 预测偏移量;[x,y,w,h]
	:return: 预测的边界框
	"""
	# [x_1,y_1,x_2,y_2] --> anc = [x,y,w,h]
	anc = d2l.box_corner_to_center(anchors)
	# 没弄明白为什么要这么做
	pred_bbox_xy = (offset_preds[:, :2] * anc[:, 2:] / 10) + anc[:, :2]
	pred_bbox_wh = torch.exp(offset_preds[:, 2:] / 5) * anc[:, 2:]
	# pred_bbox [x,y,w,h]
	pred_bbox = torch.cat((pred_bbox_xy, pred_bbox_wh), axis=1)
	predicted_bbox = d2l.box_center_to_corner(pred_bbox)
	return predicted_bbox
def nms(boxes, scores, iou_threshould):
	"""
	function : 对预测边界框的置信度进行排序
	:param boxes: 预测边界框
	:param scores: 置信度
	:param iou_threshould: 设置丢弃的交并比值
	:return: 保留预测边界框的指标
	"""
	# 对置信度进行降序排序,B 表示降序后的索引值
	B = torch.argsort(scores, dim=-1, descending=True)
	# 设置保留的列表,保留预测边界框的指标
	keep = []
	while B.numel() > 0:
		i = B[0] # 将列表中最大置信度作为B0基准
		keep.append(i)
		if B.numel() == 1: break
		iou = box_iou(boxes[i, :].reshape(-1, 4), # 将B0与其他的锚框进行交并比 IoU
					  boxes[B[1:], :].reshape(-1, 4)).reshape(-1)
		# torch.nonzero 返回的不为零的值所在的索引位置
		inds = torch.nonzero(iou <= iou_threshould).reshape(-1)
		B = B[inds + 1]
	return torch.tensor(keep, device=boxes.device)
- multibox_detection
def multibox_detection(cls_probs, offset_preds, anchors, nms_threshould=0.5,
					   pos_threshould=0.009999999):
	"""
	function: 使用非极大值抑制来预测边界框
	:param cls_probs:类别的概率大小[batch_size,num_classes,num_anchors]
	:param offset_preds:偏移预测值
	:param anchors:锚框 [batch_size,x1,y1,x2,y2]
	:param nms_threshould: nms的丢弃交并比
	:param pos_threshould:
	:return:[batch_size,num_anchors,class,Confidence_interval,x1,y1,x2,y2]
	"""
	device, batch_size = cls_probs.device, cls_probs.shape[0]
	anchors = anchors.squeeze(0) # [x1,y1,x2,y2]
	num_classes, num_anchors = cls_probs.shape[1], cls_probs.shape[2]
	out = []
	for i in range(batch_size):
		cls_probs, offset_preds = cls_probs[i], offset_preds[i].reshape(-1, 4)
		conf, class_id = torch.max(cls_probs[1:], 0)
		# predicted_bb = [x1,y1,x2,y2]
		predicted_bb = offset_inverse(anchors, offset_preds)
		keep = nms(predicted_bb, conf, nms_threshould)
		all_idx = torch.arange(num_anchors, dtype=torch.long, device=device)
		combined = torch.cat((keep, all_idx))
		uniques, counts = combined.unique(return_counts=True)
		non_keep = uniques[counts == 1]
		all_idx_sorted = torch.cat((keep, non_keep))
		class_id[non_keep] = -1
		class_id = class_id[all_idx_sorted]
		conf, predicted_bb = conf[all_idx_sorted], predicted_bb[all_idx_sorted]
		below_min_idx = (conf < pos_threshould)
		class_id[below_min_idx] = -1
		conf[below_min_idx] = 1 - conf[below_min_idx]
		pred_info = torch.cat((class_id.unsqueeze(1),
							   conf.unsqueeze(1),
							   predicted_bb), dim=1)
		out.append(pred_info)
	return torch.stack(out)
5. 多尺度目标检测
5.1 多尺度锚框
就是我们可以通过不同的比例来对同样的图像生成 不同大小的锚框
- 代码
def display_anchors(fmap_w, fmap_h, s):
	"""
	function : 根据指定的高fmap_h,宽fmap_w,和比例s 来生成不同的锚框,
	因为锚框中的(x,y)轴坐标值已经被处以特征图fmap的宽度和高度,因此这些值
	介于0和1之间,表示特征图中锚框的相对位置。所以为了还原,我们需要乘以
	相对应的w,h
	:param fmap_w: 宽
	:param fmap_h: 高
	:param s: 比例大小
	:return: 显示锚框
	"""
	# 设置画布大小
	d2l.set_figsize()
	# 全为 0 的张量,fmap = (x,y,f,w)
	fmap = torch.zeros((1, 10, fmap_h, fmap_w))
	# 生成不同尺寸的锚框
	anchors = d2l.multibox_prior(fmap, sizes=s, ratios=[1, 2, 0.5])
	bbox_scale = torch.tensor((w, h, w, h))
	d2l.show_bboxes(d2l.plt.imshow(img).axes,
					anchors[0] * bbox_scale)
5.2 多尺度检测
我们可以利用深层神经网络在多个层次上对图像进行分层表示,从而实现多尺度目标检测
6. 目标检测数据集
6.1 数据集预处理思路
- 下载数据集
- 读取数据集的图像和标签
- 将(features,labels)变成 dataset 一对对的
- 将 dataset 变成批量的dataloader,得到 train_iter,val_iter
- 批量读取显示
6.2 源码
# 1. 导入相关数据库
import matplotlib.pyplot as plt
import os
import pandas as pd
import torch
import torchvision

from d2l import torch as d2l

# 2. 定义数据地址
d2l.DATA_HUB['banana-detection'] = (
    d2l.DATA_URL + 'banana-detection.zip',
    '5de26c8fce5ccdea9f91267273464dc968d20d72')

# 3. 读取香蕉检测数据集中的图像和标签
def read_data_bananas(is_train=True):
    """读取香蕉检测数据集中的图像和标签"""
    # data_dir ='..\\data\\banana-detection
    data_dir = d2l.download_extract('banana-detection')
    # 地址目录
    csv_fname = os.path.join(data_dir, 'bananas_train' if is_train
                             else 'bananas_val', 'label.csv')
    # 读取 csv文件
    # 原始的csv_data形状:[1000,6]:[img_name,label,xmin,ymin xmax ymax]
    csv_data = pd.read_csv(csv_fname)
    # 将 表格数据的行序列用 img_name 代替
    csv_data = csv_data.set_index('img_name')# 形状:[1000,5]:(img_name)[label,xmin,ymin,xmax,ymax]
    # 创建两个空列表 images,targets
    images, targets = [], []
    # 逐行迭代数据
    # img_name:str '0.png';
    # target:series:[0-label,0-xmin,0-ymin,0-xmax,0-ymax]
    # targets : (1000,5);每行为:[label,xmin,ymin,xmax,ymax]
    # images :  (1000,3):每行为:[channels,height,width]
    for img_name, target in csv_data.iterrows():
        images.append(torchvision.io.read_image(
            os.path.join(data_dir, 'bananas_train' if is_train else
                         'bananas_val', 'images', f'{img_name}')))
        # 这里的target包含(类别,左上角x,左上角y,右下角x,右下角y),
        # 其中所有图像都具有相同的香蕉类(索引为0)
        targets.append(list(target))
        # images = Tensor[image_channels, image_height, image_width]
        # unsqueeze 在第 1 维增加一个大小为 1 的维度,并归一化处理
    return images, torch.tensor(targets).unsqueeze(1) / 256

#@save
# 4. 自定义香蕉数据集,需满足三个条件
# 1) 初始化函数: __init__
# 2) 根据 index 获取 label 函数: __getitem__
# 3) 特征的长度函数 : __len__
class BananasDataset(torch.utils.data.Dataset):
    """一个用于加载香蕉检测数据集的自定义数据集"""
    def __init__(self, is_train):
        self.features, self.labels = read_data_bananas(is_train)
        print('read ' + str(len(self.features)) + (f' training examples' if
              is_train else f' validation examples'))

    def __getitem__(self, idx):
        return (self.features[idx].float(), self.labels[idx])

    def __len__(self):
        return len(self.features)


# 5. 加载香蕉检测数据集,将得到的dataset转换成 DataLoader 类型,
# 生成训练迭代器train_iter,验证迭代器val_iter ,方便后期训练
def load_data_bananas(batch_size):
    """加载香蕉检测数据集"""
    # 训练集需要打乱来提高网络的鲁棒性,所以 shuffle=True
    # 验证集则不需要,所以 shuffle=False
    train_iter = torch.utils.data.DataLoader(BananasDataset(is_train=True),
                                             batch_size, shuffle=True)
    val_iter = torch.utils.data.DataLoader(BananasDataset(is_train=False),
                                           batch_size)
    return train_iter, val_iter


# 6. 定义批量大小batch_size=32,边缘框大小edge_size=256
batch_size, edge_size = 32, 256

# 7. 加载训练集迭代器 train_iter,验证集不需要
train_iter, _ = load_data_bananas(batch_size)
# features:[1000]
# labels = tensor:(1000,1,5)
# 8. 将训练集中的第一个batch拿出来
batch = next(iter(train_iter))

print(batch[0].shape, batch[1].shape)

# 9. 将第0个批量中的前10个训练集加载进来,
#    permute 调换张量的顺序为 (0,2,3,1)后再除以255后使得张量值在[0,1]之间
imgs = (batch[0][0:10].permute(0, 2, 3, 1)) / 255

# 10.设置轴
axes = d2l.show_images(imgs, 2, 5, scale=2)

# 11. 将前10张图片含边缘框显示出来
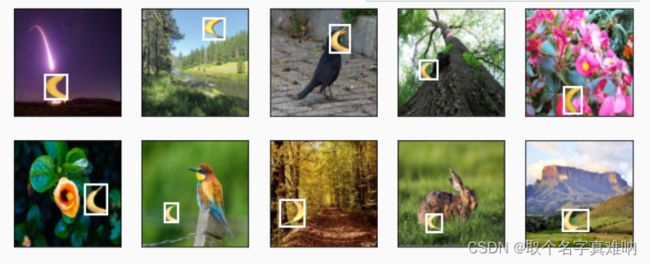
for ax, label in zip(axes, batch[1][0:10]):
    d2l.show_bboxes(ax, [label[0][1:5] * edge_size], colors=['w'])
    plt.show()


