微信小程序(二)-- 项目实战
技术选型
小程序的第三方框架:
- 腾讯wepy 语法类似vue
- 美团mpvue 语法类似vue
- 京东taro 语法类似react
- 滴滴 chameleon
- uni-app 语法类似vue
- 原生框架 MINA
本次微信小程序的实战项目,使用原生框架。
项目搭建
1 新建小程序项目
填入自己的appid
搭建目录结构

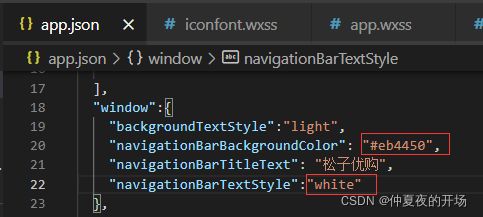
修改应用标题和页面标题;
删除log页面;
删除app.wxss和index.wxss中的内容
删除app.js和index.js中的内容,并且使用wx-app和wx-page快捷生成代码。
搭建项目的页面

列式编程小技巧:
Shift+Alt+鼠标,可以从鼠标点击的2次头尾的列。
Ctrl+D 可以对多列选择从当前到之后的片段。
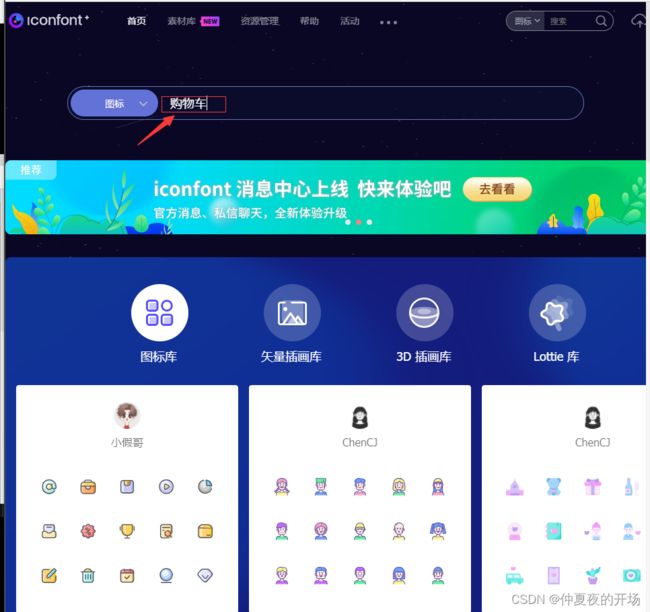
2 引入字体图标
https://www.iconfont.cn/
步骤:
- 查找要用的图标;
- 点击选择的图标,点击
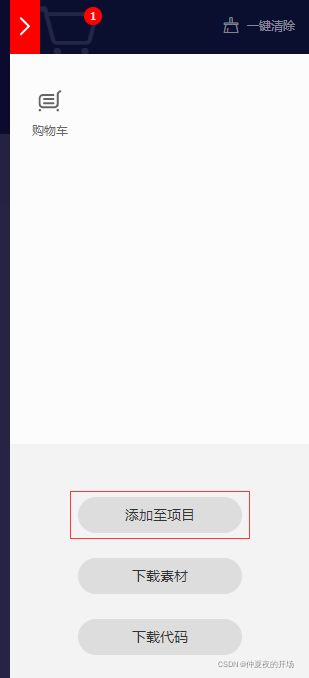
添加入库 - 选好需要的所有图标后,点击右边
购物车的按钮 - 点击
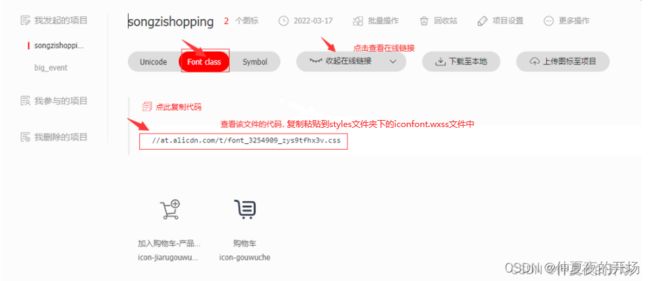
添加至项目 - 选择
Font class,选择查看在线链接,复制当前生成的css文件链接,进行查看。 - 将第5步中的css文件中的代码,全选复制粘贴至项目styles文件夹下的iconfont.wxss文件中
- 在app.wxss文件中引入iconfont.wxss的内容,
@import "./styles/iconfont.wxss;"注意这里要加分号,否则下面的样式会报错。 - 字体图标的使用:
3 搭建项目tabbar结构
tabbar就是小程序中页面最下方的标签结构。
注意:tabbar最少有2个项才行,只写一个会报错的。
在app.json文件中的windows下方写一个同级的tabber,如图。
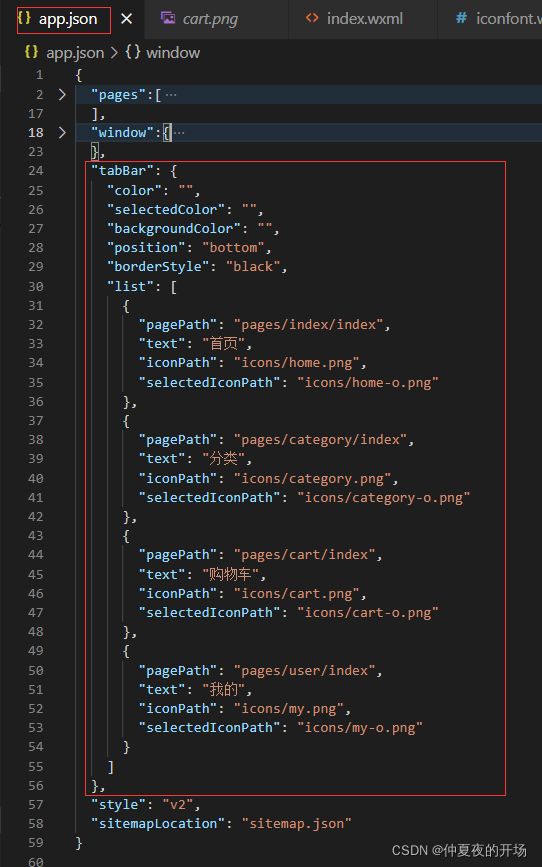
"tabBar": {
    "color": "",// 未选中时的字体颜色
    "selectedColor": "",
    "backgroundColor": "",
    "position": "bottom",
    "borderStyle": "black",
    "list": [
      {
        "pagePath": "pages/index/index",// 页面的相对路径,注意写法,这里是斜杠,而不是反斜杠
        "text": "首页",// 标题
        "iconPath": "icons/home.png",// 图标的相对路径
        "selectedIconPath": "icons/home-o.png"// 选中时的图标的相对路径
      },
      {
        "pagePath": "pages/category/index",
        "text": "分类",
        "iconPath": "icons/category.png",
        "selectedIconPath": "icons/category-o.png"
      },
      {
        "pagePath": "pages/cart/index",
        "text": "购物车",
        "iconPath": "icons/cart.png",
        "selectedIconPath": "icons/cart-o.png"
      },
      {
        "pagePath": "pages/user/index",
        "text": "我的",
        "iconPath": "icons/my.png",
        "selectedIconPath": "icons/my-o.png"
      }
    ]
  },
4 初始化页面样式
/* 全局引入wxss文件,每个页面都能使用这个文件中的类 */
@import "./styles/iconfont.wxss";

/* 在微信小程序中,不支持通配符“*” */
page,view,text,swiper,swiper-item,image,navigater {
  padding: 0;
  margin: 0;
  box-sizing: border-box;
}
/* 主题颜色,通过变量来实现
  1 less中存在变量这个知识
  2 原生的css和wxss也支持变量
*/
page{
  /* 定义主题颜色 */
  --themeColor: #eb4450;
  /* 定义统一字体大小,假设设计稿大小是375px
    1px = 2rpx
    14px = 28px
  */
  font-size: 28rpx;
}
/* index.wxss */
view{
  /* 使用主题颜色 */
  color:var(--themeColor);
}
首页
效果

小技巧:取消下图中的勾选,可以解决VS中只有一个文件夹不展开的问题。

首页-轮播图
首页-获取轮播图数据
接口文档地址:https://www.showdoc.com.cn/128719739414963
报错和解决方法如下2图:

解决方法一:
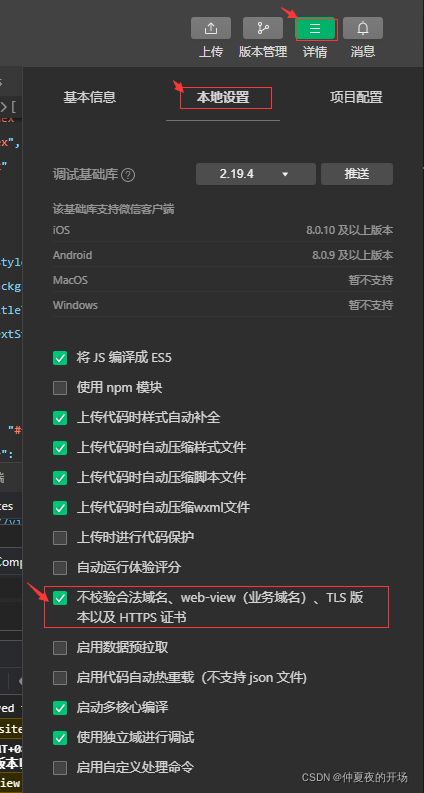
解决方法二:
介绍->点击链接跳转至官网首页->扫码登录->设置啥子服务器来着

// index.js
// 0 引入用来发送请求的方法-- 解构方式拿到request函数
import { request } from "../../request/index.js"
//Page Object
Page({
  data: {
    // 轮播图数组
    swiperList:[]
  },
  // 页面开始加载的时候就会触发的事件
  onLoad: function(options) {
    // 1 发送异步请求,获取轮播图数据
    // 优化的手段可以通过es6的promise来解决这个问题
    wx.request({
      url:'https://api-hmugo-web.itheima.net/api/public/v1/home/swiperdata',
      success:(res) => {
        // 箭头函数内部的this是词法作用域,由上下文确定
        // console.log(res.data)
        // console.log(this,typeof(this));
        this.setData({
          swiperList:res.data.message
        })
      }
    })
  }
});
首页-轮播图-动态渲染
<view class="szyg_index">

  <SearchInput>SearchInput>


  <view class="index_swiper">


    <swiper autoplay interval="3000" indicator-dots circular>
      <swiper-item
      wx:for="{{swiperList}}"
      wx:key="goods_id"
      >
        <navigator>
          <image  mode="widthFix"  src="{{item.image_src}}">

          image>
        navigator>
      swiper-item>
    swiper>
  view>

view>
/* index.wxss */
.index_swiper swiper {
  width: 750rbx;
  height: 340rpx;
}
.index_swiper swiper image {
  width: 100%;
}
轮播图优化
容易陷入回调地狱,需要用promise封装。
// request文件夹下的index.js
export const request=(params)=>{
  return new Promise((resolve,reject)=>{
    wx.request({
      ...params,
      success: (result)=>{
        resolve(result)
      },
      fail: (err)=>{
        reject(err)
      }
    });
  })
}
index文件夹下的index.js
// 0 引入用来发送请求的方法-- 解构方式拿到request函数
import { request } from "../../request/index.js"
//Page Object
Page({
  data: {
    // 轮播图数组
    swiperList:[],
  },
  // 页面开始加载的时候就会触发的事件
  onLoad: function(options) {
    // 1 发送异步请求,获取轮播图数据
    // 优化的手段可以通过es6的promise来解决这个问题
    // wx.request({
    //   url:'https://api-hmugo-web.itheima.net/api/public/v1/home/swiperdata',
    //   success:(res) => {
    //     // 箭头函数内部的this是词法作用域,由上下文确定
    //     console.log(res.data)
    //     // console.log(this,typeof(this));
    //     this.setData({
    //       swiperList:res.data.message
    //     })
    //   }
    // })
    this.getSwiperList()
  },
  // 获取轮播图数据
  getSwiperList() {
    request({url:'https://api-hmugo-web.itheima.net/api/public/v1/home/swiperdata'})
    .then(result=>{
      this.setData({
              swiperList:result.data.message
            })
    })
  }
});
首页-分类导航
// 0 引入用来发送请求的方法-- 解构方式拿到request函数
import { request } from "../../request/index.js"
//Page Object
Page({
  data: {
    // 轮播图数组
    swiperList:[],
    // 导航数组
    catesList:[],
  },
  // 页面开始加载的时候就会触发的事件
  onLoad: function(options) {
    // 1 发送异步请求,获取轮播图数据
    // 优化的手段可以通过es6的promise来解决这个问题
    // wx.request({
    //   url:'https://api-hmugo-web.itheima.net/api/public/v1/home/swiperdata',
    //   success:(res) => {
    //     // 箭头函数内部的this是词法作用域,由上下文确定
    //     console.log(res.data)
    //     // console.log(this,typeof(this));
    //     this.setData({
    //       swiperList:res.data.message
    //     })
    //   }
    // })
    this.getSwiperList()
    this.getCatesList()
  },
  // 获取轮播图数据
  getSwiperList() {
    request({url:'https://api-hmugo-web.itheima.net/api/public/v1/home/swiperdata'})
    .then(result=>{
      this.setData({
              swiperList:result.data.message
            })
    })
  },
  // 获取分类导航数据
  getCatesList(){
    request({url:'https://api-hmugo-web.itheima.net/api/public/v1/home/catitems'})
    .then(result=>{
      console.log(result);
      this.setData({
              catesList:result.data.message
            })
    })
  }
});
<view class="szyg_index">

  <SearchInput>SearchInput>


  <view class="index_swiper">


    <swiper autoplay interval="3000" indicator-dots circular>
      <swiper-item
      wx:for="{{swiperList}}"
      wx:key="goods_id"
      >
        <navigator>
          <image  mode="widthFix"  src="{{item.image_src}}">

          image>
        navigator>
      swiper-item>
    swiper>
  view>


  <view class="index_cate">
    <navigator
    wx:for="{{catesList}}"
    wx:key="name"
    >
      <image class="" src="" mode="widthFix" src="{{item.image_src}}"/>

    navigator>

  view>

view>
这里用了弹性盒子的知识,.index_cate是Flex容器。
设置navigator标签的flex: 1,则平分容器的空间。
这时,image的大小仍然很大,如下图
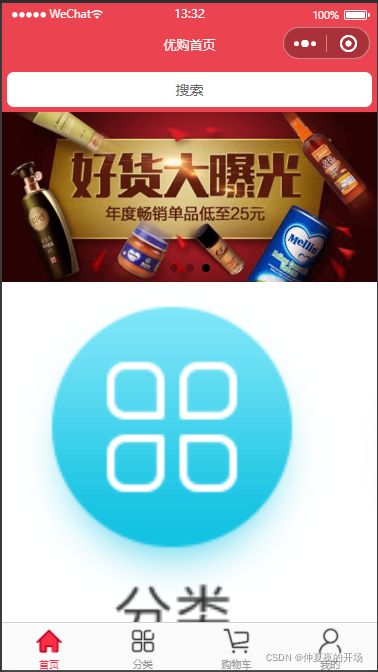
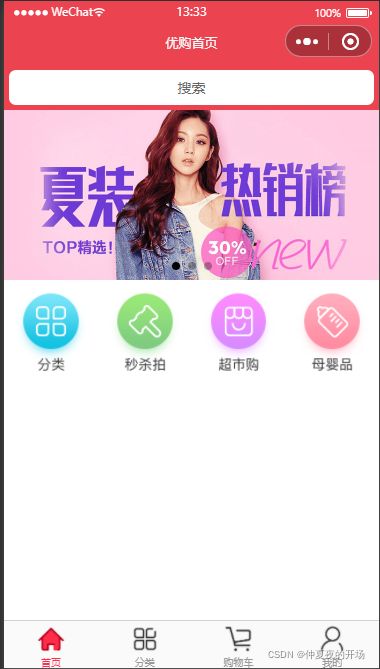
只有设置image标签的width:100%;之后,图标大小才能如预想那般显示。
设置navigator标签的padding: 10px;,让图标变得更小一些,(这里注意:图片已经是随宽度等比例大小变化)。
.index_cate{
  display: flex;
  navigator{
    flex: 1;
    padding: 10px;
    image{
      width:100%;
    }
  }
}
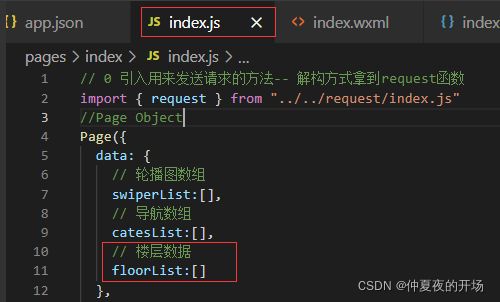
首页-楼层
请求URL:https://api-hmugo-web.itheima.net/api/public/v1/home/floordata
楼层结构
  <view class="index_floor">
    <view class="floor_group"
    wx:for="{{floorList}}"
    wx:for-item="item1"
    wx:for-index="index1"
    wx:key="floor_title"
    >

      <view class="floor_title">

        <image mode="widthFix" src="{{item1.floor_title.image_src}}">image>
      view>

      <view class="floor_list">
        <navigator
        wx:for="{{item1.product_list}}"
        wx:for-item="item2"
        wx:for-index="index2"
        wx:key="name"
        >

        <image mode="{{index2===0?'widthFix':'scaleToFill'}}" src="{{item2.image_src}}">image>
        navigator>
      view>
    view>
  view>
楼层css优化
首页的index.less文件
1.设置导航标签浮动float: left;,宽度width:33.33%,从而每个导航标签的宽度都占屏幕的1/3;
2.设置第一张图盘的高度随着宽度变化,在wxml文件中设置图片标签的mode="{{index2===0?'widthFix':'scaleToFill'}}";
3.后4张图片的高度是第1张图片的高度的一半。在浏览器中通过url查看第1张图片,得到高度为232 * 386,则设置其高度为 33.33vw * 386 / 232。通过子代选择器,选择后4张图片,设置高度为第1张图片的一半。
4.清除.floor_list的浮动
5.加上边框。这里注意:需要在全局设置navigator标签box-sizing: border-box;
6.设置.floor_list中的图片的宽高继承width: 100%; height: 100%;
.index_floor{
  .floor_group{
    .floor_title{
      padding: 10rpx 0;
      image{
        width: 100%;
      }
    }
    .floor_list{
      // 清除浮动
      overflow: hidden;
      // 每张图片的宽度都是容器的1/3,后面4张的高度都是第1张的1/2.
      navigator{
        float: left;
        width: 33.33%;
        // &代表所有父选择器(不仅仅是最近的祖先)
        // -n+2,表示倒数第4个元素,以及后边的所有元素。即后4个元素
        &:nth-last-child(-n+4){
          // 原图的宽高 232 * 386
          // 第一张:232 / 386 = 33.33vw / height
          // 100vw等于屏幕宽度
          // 除法不支持的,加上(),这样wxss就可以算出值了。
          height:((33.33vw * 386 / 232) / 2);
          // 后4张图片加左边框
          border-left: 10rpx solid #ffff;
        }
        // 2、3两个超链接
        &:nth-child(2),
        &:nth-child(3){
          border-bottom: 10rpx solid #fff;
        }
        image{
          width: 100%;
          // 高要继承
          height: 100%;
        }
      }
    }
  }
}
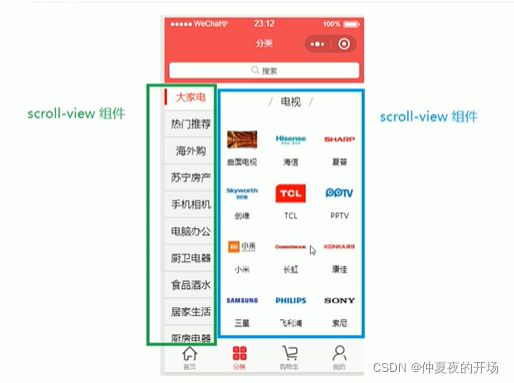
分类页面
效果
每次编辑保存页面时,项目都会重新跳回到首页。解决方法:
指定编译模式,其实就是设置小程序每次启动的页面而已。
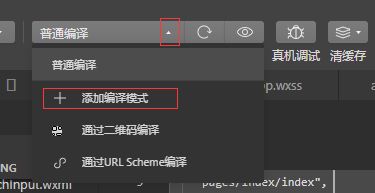
注意:当前在哪个页面上添加编译模式,在启动页面项就会自动填充该页面。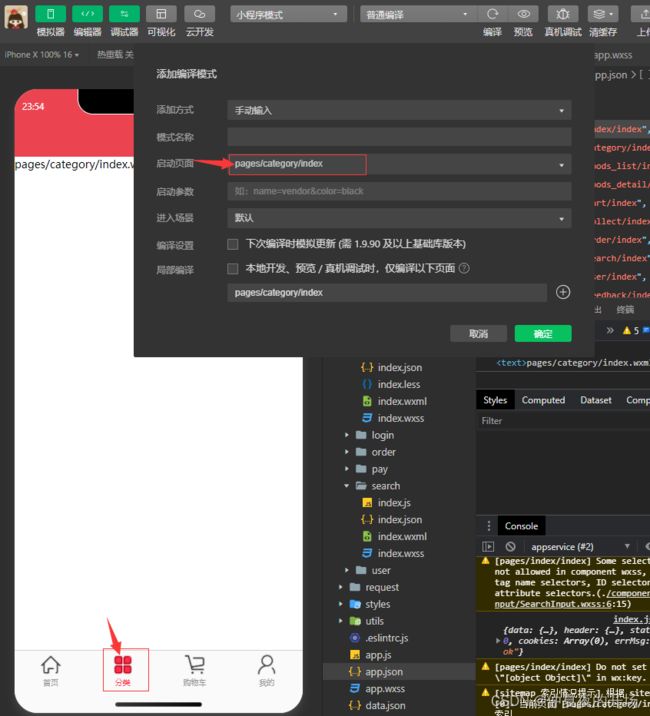
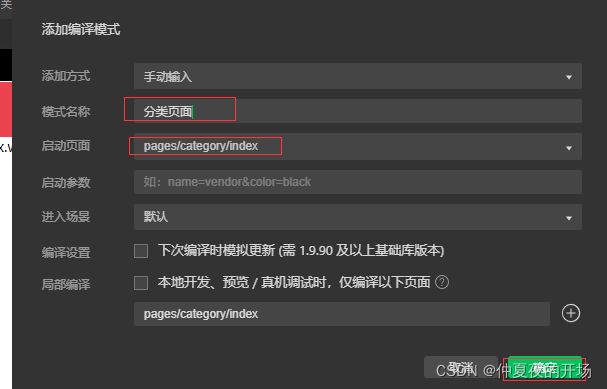
编辑保存后,重新刷新后,就是这个页面。
页面布局
静态布局部分的代码:
// category文件夹下的index.js文件
{
  "usingComponents": {
    "SearchInput":"../../components/SearchInput/SearchInput"
  },
  "navigationBarTitleText": "商品分类"
}
自己试着写的代码如下:
    <scroll-view scroll-y class="right_content">
      <view class="goods_group"
      wx:for="{{rightContent}}"
      wx:for-item="item1"
      wx:for-index="index1"
      wx:key="cat_id"
      >
        <view class="goods_title">/ {{item1.cat_name}} /view>
        <view class="goods_list">
          <view class="goods"
          wx:for="{{item1.children}}"
          wx:key="cat_id"
          >
            <image mode="widthFix" class="goods_image" src="{{item.cat_icon}}">image>
            <view class="goods_name">{{item.cat_name}}view>
          view>
        view>
      view>
    scroll-view>
page{
  height: 100%;
}
.cates{
  height: 100%;
  .cates_container{
    display: flex;
    height: ~'calc(100vh - 90rpx)';
    // height: 100%;
    .left_menu{
      // 伸缩盒子的子项,则高度是100%
      flex: 2;
      // background-color: aqua;
      .menu_item{
        height: 80rpx;
        display: flex;
        justify-content: center;
        align-items: center;
        font-size: 30rpx;
      }
    }
    .right_content{
      margin: 20rpx;
      // 伸缩盒子的子项,则高度是100%
      flex: 5;
      // background-color: lawngreen;
      .goods_group{
        .goods_title{
          text-align: center;
        }
        .goods_list{

          .goods{
            float: left;
            width:33.33%;
            border: 2px solid blue;
            image{
              width: 100%;

            }
            .goods_name{
              text-align: center;

            }
          }
        }
      }
    }
  }
}
- 每个种类都是一个超链接,需要用navigator标签;
<view class="cates">

  <SearchInput>SearchInput>


  <view class="cates_container">

    <scroll-view scroll-y class="left_menu">
      <view
      class="menu_item {{currentIndex===index?'active':''}}"
      wx:for="{{leftMenuList}}"
      wx:key="*this"
      >
    {{item}}view>
    scroll-view>


    <scroll-view scroll-y class="right_content">
      <view class="goods_group"
      wx:for="{{rightContent}}"
      wx:for-item="item1"
      wx:for-index="index1"
      wx:key="cat_id"
      >
        <view class="goods_title">
          <text class="delimiter">/text>
          <text class="title">{{item1.cat_name}}text>
          <text class="delimiter">/text>
        view>
        <view class="goods_list">
          <navigator
          wx:for="{{item1.children}}"
          wx:key="cat_id"
          >
            <image mode="widthFix" src="{{item.cat_icon}}">image>
            <view class="goods_name">{{item.cat_name}}view>
          navigator>
        view>
      view>
    scroll-view>

  view>

view>
page{
  height: 100%;
}
.cates{
  height: 100%;
  .cates_container{
    display: flex;
    height: ~'calc(100vh - 90rpx)';
    // height: 100%;
    .left_menu{
      // 伸缩盒子的子项,则高度是100%
      flex: 2;
      // background-color: aqua;
      .menu_item{
        height: 80rpx;
        display: flex;
        justify-content: center;
        align-items: center;
        font-size: 30rpx;
      }
      .active{
        color: var(--themeColor);
        // 颜色等于字体颜色
        border-left: 5rpx solid current;
      }
    }
    .right_content{
      // 伸缩盒子的子项,则高度是100%
      flex: 5;
      // background-color: lawngreen;
      .goods_group{
        .goods_title{
          // 高度和左侧的菜单子项一样高
          height: 80rpx;
          display: flex;
          justify-content: center;
          align-items: center;
          .delimiter{
            color:#ccc;
            padding: 0 10rpx;
          }
          .title{

          }
        }
        .goods_list{
          background-color: blue;
          display: flex;
          // 换行效果
          flex-wrap: wrap;
          navigator{
            width:33.33%;
            // border: 2px solid blue;
            // 图片和文字都水平居中,给父元素添加该属性
            text-align: center;
            image{
              // 移动端的图片的宽度一般都是100%,表示它的宽度由外部容器决定
              // 可以在全局样式文件中进行设置
              // width: 100%;

            }
            .goods_name{
              // text-align: center;

            }
          }
        }
      }
    }
  }
}
// 0 引入用来发送请求的方法-- 解构方式拿到request函数
import { request } from "../../request/index.js"
// pages/category/index.js
Page({

    /**
     * 页面的初始数据
     */
    data: {
      // 左侧的菜单数据
      leftMenuList:[],
      // 右侧的商品数据
      rightContent:[],
      // 被点击的左侧的菜单
      currentIndex:0
    },
    // 接口的返回数据
    // 不放data里是因为它不与渲染层交互,只是临时存储,节省资源
    // setData是设置data:{}里面的数据才用的

    Cates:[],
    /**
     * 生命周期函数--监听页面加载
     */
    onLoad: function (options) {
      this.getCates()
    },
    // 获取分类数据
    getCates() {
      request({
        url:'https://api-hmugo-web.itheima.net/api/public/v1/categories',
      }).then(res => {
        this.Cates = res.data.message
        // 构造左侧的大菜单数据
        // let leftMenuList = this.Cates.map(v=>v.cat_name);
        // 构造右侧的商品数据
        let rightContent = this.Cates[0].children
        this.setData({
          leftMenuList: this.Cates.map(v=>v.cat_name),
          rightContent
        })
      })
    }
})
分类-点击菜单切换商品内容
- 点击左侧菜单项,会出现激活效果;
- 同时右侧内容跟着变化
这里,我原本 不理解为什么右侧内容是只获取了Cates[0]。因为是根据左侧选择了菜单项,右侧会对应的显示Cates[index]的内容。以后做项目也得注意,先完成能看到的部分,不要想复杂了
![]()
也不能直接在onLoad函数里面直接将0改成this.currentIndex。否则会报错。
难道Page对象的初始数据data对象中的数据不能被js中的函数使用吗?

// 左侧菜单项的点击事件
    handleItemTap(e) {
      /*
      1 获取被点击的标题的索引
      2 给data中的currentIndex赋值
      3 根据不同的索引来渲染右侧的商品内容
      */
      const {index} = e.currentTarget.dataset
      let rightContent = this.Cates[index].children
      this.setData({
        currentIndex: index,
        rightContent
      })
    }
    <scroll-view scroll-y class="left_menu">
      <view
      bindtap="handleItemTap"
      data-index="{{index}}"
      class="menu_item {{currentIndex===index?'active':''}}"
      wx:for="{{leftMenuList}}"
      wx:key="*this"
      >
    {{item}}view>
    scroll-view>
分类-使用缓存技术
因为接口的返回数据量太大了,size为262KB。为了优化用户体验,需要做一个缓存效果。
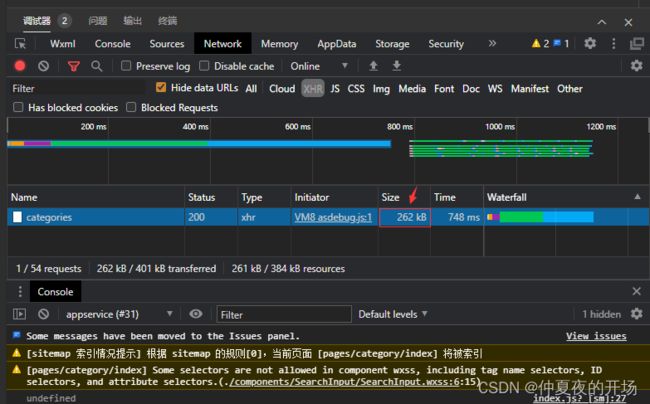

思路:
在打开页面的时候,先做一个判断,判断本地存储中有没有旧的数据,如果说没有,就发送新的请求来获取数据;如果说有就的数据并且没有过期,就使用本地存储中的旧数据。
代码:
优化接口代码-- 提取公共接口路径
将下图中的这一串路径简化一下,把里面的公共字符串部分提取出来,希望提取完毕后变成/categories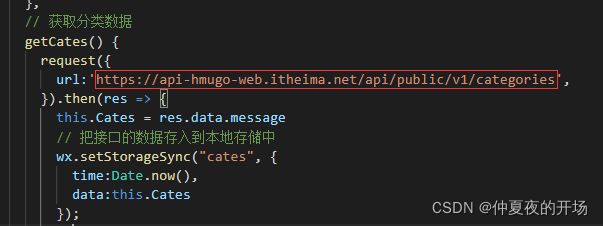

https://github.com/facebook/regenerator/blob/5703a79746fffc152600fdcef46ba9230671025a/packages/regenerator-runtime/runtime.js
商品列表
商品列表-获取分类id
在导航标签中设置跳转链接:url:"/page/goods_list/index?cid={{item.cat_id"
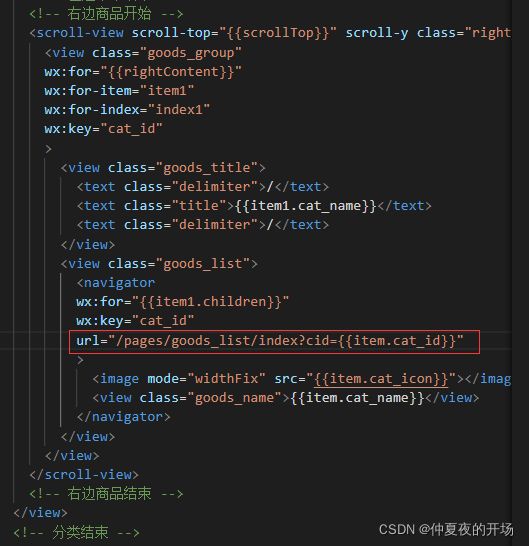
在跳转后的页面中,设置显示页面参数,可以看到页面参数为:cid=8

商品列表–实现搜索框和tabs组件
效果:

添加搜索栏:
1.在goods_list文件夹下的index.json文件中进行组件声明;
{
  "usingComponents": {
    "SearchInput":"../../components/SearchInput/SearchInput"
  },
  "navigationBarTitleText":"商品列表"

}
2.在goods_list文件夹下的index.wxml文件中使用组件标签
<SearchInput>SearchInput>
自定义组件实现tabs组件:
这里为什么要自定义组件呢?难道可以重复利用吗?
1.新建Tabs组件;
2.在goods_list中进行引入
3.page中使用自定义组件的标签
// pages/goods_list/index.js
Page({
  /**
     * 页面的初始数据
     */
   data: {
    tabs:[
      {
        id:0,
        value:"综合",
        isActive:true
      },
      {
        id:1,
        value:"销量",
        isActive:false
      },
      {
        id:2,
        value:"价格",
        isActive:false
      }
    ],
    // 被点击的标题的index

  },

  /**
   * 生命周期函数--监听页面加载
   */
  onLoad: function (options) {
    console.log(options);
  },
  // 标题的点击事件,只不过是从子组件传递过来的
  handleTabsItemChange(e) {
    // 1 获取被点击的标题索引
    const {index} = e.detail
    // 2 修改原数组,产生一个激活产生效果
    let {tabs} = this.data;
    tabs.forEach((v,i) => {
      // v.isActive = i===index ? true:false
      i===index?v.isActive=true:v.isActive=false
    })
    // 3 赋值到data中
    this.setData({
      tabs
    })
  }
})
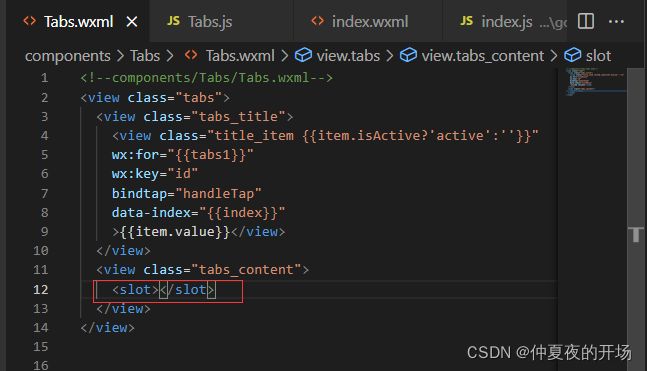
插槽:
商品列表–静态样式
<SearchInput>SearchInput>
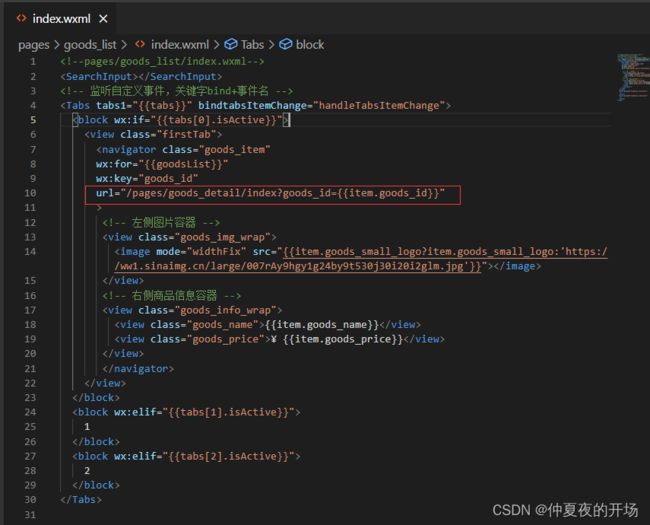
<Tabs tabs1="{{tabs}}" bindtabsItemChange="handleTabsItemChange">
<block wx:if="{{tabs[0].isActive}}">
<view class="firstTab">
<navigator class="goods_item"
>
<view class="goods_img_wrap">
<image mode="widthFix" src="https://i0.hdslb.com/bfs/archive/5bfe3753cf7113e9121f4adc37e8ca996b763443.jpg@160w_100h_1c.webp">image>
view>
<view class="goods_info_wrap">
<view class="goods_name">海信(Hisense)LED ffdfdfdfdfdsf辅导费地方得到辅导费d600英寸大幅度分开京东方假大空觉得 角度看海信(Hisense)LED ffdfdfdfdfdsf辅导费地方得到辅导费d600英寸大幅度分开京东方假大空觉得 角度看view>
<view class="goods_price">¥ 13999view>
view>
navigator>
<navigator class="goods_item"
>
<view class="goods_img_wrap">
<image mode="widthFix" src="https://i0.hdslb.com/bfs/archive/5bfe3753cf7113e9121f4adc37e8ca996b763443.jpg@160w_100h_1c.webp">image>
view>
<view class="goods_info_wrap">
<view class="goods_name">海信(Hisense)LEDview>
<view class="goods_price">¥ 13999view>
view>
navigator>
view>
block>
<block wx:elif="{{tabs[1].isActive}}">
1
block>
<block wx:elif="{{tabs[2].isActive}}">
2
block>
Tabs>
/* pages/goods_list/index.wxss */
.firstTab{
  .goods_item{
    display: flex;
    border-bottom: 5rpx solid #ccc;
    .goods_img_wrap{
      flex: 2;
      display: flex;
      justify-content: center;
      align-items: center;
      image{
        width: 70%;
      }
    }
    .goods_info_wrap{
      // 伸缩盒子
      display: flex;
      // 主轴方向:列的方向
      flex-direction: column;
      // 空白环绕
      justify-content: space-around;
      flex: 3;
      .goods_name{
        display: -webkit-box;
        overflow: hidden;
        -webkit-box-orient: vertical;
        -webkit-line-clamp:2;
      }
      .goods_price{
        color: var(--themeColor);
        font-size: 32rpx;
      }
    }
  }
}
商品列表–动态渲染
发请求获取数据,来替换页面这些写死的假数据。

data同层级下写一个接口需要的数据:为啥
参考Vue的自定义数据。我猜想是不是因为,这个数据不需要渲染到前端,只是后端要处理,所以不用卸载data中
data数据是用来响应绑定的,里面每个对象都是加了监听器的,会比原来大,还有一堆事件,如果只是内部使用的变量,不需要定义到data中,纯prop对象即可。
加载下一页数据
<SearchInput>SearchInput>

<Tabs tabs1="{{tabs}}" bindtabsItemChange="handleTabsItemChange">
  <block wx:if="{{tabs[0].isActive}}">
    <view class="firstTab">
      <navigator class="goods_item"
      wx:for="{{goodsList}}"
      wx:key="goods_id"
      >

       <view class="goods_img_wrap">
         <image mode="widthFix" src="{{item.goods_small_logo?item.goods_small_logo:'https://ww1.sinaimg.cn/large/007rAy9hgy1g24by9t530j30i20i2glm.jpg'}}">image>
       view>

       <view class="goods_info_wrap">
         <view class="goods_name">{{item.goods_name}}view>
         <view class="goods_price">¥ {{item.goods_price}}view>
       view>
       navigator>

    view>
  block>
  <block wx:elif="{{tabs[1].isActive}}">
    1
  block>
  <block wx:elif="{{tabs[2].isActive}}">
    2
  block>
Tabs>
/*
1 用户上滑页面,滚动条触底时,开始加载下一页数据
  1 先找到滚动条触底事件
  2 判断还有没有下一页数据
    1 当前页码 this.queryParams.pagenum
    2 总页数 Math.ceil(总条数/页容量)  向上取整
    3 判断当前页码是否大于或等于总页数,则表示没有下一页
    4 否则,有下一页
  3 假如没有,则弹出提示框“不要再滑动了”
  4 假如还有下一页,则加载下一页数据
    1 当前页码++
    2 重新发送请求
    3 数据请求回来后,对data中的数组进行拼接,而不是替换
*/
import { request } from "../../request/index.js"
Page({
  /**
     * 页面的初始数据
     */
   data: {
    tabs:[
      {
        id:0,
        value:"综合",
        isActive:true
      },
      {
        id:1,
        value:"销量",
        isActive:false
      },
      {
        id:2,
        value:"价格",
        isActive:false
      }
    ],
    goodsList:[],
  },

  // 被点击的标题的index
  QueryParams:{
    query:"",
    cid:"",
    pagenum:1,
    pagesize:10
  },
  // 总件数
  total:0,
  /**
   * 生命周期函数--监听页面加载
   */
  onLoad: function (options) {
    // console.log(options.cid);
    this.QueryParams.cid = options.cid;
    // console.log(this.QueryParams);
    this.getGoodsList()
  },
  // 获取商品列表数据
  async getGoodsList() {
    const res = await request({url:"/goods/search", data:this.QueryParams})
    console.log(res.data.message.goods);
    this.total = res.data.message.total;
    this.setData({
      // 数组拼接
      goodsList:[...this.data.goodsList,...res.data.message.goods],
    })
  },
  // 标题的点击事件,只不过是从子组件传递过来的
  handleTabsItemChange(e) {
    // 1 获取被点击的标题索引
    const {index} = e.detail
    // 2 修改原数组,产生一个激活产生效果
    let {tabs} = this.data;
    tabs.forEach((v,i) => {
      // v.isActive = i===index ? true:false
      i===index?v.isActive=true:v.isActive=false
    })
    // 3 赋值到data中
    this.setData({
      tabs
    })
  },
  // 页面上拉触底事件的处理函数
  onReachBottom(){
    if(this.QueryParams.pagenum >= Math.ceil(this.total/this.QueryParams.pagesize)){
      // 没有下一页数据
      // console.log("没有下一页数据");
      // 显示一会儿后提示框隐藏掉
      wx.showToast({
        title: '没有下一页数据了',
        icon: 'none',
        image: '',
        duration: 1500,
        mask: false,
        success: (result)=>{

        },
        fail: ()=>{},
        complete: ()=>{}
      });
    }
    else{
      this.QueryParams.pagenum++;
      this.getGoodsList()
    }

  }
})
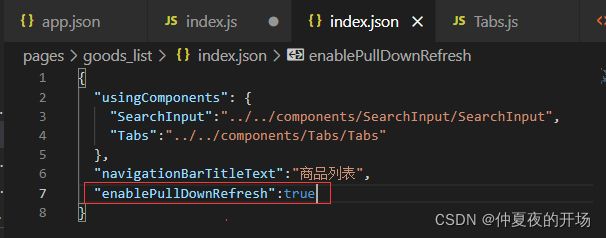
商品列表–下拉刷新
/*
2 下拉刷新页面
  1 触发下拉刷新事件 需要在页面的json文件中
    找到 触发下拉刷新的事件
  2 重置数据数组,清空数组
  3 重置页码,设置为1
  4 发送请求
  5 数据请求回来后,手动关闭等待效果
*/
  // 下拉刷新事件
  onPullDownRefresh() {
    // console.log("下拉刷新");
    this.data.goodsList = [];
    this.QueryParams.pagenum = 1;
    this.QueryParams.pagesize = 10;
    this.getGoodsList()
  }
![]()
添加全局的正在加载中图标效果
在发送请求之前显示加载中图标,请求回来之后关闭加载中图标。
官网->开发->API->界面->交互

这里可以将官网示例直接赋值粘贴至onLoad函数中,看看代码是否有效。
设想:在getGoodsList函数中,发送请求前调用,请求成功后关闭。问题在于:请求很多,后期不容易修改。
结论:把显示图标的功能封装到request发请求的代码中。
问题:如果同时有多个请求发出,在第一个请求成功后,加载图标会消失,而此时其他的请求还没有成功。这样就不合理。
应该是:所有的请求都回来了,才关闭图标。
如何实现:

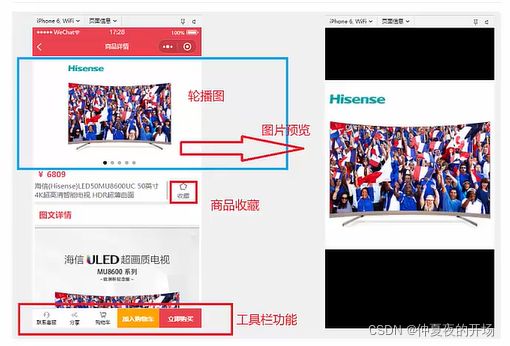
商品详情页面
- 获取数据
- 静态渲染
- 动态渲染
- 功能
页面分析:
1 发送请求获取数据
2 点击轮播图,预览大图功能
1 给轮播图绑定点击事件
2 调用小程序的api – previewImage
3 点击加入购物车
1 先绑定点击事件
2 获取缓存中的购物车数据–数组格式
3 先判断一下当前的商品是否已经存在于购物车里了
4 已经存在,则修改商品数据,执行购物车数量++,重新把购物车数组填充回缓存中
5 不存在,则直接给购物车数组添加一个新元素即可 带上一个数量属性 num
6 弹出提示
*/
// pages/goods_detail/index.js
/*
页面分析:

*/
import {request} from "../../request/index.js"
Page({

    /**
     * 页面的初始数据
     */
    data: {
      goodsObj:{}
    },

    /**
     * 生命周期函数--监听页面加载
     */
    onLoad: function (options) {
      const {goods_id} = options;
      this.getGoodsDetail(goods_id)
    },
    // 获取商品详情数据
    async getGoodsDetail(goods_id) {
      const res = await request({
        url:"/goods/detail",
        data:{goods_id}
      })
      this.setData({
        goodsObj: res.data.message,
      })
    }

})
这一步的效果:点到AppData,可以看到goodsObj对象中有数据。
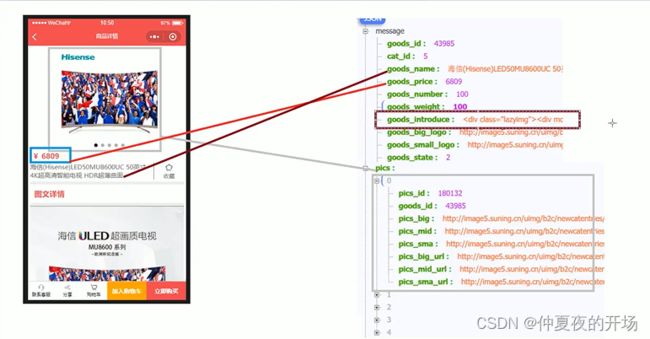
接口数据和页面分析
一般情况下,像是商品的图文详情部分,都是通过富文本渲染的,因为每一种商品,它的图文详情是不固定的,无法写死标签和样式,格式不固定,所以这些数据都是从后台直接返回的。
轮播图动态渲染
<view class="detail_swiper">
  <swiper
  autoplay
  circular
  indicator-dots
  >
    <swiper-item
    wx:for="{{goodsObj.pics}}"
    wx:key="goods_id"
    >
      <image mode="widthFix" class="goods" src="{{item.pics_mid}}">image>
    swiper-item>

  swiper>
view>
这里由于和image的宽高是默认的,需要根据原图大小做个处理。
根据链接,查看原图的宽高为400*400。
text-align是
/* pages/goods_detail/index.wxss */
.detail_swiper{
  swiper{
    // 原图的宽高 400 * 400
    // 400 / 400 = 100vw / height
    height: 70vw;
    // background-color: red;
    text-align: center;
    image{
      width: 60%;
    }
  }
}
价格&名称&图文详情
<view class="detail_swiper">
  <swiper
  autoplay
  circular
  indicator-dots
  >
    <swiper-item
    wx:for="{{goodsObj.pics}}"
    wx:key="goods_id"
    >
      <image mode="widthFix" class="goods" src="{{item.pics_mid}}">image>
    swiper-item>
  swiper>
view>
<view class="goods_price">¥{{goodsObj.goods_price}}view>
<view class="goods_name_row">
  <view class="goods_name">{{goodsObj.goods_name}}view>
    <view class="goods_collect">
      <text class="iconfont icon-shoucang">text>
      <view class="collect_text">收藏view>
    view>
view>

<view class="goods_info">
  <view class="goods_info_title">图文详情view>
  <view class="goods_info_content">

    <rich-text class="" nodes="{{goodsObj.goods_introduce}}">

    rich-text>
  view>
view>
/* pages/goods_detail/index.wxss */
.detail_swiper{
  swiper{
    // 原图的宽高 400 * 400
    // 400 / 400 = 100vw / height
    height: 70vw;
    // background-color: red;
    text-align: center;
    image{
      width: 60%;
    }
  }
}
.goods_price{
  padding: 15rpx;
  font-size: 32rpx;
  font-weight: 600;
  color:var(--themeColor);
}
.goods_name_row{
  display: flex;
  border-top: 5rpx solid #dedede;
  border-bottom: 5rpx solid #dedede;
  padding: 10rpx 0 ;
  .goods_name{
    flex: 5;
    color: #000;
    font-size: 30rpx;
    padding: 0 10rpx;
    // 处理超过2行,则...
    display: -webkit-box;
    overflow: hidden;
    -webkit-box-orient: vertical;
    -webkit-line-clamp: 2;
  }
  .goods_collect{
    flex: 1;
    display: flex;
    flex-direction: column;
    justify-content: center;
    align-items: center;
    border-left: 5rpx solid #dedede;
    .iconfont{}
    .collect_text{}
  }
}
.goods_info{
  .goods_info_title{
    font-size: 32rpx;
    color: var(--themeColor);
    font-weight: 600;
    padding: 20rpx;
  }
}
优化动态渲染
放大预览图片
给轮播图绑定一个预览大图功能
官网->开发->API->媒体->图片->wx.previewImage

// pages/goods_detail/index.js
/*
页面分析:
  1 发送请求获取数据
  2 点击轮播图,预览大图功能
    1 给轮播图绑定点击事件
    2 调用小程序的api -- previewImage
*/
import {request} from "../../request/index.js"
Page({

    /**
     * 页面的初始数据
     */
    data: {
      goodsObj:{}
    },
    // 全局的商品对象
    GoodsInfo:{},
    /**
     * 生命周期函数--监听页面加载
     */
    onLoad: function (options) {
      const {goods_id} = options;
      this.getGoodsDetail(goods_id)
    },
    // 获取商品详情数据
    async getGoodsDetail(goods_id) {
      const res = await request({
        url:"/goods/detail",
        data:{goods_id}
      })
      this.GoodsInfo = res.data.message;
      this.setData({
        // goodsObj: res.data.message,
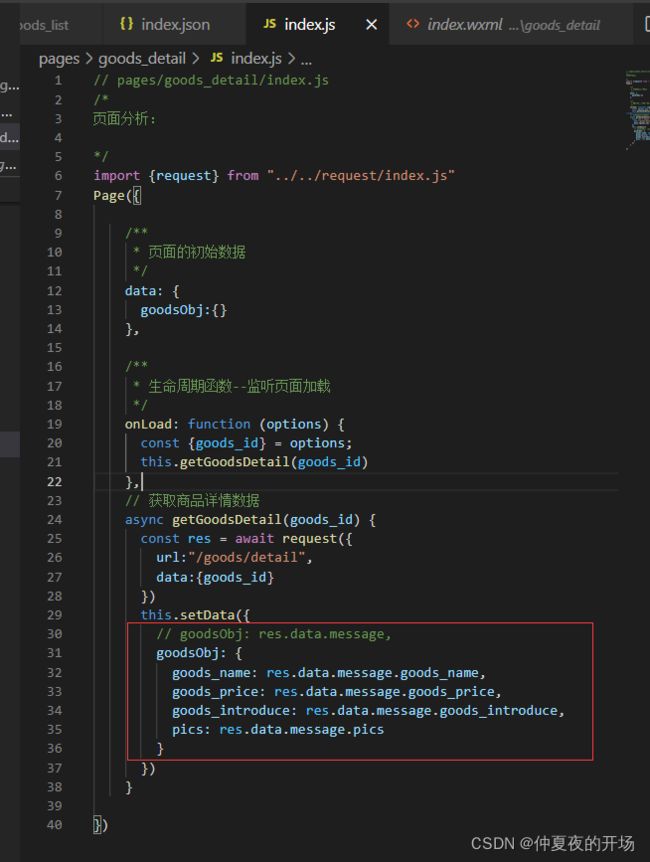
        goodsObj: {
          goods_name: res.data.message.goods_name,
          goods_price: res.data.message.goods_price,
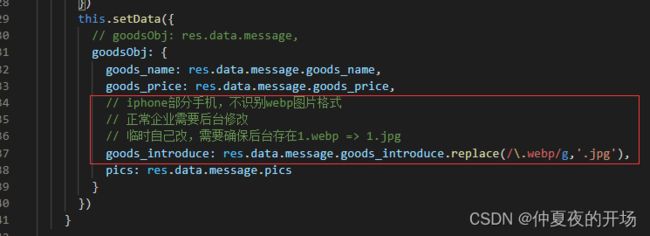
          // iphone部分手机,不识别webp图片格式
          // 正常企业需要后台修改
          // 临时自己改,需要确保后台存在1.webp => 1.jpg
          goods_introduce: res.data.message.goods_introduce.replace(/\.webp/g,'.jpg'),
          pics: res.data.message.pics
        }
      })
    },
    // 点击轮播图,放大预览
    handlePreviewImage(e) {
      // 先构造要预览的图片数组
      // 这里老师是特地设置了全局变量GoodsInfo,来获取图片数组;我这里还是坚持用的data里的goodsObj。目前可以成功,不知道会有啥问题会出现。
      const urls = this.data.goodsObj.pics.map(v=>v.pics_mid)
      // 接收传递过来的 图片url
      console.log(e);
      const current = e.currentTarget.dataset.current
      wx.previewImage({
        current,
        urls
      });

    }

})
底部工具栏
固定在详情页面的底部
view>

<view class="btm_tool">
  <view class="tool_item">
    <view class="iconfont icon-kefu">view>
    <view>客服view>
  view>
  <view class="tool_item">
    <view class="iconfont icon-fenxiang">view>
    <view>分享view>
  view>
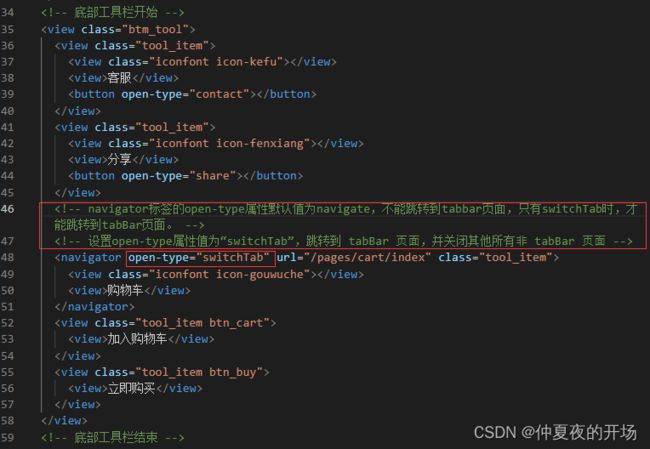
  <view class="tool_item">
    <view class="iconfont icon-gouwuche">view>
    <view>购物车view>
  view>
  <view class="tool_item btn_cart">
    <view>加入购物车view>
  view>
  <view class="tool_item btn_buy">
    <view>立即购买view>
  view>
view>
page{
  // 避免底部工具栏挡住页面内容,需要设置一个底部padding,高度与底部工具栏一致
  padding-bottom: 90rpx;
}

.btm_tool{
  position: fixed;
  left: 0;
  bottom:0;
  // 当块级元素加了绝对定位后和固定定位后,都要设置一个宽度,否则宽度就是内容撑开的。
  width: 100%;
  height: 90rpx;
  background-color: #fff;
  display: flex;


  .tool_item{
    flex:1;
    display: flex;
    flex-direction: column;
    justify-content: center;
    align-items: center;
    font-size: 24rpx;
  }
  .btn_cart{
    flex: 2;
    display: flex;
    flex-direction: column;
    justify-content: center;
    align-items: center;
    background-color: #ffa500;
    color: #fff;
    font-size: 30rpx;
    font-weight: 600;
  }
  .btn_buy{
    flex: 2;
    display: flex;
    flex-direction: column;
    justify-content: center;
    align-items: center;
    background-color: #eb4450;
    color: #fff;
    font-size: 30rpx;
    font-weight: 600;
  }
}
功能部分:
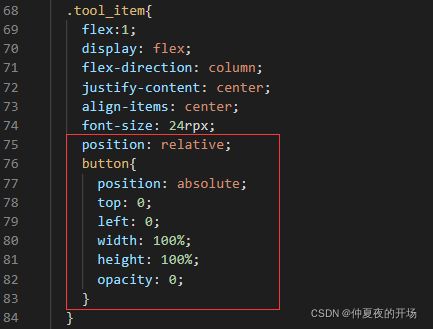
访问客服是button标签的功能,可以将view标签改成button标签,从而实现功能。但是会担心button的默认样式会影响。
解决方法:使用“障眼法”,使用子绝父相,将button的透明度设为0,即可。
<view class="tool_item">
    <view class="iconfont icon-kefu">view>
    <view>客服view>
    <button open-type="contact">button>
  view>
商品详情-加入购物车
由于接口的关系,使用小程序内置的本地存储功能来缓存购物车数据。(实际项目应该是返回后台,用数据库记录。)
// 加入购物车
    handlecartAdd() {
      // 1 获取缓存中的购物车数组
      // 如果缓存中无购物车数组,则设置为空数组
      let cart = wx.getStorageSync("cart")||[];
      //  2 判断商品对象是否存在于购物车数组中
      // array.findIndex(function(currentValue, index, arr), thisValue) 为数组中的每个元素运行的函数。
      // 如果数组中的任何元素通过测试,则返回数组元素索引,否则返回 -1。
      console.log(this.GoodsInfo);
      console.log(cart);
      let index = cart.findIndex(v=>v.goods_id===this.GoodsInfo.goods_id)
      if(index===-1){
        // 该商品不存在购物车对象中,是第一次添加
        this.GoodsInfo.num = 1;
        cart.push(this.GoodsInfo)
      }else{
        // 存在,则num++
        cart[index].num++;
      }
      wx.setStorageSync("cart", cart);
      // 6 弹窗提示
      wx.showToast({
        title: '加入成功',
        icon: 'success',
        image: '',
        duration: 1500,
        // true 防止用户手抖 疯狂点击按钮
        mask: true
      });

    }
购物车
/*
1 获取用户的收货地址
  1 绑定点击事件
  2 调用小程序内置api,获取用户的收货地址
2 页面加载完毕
  0 onLoad 但是购物车需要被频繁的打开和隐藏,希望每一次被打开的时候,都重新做一个初始化,所以用onShow事件
  1 获取本地存储中的地址数据
  2 把数据设置给data中的一个变量
3 onShow触发的时候
  0 回到了商品详情页面,第一次添加商品的时候,手动添加属性
    1 num = 1
    2 checked = true
  1 获取缓存中的购物车数组
  2 把购物车数组填充到data中
4 全选的实现 数据的展示
  1 onShow 获取缓存中的购物车数组
  2 根据购物车中的商品数据,所有的商品都被选中 checked=true,则全选就被选中
5 总价格和总数量
  1 都需要商品被选中,我们才拿来计算
  2 获取购物车数组
  3 遍历
  4 判断商品是否备案中
  5 总价格+=商品的单价*商品的数量
  5 总数量+=商品的数量
  6 把计算后的价格和数量 设置回data即可。
6 商品的选中
  1 绑定change事件
  2 获取到被修改的商品对象
  3 商品对象的选中状态 取反
  4 重新填充回data 和缓存中
  5 重新计算全选、总价格、总数量等
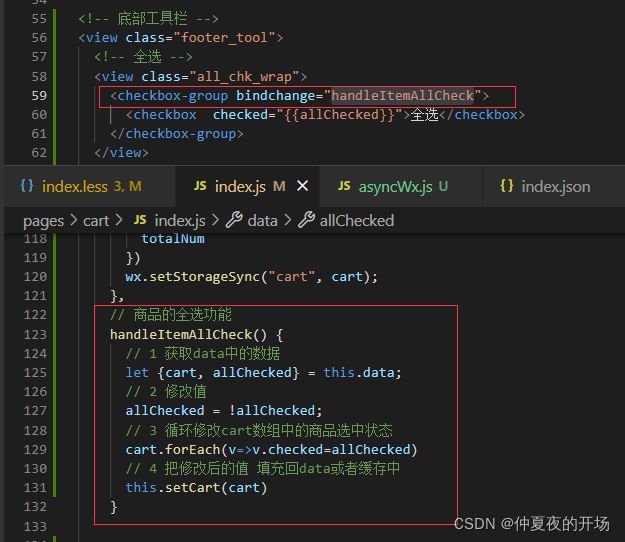
7 全选和反选
  1 全选复选框绑定事件 change
  2 获取data中的全选变量 allChecked
  3 直接取反allChecked=!allChecked
  4 遍历购物车数组 让里面的商品选中状态跟随着allChecked改变而改变
  5 把购物车数组和全选状态 设置回data,把购物车重新设置回缓存中
8 商品数量的编辑
  1 + 和 - 绑定同一个点击事件,区分的关键在于 自定义属性
    1 + +1
    2 - -1
  2 传递被点击的商品id
  3 获取到data中的购物车数组,根据刚才拿到的商品id,来获取需要被修改的商品对象
  4 直接修改商品对象的数量属性
  5 把购物车数组重新设置回缓存和data中 this.setCart
9 商品删除
  优化8中的4
    1 当购物车中的商品数量为1,且点击-号时,此时弹窗提示,问用户是否删除,
    点击是,则直接删除。用户点击取消 则什么都不做
10 没有商品
  1 判断购物车中是否有商品
    1 存在商品,则显示商品
    2 没有商品,则显示文字、图标或者图片来提醒用户去选购商品
11 点击结算
  1 判断有没有收货地址信息
  2 判断用户有没有选购商品
  3 经过以上验证,则跳转到支付页面
*/
购物车分析&收货按钮样式
收货地址分析
/*
1 获取用户的收货地址
  1 绑定点击事件
  2 调用小程序内置api,获取用户的收货地址
2 页面加载完毕
  0 onLoad 但是购物车需要被频繁的打开和隐藏,希望每一次被打开的时候,都重新做一个初始化,所以用onShow事件
  1 获取本地存储中的地址数据
  2 把数据设置给data中的一个变量
*/
Page({
    // 点击获取收货地址
    handleChooseAddress() {
      // 2  获取收货地址
      wx.chooseAddress({
        success: (address) => {
          address.all = address.provinceName+address.cityName+address.countyName+address.detailInfo;
          wx.setStorageSync("address", address);

        },
        fail: () => {},
        complete: () => {}
      });

    }

})
点击添加收货地址按钮,会调用小程序内置api,获取用户的收货地址。
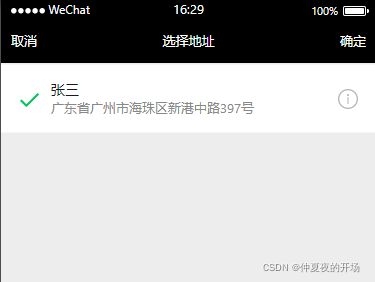
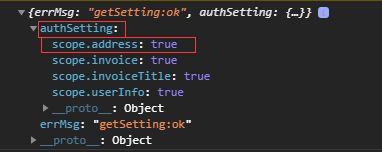
官方维护过的问题:用户在第一次授权时点击取消了,再次点击添加收货地址按钮时不会有反应,这是因为authSetting.scope.address已经是false。
wx.getSetting({
        success: (result)=>{
          console.log(result);
        },
        fail: ()=>{},
        complete: ()=>{}
      });
意外情况处理
/utils/asyncWx.js
/*
promise形式的 chooseAddress
*/
export const chooseAddress = () => {
  return new Promise((resolve, reject) => {
    wx.chooseAddress({
      success: (result) => {
        resove(result)
      },
      fail: (err) => {
        reject(err)
      },
      complete: () => {}
    });

  })
}
1 获取用户的收货地址
1 绑定点击事件
2 调用小程序内置api,获取用户的收货地址
收货地址和按钮切换显示
/*
1 获取用户的收货地址
  1 绑定点击事件
  2 调用小程序内置api,获取用户的收货地址
2 页面加载完毕
  0 onLoad 但是购物车需要被频繁的打开和隐藏,希望每一次被打开的时候,都重新做一个初始化,所以用onShow事件。比如:选择地址后,显示购物车页面,此时希望地址刷新
  1 获取本地存储中的地址数据
  2 把数据设置给data中的一个变量
*/

import { chooseAddress, setStorageSync } from "../../utils/asyncWx.js";

Page({
    /**
     * 页面的初始数据
     */
    data: {
      address:{}
    },
    onShow: function () {
      // 1 获取缓存中的收货地址信息
      const address = wx.getStorageSync("address");
      // 2 给data赋值
      this.setData({
        address
      })
    }
})
<!-- 收货地址 -->
<view class="receive_address_row">
  <!-- 当收货地址不存在时,按钮显示 -->
  <!-- 空对象的bool类型也是true,无法用{{address}}来判断 -->
  <!-- 拿对象中的属性来判断 -->
  <view class="address_btn" wx:if="{{!address.userName}}">
    <button bindtap="handleChooseAddress" type="primary" plain>添加收货地址</button>
  </view>
  <!-- 当收货地址存在时,详细信息显示 -->
  <view wx:else class="user_info_row">
    <view class="user_info">
      <view>收货人:{{address.userName}}</view>
      <view>{{address.all}}</view>
    </view>
    <view class="user_phone">{{address.telNumber}}</view>
  </view>
</view>
  .user_info_row{
    display: flex;
    padding: 20rpx;
    .user_info{
      flex: 5;
    }
    .user_phone{
      flex: 3;
      text-align: right; // 电话号码右对齐
    }
  }
}
购物车列表-静态样式
1、写html结构
<view class="cart_content">

  <view class="cart_title">购物车view>

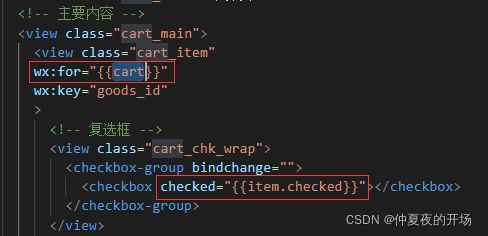
  <view class="cart_main">
    <view class="cart_item">

      <view class="cart_chk_wrap">
        <checkbox-group bindchange="">
          <checkbox>checkbox>
        checkbox-group>
      view>


      <navigator class="cart_img_wrap">
        <image mode="widthFix"src="http://image4.suning.cn/uimg/b2c/newcatentries/0000000000-000000000606013705_1_800x800.jpg">image>
      navigator>

      <view class="cart_info_wrap">
        <view class="goods_name">TCL电视 49P3view>
        <view class="goods_price_row">
          <view class="goods_price">¥999view>
          <view class="cart_num_tool">
            <view class="num_edit">-view>
            <view class="goods_num">1view>
            <view class="num_edit">+view>
          view>
        view>
      view>
    view>
  view>
view>
2、将标签写在less文件里面
将要设置样式的标签全部选中
快捷键 Ctrl + Shift + P,或者帮助->显示所有命令

选择Generate CSS tree,会生成下列文件
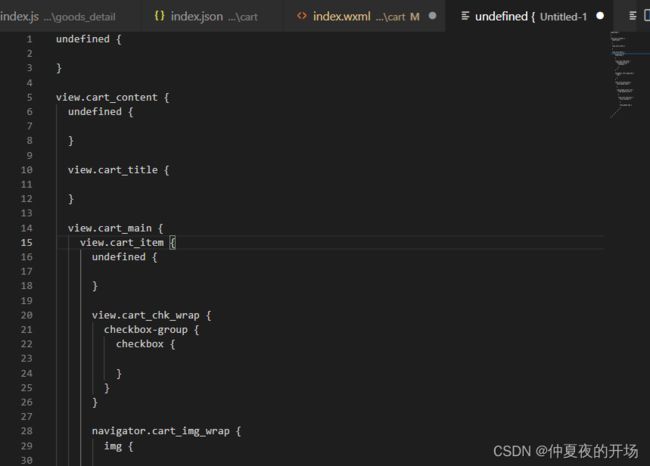
复制粘贴到less文件,再做一些修改。

鼠标选中.,按Ctrl+D,选中多个,按<-键,再按Ctrl+D,选中多个.前面的标签名,按delete删掉。
.cart_content{
  .cart_title{}
  .cart_main{
    .cart_item{
      display: flex;
      .cart_chk_wrap{
        flex:1;
      }
      .cart_img_wrap{
        flex:2;

      }
      .cart_info_wrap{
        flex:3;

      }
    }
  }
}

.cart_content {
  .cart_title {
    padding: 20rpx;
    font-size: 36rpx;
    color: var(--themeColor);
    border-top: 1rpx solid currentColor;
    border-bottom: 1rpx solid currentColor;
  }

  .cart_main {
    .cart_item {
      padding: 10rpx;
      display: flex;
      border: 1rpx solid #ccc;
      .cart_chk_wrap {
        flex: 1;
        display: flex;
        justify-content: center;
        align-items: center;
        checkbox-group {
          checkbox {

          }
        }
      }

      .cart_img_wrap {
        flex: 2;
        display: flex;
        justify-content: center;
        align-items: center;
        image {
          width: 80%;
        }
      }

      .cart_info_wrap {
        display: flex;
        flex-direction: column;
        justify-content: space-around;
        flex: 4;
        .goods_name {
          display: -webkit-box;
          overflow: hidden;
          -webkit-box-orient: vertical;
          -webkit-line-clamp: 2;
          color: #666;
        }
        .goods_price_row {
          display: flex;
          justify-content: space-between;
          .goods_price {
            color: var(--themeColor);
            font-size: 34rpx;
          }
          .cart_num_tool {
            display: flex;
            justify-content: center;
            align-items: center;
            .num_edit {
              display: flex;
              width: 55rpx;
              height: 55rpx;
              border: 1px solid #ccc;
              justify-content: center;
              align-items: center;
            }
            .goods_num {
              display: flex;
              width: 55rpx;
              height: 55rpx;
              justify-content: center;
              align-items: center;

            }
          }
        }
      }
    }
  }
}
底部工具栏 静态结构
- 容器加了固定定位,挡在下面了,所以要给页面加个padding-bottom,把它给撑上去。
- view中的文字设置水平居中可以用
text-align属性;需要水平垂直都居中,则需要用到display: flex; justify-content: center; align-items: center; - 设置容器在页面的底部,可以用绝对定位
- 容器加上定位之后,它的宽是被内容撑开的。记得要给它设置
width: 100%; - font-weight
normal : 正常的字体。相当于number为400。声明此值将取消之前任何设置
bold : 粗体。相当于number为700。也相当于b对象的作用
bolder : IE5+ 特粗体
lighter : IE5+ 细体
number : IE5+ 100 | 200 | 300 | 400 | 500 | 600 | 700 | 800 | 900
page{
  //因为容器加了固定定位,挡在下面了,所以要给页面加个padding-bottom,把它给撑上去。
  padding-bottom: 90rpx;
}
.footer_tool {
  position: fixed;
  bottom: 0;
  left: 0;
  // 容器加上定位之后,它的宽是被内容撑开的
  width: 100%;
  height: 90rpx;
  border-top: 1rpx solid #ccc;
  background-color: #fff;
  display: flex;
  .all_chk_wrap {
    flex:2;
    display: flex;
    justify-content: center;
    align-items: center;
    checkbox-group {
      checkbox {

      }
    }
  }

  .total_price_wrap {
    flex: 5;
    padding-right: 15rpx;
    text-align: right;
    .total_price {
      .total_price_text {
        color: var(--themeColor);
        font-size: 34rpx;
        font-weight: 600;
      }
    }


  }

  .order_pay_wrap {
    flex: 3;
    background-color: var(--themeColor);
    color: #fff;
    font-size: 32rpx;
    font-weight: 600;
    display: flex;
    justify-content: center;
    align-items: center;
  }
}
购物车-动态数据渲染
回到商品详情页面,点击加入购物车,发现缓存中会添加一条数据。
- 在onShow方法中获取缓存中的cart数组,存储到data中
- 为了更加规范,在data中声明cart数组
- 类名为.cart_item的标签中加入循环代码
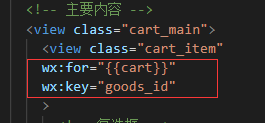
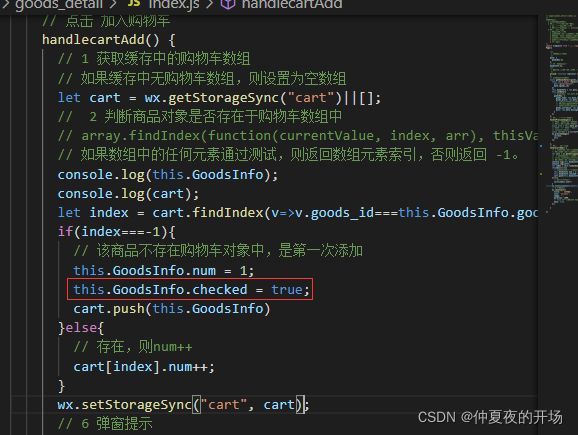
第一次添加商品的时候,手动添加属性
1 num = 1
2 checked = true

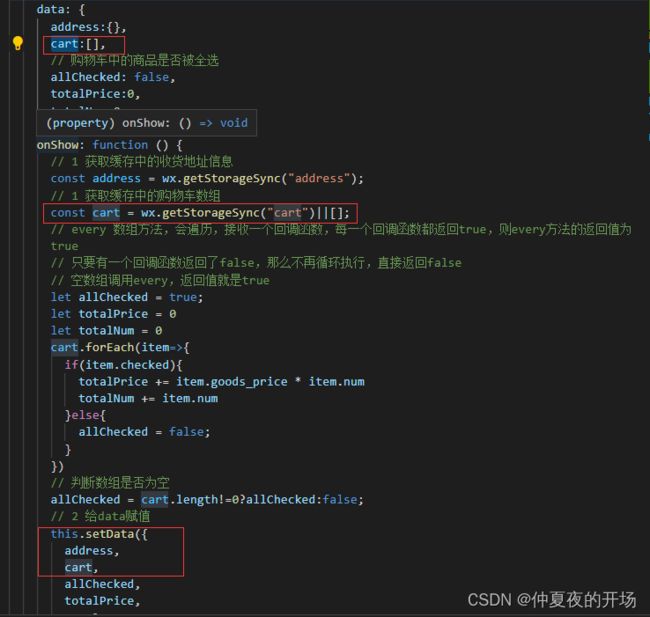
购物车-全选-数据展示
全选功能实现
- 在data中声明一个
allChecked数据,用来记录是否全选。 - 获取购物车数组时,这个值可能是一个空字符串,需要进行处理
|| [],确保类型正确。

every 数组方法的使用
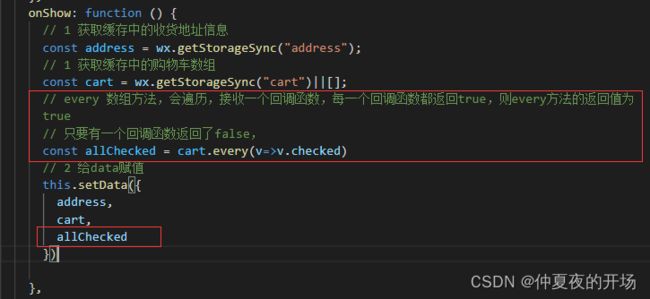

问题:清空storage,重新编译购物车页面,此时购物车里没有商品,但是全选复选框被勾选了


购物车-总价格&总数量
购物车-商品选中
当我们点击复选框时 ,其实要改变的是data中的购物车数组中商品的checked属性,将它由true改成false,同时也要修改缓存中的购物车数组中商品的checked属性。
// 商品选中
    handleItemChange(e) {
      // 1 获取被修改的商品的id
      const goods_id = e.currentTarget.dataset.id;
      // console.log(goods_id);
      // 2 获取购物车数组
      let {cart} = this.data;
      // 3 找到被修改的商品对象
      let index = cart.findIndex(v=>v.goods_id===goods_id)
      // 4 选中状态取反
      cart[index].checked = !cart[index].checked;
      // 5 6 把购物车数据重新设置回data和缓存中
      this.setData({
        cart
      })
      wx.setStorageSync("cart", cart);
      // 7 重新计算全选、总价格、总数量等
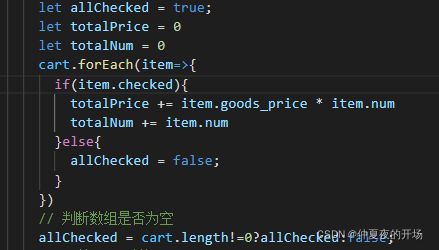
      let allChecked = true;
      let totalPrice = 0
      let totalNum = 0
      cart.forEach(item=>{
        if(item.checked){
          totalPrice += item.goods_price * item.num
          totalNum += item.num
        }else{
          allChecked = false;
        }
      })
      // 判断数组是否为空
      allChecked = cart.length!=0?allChecked:false;
      // 2 给data赋值
      this.setData({
        cart,
        allChecked,
        totalPrice,
        totalNum
      })
    }
功能是完成了,但是代码很繁琐,需要进行一下封装
// 设置购物车状态,重新计算底部工具栏的数据,比如全选、总价格、总数量等
    setCart(cart) {

      // 7 重新计算全选、总价格、总数量等
      let allChecked = true;
      let totalPrice = 0
      let totalNum = 0
      cart.forEach(item=>{
        if(item.checked){
          totalPrice += item.goods_price * item.num
          totalNum += item.num
        }else{
          allChecked = false;
        }
      })
      // 判断数组是否为空
      allChecked = cart.length!=0?allChecked:false;
      // 5 6 把购物车数据重新设置回data和缓存中
      // 2 给data赋值
      this.setData({
        cart,
        allChecked,
        totalPrice,
        totalNum
      })
      wx.setStorageSync("cart", cart);
    }
购物车-全选 反选
购物车-商品数量编辑

问题:当购物车中的商品数量为1,且点击-号时,此时弹窗提示,问用户是否删除,点击是,则直接删除。
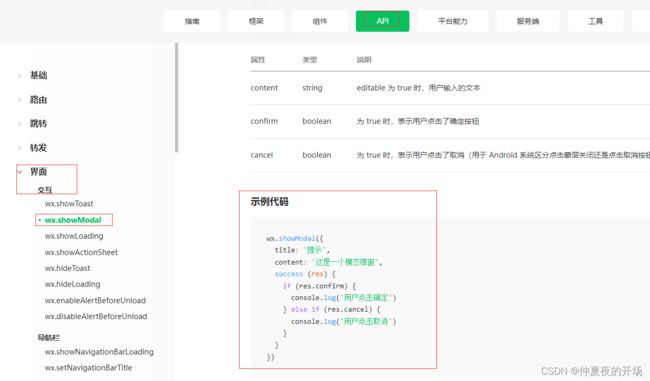
// success不是箭头函数的话,这里的this就变成了wx.showModal对象了,所以要写成箭头函数的形式
this.setCart(cart)
把弹窗提示封装成promise的格式
 // 商品数量的编辑功能
    async handleItemNumEdit(e) {
      // 1 获取传递过来的参数
      const {operation, id} = e.currentTarget.dataset;
      // console.log(operation, id);
      // 2 获取购物车数组
      let {cart} = this.data;
      // 3 找到需要修改的商品的索引
      const index = cart.findIndex(v=>v.goods_id===id)
      // 4 判断是否要修改数量
      if(cart[index].num===1 && operation===-1) {
        const result = await showModal({content:'是否删除商品?'})
        if (result.confirm) {
          // splice数组方法,删除index的1个元素
          cart.splice(index, 1)
          this.setCart(cart)
        } else if (result.cancel) {
          console.log("取消删除");
        }
      }
      else {
        cart[index].num += operation;
        // 5 设置回缓存和data中
        this.setCart(cart)
      }
asyncWx.js文件
/**
 *promise形式的 showModal
 * @param {object} param0
 * @returns
 */
export const showModal = ({content}) => {
  return new Promise((resolve, reject) => {
    wx.showModal({
      title: '提示',
      content: content,
      success: (result) => {
        resolve(result)
      },
      fail: (err) => {
        reject(err)
      },
      complete: () => {}
    });
  })
}
购物车-没有商品的状态提示
1、将.cart_item折叠后,用block标签包裹起来,

购物车-结算按钮功能
// 点击结算
    async handlePay() {
      // 1 判断收货地址
      const {address,totalNum} = this.data;
      if(!address.userName) {
        const res = await showToast({title:"您还没有选择收货地址"})
        return
      }
      // 判断用户有没有选购商品
      if(totalNum===0){
        const res = await showToast({title:"您还没有选购商品哦"})
        return
      }
      // 跳转到支付页面
      wx.navigateTo({
        url: '/pages/pay/index'
      });
