从零开始玩转物体检测(二):TensorFlow 2.x Object Detection API快速安装手册
文章目录
-
- 1. 概述
- 2. 预置条件
- 3. 安装步骤
-
- 3.1 启动docker
- 3.3 使用vscode访问docker container
- 3.4 更换docker容器ubuntu系统的安装源为国内源
- 3.5 验证GPU是否加载成功(在电脑有Nvidia显卡的情况下)
- 3.6 下载tensorflow object detection api项目源码
- 3.7 安装配置protobuf
- 3.8 将proto后缀文件转换为python可识别格式
- 3.9 安装coco api
- 3.10 安装object detection api
相关专栏:
- 从零开始玩转物体检测(一): Windows部署Docker GPU深度学习开发环境
- 从零开始玩转物体检测(二):TensorFlow 2.x Object Detection API快速安装手册
- 从零开始玩转物体检测(三): 基于Tensorflow2.x Object Detection API构建自定义物体检测器
1. 概述
tensorflow object detection api一个框架,它可以很容易地构建、训练和部署对象检测模型,并且是一个提供了众多基于COCO数据集、Kitti数据集、Open Images数据集、AVA v2.1数据集和iNaturalist物种检测数据集上提供预先训练的对象检测模型集合。
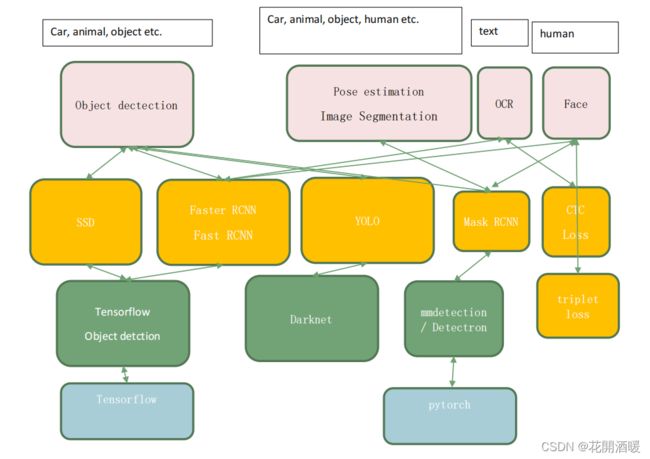
tensorflow object detection api是目前最主流的目标检测框架之一,主流的目标检测模型如图所示:

2. 预置条件
为了顺利按照本手册安装tensroflow object detection api,请参考Windows部署Docker GPU深度学习开发环境安装必备的工具。
若自行创建安装条件,请确保已经满足以下条件
- 支持python3.8以上版本
- 支持cuda、cudnn(可选)
- 支持git
本手册使用docker运行环境。
3. 安装步骤
3.1 启动docker
启动docker桌面客户端,如图所示:
 ### 3.2 启动容器
在windows平台可以启动命令行工具或者windows terminal工具(App Store下载),这里使用terminal工具。
输入以下命令,查看当前存在的images列表
PS C:\Users\xxxxx> docker images
REPOSITORY               TAG                 IMAGE ID       CREATED       SIZE
docker/getting-started   latest              bd9a9f733898   5 weeks ago   28.8MB
tensorflow/tensorflow    2.8.0-gpu-jupyter   cc9a9ae2a5af   6 weeks ago   5.99GB
可以看到之前安装的tensorflow-2.8.0-gpu-jupyter镜像,现在基于这个镜像启动容器
docker run --gpus all -itd -v e:/dockerdir/docker_work/:/home/zhou/ -p 8888:8888 -p 6006:6006 --ipc=host cc9a9ae2a5af jupyter notebook --no-browser --ip=0.0.0.0 --allow-root --NotebookApp.token= --notebook-dir='/home/zhou/'
命令释义:
docker run:表示基于镜像启动容器
–gpus all:不加此选项,nvidia-smi命令会不可用
-i: 交互式操作。
-t: 终端。
-d:后台运行,需要使用【docker exec -it 容器id /bin/bash】进入容器
-v e:/dockerdir/docker_work/:/home/zhou/:将windows平台的e:/dockerdir/docker_work/目录映射到docker的ubuntu系统的/home/zhou/目录下,实现windows平台和docker系统的文件共享
-p 8888:8888 -p 6006:6006:表示将windows系统的8888、6006端口映射到docker的8888、6006端口,这两个端口分别为jupyter notebook和tensorboard的访问端口
–ipc=host:用于多个容器之间的通讯
cc9a9ae2a5af:tensorflow-2.8.0-gpu-jupyter镜像的IMAGE ID
jupyter notebook --no-browser --ip=0.0.0.0 --allow-root --NotebookApp.token= --notebook-dir=’/home/zhou/’: docker开机启动命令,这里启动jupyter
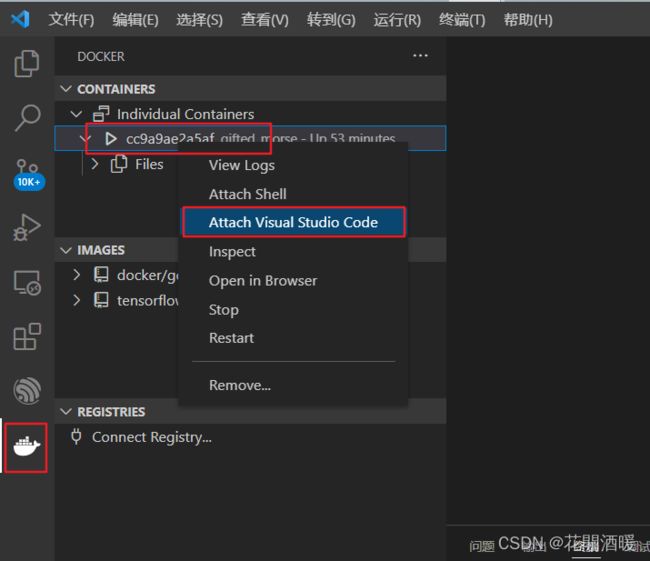
3.3 使用vscode访问docker container
启动vscode后,选择docker工具栏,在启动的容器上,右键选择附着到VsCode

3.4 更换docker容器ubuntu系统的安装源为国内源
在vscode软件界面上,选择【文件】-【打开文件夹】,选择根目录【/】,找到【/etc/apt/sources.list】,将ubuntu的安装源全部切换为aliyun源,具体操作为:将【archive.ubuntu.com】修改为【mirrors.aliyun.com】即可,修改后如下:
# See http://help.ubuntu.com/community/UpgradeNotes for how to upgrade to
# newer versions of the distribution.
deb http://mirrors.aliyun.com/ubuntu/ focal main restricted
# deb-src http://mirrors.aliyun.com/ubuntu/ focal main restricted

## Major bug fix updates produced after the final release of the
## distribution.
deb http://mirrors.aliyun.com/ubuntu/ focal-updates main restricted
# deb-src http://mirrors.aliyun.com/ubuntu/ focal-updates main restricted

## N.B. software from this repository is ENTIRELY UNSUPPORTED by the Ubuntu
## team. Also, please note that software in universe WILL NOT receive any
## review or updates from the Ubuntu security team.
deb http://mirrors.aliyun.com/ubuntu/ focal universe
# deb-src http://mirrors.aliyun.com/ubuntu/ focal universe
deb http://mirrors.aliyun.com/ubuntu/ focal-updates universe
# deb-src http://mirrors.aliyun.com/ubuntu/ focal-updates universe

## N.B. software from this repository is ENTIRELY UNSUPPORTED by the Ubuntu
## team, and may not be under a free licence. Please satisfy yourself as to
## your rights to use the software. Also, please note that software in
## multiverse WILL NOT receive any review or updates from the Ubuntu
## security team.
deb http://mirrors.aliyun.com/ubuntu/ focal multiverse
# deb-src http://mirrors.aliyun.com/ubuntu/ focal multiverse
deb http://mirrors.aliyun.com/ubuntu/ focal-updates multiverse
# deb-src http://mirrors.aliyun.com/ubuntu/ focal-updates multiverse

## N.B. software from this repository may not have been tested as
## extensively as that contained in the main release, although it includes
## newer versions of some applications which may provide useful features.
## Also, please note that software in backports WILL NOT receive any review
## or updates from the Ubuntu security team.
deb http://mirrors.aliyun.com/ubuntu/ focal-backports main restricted universe multiverse
# deb-src http://mirrors.aliyun.com/ubuntu/ focal-backports main restricted universe multiverse

## Uncomment the following two lines to add software from Canonical's
## 'partner' repository.
## This software is not part of Ubuntu, but is offered by Canonical and the
## respective vendors as a service to Ubuntu users.
# deb http://archive.canonical.com/ubuntu focal partner
# deb-src http://archive.canonical.com/ubuntu focal partner

deb http://security.ubuntu.com/ubuntu/ focal-security main restricted
# deb-src http://security.ubuntu.com/ubuntu/ focal-security main restricted
deb http://security.ubuntu.com/ubuntu/ focal-security universe
# deb-src http://security.ubuntu.com/ubuntu/ focal-security universe
deb http://security.ubuntu.com/ubuntu/ focal-security multiverse
# deb-src http://security.ubuntu.com/ubuntu/ focal-security multiverse
- 执行如下命令,更新配置
apt-get update;apt-get -f install; apt-get upgrade
- 更多aliyun的源配置访问:阿里云安装源传送门
3.5 验证GPU是否加载成功(在电脑有Nvidia显卡的情况下)
- 输入
nvidia-smi查看GPU使用情况,nvcc -V查询cuda版本
root@cc58e655b170:/home/zhou# nvidia-smi
Tue Mar 22 15:08:57 2022
+-----------------------------------------------------------------------------+
| NVIDIA-SMI 470.85       Driver Version: 472.47       CUDA Version: 11.4     |
|-------------------------------+----------------------+----------------------+
| GPU  Name        Persistence-M| Bus-Id        Disp.A | Volatile Uncorr. ECC |
| Fan  Temp  Perf  Pwr:Usage/Cap|         Memory-Usage | GPU-Util  Compute M. |
|                               |                      |               MIG M. |
|===============================+======================+======================|
|   0  NVIDIA GeForce ...  Off  | 00000000:01:00.0 Off |                  N/A |
| N/A   48C    P8     9W /  N/A |    153MiB /  6144MiB |    ERR!      Default |
|                               |                      |                  N/A |
+-------------------------------+----------------------+----------------------+

+-----------------------------------------------------------------------------+
| Processes:                                                                  |
|  GPU   GI   CI        PID   Type   Process name                  GPU Memory |
|        ID   ID                                                   Usage      |
|=============================================================================|
|  No running processes found                                                 |
+-----------------------------------------------------------------------------+
root@cc58e655b170:/home/zhou# nvcc -V
nvcc: NVIDIA (R) Cuda compiler driver
Copyright (c) 2005-2021 NVIDIA Corporation
Built on Sun_Feb_14_21:12:58_PST_2021
Cuda compilation tools, release 11.2, V11.2.152
Build cuda_11.2.r11.2/compiler.29618528_0
从nvcc -V的日志,可以看出cuda版本为11.2
- 输入以下命令,查询cuDNN版本
python -c "import tensorflow as tf;print(tf.reduce_sum(tf.random.normal([1000, 1000])))"
输出结果如下:
root@cc58e655b170:/usr# python -c "import tensorflow as tf;print(tf.reduce_sum(tf.random.normal([1000, 1000])))"
2022-03-22 15:26:13.281719: I tensorflow/core/common_runtime/gpu/gpu_device.cc:1525] Created device /job:localhost/replica:0/task:0/device:GPU:0 with 3951 MB memory:  -> device: 0, name: NVIDIA GeForce GTX 1660 Ti, pci bus id: 0000:01:00.0, compute capability: 7.5
tf.Tensor(-2613.715, shape=(), dtype=float32)
从输出日志,可以看到GPU:NVIDIA GeForce GTX 1660 Ti已经加载到docker,cuDNN版本为7.5
3.6 下载tensorflow object detection api项目源码
- 在home/zhou目录下创建tensorflow的目录
cd /home/zhou; mkdir tensorflow; cd tensorflow
- 下载源码
git clone https://github.com/tensorflow/models.git
下载完毕后,默认文件名名称为models-master, 将文件名重命名为models,保持文件名和平台一致
mv models-matser models
如果网速不好,直接下载zip压缩包吧
 下载完毕后的文档结构如图所示:
tensorflow/
└─ models/
   ├─ community/
   ├─ official/
   ├─ orbit/
   ├─ research/
   └── ...
3.7 安装配置protobuf
Tensorflow对象检测API使用Protobufs来配置模型和训练参数。在使用框架之前,必须下载并编译Protobuf库。
- 回到用户目录
cd /home/zhou
- 下载protobuf
这里下载的已经预编译好的protobuf
wget -c https://github.com/protocolbuffers/protobuf/releases/download/v3.19.4/protoc-3.19.4-linux-x86_64.zip
- 解压
先执行mkdir protoc-3.19.4创建目录,然后执行unzip protoc-3.19.4-linux-x86_64.zip -d protoc-3.19.4/解压到制定目录protoc-3.19.4
root@cc58e655b170:/home/zhou# mkdir protoc-3.19.4
root@cc58e655b170:/home/zhou# unzip protoc-3.19.4-linux-x86_64.zip -d protoc-3.19.4/
Archive:  protoc-3.19.4-linux-x86_64.zip
   creating: protoc-3.19.4/include/
   creating: protoc-3.19.4/include/google/
   creating: protoc-3.19.4/include/google/protobuf/
  inflating: protoc-3.19.4/include/google/protobuf/wrappers.proto
  inflating: protoc-3.19.4/include/google/protobuf/source_context.proto
  inflating: protoc-3.19.4/include/google/protobuf/struct.proto
  inflating: protoc-3.19.4/include/google/protobuf/any.proto
  inflating: protoc-3.19.4/include/google/protobuf/api.proto
  inflating: protoc-3.19.4/include/google/protobuf/descriptor.proto
   creating: protoc-3.19.4/include/google/protobuf/compiler/
  inflating: protoc-3.19.4/include/google/protobuf/compiler/plugin.proto
  inflating: protoc-3.19.4/include/google/protobuf/timestamp.proto
  inflating: protoc-3.19.4/include/google/protobuf/field_mask.proto
  inflating: protoc-3.19.4/include/google/protobuf/empty.proto
  inflating: protoc-3.19.4/include/google/protobuf/duration.proto
  inflating: protoc-3.19.4/include/google/protobuf/type.proto
   creating: protoc-3.19.4/bin/
  inflating: protoc-3.19.4/bin/protoc
  inflating: protoc-3.19.4/readme.txt
- 配置protoc
在~/.bashrc文件的末尾添加如下代码
执行如下命令,使其生效export PATH=$PATH:/home/zhou/protoc-3.19.4/bin
执行source ~/.bashrcecho $PATH查看是否生效
可以看到protoc的安装目录root@cc58e655b170:/home/zhou/protoc-3.19.4/bin# echo $PATH /home/zhou/protoc-3.19.4/bin:/home/zhou/protoc-3.19.4/bin:/home/zhou/protoc-3.19.4/bin:/root/.vscode-server/bin/c722ca6c7eed3d7987c0d5c3df5c45f6b15e77d1/bin/remote-cli:/usr/local/nvidia/bin:/usr/local/cuda/bin:/usr/local/sbin:/usr/local/bin:/usr/sbin:/usr/bin:/sbin:/bin:/home/zhou/protoc-3.19.4/bin/home/zhou/protoc-3.19.4/bin已经添加到PATH了。
3.8 将proto后缀文件转换为python可识别格式
- 切换目录
cd /home/zhou/tensorflow/models/research/
- 查看转换前的目录文件列表
ls object_detection/protos/
protoc object_detection/protos/*.proto --python_out=.
- 转换后,如下所示
ls object_detection/protos/
3.9 安装coco api
从TensorFlow 2.x开始, pycocotools包被列为对象检测API的依赖项。理想情况下,这个包应该在安装对象检测API时安装,如下面安装对象检测API一节所述,但是由于各种原因,安装可能会失败,因此更简单的方法是提前安装这个包,在这种情况下,稍后的安装将被跳过。
pip install cython
pip install git+https://github.com/philferriere/cocoapi.git#subdirectory=PythonAPI
默认指标是基于Pascal VOC评估中使用的那些指标。要使用COCO对象检测指标,在配置文件的eval_config消息中添加metrics_set: "coco_detection_metrics"。要使用COCO实例分割度量,在配置文件的eval_config消息中添加metrics_set: "coco_mask_metrics"。
3.10 安装object detection api
- 当前的工作路径应为
root@cc58e655b170:/home/zhou/tensorflow/models/research# pwd
/home/zhou/tensorflow/models/research
- 安装object detection api
cp object_detection/packages/tf2/setup.py .
python -m pip install --use-feature=2020-resolver .
安装过程会持续一段时间,安装完毕后,可以执行如下代码,测试安装是否完成。
python object_detection/builders/model_builder_tf2_test.py
输出如下:
......
I0322 16:48:09.677789 140205126002496 efficientnet_model.py:144] round_filter input=192 output=384
I0322 16:48:10.876914 140205126002496 efficientnet_model.py:144] round_filter input=192 output=384
I0322 16:48:10.877072 140205126002496 efficientnet_model.py:144] round_filter input=320 output=640
I0322 16:48:11.294571 140205126002496 efficientnet_model.py:144] round_filter input=1280 output=2560
I0322 16:48:11.337533 140205126002496 efficientnet_model.py:454] Building model efficientnet with params ModelConfig(width_coefficient=2.0, depth_coefficient=3.1, resolution=600, dropout_rate=0.5, blocks=(BlockConfig(input_filters=32, output_filters=16, kernel_size=3, num_repeat=1, expand_ratio=1, strides=(1, 1), se_ratio=0.25, id_skip=True, fused_conv=False, conv_type='depthwise'), BlockConfig(input_filters=16, output_filters=24, kernel_size=3, num_repeat=2, expand_ratio=6, strides=(2, 2), se_ratio=0.25, id_skip=True, fused_conv=False, conv_type='depthwise'), BlockConfig(input_filters=24, output_filters=40, kernel_size=5, num_repeat=2, expand_ratio=6, strides=(2, 2), se_ratio=0.25, id_skip=True, fused_conv=False, conv_type='depthwise'), BlockConfig(input_filters=40, output_filters=80, kernel_size=3, num_repeat=3, expand_ratio=6, strides=(2, 2), se_ratio=0.25, id_skip=True, fused_conv=False, conv_type='depthwise'), BlockConfig(input_filters=80, output_filters=112, kernel_size=5, num_repeat=3, expand_ratio=6, strides=(1, 1), se_ratio=0.25, id_skip=True, fused_conv=False, conv_type='depthwise'), BlockConfig(input_filters=112, output_filters=192, kernel_size=5, num_repeat=4, expand_ratio=6, strides=(2, 2), se_ratio=0.25, id_skip=True, fused_conv=False, conv_type='depthwise'), BlockConfig(input_filters=192, output_filters=320, kernel_size=3, num_repeat=1, expand_ratio=6, strides=(1, 1), se_ratio=0.25, id_skip=True, fused_conv=False, conv_type='depthwise')), stem_base_filters=32, top_base_filters=1280, activation='simple_swish', batch_norm='default', bn_momentum=0.99, bn_epsilon=0.001, weight_decay=5e-06, drop_connect_rate=0.2, depth_divisor=8, min_depth=None, use_se=True, input_channels=3, num_classes=1000, model_name='efficientnet', rescale_input=False, data_format='channels_last', dtype='float32')
INFO:tensorflow:time(__main__.ModelBuilderTF2Test.test_create_ssd_models_from_config): 33.12s
I0322 16:48:11.521103 140205126002496 test_util.py:2373] time(__main__.ModelBuilderTF2Test.test_create_ssd_models_from_config): 33.12s
[       OK ] ModelBuilderTF2Test.test_create_ssd_models_from_config
[ RUN      ] ModelBuilderTF2Test.test_invalid_faster_rcnn_batchnorm_update
INFO:tensorflow:time(__main__.ModelBuilderTF2Test.test_invalid_faster_rcnn_batchnorm_update): 0.0s
I0322 16:48:11.532667 140205126002496 test_util.py:2373] time(__main__.ModelBuilderTF2Test.test_invalid_faster_rcnn_batchnorm_update): 0.0s
[       OK ] ModelBuilderTF2Test.test_invalid_faster_rcnn_batchnorm_update
[ RUN      ] ModelBuilderTF2Test.test_invalid_first_stage_nms_iou_threshold
INFO:tensorflow:time(__main__.ModelBuilderTF2Test.test_invalid_first_stage_nms_iou_threshold): 0.0s
I0322 16:48:11.535152 140205126002496 test_util.py:2373] time(__main__.ModelBuilderTF2Test.test_invalid_first_stage_nms_iou_threshold): 0.0s
[       OK ] ModelBuilderTF2Test.test_invalid_first_stage_nms_iou_threshold
[ RUN      ] ModelBuilderTF2Test.test_invalid_model_config_proto
INFO:tensorflow:time(__main__.ModelBuilderTF2Test.test_invalid_model_config_proto): 0.0s
I0322 16:48:11.535965 140205126002496 test_util.py:2373] time(__main__.ModelBuilderTF2Test.test_invalid_model_config_proto): 0.0s
[       OK ] ModelBuilderTF2Test.test_invalid_model_config_proto
[ RUN      ] ModelBuilderTF2Test.test_invalid_second_stage_batch_size
INFO:tensorflow:time(__main__.ModelBuilderTF2Test.test_invalid_second_stage_batch_size): 0.0s
I0322 16:48:11.539124 140205126002496 test_util.py:2373] time(__main__.ModelBuilderTF2Test.test_invalid_second_stage_batch_size): 0.0s
[       OK ] ModelBuilderTF2Test.test_invalid_second_stage_batch_size
[ RUN      ] ModelBuilderTF2Test.test_session
[  SKIPPED ] ModelBuilderTF2Test.test_session
[ RUN      ] ModelBuilderTF2Test.test_unknown_faster_rcnn_feature_extractor
INFO:tensorflow:time(__main__.ModelBuilderTF2Test.test_unknown_faster_rcnn_feature_extractor): 0.0s
I0322 16:48:11.542018 140205126002496 test_util.py:2373] time(__main__.ModelBuilderTF2Test.test_unknown_faster_rcnn_feature_extractor): 0.0s
[       OK ] ModelBuilderTF2Test.test_unknown_faster_rcnn_feature_extractor
[ RUN      ] ModelBuilderTF2Test.test_unknown_meta_architecture
INFO:tensorflow:time(__main__.ModelBuilderTF2Test.test_unknown_meta_architecture): 0.0s
I0322 16:48:11.543226 140205126002496 test_util.py:2373] time(__main__.ModelBuilderTF2Test.test_unknown_meta_architecture): 0.0s
[       OK ] ModelBuilderTF2Test.test_unknown_meta_architecture
[ RUN      ] ModelBuilderTF2Test.test_unknown_ssd_feature_extractor
INFO:tensorflow:time(__main__.ModelBuilderTF2Test.test_unknown_ssd_feature_extractor): 0.0s
I0322 16:48:11.545147 140205126002496 test_util.py:2373] time(__main__.ModelBuilderTF2Test.test_unknown_ssd_feature_extractor): 0.0s
[       OK ] ModelBuilderTF2Test.test_unknown_ssd_feature_extractor
----------------------------------------------------------------------
Ran 24 tests in 42.982s

OK (skipped=1)
看到结果为OK,则表示安装成功,接下来就可以开始物体检测之旅了。
参考下一篇:基于Tensorflow2.x Object Detection API构建自定义物体检测器
相关专栏:
- 从零开始玩转物体检测(一): Windows部署Docker GPU深度学习开发环境
- 从零开始玩转物体检测(二):TensorFlow 2.x Object Detection API快速安装手册
- 从零开始玩转物体检测(三): 基于Tensorflow2.x Object Detection API构建自定义物体检测器

