Unity 反射从入门到跑偏(BoxProjection 到 Fake Interior)
前言:
最近在学习反射相关的内容,从反射的原理到Cube Map的生成及使用,Reflection Probe的原理及使用,重点研究了Box Projection Reflection Probe与Fake Interior(假室内效果)的关系,及其背后的原理。
运行环境:
Unity 2020.3.18f1
Render Pipeline: URP
测试场景:Unity 3D Sample Scene(URP)
环境映射 Environment Mapping
环境映射可以分为静态的(Cube Map)与动态的(Planar Reflection)。而Reflection Probe有3种模式可以选,RealTime, Bake, Custom。RealTime是动态的,Bake是静态的。当然这里的动态和静态也对应着是否是实时反射,一般而言,静态环境映射的优点是开销比较低,缺点是无法反射场景中的动态物体。动态环境映射反之。
Cube Map
Cube Map是一项古早的技术,就是使用6张纹理来模拟摄像机6个朝向看到的内容,最典型的应用就是Sky box。虽然Cube Map已经在被淘汰的边缘了(见下图),不过这并不妨碍我们通过Cube Map来了解环境反射的过程。
通过使用puppet_master提供的脚本,生成Cube Map纹理,使用texCUBE接口采样Cube Map纹理,替换Ground材质,可以看到替换后的地面出现了其他物体的反射。
half4 frag(v2f i) : SV_Target
{
    half4 col = texCUBE(_CubeTex, i.reflectionDir);
    return col;
}

Reflection Probe
Reflection Probe,没用过Reflection Probe的同学可以从官方的Tutorial学习。与采样Cube Map的方法类似,使用Unity内置的接口采样Reflection Probe的信息,这里Reflection Probe开启了HDR,采样的结果需要调用DecodeHDR进行解码。
half4 frag(v2f i) : SV_Target
{
    half4 rgbm = UNITY_SAMPLE_TEXCUBE(unity_SpecCube0, i.reflectionDir);
    half3 color = DecodeHDR(rgbm, unity_SpecCube0_HDR);
    return half4(color, 1.0);
}
Box Projection Reflection Probe
观察上图中,栏杆与地面交接的部分,地面的反射是不正确的。这是由于Reflection Probe采样方向的偏差造成反射物体与实际物体不匹配。这时需要使用Box Projection Cube Map的技术来修正采样的方向,得到更好的效果。Unity提供了接口BoxProjectedCubemapDirection可以直接使用:
half4 frag (v2f i) : SV_Target
{
	float3 reflectDir = i.reflectionDir;
	reflectDir = BoxProjectedCubemapDirection(reflectDir, i.worldPos, unity_SpecCube0_ProbePosition, unity_SpecCube0_BoxMin, unity_SpecCube0_BoxMax);
	half4 rgbm = UNITY_SAMPLE_TEXCUBE(unity_SpecCube0, reflectDir);
	half3 color = DecodeHDR(rgbm, unity_SpecCube0_HDR);
	return half4(color, 1.0);
}

可以看到,栏杆与地面的接触部分,反射效果明显变好了,这是为什么呢?
这里需要从Reflection Probe采样的原理说起了,puppet_master的推理非常详尽,建议手动推导一遍。
推导对应的代码如下:
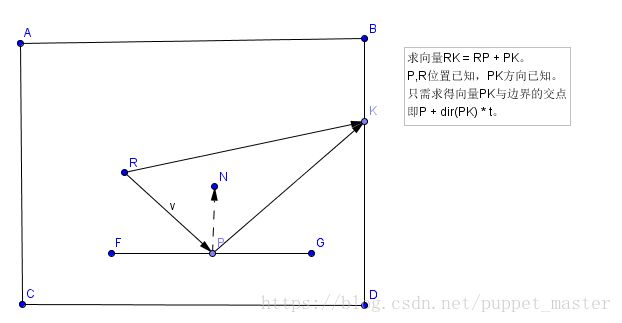
 half3 nrdir = normalize(worldRefl); //PK方向
 half3 bounding = (nrdir > 0.0f) ? rbmax : rbmin //求得PK方向上包围盒的坐标
 half3 T = (bounding - worldPos) / ndir; //求得三方向上的T值
 half t = min(min(T.x, T.y), T.z); //求得最小t

 half3 rp = worldPos - cubeMapCenterPos; //向量RP
 half3 pk = worldPos + t * nrdir; //向量pk
 half3 rk = rp + pk; //向量rk为最终采样方向
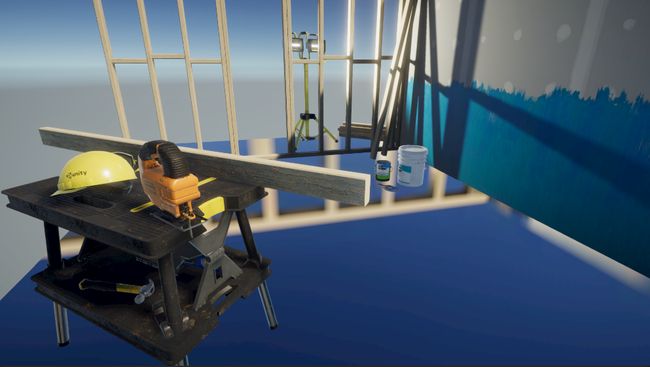
Fake Interior
还记得之前在做《七大罪》的技术分析时(为什么忽然扯到这个技术,下面有解答),其中有一个假室内(Fake Interior)效果令我印象非常深刻,简单来说就是利用2D纹理来模拟带有景深的3D室内效果,仿佛从窗口看进去的房间是一个真实的3D空间。
此处应该有动图:
有一位博主根据Unity Tokyo 2019的官方介绍,推演了这种效果实现的原理一种假室内(Fake Interior)效果的实现,当时看到这篇文章,只觉得效果很好,代码也有,本着不求甚解(其实是看不懂)的精神,并没有对数学推理做深入研究。这次看到上面puppet_master推导BoxProjectedCubemapDirection的图片后:
忽然发现与Fake Interior的推导过程有几分相似:

发现二者的共同点都是使用P点经过变换后的P’点的坐标对Cube Map进行采样。BoxProjection的P’是由视线方向与法线方向求得反射方向得到的,Fake Interior的P’是由视线方向的延长线与Cube Map求交得到的。
实现Fake Interior
使用下面这张cube map便于观察
加上一种假室内(Fake Interior)效果的实现其中的代码,很容易看到下面的效果:
上代码:
fixed4 frag (v2f i) : SV_Target
{

    fixed4 windowColor = tex2D(_WindowTex, i.uv);
    float3 viewDirOS = normalize(i.viewDirOS);
    float3 normalOS = i.normalOS;
    float radius = 0.5, posEntr, posExit;
    float bias = 2 * radius * (1 - _RoomDepth);

    float3 boxMin = (float3)(-radius) + lerp((float3)0, bias * normalOS, Max3(normalOS.x, normalOS.y, normalOS.z));
    float3 boxMax = (float3)(radius) + lerp(bias * normalOS, (float3)0, Max3(normalOS.x, normalOS.y, normalOS.z));
    // 重点看这里,这里使用了IntersectRayAABB
    IntersectRayAABB(i.positionOS, -viewDirOS, boxMin, boxMax, 1, 2, posEntr, posExit);
    float3 sampleDir = i.positionOS - posExit * viewDirOS;
    sampleDir -= bias * normalOS;

    fixed4 col = texCUBElod(_RoomTex, float4(sampleDir, 0));
    col.rgb += windowColor.rgb * windowColor.a;
    return col;
}
从Fake Interior 到 IntersectAABB
一种假室内(Fake Interior)效果的实现中有一段话醍醐灌顶:
麻烦的地方就在于怎么确定出P’的坐标,本质上就是需要计算过点P的View射线与另一个平面的交点坐标。
第一版的思路是这样的,计算出与6个平面的交点,然后根据坐标0 ≤ P’.xyz ≤ radius去掉正方体外的交点,优化过后只需计算三次,但算法依旧很粗糙。
偶然间了解到这就是计算Ray与AABB交点的经典问题,现在这版是在srp的库寻找到一套更简便的算法实现来求得交点。
这也解释了上面为什么要用IntersectRayAABB接口,至于为什么作者的文章中拷贝了一份IntersectRayAABB的实现,是由于文中的shader写法是用cg写的,切换到hlsl后,引用GeometricTools.hlsl文件后,可以直接调用。
下面是改写后的代码:
Shader "coffeecat/FakeInterior/FakeRoom_HLSL"
{
    Properties
    {
        [NoScaleOffset]_WindowTex ("Window Texture", 2D) = "black" {}
        _RoomTex ("Room Texture", CUBE) = ""{}
        _RoomDepth ("Room Depth", Range(-1, 1)) = 1.0
    }
    SubShader
    {
        Tags { "RenderType"="Opaque" }
        Cull Back

        Pass
        {
            HLSLPROGRAM
            #pragma vertex vert
            #pragma fragment frag

            #include "Packages/com.unity.render-pipelines.universal/ShaderLibrary/Core.hlsl"
            #include "Packages/com.unity.render-pipelines.core/ShaderLibrary/GeometricTools.hlsl"       // intersect functions in here
            #define FLT_EPS  5.960464478e-8  // 2^-24, machine epsilon: 1 + EPS = 1 (half of the ULP for 1.0f)
            #define Max3(a, b, c) max(max(a, b), c)
            #define Min3(a, b, c) min(min(a, b), c)

            struct appdata
            {
                float4 positionOS : POSITION;
                float2 uv : TEXCOORD0;
                float3 normal : NORMAL;
            };

            struct v2f
            {
                float2 uv : TEXCOORD0;
                float4 positionCS : SV_POSITION;
                float3 positionOS : TEXCOORD1;
                float3 viewDirOS : TEXCOORD2;
                float3 normalOS : TEXCOORD3;
                float3 uvw : TEXCOORD4;
            };

            sampler2D _WindowTex;
            samplerCUBE _RoomTex;
            float4 _RoomTex_ST;
            half _RoomDepth;

            v2f vert (appdata v)
            {
                v2f o;
                o.positionCS = TransformObjectToHClip(v.positionOS);
                o.uv = v.uv;
                o.uvw = v.positionOS * _RoomTex_ST.xyx * 0.999 + _RoomTex_ST.zwz;
                o.positionOS = v.positionOS;
                // o.viewDirOS = ObjSpaceViewDir(v.positionOS);
                o.viewDirOS = TransformWorldToObject(GetCameraPositionWS()) - v.positionOS;
                o.normalOS = v.normal;
                return o;
            }

            half4 frag (v2f i) : SV_Target
            {
                half4 windowColor = tex2D(_WindowTex, i.uv);
                float3 viewDirOS = normalize(i.viewDirOS);
                float3 normalOS = i.normalOS;
                float radius = 0.5, posEntr, posExit;
                float bias = 2 * radius * (1 - _RoomDepth);

                float3 boxMin = (float3)(-radius) + lerp((float3)0, bias * normalOS, Max3(normalOS.x, normalOS.y, normalOS.z));
                float3 boxMax = (float3)(radius) + lerp(bias * normalOS, (float3)0, Max3(normalOS.x, normalOS.y, normalOS.z));

                IntersectRayAABB(i.positionOS, -viewDirOS, boxMin, boxMax, 1, 2, posEntr, posExit);
                float3 sampleDir = i.positionOS - posExit * viewDirOS;
                sampleDir -= bias * normalOS;

                half4 col = texCUBElod(_RoomTex, float4(sampleDir, 0));
                col.rgb += windowColor.rgb * windowColor.a;
                return col;
            }

            ENDHLSL
        }
    }
}
继续探究IntersectRayAABB的实现:
//-----------------------------------------------------------------------------
// Intersection functions
//-----------------------------------------------------------------------------

bool IntersectRayAABB(float3 rayOrigin, float3 rayDirection,
                      float3 boxMin,    float3 boxMax,
                      float  tMin,       float tMax,
                  out float  tEntr,  out float tExit)
{
    // Could be precomputed. Clamp to avoid INF. clamp() is a single ALU on GCN.
    // rcp(FLT_EPS) = 16,777,216, which is large enough for our purposes,
    // yet doesn't cause a lot of numerical issues associated with FLT_MAX.
    float3 rayDirInv = clamp(rcp(rayDirection), -rcp(FLT_EPS), rcp(FLT_EPS));

    // Perform ray-slab intersection (component-wise).
    float3 t0 = boxMin * rayDirInv - (rayOrigin * rayDirInv);
    float3 t1 = boxMax * rayDirInv - (rayOrigin * rayDirInv);

    // Find the closest/farthest distance (component-wise).
    float3 tSlabEntr = min(t0, t1);
    float3 tSlabExit = max(t0, t1);

    // Find the farthest entry and the nearest exit.
    tEntr = Max3(tSlabEntr.x, tSlabEntr.y, tSlabEntr.z);
    tExit = Min3(tSlabExit.x, tSlabExit.y, tSlabExit.z);

    // Clamp to the range.
    tEntr = max(tEntr, tMin);
    tExit = min(tExit, tMax);

    return tEntr < tExit;
}

// This simplified version assume that we care about the result only when we are inside the box
float IntersectRayAABBSimple(float3 start, float3 dir, float3 boxMin, float3 boxMax)
{
    float3 invDir = rcp(dir);       // 对每个分量求倒数(目的是为了将除法简化为乘法,来优化性能)

    // Find the ray intersection with box plane
    float3 rbmin = (boxMin - start) * invDir;
    float3 rbmax = (boxMax - start) * invDir;

    float3 rbminmax = (dir > 0.0) ? rbmax : rbmin;

    return min(min(rbminmax.x, rbminmax.y), rbminmax.z);
}
IntersectRayAABBSimple的实现总觉得看起来有点眼熟,再贴一遍puppet_master推导BoxProjection的代码:
 half3 nrdir = normalize(worldRefl); //PK方向
 half3 bounding = (nrdir > 0.0f) ? rbmax : rbmin //求得PK方向上包围盒的坐标
 half3 T = (bounding - worldPos) / ndir; //求得三方向上的T值
 half t = min(min(T.x, T.y), T.z); //求得最小t

 half3 rp = worldPos - cubeMapCenterPos; //向量RP
 half3 pk = worldPos + t * nrdir; //向量pk
 half3 rk = rp + pk; //向量rk为最终采样方向
发现这两个函数貌似确实在做同一件事,再来看看BoxProjectedCubemapDirection的实现:
half3 BoxProjectedCubemapDirection(half3 reflectionWS, float3 positionWS, float4 cubemapPositionWS, float4 boxMin, float4 boxMax)
{
    // Is this probe using box projection?
    if (cubemapPositionWS.w > 0.0f)
    {
        float3 boxMinMax = (reflectionWS > 0.0f) ? boxMax.xyz : boxMin.xyz;
        half3 rbMinMax = half3(boxMinMax - positionWS) / reflectionWS;

        half fa = half(min(min(rbMinMax.x, rbMinMax.y), rbMinMax.z));       //IntersectRayAABBSimple的返回值

        half3 worldPos = half3(positionWS - cubemapPositionWS.xyz);

        half3 result = worldPos + reflectionWS * fa;
        return result;
    }
    else
    {
        return reflectionWS;
    }
}
对比IntersectRayAABBSimple与BoxProjectedCubemapDirection的区别仅在于前者返回fa,而后者返回矫正后的方向向量。
下面是使用puppet_master推导的方法及使用IntersectRayAABBSimple方法的完整代码:
Shader "coffeecat/Reflection/BoxProjectionReflectionProbe"
{
    SubShader
    {
        Tags { "RenderType" = "Opaque"}

        Pass
        {
            CGPROGRAM
            #pragma vertex vert
            #pragma fragment frag

            #include "UnityCG.cginc"
            #include "Lighting.cginc"

            struct v2f
            {
                float4 vertex : SV_POSITION;
                float3 reflectionDir : TEXCOORD0;
                float3 worldPos : TEXCOORD1;
            };

            v2f vert (appdata_base v)
            {
                v2f o;
                o.vertex = UnityObjectToClipPos(v.vertex);
                float3 worldNormal = UnityObjectToWorldNormal(v.normal);
                float3 worldVeiwDir = WorldSpaceViewDir(v.vertex);
                o.worldPos = mul(unity_ObjectToWorld, v.vertex);
                o.reflectionDir = reflect(-worldVeiwDir, worldNormal);
                return o;
            }
            // 还原puppet_master的实现
            float3 BoxProjection(float3 reflectDir, float3 worldPos, float4 cubeCenter, float3 cubeMin, float3 cubeMax)
            {
                // puppet_master实现
                half3 nrDir = normalize(reflectDir);
                half3 bounding = (nrDir > 0.0f) ? cubeMax : cubeMin;
                half3 T = (bounding - worldPos) / nrDir;
                half minT = min(T.x, min(T.y, T.z));

                // puppet_master文中引用的BoxProjectedCubemapDirection实现,与本地的版本14.0.2有所区别,我手里的版本已经没有这种实现了。
                // half3 nrDir = normalize(reflectDir);
                // half3 rbmax = (cubeMax.xyz - worldPos) / nrDir;
                // half3 rbmin = (cubeMin.xyz - worldPos) / nrDir;
                // half3 rbminmax = (nrDir > 0.0f) ? rbmax : rbmin;
                // half minT = min(rbminmax.x, min(rbminmax.y, rbminmax.z));

                float3 RP = worldPos - cubeCenter.xyz;
                // float3 PK = worldPos + nrDir * minT;         // 修正了puppet_master原本推导的一个问题,这样计算会计算两次worldPos,导致最终结果多一个偏移。
                float3 PK = nrDir * minT;
                float3 RK = RP + PK;
                return RK;
            }
            // 从GeometricTools.hlsl拷贝过来的
            // This simplified version assume that we care about the result only when we are inside the box
            float IntersectRayAABBSimple(float3 start, float3 dir, float3 boxMin, float3 boxMax)
            {
                float3 invDir = rcp(dir);

                // Find the ray intersection with box plane
                float3 rbmin = (boxMin - start) * invDir;
                float3 rbmax = (boxMax - start) * invDir;

                float3 rbminmax = (dir > 0.0) ? rbmax : rbmin;

                return min(min(rbminmax.x, rbminmax.y), rbminmax.z);
            }

            half4 frag(v2f i) : SV_Target
            {
                float3 reflectDir = i.reflectionDir;
                // 1.使用URP内置函数
                reflectDir = BoxProjectedCubemapDirection(reflectDir, i.worldPos, unity_SpecCube0_ProbePosition, unity_SpecCube0_BoxMin, unity_SpecCube0_BoxMax);
                // 2.使用puppet_master推导的方法
                // reflectDir = BoxProjection(reflectDir, i.worldPos, unity_SpecCube0_ProbePosition, unity_SpecCube0_BoxMin, unity_SpecCube0_BoxMax);
                // 3.使用IntersectRayAABBSimple实现,
                // 注意这里传入的方向需要进行normalize的计算,否则会有偏移
                // float dis = IntersectRayAABBSimple(i.worldPos, normalize(reflectDir), unity_SpecCube0_BoxMin, unity_SpecCube0_BoxMax);
                // reflectDir = i.worldPos - unity_SpecCube0_ProbePosition.xyz + normalize(reflectDir) * dis;
                half4 rgbm = UNITY_SAMPLE_TEXCUBE(unity_SpecCube0, reflectDir);
                half3 color = DecodeHDR(rgbm, unity_SpecCube0_HDR);
                return half4(color, 1.0);
            }
            ENDCG
        }
    }
}
coffeecato:还是自己的数学(物理)底子太薄了。很多看似复杂的效果,底层都是基础的数学知识点,而如果这个知识点并不在知识库中,恐怕得摸着知识库的墙绕地球一圈才能找到打开门的钥匙,而我就是绕了很远的路,才发现射线检测,射线与AABB包围盒相交检测等知识点。
参考资料
Unity Shader-反射效果(CubeMap,Reflection Probe,Planar Reflection,Screen Space Reflection)
一种假室内(Fake Interior)效果的实现