Nginx入门及基本使用
Nginx入门及基本使用
文章目录
- Nginx入门及基本使用
- 参考
- 一、Nginx 相关知识
-
- 什么是Nginx
- Nginx 的作用
-
- 代理
- 负载均衡
- 动静分离
- 二、Nginx 下载
- 三、Nginx 常用命令
- 四、 Nginx 的配置文件
-
- 全局模块
- events 模块
- http 全局模块
- 实践
-
- 准备工作
- nginx配置请求转发
- 根据请求后缀分发
- 配置负载均衡
-
- weight
- ip hash
- fair
- 总结
参考
- https://segmentfault.com/a/1190000023328201
- https://blog.csdn.net/p1967914901/article/details/125509760?spm=1001.2014.3001.5502
- 博客1
一、Nginx 相关知识
什么是Nginx
Nginx是一个高性能的http和反向代理服务器,其特点是占用内存小,并发能力强。Nginx专为性能优化而开发,性能是其最重要的考量,能经受高负载的考验,有报告表明能支持高达50000个并发连接数。
Nginx 的作用
代理
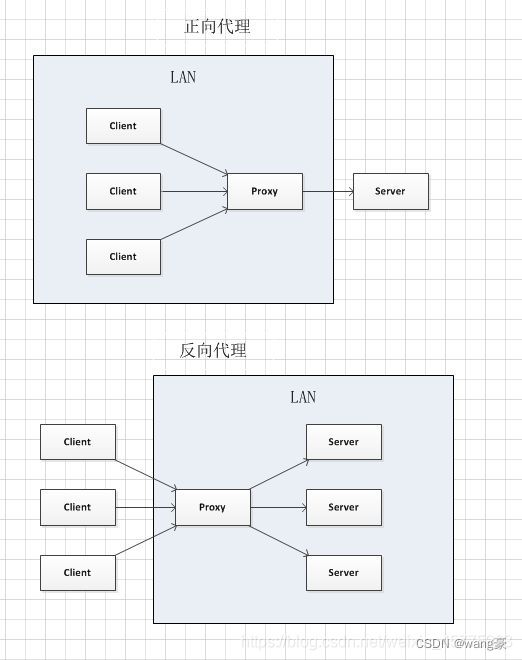
正向代理:在浏览器中配置代理服务器,通过代理服务器进行互联网访问。
反向代理:将请求发送到反向代理服务器,由反向代理服务器去选择目标服务器获取数据后,再返回给客户端,此时反向代理服务器和目标服务器对外就是一个服务器,暴漏的是代理服务器地址。

负载均衡
如果请求数过大,单个服务器解决不了,我们增加服务器的数量,然后将请求分发到各个服务器上,将原先请求集中到单个服务器的情况改为请求分发到多个服务器上,就是负载均衡。
动静分离
为了加快服务器的解析速度,可以把动态页面和静态页面交给不同的服务器来解析,加快解析速度,降低原来单个服务器的压力。
二、Nginx 下载
下载地址
可选择其中的稳定版下载

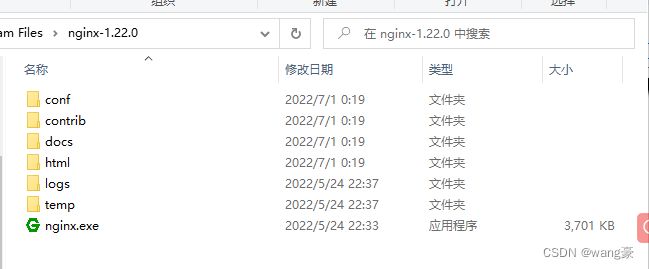
下载完毕后我们可进入到解压后的文件目录

双击neginx.exe或命令行运行neginx.exe, 成功后,可访问http://localhost:80若出现下面结果说明nginx启动成功!
三、Nginx 常用命令
- 查看
nginx版本
nginx.exe -v
- 启动
nginx
nginx.exe
- 强制关闭
nginx
nginx.exe -s stop
- 处理完现存请求后关闭
nginx
nginx.exe -s quit
- 重新加载
nginx配置信息(后面修改配置信息后需执行使得修改结果有效)
nginx.exe -s reload
四、 Nginx 的配置文件
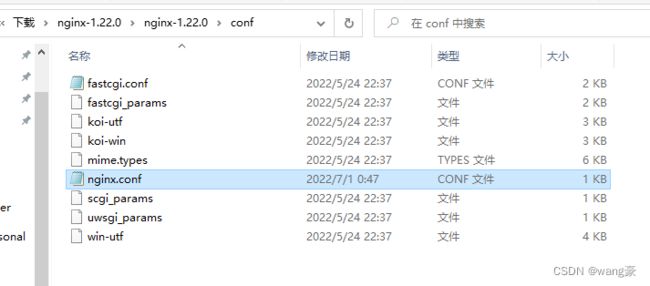
找到Nginx下载得到文件中的nginx.conf 配置文件

删除掉注释信息后,我们可以看到
worker_processes  1;

events {
    worker_connections  1024;
}

http {
    include       mime.types;
    default_type  application/octet-stream;
    sendfile        on;
    #tcp_nopush     on;

    #keepalive_timeout  0;
    keepalive_timeout  65;
    #gzip  on;

    server {
        listen       80;
        server_name  localhost;
        location / {
            root   html;
            index  index.html index.htm;
        }

        error_page   500 502 503 504  /50x.html;
        location = /50x.html {
            root   html;
        }
   }

}
nginx的配置文件一般包含三个部分。
全局模块
从配置文件开始到events块之间的内容,主要会设置一些nginx服务器整体运行的配置指令。
worker_processes 1;
这里worker_processes代表nginx处理并发的相关配置,值越大处理并发的能力越强
events 模块
events块涉及的指令主要影响nginx服务器与用户网络的连接。
events {
    worker_connections  1024;
}
这里的worker_connections 设置了nginx支持的最大连接数
http 全局模块
nginx服务器配置最频繁的部分。http全局块包含http块和server块。
实践
准备工作
使用js中的Koa框架写两个后端接口,模拟两台不同的服务器。
const Koa = require('Koa');
const app1 = new Koa();
const app2 = new Koa();

app1.use(ctx => {
  ctx.body = 'Hello World 8001';
});

app1.listen(8001,() => {
  console.log('启动成功 8001');
});

app2.use(ctx => {
  ctx.body = 'Hello World 8002';
});

app2.listen(8002,() => {
  console.log('启动成功 8002');
});
并且用 node ××.js 启动服务器,出现下图则说明启动成功,那么我们就可以继续使用nginx啦

nginx配置请求转发
我们修改nginx配置文件中的相关信息,将其中的server模块修改为:
 server {
        listen       80;
        server_name  localhost;
        location / {
            root   html;
            proxy_pass http://127.0.0.1:8001;
            index  index.html index.htm;
        }

        error_page   500 502 503 504  /50x.html;
        location = /50x.html {
            root   html;
        }
   }
以上这段配置的作用是,每次请求http://localhost:81/,都会被转发到http://localhost:8001/, 此时我们可访问http://localhost:81/,出现:

根据请求后缀分发
我们修改nginx配置文件中的相关信息,将其中的server模块修改为:
 server {
        listen       81;
        server_name  localhost;
        location ~ /a {
            root   html;
            proxy_pass http://127.0.0.1:8001;
            index  index.html index.htm;
        }

        location ~ /b {
            root   html;
            proxy_pass http://127.0.0.1:8002;
            index  index.html index.htm;
        }

        error_page   500 502 503 504  /50x.html;
        location = /50x.html {
            root   html;
        }
   }
这样我们每次访问http://localhost:81/a 都会被转发到http://127.0.0.1:8001, 访问http://localhost:81/b 都会被转发到http://127.0.0.1:8002。
配置负载均衡
负载均衡
就是当我们的项目后端由服务器的集群实现,同一个功能有多个服务器可以实现。如何做到将请求更合理得分配转发给这些服务器就是负载均衡要做的事
weight
案例
首先我们在http块中配置两个服务的列表,并分别设置权重weight.
weight 默认为1,权重越高,分配的请求越多。
upstream myserver{
      server 127.0.0.1:8002 weight=1;
      server 127.0.0.1:8001 weight=2;
 }
修改server模块修改为:
 server {
        listen       81;
        server_name  localhost;
        location ~ /a {
            root   html;
            proxy_pass http://127.0.0.1:8001;
            index  index.html index.htm;
        }

        location ~ /b {
            root   html;
            proxy_pass http://127.0.0.1:8002;
            index  index.html index.htm;
        }

        error_page   500 502 503 504  /50x.html;
        location = /50x.html {
            root   html;
        }
   }
此时我们在去访问
http://localhost:81/,并反复刷新几次会发现页面上的内容Hello World 8002和Hello World 8001交替出现。
ip hash
ip hash:每个请求按访问ip的hash结果分配,这样每个访客固定访问一个后台服务器,可以解决session的问题。
修改上一步配置的myserver为:
upstream myserver{
      ip_hash;
      server 127.0.0.1:8002 weight=1;
      server 127.0.0.1:8001 weight=2;
   }
fair
ip hash:按后端响应时间进行分配,响应时间越短分配的请求越多。
修改上一步配置的myserver为:
   upstream myserver{
      server 127.0.0.1:8002 weight=1;
      server 127.0.0.1:8001 weight=2;
      fair;
   }
总结
本文做为一个nginx入门,到这里就基本完结了。


