【YoloV5 6.0|6.1 部署 TensorRT到torchserve】环境搭建|模型转换|engine模型部署(详细的packet文件编写方法)
忽然发现,关于部署TensorRT的文章少的可怜,于是乎,决定分享一下我自己关于这部分内容的一些成功实操和心得。还是希望大家可以分享出去,让更多人看到!!!
QQ: 1757093754
我的操作环境:
Yolov5 6.0:目前官方更新到6.1 —> 2022.7.5
python:3.8(anaconda3 2021.5)
CUDA: 11.4
CUDNN: 8.2.2
TensorRT: 8.2.2.1
torch:1.9.1+cu111
torchvision:0.10.1+cu111
vs:2019
OpenCV:4.5.0<如果你的yolov5版本是6.0、6.1,则可以不用OpenCV>
注:如果在进行操作的时候发现环境有问题,一定要检查自己的环境版本问题!!!
注:Yolov5 1~5版本并没有封装完好的TensorRT转换流程,故需要借助其他方法完成模型转换,但是6.0、6.1内置TensorRT的export。
目录
忽然发现,关于部署TensorRT的文章少的可怜,于是乎,决定分享一下我自己关于这部分内容的一些成功实操和心得。还是希望大家可以分享出去,让更多人看到!!!
我的操作环境:
前言
版本对应关系:(这一部分如果已经完成了,可以直接跳到下一个环节)
环境安装
第一步:安装CUDA和CUDNN
第二步:配置环境变量
第三步:安装tensorrt到python环境(pip)
模型转换(pt --> engine)
命令行参数解析:
编辑 export.py 命令行:
torchserve部署文件的制作
前言
handler.py的撰写
模型加载方法
数据加载(预处理)方法
推理方法
后处理方法
最后
部署工作
执行打包命令生成mar文件
打开torchserve服务
测试图片
后记
参考资料
前言
- 本人使用的操作系统是 windows10,但同样的方法Linux也可以使用。
- 本次操作不基于 TensorRTx 工具。<这是1~5版本yolov5模型转换时需要用到的>
- 以下操作不会用到 OpenCV和Cmake,但是会给出下载方法。
- 欢迎讨论、交流:QQ | 1757093754
版本对应关系:(这一部分如果已经完成了,可以直接跳到下一个环节)
tensorrtx下载链接
GitHub - wang-xinyu/tensorrtx: Implementation of popular deep learning networks with TensorRT network definition API![]() https://github.com/wang-xinyu/tensorrtx Anaconda 和 python的对应关系:
https://github.com/wang-xinyu/tensorrtx Anaconda 和 python的对应关系:
Old package lists — Anaconda documentationhttps://docs.anaconda.com/anaconda/packages/oldpkglists/anaconda的国内下载源(清华源):
Index of /anaconda/archive/ | 清华大学开源软件镜像站 | Tsinghua Open Source MirrorIndex of /anaconda/archive/ | 清华大学开源软件镜像站,致力于为国内和校内用户提供高质量的开源软件镜像、Linux 镜像源服务,帮助用户更方便地获取开源软件。本镜像站由清华大学 TUNA 协会负责运行维护。![]() https://mirrors.tuna.tsinghua.edu.cn/anaconda/archive/Cmake下载<本次不会用到,只限windows系统的yolov5 1~5版本部署>:
https://mirrors.tuna.tsinghua.edu.cn/anaconda/archive/Cmake下载<本次不会用到,只限windows系统的yolov5 1~5版本部署>:
Download | CMake![]() https://cmake.org/download/OpenCV下载<本次不会用到,只限windows系统的yolov5 1~5版本部署>:
https://cmake.org/download/OpenCV下载<本次不会用到,只限windows系统的yolov5 1~5版本部署>:
Releases - OpenCV![]() https://opencv.org/releases/opencv与vs对应关系:
https://opencv.org/releases/opencv与vs对应关系:
vc6 = Visual Studio 6
vc7 = Visual Studio 2003
vc8 = Visual Studio 2005
vc9 = Visual Studio 2008
vc10 = Visual Studio 2010
vc11 = Visual Studio 2012
vc12 = Visual Studio 2013
vc14 = Visual Studio 2015
vc15 = Visual Studio 2017
vc16 = Visual Studio 2019注:这里我用的是vs2019,但是它不仅支持vc16,还支持了vc15、vc14,在你下载opencv的时候,安装包会写明其内置的vc版本。
CUDA下载版本关系(注意自己电脑的driver version):
| CUDA Toolkit | Toolkit Driver Version | |
|---|---|---|
| Linux x86_64 Driver Version | Windows x86_64 Driver Version | |
| CUDA 11.7 GA | >=515.43.04 | >=516.01 |
| CUDA 11.6 Update 2 | >=510.47.03 | >=511.65 |
| CUDA 11.6 Update 1 | >=510.47.03 | >=511.65 |
| CUDA 11.6 GA | >=510.39.01 | >=511.23 |
| CUDA 11.5 Update 2 | >=495.29.05 | >=496.13 |
| CUDA 11.5 Update 1 | >=495.29.05 | >=496.13 |
| CUDA 11.5 GA | >=495.29.05 | >=496.04 |
| CUDA 11.4 Update 4 | >=470.82.01 | >=472.50 |
| CUDA 11.4 Update 3 | >=470.82.01 | >=472.50 |
| CUDA 11.4 Update 2 | >=470.57.02 | >=471.41 |
| CUDA 11.4 Update 1 | >=470.57.02 | >=471.41 |
| CUDA 11.4.0 GA | >=470.42.01 | >=471.11 |
| CUDA 11.3.1 Update 1 | >=465.19.01 | >=465.89 |
| CUDA 11.3.0 GA | >=465.19.01 | >=465.89 |
| CUDA 11.2.2 Update 2 | >=460.32.03 | >=461.33 |
| CUDA 11.2.1 Update 1 | >=460.32.03 | >=461.09 |
| CUDA 11.2.0 GA | >=460.27.03 | >=460.82 |
| CUDA 11.1.1 Update 1 | >=455.32 | >=456.81 |
| CUDA 11.1 GA | >=455.23 | >=456.38 |
| CUDA 11.0.3 Update 1 | >= 450.51.06 | >= 451.82 |
| CUDA 11.0.2 GA | >= 450.51.05 | >= 451.48 |
| CUDA 11.0.1 RC | >= 450.36.06 | >= 451.22 |
| CUDA 10.2.89 | >= 440.33 | >= 441.22 |
| CUDA 10.1 (10.1.105 general release, and updates) | >= 418.39 | >= 418.96 |
| CUDA 10.0.130 | >= 410.48 | >= 411.31 |
| CUDA 9.2 (9.2.148 Update 1) | >= 396.37 | >= 398.26 |
| CUDA 9.2 (9.2.88) | >= 396.26 | >= 397.44 |
| CUDA 9.1 (9.1.85) | >= 390.46 | >= 391.29 |
| CUDA 9.0 (9.0.76) | >= 384.81 | >= 385.54 |
| CUDA 8.0 (8.0.61 GA2) | >= 375.26 | >= 376.51 |
| CUDA 8.0 (8.0.44) | >= 367.48 | >= 369.30 |
| CUDA 7.5 (7.5.16) | >= 352.31 | >= 353.66 |
| CUDA 7.0 (7.0.28) | >= 346.46 | >= 347.62 |
注:该版本为最小驱动版本,可以大于该版本。
cudnn与cuda对应关系及下载:
cuDNN Archive | NVIDIA Developer![]() https://developer.nvidia.com/rdp/cudnn-archive#a-collapse742-10 cuda与TensorRT对应关系及下载:
https://developer.nvidia.com/rdp/cudnn-archive#a-collapse742-10 cuda与TensorRT对应关系及下载:
NVIDIA TensorRT Download | NVIDIA Developer![]() https://developer.nvidia.com/nvidia-tensorrt-download注:下载TensorRT的时候记得点这个:
https://developer.nvidia.com/nvidia-tensorrt-download注:下载TensorRT的时候记得点这个:
点开任意一个,可以看到有给出的版本对应关系,自行下载即可!
恭喜你!第一步完成了,成功下载了所有环境!
环境安装
- 前面讲了所需要的环境和其版本对应关系,这一节讲如何进行搭建环境。
第一步:安装CUDA和CUDNN
CUDA的安装默认路径设置在了:C:\Program Files\NVIDIA GPU Computing Toolkit\CUDA
这个就不要移动了,方便以后修改和查找。多个CUDA版本之间可以共存且不影响(注意区分你的驱动和CUDA的关系,他们不是一回事,驱动肯定不能多安装) ,实际工作的CUDA取决于你的环境变量。
安装好CUDA之后,你需要安装cudnn,方法有点特殊:
- 将cuda\bin中的文件复制到 C:\Program Files\NVIDIA GPU Computing Toolkit\CUDA\v10.2\bin
- 将cuda\include中的文件复制到 C:\Program Files\NVIDIA GPU Computing Toolkit\CUDA\v10.2\include
- 将cuda\lib中的文件复制到 C:\Program Files\NVIDIA GPU Computing Toolkit\CUDA\v10.2\lib
第二步:配置环境变量
- C:\Program Files\NVIDIA GPU Computing Toolkit\CUDA\v11.4\bin
- C:\Program Files\NVIDIA GPU Computing Toolkit\CUDA\v11.4\libnvvp
- D:\TensorRT-8.2.2.1.Windows10.x86_64.cuda-11.4.cudnn8.2\TensorRT-8.2.2.1\include
- D:\TensorRT-8.2.2.1.Windows10.x86_64.cuda-11.4.cudnn8.2\TensorRT-8.2.2.1\lib
- D:\opencv_4.5.0\opencv\build\x64\vc15\bin
- D:\opencv_4.5.0\opencv\build\x64\vc15\lib
- D:\Cmake\bin
注:OpenCV、Cmake没安装则不用配置,只检查tensorrt、cuda、anaconda的环境即可。
第三步:安装tensorrt到python环境(pip)
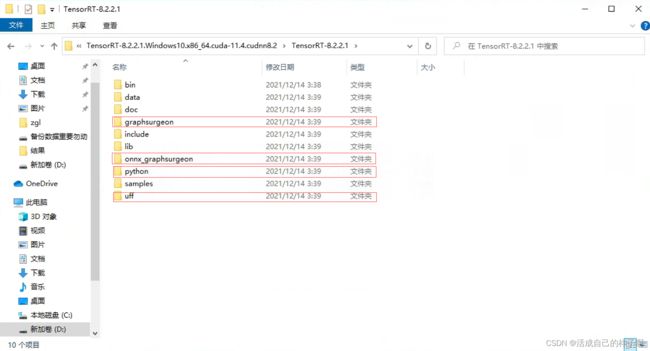
打开下载好的tensorrt,注意以下4个文件夹,我们需要安装里面的whl到python环境当中。
pip install graphsurgeon\graphsurgeon-0.4.5-py2.py3-none-any.whl
pip install onnx_graphsurgeon\onnx_graphsurgeon-0.3.12-py2.py3-none-any.whl
pip install python\tensorrt-8.2.2.1-cp38-none-win_amd64.whl
pip install uff\uff-0.6.9-py2.py3-none-any.whl
注:在python文件夹下有4个whl,这里我的python环境是3.8,故只安装cp38版本的whl即可。
注:以上过程正常情况下均不会报错。
模型转换(pt --> engine)
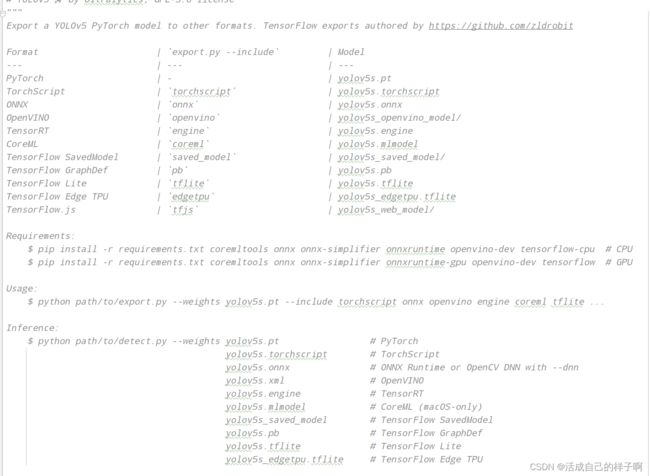
在yolov5 6版本中,给出了市面主流模型的转换方案,下面是支持模型的权重图:
我们直接使用 export.py 就可以直接转换模型了:(如果你前面的过程没有任何问题的话)
命令行参数解析:
- --data:因为转换的权重不再是yolo.py里面的模型类,故不再有names的成员变量,需要我们指定data文件去加载类别信息!
- --weights:我们训练完成了 pt 权重。(best.pt、epoch.pt都可以)
- --imgsz:固定一个大小去模拟推理,这里建议你训练的时候用的什么resize,你这里就写什么。(当指定完大小时,生成的权重只能将如此大小的图片输入模型预测)
- --device:一定要用GPU!!! 一定要用GPU!!!一定要用GPU!!!重要的事情说3遍,这个是推理计算用的,和生成的模型无关,我用GPU都跑了半个小时!!!
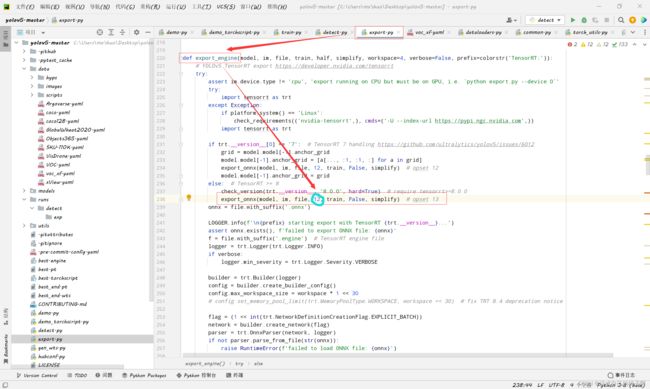
- --opset:你的onnx opset型号。(如果你以上过程均和我一样,就是12,不然也是12 【doge】)(其实你这个地方改不改都无所谓。。因为源代码默认13了【如果报opset版本的错,则要修改以下源代码】)
- --conf-thres: 你的预测结果的置信度的阈值,大于此值时显示
- --include:只写 engine 就行。
其他参数:
- --workspace:推理过程当中显存最大开销,这个默认是4,我设置的7。 【该参数可以减少模型转换时间】
注:运行的时候如果报opset版本的错误,请把这个地方改成12。(opset version)
 export.py 命令行:
python .\export.py --data .\data\voc_xf.yaml --weights .\best.pt --imgsz 640,640 --batch-size 1 --device 0 --workspace 7 --conf-thres 0.6 --include engine
注:
- export通过onnx为中介,故中间会生成一个onnx的模型,再通过其生成engine。
- 转换时间很长,大概半个小时(开4G显存的话,我开了7G,是10多分钟)。
- 期间转换使用的显存会持续增加,可以开另外一个进程的终端去查看显存使用情况。
- 转换期间可能会出现警告,只要程序没终止,说明还在转换,不要暂停!!!
查看显存使用情况:
nvidia-smi生成的engine和onnx:
可以看到生成的engine还是非常小的。
torchserve部署文件的制作
- 在之前的工作中,我们已经获得了engine权重,它可以加速我们的模型预测,我们要把它部署在服务器上,这一小节将讲述如何制作torchserve部署所用的文件。
前言
在之前,我写过了一篇博客,记录了torchserve的安装和使用过程: (可以参考一下)
【torchserve安装和使用】torchserve部署方法|常见问题汇总|mmdetection使用torchserve部署|不使用docker_活成自己的样子啊的博客-CSDN博客_torchserve部署![]() https://blog.csdn.net/m0_61139217/article/details/125014279?spm=1001.2014.3001.5501
https://blog.csdn.net/m0_61139217/article/details/125014279?spm=1001.2014.3001.5501
handler.py的撰写
上面那篇博客里面讲到,handler.py 要重新实现自己的 模型加载方法、数据加载(预处理)方法、推理方法、后处理方法。这一次,就亲手实现一下yolov5的handler编写:
模型加载方法
加载模型的方法,我们采用yolov5里面 detect.py 使用的 DetectMultiBackend 类。
我们自定义一个model.py去继承一下这个类,方便我们在handler中调用:
model.py:
from models.common import DetectMultiBackend

class YOLOV5ObjectDetector(DetectMultiBackend):
    def __init__(self, weights, device, data):
        super(YOLOV5ObjectDetector, self).__init__(weights=weights, device=device, data=data)
在继承的时候,我们只需要传入3个参数即可,一个是权重的路径,一个是预测使用的GPU还是CPU,一个是我们的数据集格式文件(voc_xf.yaml)
之后我们开始实现 handler.py 里面的模型加载方法:
names = []
def _load_pickled_model(self, model_dir, model_file, model_pt_path):
        """
        Loads the pickle file from the given model path.
        Args:
            model_dir (str): Points to the location of the model artefacts.
            model_file (.py): the file which contains the model class.
            model_pt_path (str): points to the location of the model pickle file.
        Raises:
            RuntimeError: It raises this error when the model.py file is missing.
            ValueError: Raises value error when there is more than one class in the label,
                        since the mapping supports only one label per class.
        Returns:
            serialized model file: Returns the pickled pytorch model file
        """
        # 检测是否有model.py
        model_def_path = os.path.join(model_dir, model_file)
        if not os.path.isfile(model_def_path):
            raise RuntimeError("Missing the model.py file")

        # 检测model.py当中是否只有一个类
        module = importlib.import_module(model_file.split(".")[0])
        model_class_definitions = list_classes_from_module(module)
        if len(model_class_definitions) != 1:
            raise ValueError(
                "Expected only one class as model definition. {}".format(model_class_definitions)
            )

        model_class = model_class_definitions[0]  # YOLOV5ObjectDetector类

        self.device = torch.device('cuda:0' if torch.cuda.is_available() else 'cpu')

        model = model_class(model_pt_path, self.device, 'voc_xf.yaml')

        self.names = model.names
        self.names[0] = 'xf_road'
        return model
因为 DetectMultiBackend 类同时将数据集格式文件和模型加载进去了,所以我们可以将其的成员变量names赋值给handler.py的成员变量names中(这个变量需要自己定义一下,如上面代码块的第一行)。
注:
- 代码中的倒数2行是调整我自己数据集的,用来把第一个类别的名称改一下,这个不是必须的。
- 这个names就是预测类别显示的名称,再次期间你可以使用中文但是需要下载一个中文ttf。
数据加载(预处理)方法
handler.py 中的 preprocess 方法实现了对要检测的数据的一个预处理,参数data可能是多样的,这取决于上传的方式。
    def preprocess(self, data):
        print("DEBUG--%d" % len(data))
        images = []
        for row in data:
            image = row.get("data") or row.get("body")
            if isinstance(image, str):
                # if the image is a string of bytesarray.
                image = base64.b64decode(image)
            elif isinstance(image, (bytearray, bytes)):  # if the image is sent as bytesarray
                image = Image.open(io.BytesIO(image))
                # # 将bgr转为rbg
                image = cv2.cvtColor(np.asarray(image), cv2.COLOR_RGB2BGR)
            else:  # if the image is a data list
                image = image.get('instances')[0]
                image = np.divide(torch.HalfTensor(image), 255)

            img0 = image  # 保存原始图像信息
            img = letterbox(image, 640, stride=32, auto=self.model.pt)[0]

            # Convert
            img = img.transpose((2, 0, 1))[::-1]  # HWC to CHW, BGR to RGB
            image = np.ascontiguousarray(img)

            image = torch.from_numpy(image).float().to(self.device)

            image /= 255

            if len(image.shape) == 3:
                image = image[None]  # 在batch-size维度展开

            images.append([image, img0])
        # images = torch.stack(images).to(self.device)  # 数据集的拼接和扩维
        return images
值得一提的是:
因为转换之后的tensorrt模型已经固定了输入特征矩阵的大小,所以我们需要记录一下图片预处理前后的大小,方便后处理过程中对预测得到的标注框进行还原。
img0对应了原始图像。
image对应了数据增强完的图像。
推理方法
handler.py 中通过 inference 方法实现模型对数据的处理推断过程。
我们采用yolov5当中模型对数据的处理推断过程:
 def inference(self, data, *args, **kwargs):
        results = []

        for each_data in data:
            im, im0 = each_data
            pred = self.model(im, augment=False, visualize=False)
            results.append([each_data, pred])

        return results
值得一提的是:
preprocess、inference、postprocess的参数和返回值是传递的,上一个方法的返回值既是下一个方法的参数。
后处理方法
这里就是我们要撰写的handler.py中的最后一个方法了,他负责对预测结果的处理和输出。
由于项目保密性,我已隐去重要代码:
    def postprocess(self, data):
        all_result = []

        for each_data, pred in data:
            result = []

            # 非极大值抑制
            pred = non_max_suppression(pred, conf_thres=0.3, iou_thres=0.45, classes=None, agnostic=False, max_det=1000)[0]

            if pred is None:
                print('No target detected.')
                result.append({"classes": [], "scores": [], "boxes": []})
                return result
            else:
                # 将方框从img大小重新缩放为im0大小
                object = []
                pred[:, :4] = scale_coords(each_data[0].shape[2:], pred[:, :4], each_data[1].shape).round()

                pred[:, :4] = pred[:, :4].round()
                boxes = pred[:, :4].detach().cpu().numpy()
                scores = pred[:, 4].detach().cpu().numpy()
                classes = pred[:, 5].detach().cpu().numpy().astype(np.int)
                new_classes = [self.names[i] for i in classes]

                for i in range(len(classes)):
                    object.append([new_classes[i], boxes[i][0], boxes[i][1], boxes[i][2], boxes[i][3], scores[i]])

                new_cars = object  # 此处隐掉了重要代码

                if new_cars:
                    result.append({
                        "classes": [classes for classes, _, _, _, _, _ in new_cars],
                        "scores": [str(scores) for _, _, _, _, _, scores in new_cars],
                        "boxes": [str([b0, b1, b2, b3]) for _, b0, b1, b2, b3, _ in new_cars]
                    }
                    )

                    print('GYYDEBUG--RESULT:{}'.format(result))

                    all_result.append(result)

                    return all_result
                else:
                    result.append({"classes": [], "scores": [], "boxes": []})
                    return result
最后
handler.py 文件的完成意味着部署的前提工作已经完成。
最后将所有文件(包含依赖关系所需要的文件)放在一起:打包成 packet_trt
注:文中的几个步骤仅供参考学习,直接cv是没用的,这是我自己的项目的handler,要真的想学会,还请认真研究其中代码的原理。该代码是成功部署上了的代码。
部署工作
- 当你完成了你的所有文件准备,你就可以正式开始你的部署工作了。
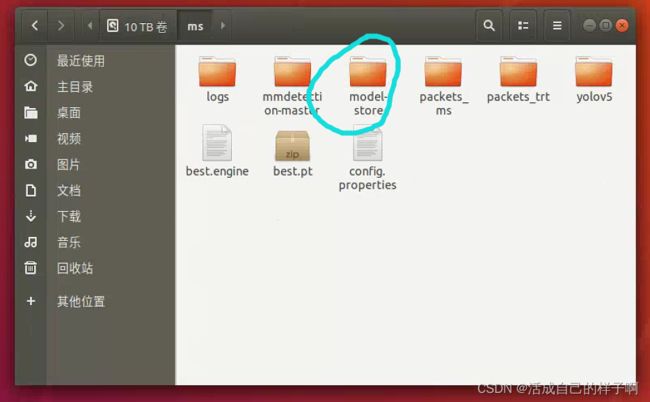
将你的打包的 packet_trt 放到你要部署的服务器上面:
注:这里我把权重移出来了。
执行打包命令生成mar文件
注意文件的相对路径:
torch-model-archiver --model-name test_trt --version 1 --serialized-file best.engine --handler packets_trt/handler.py --model-file packets_trt/model.py --extra-file packets_trt -f(生成的mar我将其移到 model-store 文件夹下面【要自己新建一个model-store文件夹】)
打开torchserve服务
torchserve --start --model-store model-store --models test=test_trt.mar --ts_config ./config.properties正常部署的显示:(有TensorRT的信息)
注:
- [I]:是tensorrt的正常信息日志报告。
- [W]:是tensorrt的警告,这个不是报错,可以不用管。
- [E] :这个是报错,出现了这个代表流程出现了问题。
测试图片
这里我测试了一次性加载多张不同格式的图片:
curl http://localhost:8085/predictions/test -T "{01.jpg,02.png}"成功测试生成的日志:(下图中上面那几行请忽略,我测试的时候点错了【doge】)
成功测试的结果:(注:这里啥也没检测到是因为我用代码隐藏了,由于项目的保密性,还请大家理解!!!)
后记
注:
- 生成engine的TensorRT环境和部署时加载模型的TensorRT需要是一样的,建议模型转换和部署在同一个环境下面进行。
- 部署的时候建议开2个终端,一个来显示部署的信息,另一个用来测试,这样可以方便查看模型的推理部分是否会出现问题。
- 如果部署完的时候发现模型没加载到torchserve里面,则要依次检查 生成的mar文件是否正确、handler编写是否正确、环境是否安装正确。
- 撰写不易,还请大家能给我推推流~~~【doge】
参考资料:
yolov5部署之七步完成tensorRT模型推理加速_Christo3的博客-CSDN博客_tensorrt部署yolov5 https://blog.csdn.net/weixin_41552975/article/details/114398669?spm=1001.2101.3001.6661.1&utm_medium=distribute.pc_relevant_t0.none-task-blog-2~default~CTRLIST~default-1-114398669-blog-125082939.pc_relevant_aa&depth_1-utm_source=distribute.pc_relevant_t0.none-task-blog-2~default~CTRLIST~default-1-114398669-blog-125082939.pc_relevant_aa&utm_relevant_index=1
TorchServe部署pytorch模型_lulu_陌上尘的博客-CSDN博客_torchserve![]() https://blog.csdn.net/qq_41360255/article/details/116707586
https://blog.csdn.net/qq_41360255/article/details/116707586
1. TorchServe — PyTorch/Serve master documentation![]() https://pytorch.org/serve/TensorRT SDK | NVIDIA Developer
https://pytorch.org/serve/TensorRT SDK | NVIDIA Developer![]() https://developer.nvidia.com/tensorrt
https://developer.nvidia.com/tensorrt


