花费一个下午从0到1实现的轮播图,当然还有很多需要改进的地方(欢迎提出需要改进的地方),等我再努力努力,将其封装成一个组件。
上效果

一、实现过程
1)首先实现基本布局
//图片列表 //上一张<//下一张>//导航点
2)主要样式
简单布局样式就不说了,主要讲如何将图片横向排列起来
先给容器设置相对定位,通过overflow将超出部分隐藏
.carousel-container {
      position: relative;
      width: 500px;
      height: 300px;
      /* overflow: hidden; */
      background-color: #ccc;
 }
然后图片列表设置相对定位和flex盒子,这样每一个滑块就横向排列成一排了
.carousel-container .carousel-list {
      position: relative;
      display: flex;
      height: 100%;
      width: 100%;
 }
左右滑动按钮通过绝对定位+transform的方式移动到两边,导航点也是一样,就不一一详说了
二、如何实现无缝呢 (重点来了)
思路:
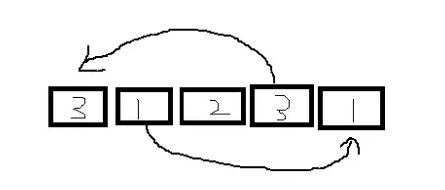
1、先实现向后滚动无缝连接,将最后一张复制一份放到最前面,当滚动到最后一张时,再次滚动,将要滚动到第一张时,先取消过渡transition,瞬间跳到最前面复制的那张上,然后继续运行动画到第一张,这样看起来就无缝了
2、向前滚动无缝连接,思路同上,复制第一张图片放到最后,当滚动到第一张,再次滚动时,瞬间跳到最后复制的那张图片上,继续滚动到轮播图的最后一张上。
主要代码
先获取到dom元素,currentIndex是当前轮播到的图片下标
let currentIndex = 0;
const doms = {
      carouselList: document.querySelector('.carousel-list'),
      arrowLeft: document.querySelector('.carousel-arrow-left'),
      arrowRight: document.querySelector('.carousel-arrow-right'),
      indicator: document.querySelectorAll('.indicator span')
    }
先初始化dom,复制图片
// 复制第一张放最后,最后一张图片放第一张之前
    function init() {
      let lastImg = doms.carouselList.lastElementChild.cloneNode(true)
      let firstImg = doms.carouselList.firstElementChild.cloneNode(true)

      doms.carouselList.appendChild(firstImg)
      doms.carouselList.insertBefore(lastImg, doms.carouselList.firstElementChild)
      lastImg.style.position = 'absolute'
      lastImg.style.transform = 'translateX(-100%)'
    }
    //执行一下
    init()
实现到任意一张图片的方法
function moveTo(index) {
      doms.carouselList.style.transform = `translateX(-${index * 100}%)`
      doms.carouselList.style.transition = '.5s'

      // 去掉导航点选中效果
      let active = document.querySelector('.indicator span.active')
      active.classList.remove('active')
      // 添加选中效果
      doms.indicator[index].classList.add('active')
      currentIndex = index
    }
给导航点绑定点击跳转事件
// 给导航点添加事件
    doms.indicator.forEach((item, i) => {
      item.onclick = function () {
        moveTo(i);
      }
    })
给前后按钮绑上执行事件,判断边界图片,及时取消过渡效果,瞬间跳到复制的图片位置,调用moveTo到第一张或最后一张图片上。
let indicatorLength = doms.indicator.length;
    function preSlide() {
      if (currentIndex === 0) {
        doms.carouselList.style.transition = 'none'
        doms.carouselList.style.transform = `translateX(-${indicatorLength * 100}%)`
        doms.carouselList.clientHeight
        moveTo(indicatorLength - 1)
      } else {
        moveTo(currentIndex - 1)
      }
    }
    function nextSlide() {
      if (currentIndex === doms.indicator.length - 1) {
        doms.carouselList.style.transition = 'none'
        doms.carouselList.style.transform = 'translateX(100%)'
        doms.carouselList.clientHeight
        moveTo(0)
      } else {
        moveTo(currentIndex + 1)
      }
    }

    doms.arrowLeft.onclick = function () {
      preSlide();
    }

    doms.arrowRight.onclick = function () {
      nextSlide()
    }
最后使用定时器调用nertSlide方法就实现自动播放了
function start(time = 2000) {
      setInterval(() => {
        nextSlide()
      }, time)
    }
    start()
完整代码
Document 

 <>
<>
到此这篇关于JavaScript实现无缝轮播图的示例代码的文章就介绍到这了,更多相关JavaScript无缝轮播图内容请搜索脚本之家以前的文章或继续浏览下面的相关文章希望大家以后多多支持脚本之家!