NMS非极大值抑制原理——目标检测
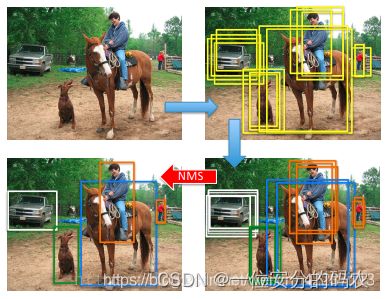
基于anchor的目标检测算法中,会产生很多候选矩形框冗余。会出现多个矩形框指向同一个目标的情况,为了将最能代表位置的矩形框留下,将其他矩形框剔除,提出了非极大值抑制算法。

非极大值抑制(Non-Maximum Suppression)算法简称NMS算法。
原理
IoU(Intersection over Union)为交并比,如图1所示,IoU相当于两个区域交叉的部分除以两个区域的并集部分得出的结果。图2是IoU为各个取值时的情况展示,一般来说,这个score > 0.5 就可以被认为一个不错的结果了。
经典NMS最初第一次应用到目标检测中是在RCNN算法中,其实现严格按照搜索局部极大值,抑制非极大值元素的思想来实现的,具体的实现步骤如下:
中文:
(1)设定目标框的置信度阈值,常用的阈值是0.5左右
(2)根据置信度降序排列候选框列表
(3)选取置信度最高的框A添加到输出列表,并将其从候选框列表中删除
(4)计算A与候选框列表中的所有框的IoU值,删除大于阈值的候选框
(5)重复上述过程,直到候选框列表为空,返回输出列表
英文:
1. choose the highest score element a_1 in set B, add a_1 to the keep set C
2. compute the IOU between the chosen element(such as a_1) and others elements in set B
3. only keep the nums at set B whose IOU value is less than thresholds (can be set as >=0.5), delete the nums similiar
to a_1(the higher IOU it is , the more interseciton between a_1 and it will have)
4. choose the highest score value a_2 left at set B and add a_2 to set C
5. repeat the 2-4 until there is nothing in set B, while set C is the NMS value set
相关代码
#!/usr/bin/env python3
# -*- coding: utf-8 -*-
"""
NMS function(Non-Maximum Suppression,  抑制不是极大值的元素)
        psedocode:
            1. choose the highest score element  a_1  in set B, add a_1 to the keep set C
            2. compute the IOU between the chosen element(such as a_1) and others elements in set B
            3. only keep the nums  at set B whose IOU value is less than thresholds (can be set as >=0.5), delete the nums similiar
                to a_1(the higher IOU it is , the more interseciton between a_1 and it will have)
            4. choose the highest score value a_2 left at set B  and add a_2 to set C
            5. repeat the 2-4 until  there is nothing in set B, while set C is the NMS value set

"""
import numpy as np
# boxes表示人脸框的xywh4点坐标+相关置信度
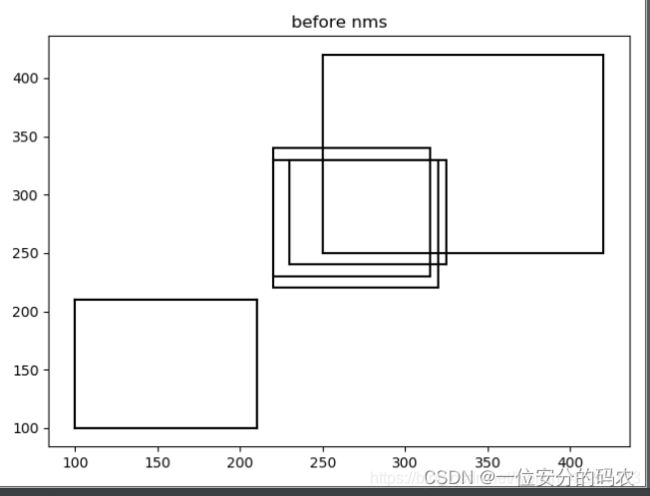
boxes = np.array([[100, 100, 210, 210, 0.72],
                  [250, 250, 420, 420, 0.8],
                  [220, 220, 320, 330, 0.92],
                  [100, 100, 210, 210, 0.72],
                  [230, 240, 325, 330, 0.81],
                  [220, 230, 315, 340, 0.9]])


def py_cpu_nms(dets, thresh):
    # dets:(m,5)  thresh:scaler

    x1 = dets[:, 0]
    y1 = dets[:, 1]
    x2 = dets[:, 2]
    y2 = dets[:, 3]

    areas = (y2 - y1 + 1) * (x2 - x1 + 1)
    scores = dets[:, 4]
    keep = []
    # index表示按照scores从高到底的相关box的序列号
    index = scores.argsort()[::-1]

    while index.size > 0:
        print("sorted index of boxes according to scores", index)
        # 选择得分最高的score直接加入keep列表中
        i = index[0]
        keep.append(i)
        # 计算score最高的box和其他box分别的相关交集坐标
        x11 = np.maximum(x1[i], x1[index[1:]])
        y11 = np.maximum(y1[i], y1[index[1:]])
        x22 = np.minimum(x2[i], x2[index[1:]])
        y22 = np.minimum(y2[i], y2[index[1:]])

        print("x1 values by original order:", x1)
        print("x1 value by scores:", x1[index[:]])
        print("x11 value means  replacing the less value compared"\
              " with the value by the largest score :" , x11)
        # 计算交集面积
        w = np.maximum(0, x22 - x11 + 1)  # the weights of overlap
        h = np.maximum(0, y22 - y11 + 1)  # the height of overlap
        overlaps = w * h
        # 计算相关IOU值(交集面积/并集面积,表示边框重合程度,越大表示越相似,越该删除)
        ious = overlaps / (areas[i] + areas[index[1:]] - overlaps)
        # 只保留iou小于阈值的索引号,重复上步
        idx = np.where(ious <= thresh)[0]
        # 因为第一步index[0]已经被划走,所以需要原来的索引号需要多加一
        index = index[idx + 1]

    return keep


import matplotlib.pyplot as plt


def plot_bbox(dets, c='k', title_name="title"):
    x1 = dets[:, 0]
    y1 = dets[:, 1]
    x2 = dets[:, 2]
    y2 = dets[:, 3]

    plt.plot([x1, x2], [y1, y1], c)
    plt.plot([x1, x1], [y1, y2], c)
    plt.plot([x1, x2], [y2, y2], c)
    plt.plot([x2, x2], [y1, y2], c)
    plt.title(title_name)

if __name__ == '__main__':
    plot_bbox(boxes, 'k', title_name="before nms")  # before nms
    plt.show()

    keep = py_cpu_nms(boxes, thresh=0.7)

    plot_bbox(boxes[keep], 'r', title_name="after_nme")  # after nms
    plt.show()

