【26】pytorch中的grad求导说明以及利用backward获取梯度信息
以下内容如有错误,恳请指出。
这两天对pytorch中的梯度计算以及其自动求导机制进行一个简单的实验,主要部分有两个,第一部分是关于pytorch求梯度的简单接口;第二部分是描述grad-cam进行可视化的简单原理与大概的逻辑实现。
文章目录
- 1. pytorch关于grad的简单测试
-
- 1.1 标量对向量求导
- 1.2 矩阵对矩阵求导
- 2. pytorch获取网络输入的梯度信息
- 3. pytorch获取中间过程的梯度信息
1. pytorch关于grad的简单测试
1.1 标量对向量求导
对于一个简单的映射函数,比如: y = 3 x 2 + 2 x y=3x^{2}+2x y=3x2+2x,可以知道关于y对x求导的结果为: y ′ = 6 x + 2 y'=6x+2 y′=6x+2,当 x = 2 x=2 x=2时, y ′ = 14 y'=14 y′=14,对于这个过程,在pytorch中可以通过以下代码简单实现:
# test grad 1
x = torch.tensor([2], dtype=torch.float, requires_grad=True)
y = 3*torch.pow(x, 2) + 2*x
y.backward()
x.grad   # 3*(2*x)+2=14
输出:
tensor([14.])
1.2 矩阵对矩阵求导
如果x的值是一个列表的话,也就是需要对多个输入进行求导,这时候就不能简单的进行y.backward()来求得x的梯度信息了,需要使用backward中的gradient参数,或者是autograd.backward中的grad_tensors参数,这两者是等价的,因为输入是一个列表参数,此时y也应该是一个列表。假若输入: x = [ 2 , 3 , 4 ] x = [2, 3, 4] x=[2,3,4],那么输出的梯度信息应该为 x . g r a d = [ 14 , 20 , 26 ] x.grad = [14, 20, 26] x.grad=[14,20,26]。
测试代码如下:
# test grad 2
x = torch.tensor([2, 3, 4], dtype=torch.float, requires_grad=True)
y = 3*torch.pow(x, 2) + 2*x
print("y:",y)

# ps: 对于一个向量矩阵进行反向传播需要gradient这个参数
torch.autograd.backward(y, retain_graph=True,
                        grad_tensors=torch.tensor([1,1,1], dtype=torch.float32))
# y.backward(retain_graph=True,
#             gradient=torch.tensor([1,1,1], dtype=torch.float32))
print("grad_tensors=torch.tensor([1,1,1]:\n",x.grad)   # tensor([14., 20., 26.])

torch.autograd.backward(y, retain_graph=True,
                        grad_tensors=torch.tensor([3,2,1], dtype=torch.float32))
# y.backward(retain_graph=True,
#             gradient=torch.tensor([3,2,1], dtype=torch.float32))
print("grad_tensors=torch.tensor([3,2,1]:\n",x.grad)   # tensor([42., 40., 26.])
输出:
y: tensor([16., 33., 56.], grad_fn=<AddBackward0>)
grad_tensors=torch.tensor([1,1,1]:
 tensor([14., 20., 26.])
grad_tensors=torch.tensor([3,2,1]:
 tensor([56., 60., 52.])
或者可以注意到我注释的内容,其两者是等价的:
# test grad 3
x = torch.tensor([2, 3, 4], dtype=torch.float, requires_grad=True)
y = 3*torch.pow(x, 2) + 2*x
print("y:",y)

# ps: 对于一个向量矩阵进行反向传播需要gradient这个参数
# torch.autograd.backward(y, retain_graph=True,
#                         grad_tensors=torch.tensor([1,1,1], dtype=torch.float32))
y.backward(retain_graph=True,
            gradient=torch.tensor([1,1,1], dtype=torch.float32))
print("grad_tensors=torch.tensor([1,1,1]:\n",x.grad)   # tensor([14., 20., 26.])

# torch.autograd.backward(y, retain_graph=True,
#                         grad_tensors=torch.tensor([3,2,1], dtype=torch.float32))
y.backward(retain_graph=True,
            gradient=torch.tensor([3,2,1], dtype=torch.float32))
print("grad_tensors=torch.tensor([3,2,1]:\n",x.grad)   # tensor([42., 40., 26.])
输出的内容和上面的代码输出是一样的:
y: tensor([16., 33., 56.], grad_fn=<AddBackward0>)
grad_tensors=torch.tensor([1,1,1]:
 tensor([14., 20., 26.])
grad_tensors=torch.tensor([3,2,1]:
 tensor([56., 60., 52.])
原因:pytorch在求导的过程中,分为下面两种情况:
- 如果是标量对向量求导(scalar对tensor求导):那么就可以保证上面的计算图的根节点只有一个,此时不用引入grad_tensors参数,直接调用backward函数即可,如第一种情况。
- 如果是(向量)矩阵对(向量)矩阵求导(tensor对tensor求导):实际上是先求出Jacobian矩阵中每一个元素的梯度值(每一个元素的梯度值的求解过程对应上面的计算图的求解方法),然后将这个Jacobian矩阵与grad_tensors参数对应的矩阵进行对应的点乘,得到最终的结果。如第二种情况。
此外,还需要注意,tensor.backward()中的gradient参数与torch.autograd.backward()中的参数grad_tensors的用法是一样的,但名称不一样;也就是以上两行的代码结果一样.所以可以看见输出的结果也是一样的。
2. pytorch获取网络输入的梯度信息
这里通过简单的搭建一个卷积层和一个全连接层来进行理论计算关于矩阵输入的梯度信息,实验的参数与大致计算流程如下图所示,这里的图表内容来自于博主:太阳花的小绿豆,详细见参考资料[2]:

过程为:input通过了一个2x2的卷积核运算后,再通过一个nn.Linear(4, 2)的全连接层输出softmax前的结果 y 1 , y 2 y_{1},y_{2} y1,y2。此时可以分别对 y 1 , y 2 y_{1},y_{2} y1,y2进行求导,反向传播得到输入input的梯度信息。
实验代码如下:
import torch
import torch.nn as nn

x = torch.tensor([1, 2, 3, 1, 1, 2, 2, 1, 2],
                 dtype=torch.float32, requires_grad=True).reshape(1,1,3,3)
# x = torch.autograd.Variable(x, requires_grad=True)
x.retain_grad()
print("input:",x)

conv = nn.Conv2d(1,1,kernel_size=(2,2),bias=False)
conv_weight = torch.tensor([1,0,1,2],dtype=torch.float32).reshape(1,1,2,2)
conv.load_state_dict({"weight": conv_weight})

# handle1 = conv.register_full_backward_hook(save_gradient)

conv_out = conv(x)
print("conv output:", conv_out, "\nconv output shape:", conv_out.shape)

fc = nn.Linear(4, 2, bias=False)
fc_weight = torch.tensor([[0,1,0,1],
                         [1,0,1,1]], dtype=torch.float32)
fc.load_state_dict({"weight":fc_weight})

fc_out = fc(conv_out.reshape(1,-1))
print("fc_out output:", fc_out, "\nfc_out output shape:", fc_out.shape)

# 文档中retain_graph和create_graph两个参数作用相同,因为前者是保持计算图不释放,而后者是创建计算图
# fc_out[0][0].backward()
torch.autograd.backward(fc_out[0][0], retain_graph=True, create_graph=False)
print("fc_out[0][0].backward:\n",x.grad)

# 清楚梯度,否则会累加
x.grad.zero_()
torch.autograd.backward(fc_out[0][1], retain_graph=False, create_graph=True)
print("fc_out[0][1].backward:\n",x.grad)
输出:
input: tensor([[[[1., 2., 3.],
          [1., 1., 2.],
          [2., 1., 2.]]]], grad_fn=<ViewBackward>)
conv output: tensor([[[[4., 7.],
          [5., 6.]]]], grad_fn=<ThnnConv2DBackward>)
conv output shape: torch.Size([1, 1, 2, 2])
fc_out output: tensor([[13., 15.]], grad_fn=<MmBackward>)
fc_out output shape: torch.Size([1, 2])
fc_out[0][0].backward:
 tensor([[[[0., 1., 0.],
          [0., 2., 2.],
          [0., 1., 2.]]]])
fc_out[0][1].backward:
 tensor([[[[1., 0., 0.],
          [2., 3., 0.],
          [1., 3., 2.]]]], grad_fn=<AddBackward0>)
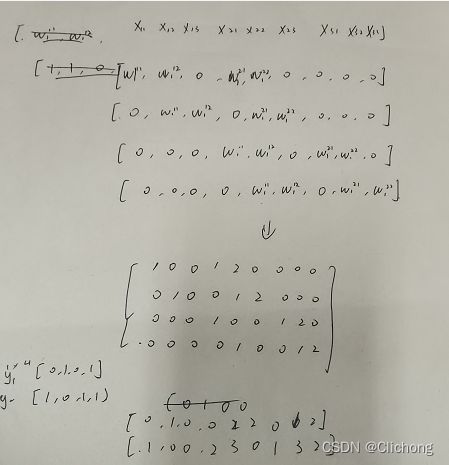
可以看见,分别对 y 1 , y 2 y_{1},y_{2} y1,y2进行方向求导可以得到各自关于输入的梯度信息,那么这里是涉及到矩阵的求导运算的,具体的过程可以见参考资料[2],这里我只简单的贴一下我手动的计算图:


所以,可以看见,手动计算的结果和pytorch的计算结果是一样的。
3. pytorch获取中间过程的梯度信息
对于之前的实验都是根据输入获取反向传播重新得到了输入的梯度,那么如何能获得中间过程中的梯度呢?
当通过神经网络进行训练时,我们所要提取的就是卷积神经网络最后一层的特征层的反向梯度信息。为此,得到了这个方向传播的梯度信息就可以做一个全局平均当成是一个当前channel的一个权重,从而可以作一个加权和的操作得到最后的grad-cam操作。所以,这一小节中,pytorch获取中间过程的梯度信息是为grad-cam可视化作准备的。
假设,一下内容以resnet50为例,如何提取之后layer4的最后一个卷积输出的反向梯度信息,以下代码可以提取最后一个卷积输出的反向梯度信息。
import torch
import torch.nn as nn
from torchvision.models import resnet50

input_grad = []
output_grad = []

def save_gradient(module, grad_input, grad_output):
    input_grad.append(grad_input)
    print(f"{module.__class__.__name__} input grad:\n{grad_input}\n")
    output_grad.append(grad_output)
    print(f"{module.__class__.__name__} output grad:\n{grad_output}\n")

model = resnet50(pretrained=True)
last_layer = model.layer4[-1]

last_layer.conv3.register_full_backward_hook(save_gradient)

input = torch.rand([8, 3, 224, 224], dtype=torch.float, requires_grad=True)
output = model(input)
print("output.shape:", output.shape)

output[0][0].backward()
gard_info = input.grad
print("gard_info.shape: ", gard_info.shape)

# print("input_grad:", input_grad)
# print("output_grad:", output_grad)
输出:
output.shape: torch.Size([8, 1000])
Conv2d input grad:
(tensor([[[[-1.6128e-02, -1.0101e-02, -1.4746e-02,  ..., -1.6404e-02,
           -8.5241e-03, -2.0387e-02],
          [-1.6439e-03, -2.9773e-03, -8.4831e-03,  ..., -2.3907e-02,
           -1.5434e-02, -1.8303e-02],
          [-8.1337e-03, -1.1036e-02, -1.2853e-02,  ..., -1.0207e-02,
           -2.2195e-02, -1.2312e-02],
          ...,
Conv2d output grad:
(tensor([[[[ 3.1618e-04, -4.9662e-03, -5.0071e-03,  ...,  2.5234e-04,
            2.4588e-04,  3.0680e-04],
          [ 2.5217e-04,  2.4869e-04,  2.8324e-04,  ...,  3.4220e-04,
           -4.9799e-03, -4.9050e-03],
          [ 3.1466e-04, -5.0282e-03, -5.0318e-03,  ...,  2.9681e-04,
           -5.0313e-03, -4.8814e-03],
          ...,
gard_info.shape:  torch.Size([8, 3, 224, 224])
这里的输出过长,就不全部展示了。
以上对于简单的backward,pytorch中只会自动的获取最后的输入梯度信息,但是对于网络中间特征层的梯度信息一般是不会保留的,所以需要利用一个列表将这些动态数据梯度信息保留下来。由此可以解决pytorch获取中间过程的梯度信息问体。
但是resnet模型结构是提前设定的,如何选择某一层的feature map输出,是第二个问题。关于这个问题,由于这里是保留了模型原有的预训练参数的,也就是只是一个推理过程,不需要训练,所以我使用了以下方法实现:
import torch
from torchvision.models import resnet50

def get_feature_map(model, input_tensor):

    x = model.conv1(input_tensor)
    x = model.bn1(x)
    x = model.relu(x)
    x = model.maxpool(x)

    x = model.layer1(x)
    x = model.layer2(x)
    x = model.layer3(x)
    x = model.layer4(x)
    return x

# get output and feature
model = resnet50(pretrained=True)
feature = get_feature_map(model, input)
在下一篇内容中会大概构建一下grad-cam的逻辑过程以及效果。
参考资料:
- pytorch中backward()函数详解
- Grad-CAM简介