JetPack-Navigation
简介
处理Fragment事物,即代替FragmentManager完成Fragment之间的跳转。
用于具有一个主Activity和多个Fragment目的地的应用。
组件
-
导航图
包含了所有导航相关信息的XML资源。一般防止在res/navigation目录下
-
NavHost
容器。用来显示Fragment的,即Activity中的fragment,要求实现NavHost
-
NavController
在NavHost中管理应用导航的对象
一句话就是,通过NavController,获取当行图中的特定路径以及目标,导航到特定的目标放到NavHost中
简单使用
要想使用Navigation组件,必须要求android studio 版本在3.3以上
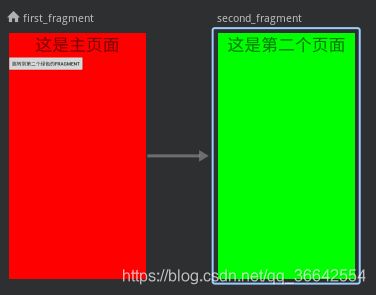
当前应用是第一个Fragment中有个按钮,点击就可以跳转到第二个Fragment中,如下图所示

1. 添加依赖
现在build.gradle(app)中添加:
implementation "androidx.navigation:navigation-fragment-ktx:2.3.0-alpha05"
implementation "androidx.navigation:navigation-ui-ktx:2.3.0-alpha05"
implementation "androidx.navigation:navigation-dynamic-features-fragment:2.3.0-alpha05"
当前,现在一并把safe args组件一起添加上。在主目录下的build.gradle添加:
buildscript {
    // ...
    dependencies {
        // ...
        //Navigation safe args组件
        classpath "androidx.navigation:navigation-safe-args-gradle-plugin:2.3.0-alpha05"
    }
}
再在build.gradle(app)中添加
// navigation,生成kotlin独有的sage args
apply plugin: "androidx.navigation.safeargs.kotlin"
2. 创建activity 与 fragment
本次创建两个Fragment和一个Activity,默认先展示第一个Fragment
-
先创建一个NavActivity和对应的activity_nav.xml
class NavActivity : AppCompatActivity() { override fun onCreate(savedInstanceState: Bundle?) { super.onCreate(savedInstanceState) setContentView(R.layout.activity_nav) } }<LinearLayout xmlns:android="http://schemas.android.com/apk/res/android" xmlns:app="http://schemas.android.com/apk/res-auto" android:layout_width="match_parent" android:layout_height="match_parent" android:orientation="vertical"> <fragment android:id="@+id/nav_host_fragment" android:layout_width="match_parent" android:layout_height="match_parent" /> LinearLayout> -
再创建NavFirstFragmen和对应的布局文件fragment_nav_first.xml
class NavFirstFragment : Fragment() { override fun onCreateView( inflater: LayoutInflater, container: ViewGroup?, savedInstanceState: Bundle? ): View? { return inflater.inflate(R.layout.fragment_nav_first, container, false) } override fun onActivityCreated(savedInstanceState: Bundle?) { super.onActivityCreated(savedInstanceState) } }<LinearLayout xmlns:android="http://schemas.android.com/apk/res/android" xmlns:app="http://schemas.android.com/apk/res-auto" android:layout_width="match_parent" android:layout_height="match_parent" android:background="#ff0000" android:orientation="vertical"> <TextView android:layout_width="wrap_content" android:layout_height="wrap_content" android:layout_gravity="center" android:text="这是主页面" android:textSize="50sp" /> <Button android:id="@+id/nav_to_second_btn" android:layout_width="wrap_content" android:layout_height="wrap_content" android:text="跳转到第二个绿色的Fragment" /> LinearLayout> -
最后创建NavSecondFragment和对应的布局文件fragment_nav_second.xml
class NavSecondFragment : Fragment() { override fun onCreateView( inflater: LayoutInflater, container: ViewGroup?, savedInstanceState: Bundle? ): View? { return inflater.inflate(R.layout.fragment_nav_second, container, false) } override fun onActivityCreated(savedInstanceState: Bundle?) { super.onActivityCreated(savedInstanceState) } }<LinearLayout xmlns:android="http://schemas.android.com/apk/res/android" xmlns:app="http://schemas.android.com/apk/res-auto" android:layout_width="match_parent" android:layout_height="match_parent" android:background="#00ff00" android:orientation="vertical"> <TextView android:layout_width="wrap_content" android:layout_height="wrap_content" android:layout_gravity="center" android:text="这是第二个页面" android:textSize="50sp" /> LinearLayout>
3. 创建导航图
在res目录下创建文件夹navigation,文件夹名称固定。然后创建xml文件,名称任意,当前这里名称为nav_graph.xml。(有的时候会出现创建了文件,但是无法使用的情况,右侧无图)
注意,这里最好是通过点击 res 文件夹右键 -》New -> Android Resource File,然后输入名称,在resource_type中选择Navigation。
<navigation xmlns:android="http://schemas.android.com/apk/res/android"
    xmlns:app="http://schemas.android.com/apk/res-auto"
    xmlns:tools="http://schemas.android.com/tools"
    android:id="@+id/nav_graph"
    app:startDestination="@id/first_fragment">

    <fragment
        android:id="@+id/first_fragment"
        android:name="com.hhh.jetpacktest.nav.NavFirstFragment"
        android:label="NavMainFragment"
        tools:layout="@layout/fragment_nav_first">

        <action
            android:id="@+id/action_first_to_second"
            app:destination="@id/second_fragment" />

    fragment>

    <fragment
        android:id="@+id/second_fragment"
        android:name="com.hhh.jetpacktest.nav.NavSecondFragment"
        android:label="NavSecondFragment"
        tools:layout="@layout/fragment_nav_second" />

navigation>
然后rebuild一下整个项目,就可以看到build/generated/source/navigation-args目录下会创建NavFirstFragmentDirections文件,里面有个 actionFirstTosecond 方法。就可以在记下来的步骤中使用这个类了。
该类生成规则就是Fragment的名称加上Direction后缀,导航图中的fragment的每个action都生成一个方法。
4. 向Activity中添加导航图
我们以NavActivity为起始地,改写对应的xml文件
<LinearLayout xmlns:android="http://schemas.android.com/apk/res/android"
    xmlns:app="http://schemas.android.com/apk/res-auto"
    android:layout_width="match_parent"
    android:layout_height="match_parent"
    android:orientation="vertical">

    <fragment
        android:id="@+id/main_nav_host"
        android:name="androidx.navigation.fragment.NavHostFragment"
        android:layout_width="match_parent"
        android:layout_height="match_parent"
        app:defaultNavHost="true"
        app:navGraph="@navigation/nav_graph" />

LinearLayout>
-
android:name
固定写法,不可改变
-
app:defaultNavHost
确保NavHost能够拦截系统的返回按钮,只能有一个默认的NavHost
-
app:navGraph
将NavHostFragment与导航图关联
还有就是,fragment一定要有id,否则运行的时候会报错
5. 导航到目的地
当前逻辑是点击NavFirstFragement中的按钮,然后就跳转NavSecondFragement,所以,修改NavFirstFragment中的onActivityCreated方法
override fun onActivityCreated(savedInstanceState: Bundle?) {
    super.onActivityCreated(savedInstanceState)
    nav_to_second_btn.setOnClickListener{
        val action = NavFirstFragmentDirections.actionFirstToSecond()
        findNavController().navigate(action)
    }
}
至此,简单示例完成。可以看到并没有使用FragmentManager就可以把Activity的Fragment给替换了
导航图
嵌套导航图
就是在navigation中嵌套一个navigation,如下所示:
<navigation xmlns:android="http://schemas.android.com/apk/res/android"
    xmlns:app="http://schemas.android.com/apk/res-auto"
    xmlns:tools="http://schemas.android.com/tools"
    android:id="@+id/nav_nested_graph"
    app:startDestination="@id/nav_first">

    <fragment
        android:id="@+id/nav_first"
        android:name="com.hhh.jetpacktest.nav.NavFirstFragment"
        android:label="NavFirstFragment"
        tools:layout="@layout/fragment_nav_first">

        <action
            android:id="@+id/action_to_second"
            app:destination="@id/nav_nested_second" />

    fragment>

    <navigation
        android:id="@+id/nav_nested_second"
        app:startDestination="@id/nav_second">
        <fragment
            android:id="@+id/nav_second"
            android:name="com.hhh.jetpacktest.nav.NavBFragment"
            android:label="NavAFragment"
            tools:layout="@layout/fragment_nav_second" />
    navigation>

navigation>
其实更布局的xml文件类似,可以嵌套使用,也可以使用include引入另外一个导航图
全局操作
就是把action当做navigation的直接子元素
<navigation xmlns:android="http://schemas.android.com/apk/res/android"
    xmlns:app="http://schemas.android.com/apk/res-auto"
    xmlns:tools="http://schemas.android.com/tools"
    android:id="@+id/nav_nested_graph"
    app:startDestination="@id/nav_first">

    <action
        android:id="@+id/action_to_first"
        app:destination="@id/nav_first" />

navigation>
rebuild一下,就可以在build/generated/source/navigation-args 目录下生成NavNestedGraphDirections类。
生成类的规则:navigation的id名称+Directions,生成的方法就是action的id采用驼峰命名法。
生成类完成后,就可以直接在java中调用
val action = NavNestedGraphDirections.actionToFirst()
导航到目的地
分为两个步骤:
- 获取NavController
- 调用navigate方法
获取NavController直接调用findNavController方法获取即可
navigate方法传入参数有很多中,主要是三种
id导航
直接在navigate传入action的id即可
URI导航
safe args 实现类型安全的导航(推荐使用)
首先需要在顶层build.gradle中添加classpath
buildscript {

    // .....

    dependencies {
        classpath "androidx.navigation:navigation-safe-args-gradle-plugin:$nav_version"
    }
}
在应用模块的build.gradle添加
apply plugin: "androidx.navigation.safeargs.kotlin"
然后build一下,就可以根据导航图生成对应的Directions文件