本文主要介绍了SpringBoot配置文件中的明文密码如何加密保存,读取以及对于自定义的加密算法加密的参数如何保存和读取。
背景
为了安全的需要,一些重要的信息比如数据库密码不能明文保存在配置文件中,需要进行加密之后再保存。SpringBoot可以使用jasypt-spring-boot这个组件来为配置属性提供加密的支持。
集成jasypt-spring-boot到项目中
根据官方README文档,可以有三种方式集成jasypt-spring-boot到项目中。
对于SpringBoot项目,直接通过引入jasypt-spring-boot-starter,然后所有的application.properties, application-*.properties, yaml的配置文件中就可以包含加密的属性。
	com.github.ulisesbocchio
	jasypt-spring-boot-starter
	3.0.4
直接引入jasypt-spring-boot,这时候需要在启动类上添加一个@EnableEncryptableProperties,然后在配置文件中可以包含有加密的字段属性。
@SpringBootApplication
@EnableEncryptableProperties
public class Application {
    ...
}
如果不想要整个Spring的配置文件都启用加密的字段属性,还可以自己指定对应加密的配置文件路径。也需要引入jasypt-spring-boot,同时在启动类上添加@EncryptablePropertySource注解,设置注解的value属性为需要读取的加密配置文件路径。
@SpringBootApplication
@EncryptablePropertySource({"classpath:encrypted.properties"})
public class Application {
    ...
}
配置文件配置加密与读取
现在知道了如何集成jasypt-spring-boot到项目中,下面就介绍一下如何加密明文的密码,以及需要如何存储在配置文件中。
首先,需要添加一个maven的插件,这个插件可以帮助我们加密我们需要的明文信息。
	com.github.ulisesbocchio
	jasypt-maven-plugin
	3.0.4
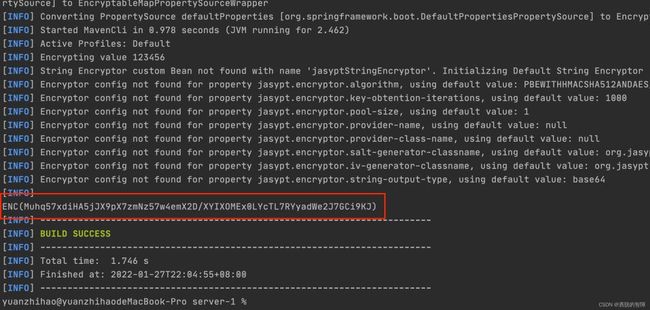
之后,执行如下的mvn命令,可以在控制台得到对于的密文。然后将配置文件中明文替换为加密后的密文。
mvn jasypt:encrypt-value -Djasypt.encryptor.password="TKzhc3fz" -Djasypt.plugin.value="123456"
-Djasypt.encryptor.password参数指定用于加密密码,我理解这个应该和秘钥类似。
-Djasypt.plugin.value参数指定需要加密的明文参数。
执行命令后,可以在控制台看到加密后的密文,密文默认是用ENC()格式包围住的,当然这个格式也可以自定义。
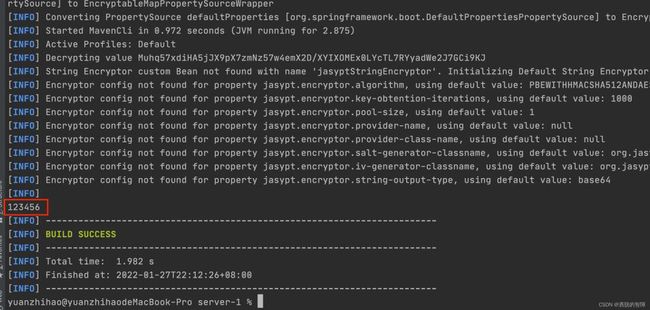
也可以通过这个mvn插件解密,执行如下命令,可以在控制台看到解密之后的明文。
mvn jasypt:decrypt-value -Djasypt.encryptor.password="TKzhc3fz" -Djasypt.plugin.value="ENC(Muhq57xdiHA5jJX9pX7zmNz57w4emX2D/XYIXOMEx0LYcTL7RYyadWe2J7GCi9KJ)"
在SpringBoot配置文件中,添加jasypt.encryptor.password属性,这个值和第二步生成密文的值要一样,不然解密会失败。
jasypt:
  encryptor:
    password: TKzhc3fz # 设置加密的password信息 类似秘钥?
test:
  password: ENC(Muhq57xdiHA5jJX9pX7zmNz57w4emX2D/XYIXOMEx0LYcTL7RYyadWe2J7GCi9KJ) # 测试数据
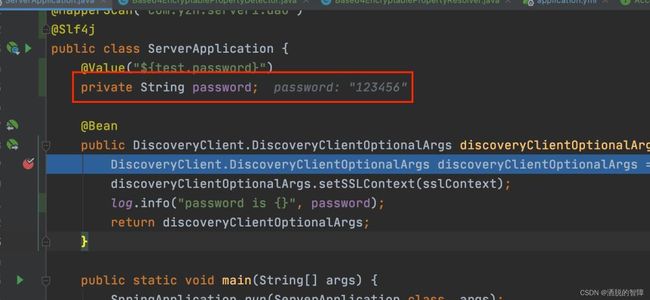
这样在主程序启动的时候,通过@Value注解就可以自动解密配置文件中的密文信息了,这样就完成了明文的加密以及后续的读取。
工作原理简析
参照官方文档,大概的工作原理如下:
首先,在Spring容器启动之后,会遍历配置文件中的所有的配置,然后发现所有按照jasypt约定规则加密的属性,此处就是使用ENC()包围的参数,这个ENC()前缀和后缀是可以自定义的,下面会讲到。
这边主要是有两个接口,分别是EncryptablePropertyDetector、EncryptablePropertyResolver,这两个接口根据名称可以看出来一个是发现器,一个是分解器。
先来看EncryptablePropertyDetector这个接口,这个接口提供了两个方法,isEncrypted和unwrapEncryptedValue,isEncrypted方法判断是否是jasypt约定规则加密的属性,unwrapEncryptedValue方法会返回去除掉前缀和后缀的真正加密的值,可以看下该接口默认的实现DefaultPropertyDetector:
/**
 * Default property detector that detects encrypted property values with the format "$prefix$encrypted_value$suffix"
 * Default values are "ENC(" and ")" respectively.
 *
 * @author Ulises Bocchio
 */
public class DefaultPropertyDetector implements EncryptablePropertyDetector {
    // 默认的前缀和后缀
    private String prefix = "ENC(";
    private String suffix = ")";

    public DefaultPropertyDetector() {
    }

    public DefaultPropertyDetector(String prefix, String suffix) {
        Assert.notNull(prefix, "Prefix can't be null");
        Assert.notNull(suffix, "Suffix can't be null");
        this.prefix = prefix;
        this.suffix = suffix;
    }

    // 判断配置属性是否是按照jasypt约定规则加密的属性
    @Override
    public boolean isEncrypted(String property) {
        if (property == null) {
            return false;
        }
        final String trimmedValue = property.trim();
        return (trimmedValue.startsWith(prefix) &&
                trimmedValue.endsWith(suffix));
    }

    // 去掉默认的前缀和后缀,返回加密的值
    @Override
    public String unwrapEncryptedValue(String property) {
        return property.substring(
                prefix.length(),
                (property.length() - suffix.length()));
    }
}
EncryptablePropertyResolver这个接口中只提供了一个方法resolvePropertyValue,这个方法会遍历配置文件属性,判断是否是加密属性,然后进行解密返回明文。在默认实现DefaultPropertyResolver中,依赖EncryptablePropertyDetector以及StringEncryptor,真正解密的方法是写在StringEncryptor,这边具体如何解密就不详细描述了,有兴趣可以自行看下。DefaultPropertyResolver类:
/**
 * @author Ulises Bocchio
 */
public class DefaultPropertyResolver implements EncryptablePropertyResolver {

    private final Environment environment;
    // 加密和解密的实现
    private StringEncryptor encryptor;
    // jasypt默认发现器
    private EncryptablePropertyDetector detector;

    public DefaultPropertyResolver(StringEncryptor encryptor, Environment environment) {
        this(encryptor, new DefaultPropertyDetector(), environment);
    }

    public DefaultPropertyResolver(StringEncryptor encryptor, EncryptablePropertyDetector detector, Environment environment) {
        this.environment = environment;
        Assert.notNull(encryptor, "String encryptor can't be null");
        Assert.notNull(detector, "Encryptable Property detector can't be null");
        this.encryptor = encryptor;
        this.detector = detector;
    }

    @Override
    public String resolvePropertyValue(String value) {
        // 该方法获取加密的属性,然后使用StringEncryptor解密并返回
        return Optional.ofNullable(value)
                .map(environment::resolvePlaceholders)
                .filter(detector::isEncrypted) // 过滤加密属性
                .map(resolvedValue -> {
                    try {
                        // 去除前缀和后缀获取真正加密的值
                        String unwrappedProperty = detector.unwrapEncryptedValue(resolvedValue.trim());
                        String resolvedProperty = environment.resolvePlaceholders(unwrappedProperty);
                        // 解密获得明文
                        return encryptor.decrypt(resolvedProperty);
                    } catch (EncryptionOperationNotPossibleException e) {
                        throw new DecryptionException("Unable to decrypt property: " + value + " resolved to: " + resolvedValue + ". Decryption of Properties failed,  make sure encryption/decryption " +
                                "passwords match", e);
                    }
                })
                .orElse(value);
    }
}
使用自定义的加密算法
如果不想要使用jasypt工具中的加密算法,或者内部要求使用某种特定的加密算法,jasypt-spring-boot组件也提供了自定义加解密的实现方式。上面在工作原理简析中提到了两个接口EncryptablePropertyDetector、EncryptablePropertyResolver,我们可以通过自己实现这两个接口的方式,并且指定对应的bean名称为encryptablePropertyDetector和encryptablePropertyResolver来覆盖框架提供的默认实现,完成加密算法和前缀后缀的自定义。
这边我就用base64加密算法举例,实现自定义的加密算法:
自己实现EncryptablePropertyDetector、EncryptablePropertyResolver接口,并且交给Spring管理,设置bean名称为encryptablePropertyDetector和encryptablePropertyResolver。
重写接口对应的方法。
@Component("encryptablePropertyDetector")
public class Base64EncryptablePropertyDetector implements EncryptablePropertyDetector {
    private static final String PREFIX = "password:";

    @Override
    public boolean isEncrypted(String property) {
        if (property == null) {
            return false;
        }
        return property.startsWith(PREFIX);
    }

    @Override
    public String unwrapEncryptedValue(String property) {
        return property.substring(PREFIX.length());
    }
}
@Component("encryptablePropertyResolver")
public class Base64EncryptablePropertyResolver implements EncryptablePropertyResolver {
    @Autowired
    private Base64EncryptablePropertyDetector encryptablePropertyDetector;

    @Override
    public String resolvePropertyValue(String value) {
        return Optional.ofNullable(value)
            .filter(encryptablePropertyDetector::isEncrypted)
            .map(resolveValue -> {
                final String unwrapEncryptedValue = encryptablePropertyDetector.unwrapEncryptedValue(resolveValue);
                return new String(Base64.getDecoder().decode(unwrapEncryptedValue),
                    StandardCharsets.UTF_8);
            })
            .orElse(value);
    }
}
配置文件中的加密属性使用自定义的前缀和后缀。这边明文先使用base64加密,之后加上“password:”前缀:
jasypt:
  encryptor:
    password: TKzhc3fz # 设置加密的password信息 类似秘钥?
test:
  password: password:MTIzNDU2 # 测试数据
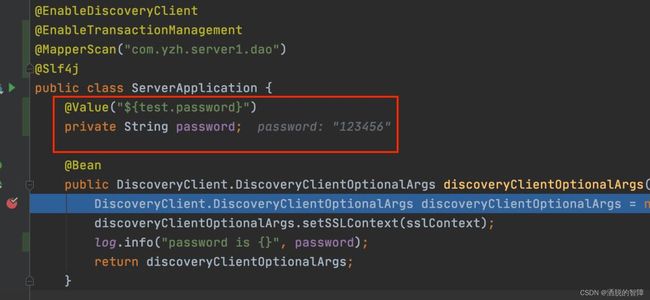
启动和读取。
结语
参考链接:https://github.com/ulisesbocchio/jasypt-spring-boot
代码地址:https://github.com/yzh19961031/SpringCloudDemo
到此这篇关于SpringBoot配置文件中密码属性加密的实现的文章就介绍到这了,更多相关SpringBoot 文件密码属性加密内容请搜索脚本之家以前的文章或继续浏览下面的相关文章希望大家以后多多支持脚本之家!


