【OpenCV-系列2】10 轮廓检测
文章目录
- 1 轮廓检测
- 2 轮廓绘制
- 3 代码实验
边缘检测之后得到二值图像,二值图像里面,边缘被标记为白色,非边缘部分被标记为黑色。要确定那个边缘是哪个物体的(哪些边缘是连通的)就需要用到轮廓提取。
1 轮廓检测
原理: 利用边缘是否连通,判断是否是同一物体的边缘,然后进行分组。

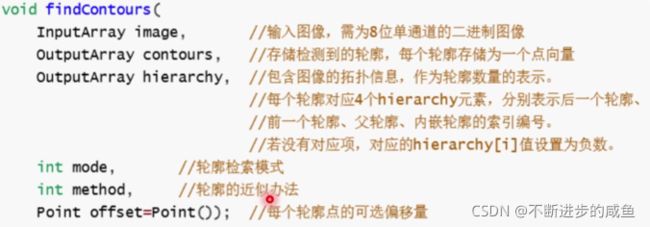
API: contours,hierarchy=cv2.findContours(image, mode, method, offset=None)
参数:
image:8进制单通道图像,通常为二进制图像
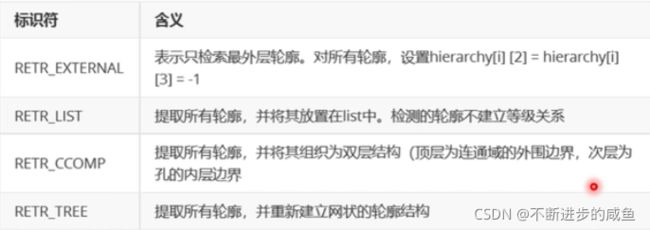
mode:轮廓检索的模式

method:轮廓近似方法

offset:每个轮廓点移动的可选偏移量。如果从图像ROI中提取轮廓,然后在整个图像上下文中对其进行分析,这将非常有用。
返回值:
contours:存储检测到的轮廓,每个轮廓都存储为一个点向量。(二维形式),contours[ i ] [n]代表第 i个轮廓的第n个轮廓点
hierarchy:每个轮廓对应4个hierarchy元素,分别表示后一个轮廓,前一个轮廓、父轮廓、内嵌轮廓的轮廓索引编号。层次结构可选输出向量,包含有关图像拓扑的信息,它的元素数量与轮廓的数量相同。对于每个第i个轮廓[ i ] ,层次 [ i ][ 0 ] 、层次[ i ][ 1 ]、层次 [ i ] [ 2 ]和层次[ i ] [ 3 ]分别设置为同一层次上后一个、前一个、第一个子轮廓、父轮廓的基于0的索引。如果轮廓i没有下一个、上一个、父轮廓或嵌套轮廓,则层次[i]的相应元素将为负值。
2 轮廓绘制
API: drawContours(image, contours, contourIdx, color, thickness=None, lineType=None, hierarchy=None, maxLevel=None, offset=None)
参数:
image:待绘制的图像
contours:所有轮廓,每个轮廓为点向量
contourIdx:轮廓绘制的指示变量,若为负值,则绘制所有轮廓
color:轮廓颜色
thickness=None:轮廓线条的粗细
lineType=None:线条类型
hierarchy=None:可选层次结构
maxLevel=None:绘制轮廓的最大等级。如果为0,则仅绘制指定的轮廓;如果为1,函数将绘制轮廓和所有嵌套轮廓;如果为2,则函数绘制轮廓、所有嵌套轮廓、所有嵌套到嵌套轮廓,等等。这个参数仅当存在可用的层次结构时,才会考虑参数。
offset=None:可选轮廓偏移参数

3 代码实验
import cv2
import numpy as np
import glob
import os

def seg(img_path):
    # 1 读取图片,灰度格式
    img = cv2.imread(img_path,0)

    # 图像预处理,对比度增强
    # cv2.imshow('img', img)
    clahe = cv2.createCLAHE(1, (8, 8))
    img=clahe.apply(img)  # 对img进行限制对比度自适应直方图均衡化

    # 2 创建蒙版,提取感兴趣区域
    mask = np.zeros([img.shape[0], img.shape[1]], dtype=np.uint8)
    mask[105:460, :] = 255
    new_img = cv2.add(img, np.zeros(np.shape(img), dtype=np.uint8), mask=mask)
    # cv2.imshow('new_img',new_img)

    # 3 轮廓提取,提取最大边缘
    _, otsu = cv2.threshold(new_img, 0, 255, cv2.THRESH_BINARY | cv2.THRESH_OTSU)
    contours, hierarchy = cv2.findContours(otsu, cv2.RETR_EXTERNAL, cv2.CHAIN_APPROX_SIMPLE)
    area = []
    # 找到最大的轮廓
    for k in range(len(contours)):
        area.append(cv2.contourArea(contours[k]))
        print(area)
    max_idx = np.argmax(np.array(area))
    return contours,max_idx


file_path='原图像文件夹路径'
images_path = glob.glob(os.path.join(file_path + '\*.jpg'))  # 所有图片路径

for img_path in images_path:
    contours,max_idx=seg(img_path)
    img=cv2.imread(img_path)
    new_image=np.zeros([img.shape[0], img.shape[1]], dtype=np.uint8)
    cv2.drawContours(new_image, contours, max_idx, (255, 255, 255),cv2.FILLED)#cv2.FILLED
    cv2.imwrite(r'目标文件夹路径\{}.jpg'.format(img_path.split('.')[0].split('\\')[-1]),new_image)

cv2.waitKey(0)