OpenCV Java入门一 在MAC系统上安装OpenCV
OpenCV网上讲的一个都不对,要么卡死电脑,要么训练模型写死,要么都只是显示显示人脸就说入门了。没有一个从安装、使用、驱动摄像头、训练模型、辩别人脸的全过程。最夸张的是连怎么安装个OpenCV的资料网上的都不全。
本篇会连续以几篇篇幅带各位入门并以最终识别人脸为全博客结束标志。读完本篇教程你将对基本人工智能算法将有了入门这一能力。为今后可以使用进一步AI应用打下扎实的基础。
在Mac系统上安装OpenCV
本系列会传授大家在两个操作系统上安装OpenCV:MAC和Win10. 这两个系统也是程序员们常用的基础,并且它的安装步骤和碰到的一些巨坑完全不同。
安装成功了,才有信心进入到HelloWorld级别代码。OpenCV安装极其复杂,当然对于没有接触过操作系统层面的程序员来说这算复杂。
其实,掌握好关键要领,一点不难,只是几分钟的事而己。
MAC上准备材料
1. OS版本
确保你的Mac为Big Sur及后续版本,笔者的Mac一直保持着最新版为Monterey12.2.1.
2. 确保Mac里的brew update为最新
这是Mac安装OpenCV前最关键的一步,很多人就卡在了这一步,最终装了10几天都没法把opencv装好,甚至把系统给装奔溃了。
因此你的brew update一定要为最新。在brew update时,经常我们会碰到卡死、或者报各种奇芭的错,99%的用户碰到的说是xcode不是最新或者说是commandline tool找不到,因此你可以使用以下步骤
sudo rm -rf /Library/Developer/CommandLineTools
sudo xcode-select --install
稍等12-15分钟(依赖于网速和你的Mac性能),即完成了xcode的修复。
再运行
brew update如果碰到brew已经坏了(别重装MAC哈),我经常碰到,是因为brew的很多源是在“墙外”,有时装一半掉一半导致了Mac内的brew被搞了“一股臭味”,那么没有关系,我们就可以修复我们的brew。
删除本机已经混乱或者坏了的brew
brew update-reset


rm -rf /usr/local/Homebrew/Library/Taps/homebrew/homebrew-core

brew tap homebrew/core
设置国内brew镜像源
# Homebrew 源代码仓库
cd "$(brew --repo)"
git remote set-url origin https://mirrors.ustc.edu.cn/brew.git
# Homebrew 核心软件仓库
cd "$(brew --repo)/Library/Taps/homebrew/homebrew-core"
git remote set-url origin https://mirrors.ustc.edu.cn/homebrew-core.git
# Homebrew cask 软件仓库,提供 macOS 应用和大型二进制文件
cd "$(brew --repo)"/Library/Taps/homebrew/homebrew-cask
git remote set-url origin https://mirrors.ustc.edu.cn/homebrew-cask.git
# Homebrew 预编译二进制软件包
echo 'export HOMEBREW_BOTTLE_DOMAIN=https://mirrors.ustc.edu.cn/homebrew-bottles' >> ~/.zshrc
source ~/.zshrc
# 更新镜像
我们使用了国内中科大源。
最后
brew update这边再次需要各位引起重视,一定要在恒定百兆宽带基础上对xcode、brew进行update或者是运行上述修复命令。本身OpenCV还有Brew以及Mac相关的一些关键资源都是在墙外,虽然国内有一些mirror,但速度不行。
如果你的网速到达不了恒定的一秒至少5兆下载速率,你光以上几步因为失败、反复、失败就要耗费40多个小时。
对于网上说有时brew update时会碰到“git clone”或者是“error: RPC failed; curl 92 HTTP/2 stream 0 was not closed cleanly: PROTOCOL_ERROR (err 1)"。
这些的root cause就是一点:
- 你的网络速率不行,导致git在clone超过100兆以上的东西时,自己把自己打断了;
此时如果你按照网上做以下的设置,试图先clone下来一个框子或者是把所谓的git下载时的缓存加大都是徒劳。因此,请确保你的网络至少有恒定的5兆每秒。现在100兆,200兆宽带都到家,这个已经不是条件限制了我想。
git config --global http.postBuffer 2024288000

git config --list

git config --global core.compression 0

git clone --depth 1 https://mirrors.ustc.edu.cn/homebrew-core.git

git fetch --unshallow

git pull --all
3. 确保必须要装ANT
除非你不想用OpenCV Java,很多人生成不了以下这两个文件就是因为忘记装ant了。
brew install ant装完后你一定要确保你的Mac的环境变量path里可以直接访问ant命令。
如果不可以在任意地方运行ant -version命令得到ant的正确输出,你还需要手工自己在~/.bash_profile里加入ant的命令于你的path变量中去。
记得一定要是ant 1.9或者以上版本,否则装了也是白装。
4. 必须记得安装python3
这个梗和上面第3点,必装ANT一样。OpenCV无论是3还是4在安装时要生成Java这两个文件,必装Python3.
brew upgrade python3mac一般自带python2,而big sur版本中装OpenCV都用的是OpenCV4,它要求必须安装python3.
因此我们可以升级我们的本地python2至3,升级完后你原有的python2还会留着。网上会说把python3和python2互换一下。
但没必要,你可以保证python2和python3都存在。因为python2用的命令叫python,python3的命令叫python3.
这个没事的。因为我本机还有不少python2写的AI,因此我经常在两者间要用哪个时做手工切换。
5. 必须安装jdk
安装JDK17,对,你没看错。
最佳实践,在你的Mac上可以保持有jdk1.8同时还有jdk17.
现在的OpenCV无论是Windows10还是Mac下的编译安装,都会使用最新class version62版本即用的是jdk17去编译和生成的jar包。
因此同样,记得你的eclipse要用“2021-12”及以后的版本。因为在此之前的eclipse版本的compiled version只能认到jdk11最多13,因此到时你的eclipse如果不支持jdk17你在运行OpenCV的应用时,整个eclipse会因为“找不到jdk location“而最终卡死,卡到电脑CPU风扇转个不停,最后不得不”杀进程“。
然后启动eclipse用系统默认的jdk1.8,运行opencv项目用本机安装的jdk17来编译和运行以及debug。
很重要,很重要,很重要,上述这一句标红的话。
这是因为,jdk17做了巨大的改变,eclipse最新版可以认出jdk17但是eclipse最新版(目前的版本)用jdk17没法在Mac上运行(因为jdk17的jre目录里的内容已经变了)。
如果你用jdk17去做成了默认的系统级path变量,那么恭喜你,你的eclipse是启动不起来的。
因此我们才有了经常本机有3个以上jdk,其中低版本一个用运启动eclipse用。其它几个版本用于不同特性的工程用。
6. 开始安装OpenCV4
到此,你可以正式安装OpenCV4了。
OpenCV4的安装过程主要涉及到以下几个核心步骤,而在Mac下是一键完成的。Mac下烦是烦在上述的第1~第2步。即xcode command line以及brew update上,这两步过了后面是一帆风顺的。如果你是在Windows10或者是Linux下安装OpenCV,你就会体会到装OpenCV4时才是最痛苦的,而在Mac上,因为有了brew,因此从这一步开始你会觉得很Hi。
OpenCV安装核心步骤(供学习者知道OpenCV在编译安装时做了什么事)
- 下载OpenCV最新master源码;
- 下载OpenCV 对应版本的contribute源码包(有内置图形、JAVA包、声音等);
- 使用C编译器,生成C工程;
- 使用C编译器,编译C工程;
- 使用python3+ant对java文件进行编译并生成java通过jndi调用OpenCV的C的底层native lib包(在Windows10下是一个.dll文件);
- 把C编译生成成功的release包进行系统安装;
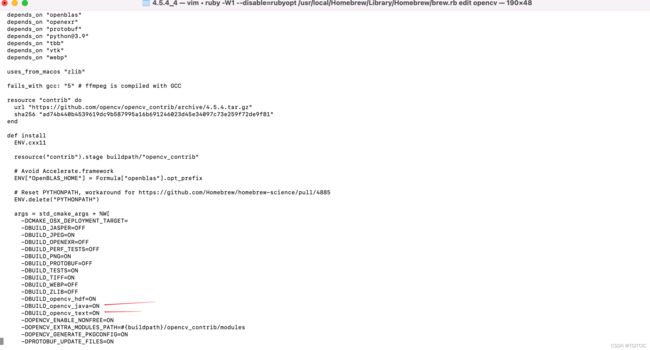
brew edit opencv在安装前,你要确认你的opencv内的java编译选项是turn on的。默认opencv是不会安装和编译打包java文件的。
在控制端找到-DBUILD_opencv_java=OFF 修改为-DBUILD_opencv_java=ON ,如下图所示
然后你就可以:
brew install --build-from-source opencv接下去按照我这个机型,22分钟后,一切显示failed 0,install successfully。
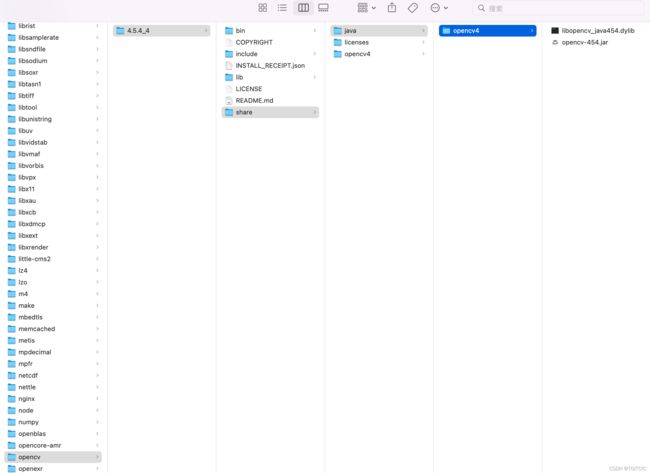
你就可以看到OpenCV4正确装在了你的这个路径下了
而java用文件是生成在这边的
使用OpenCV
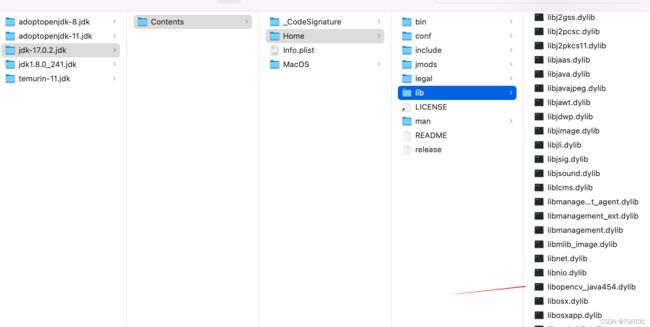
将/usr/local/share/java/opencv4/libopencv_java454.dylib文件拷贝到jdk的lib目录下
然后新建一个Eclipse工程。
在Eclipse工程里记得对于OpenCV的工程要做如下的jvm设置。
然后在你的eclipse工程里放置一个叫ext-lib的目录,把opencv-454.jar包放在这个目录中然后使用工程的“add external JARs...“方式添加给到工程的classpath目录下。
我们书写第一个OpenCV应用,即读入一幅图片并用于展示用。
主程序-ImageShow.java
package org.mk.opencv;

import org.opencv.core.*;
import org.opencv.imgcodecs.Imgcodecs;

public class ImageShow {
	public static void main(String[] args) {
		// 载入dll或者lib包(必须先加载)
		System.loadLibrary(Core.NATIVE_LIBRARY_NAME);
		// 将文件读入为OpenCV的Mat格式。注意测试时,路径不要包括中文
		Mat src = Imgcodecs.imread("/Users/macuser/opt/img/ImageShow.jpg");
		if (src.dataAddr() == 0) {
			System.out.println("打开文件出错");
		}
		ImageViewer imageViewer = new ImageViewer(src, "第一幅图片");
		imageViewer.imshow();
	}
}
ImageViewer.java-用的是java swing的JFrame控件
package org.mk.opencv;

import org.mk.opencv.util.OpenCVUtil;
import org.opencv.core.Mat;
import javax.swing.*;
import java.awt.*;

public class ImageViewer {
	private JLabel imageView;
	private Mat image;
	private String windowName;

	/**
	 * 如果使用junit测试时调用该方法,图像会一闪而过,可通过sleep()等方式暂时显示
	 *
	 * @param
	 */
	private JFrame frame = null;

	public ImageViewer() {
		frame = createJFrame(windowName, 800, 600);
	}

	public ImageViewer(Mat image) {
		this.image = image;
	}

	/**
	 * @param image      要显示的mat
	 * @param windowName 窗口标题
	 */
	public ImageViewer(Mat image, String windowName) {
		frame = createJFrame(windowName, 1024, 768);
		this.image = image;
		this.windowName = windowName;
	}

	public void setTitle(String windowName) {
		this.windowName = windowName;
	}

	public void setImage(Mat image) {
		this.image = image;
	}

	/**
	 * 图片显示
	 */
	public void imshow() {
		setSystemLookAndFeel();
		frame.pack();
		frame.setLocationRelativeTo(null);
		frame.setVisible(true);
		frame.setDefaultCloseOperation(JFrame.EXIT_ON_CLOSE);// 用户点击窗口关闭
		if (image != null) {
			Image loadedImage = OpenCVUtil.matToImage(image);
			// JFrame frame = createJFrame(windowName, image.width(), image.height());
			imageView.setIcon(new ImageIcon(loadedImage));
			frame.pack();
			// frame.setLocationRelativeTo(null);
			// frame.setVisible(true);
			// frame.setDefaultCloseOperation(JFrame.EXIT_ON_CLOSE);// 用户点击窗口关闭
		}
	}

	private void setSystemLookAndFeel() {
		try {
			UIManager.setLookAndFeel(UIManager.getSystemLookAndFeelClassName());
		} catch (ClassNotFoundException e) {
			e.printStackTrace();
		} catch (InstantiationException e) {
			e.printStackTrace();
		} catch (IllegalAccessException e) {
			e.printStackTrace();
		} catch (UnsupportedLookAndFeelException e) {
			e.printStackTrace();
		}
	}

	private JFrame createJFrame(String windowName, int width, int height) {
		JFrame frame = new JFrame(windowName);
		imageView = new JLabel();
		final JScrollPane imageScrollPane = new JScrollPane(imageView);
		imageScrollPane.setPreferredSize(new Dimension(width, height));
		frame.add(imageScrollPane, BorderLayout.CENTER);
		frame.setDefaultCloseOperation(WindowConstants.EXIT_ON_CLOSE);
		return frame;
	}

}
OpenCVUtil.java工具包
package org.mk.opencv.util;

import java.awt.AlphaComposite;
import java.awt.Graphics2D;
import java.awt.Image;
import java.awt.image.BufferedImage;
import java.awt.image.DataBufferByte;
import java.util.ArrayList;
import java.util.LinkedList;
import java.util.List;

import javax.imageio.ImageIO;

import java.io.ByteArrayInputStream;
import java.io.File;
import java.io.InputStream;

import org.apache.log4j.Logger;
import org.mk.opencv.face.FaceRecogFromFiles;
import org.opencv.core.CvType;
import org.opencv.core.Mat;
import org.opencv.core.MatOfByte;
import org.opencv.imgcodecs.Imgcodecs;

public class OpenCVUtil {
	private static Logger logger = Logger.getLogger(OpenCVUtil.class);

	public static Image matToImage(Mat matrix) {
		int type = BufferedImage.TYPE_BYTE_GRAY;
		if (matrix.channels() > 1) {
			type = BufferedImage.TYPE_3BYTE_BGR;
		}
		int bufferSize = matrix.channels() * matrix.cols() * matrix.rows();
		byte[] buffer = new byte[bufferSize];
		matrix.get(0, 0, buffer); // 获取所有的像素点
		BufferedImage image = new BufferedImage(matrix.cols(), matrix.rows(), type);
		final byte[] targetPixels = ((DataBufferByte) image.getRaster().getDataBuffer()).getData();
		System.arraycopy(buffer, 0, targetPixels, 0, buffer.length);
		return image;
	}

	public static List getFilesFromFolder(String folderPath) {
		List fileList = new ArrayList();
		File f = new File(folderPath);
		if (f.isDirectory()) {
			File[] files = f.listFiles();
			for (File singleFile : files) {
				fileList.add(singleFile.getPath());
			}
		}
		return fileList;
	}

	public static String randomFileName() {
		StringBuffer fn = new StringBuffer();
		fn.append(System.currentTimeMillis()).append((int) (System.currentTimeMillis() % (10000 - 1) + 1))
				.append(".jpg");
		return fn.toString();
	}

	public static List getPicFromFolder(String rootPath) {
		List fList = new ArrayList();
		int fileNum = 0, folderNum = 0;
		File file = new File(rootPath);
		if (file.exists()) {
			LinkedList list = new LinkedList();
			File[] files = file.listFiles();
			for (File file2 : files) {
				if (file2.isDirectory()) {
					// logger.info(">>>>>>文件夹:" + file2.getAbsolutePath());
					list.add(file2);
					folderNum++;
				} else {
					// logger.info(">>>>>>文件:" + file2.getAbsolutePath());
					FileBean f = new FileBean();
					String fileName = file2.getName();
					String suffix = fileName.substring(fileName.lastIndexOf(".") + 1);
					File fParent = new File(file2.getParent());
					String parentFolderName = fParent.getName();
					f.setFileFullPath(file2.getAbsolutePath());
					f.setFileType(suffix);
					f.setFolderName(parentFolderName);
					fList.add(f);
					fileNum++;
				}
			}
			File temp_file;
			while (!list.isEmpty()) {
				temp_file = list.removeFirst();
				files = temp_file.listFiles();
				for (File file2 : files) {
					if (file2.isDirectory()) {
						// System.out.println("文件夹:" + file2.getAbsolutePath());
						list.add(file2);
						folderNum++;
					} else {
						// logger.info(">>>>>>文件:" + file2.getAbsolutePath());
						FileBean f = new FileBean();
						String fileName = file2.getName();
						String suffix = fileName.substring(fileName.lastIndexOf(".") + 1);
						File fParent = new File(file2.getParent());
						String parentFolderName = fParent.getName();
						f.setFileFullPath(file2.getAbsolutePath());
						f.setFileType(suffix);
						f.setFolderName(parentFolderName);
						fList.add(f);
						fileNum++;
					}
				}
			}
		} else {
			logger.info(">>>>>>文件不存在!");
		}
		// logger.info(">>>>>>文件夹共有:" + folderNum + ",文件共有:" + fileNum);
		return fList;
	}

	public static BufferedImage matToBufferedImage(Mat matrix) {
		int cols = matrix.cols();
		int rows = matrix.rows();
		int elemSize = (int) matrix.elemSize();
		byte[] data = new byte[cols * rows * elemSize];
		int type;
		matrix.get(0, 0, data);
		switch (matrix.channels()) {
		case 1:
			type = BufferedImage.TYPE_BYTE_GRAY;
			break;
		case 3:
			type = BufferedImage.TYPE_3BYTE_BGR;
			// bgr to rgb
			byte b;
			for (int i = 0; i < data.length; i = i + 3) {
				b = data[i];
				data[i] = data[i + 2];
				data[i + 2] = b;
			}
			break;
		default:
			return null;
		}
		BufferedImage image2 = new BufferedImage(cols, rows, type);
		image2.getRaster().setDataElements(0, 0, cols, rows, data);
		return image2;
	}

	public static Mat bufferedImageToMat(BufferedImage bi) {
		Mat mat = new Mat(bi.getHeight(), bi.getWidth(), CvType.CV_8UC3);
		byte[] data = ((DataBufferByte) bi.getRaster().getDataBuffer()).getData();
		mat.put(0, 0, data);
		return mat;
	}
}
运行
运行ImageShow.java后得到以下效果
结速本篇教程,下一篇我们讲如何在Windows10下安装OpenCV,这个过程比起Mac OS内安装OpenCV要痛苦百倍。
但是如果按照我的博客一步步走,100%会保证你不会出错,我趟过的那些血坑你们保证再也不会趟过。


