IDEA 创建SpringMVC全过程
1、新建一个Moudle , springmvc-hello , 点击项目右键添加web的支持!

2、导入SpringMVC 的依赖和资源过滤
   <dependencies>
        <dependency>
            <groupId>junitgroupId>
            <artifactId>junitartifactId>
            <version>4.12version>
        dependency>
        <dependency>
            <groupId>org.springframeworkgroupId>
            <artifactId>spring-webmvcartifactId>
            <version>5.1.9.RELEASEversion>
        dependency>
        <dependency>
            <groupId>javax.servletgroupId>
            <artifactId>servlet-apiartifactId>
            <version>2.5version>
        dependency>
        <dependency>
            <groupId>javax.servlet.jspgroupId>
            <artifactId>jsp-apiartifactId>
            <version>2.2version>
        dependency>
        <dependency>
            <groupId>javax.servletgroupId>
            <artifactId>jstlartifactId>
            <version>1.2version>
        dependency>
    dependencies>
    <build>
        <resources>
            <resource>
                <directory>src/main/javadirectory>
                <includes>
                    <include>**/*.propertiesinclude>
                    <include>**/*.xmlinclude>
                includes>
                <filtering>falsefiltering>
            resource>
            <resource>
                <directory>src/main/resourcesdirectory>
                <includes>
                    <include>**/*.propertiesinclude>
                    <include>**/*.xmlinclude>
                includes>
                <filtering>falsefiltering>
            resource>
        resources>
    build>
3、配置web.xml , 注册DispatcherServlet
<web-app xmlns="http://xmlns.jcp.org/xml/ns/javaee"
        xmlns:xsi="http://www.w3.org/2001/XMLSchema-instance"
        xsi:schemaLocation="http://xmlns.jcp.org/xml/ns/javaee http://xmlns.jcp.org/xml/ns/javaee/web-app_4_0.xsd"
        version="4.0">


   <servlet>
       <servlet-name>SpringMVCservlet-name>
       <servlet-class>org.springframework.web.servlet.DispatcherServletservlet-class>

       <init-param>
           <param-name>contextConfigLocationparam-name>
           <param-value>classpath:springmvc-servlet.xmlparam-value>
       init-param>

       <load-on-startup>1load-on-startup>
   servlet>


   <servlet-mapping>
       <servlet-name>SpringMVCservlet-name>
       <url-pattern>/url-pattern>
   servlet-mapping>

web-app>
/ 和 /* 的区别:< url-pattern > / 不会匹配到.jsp, 只针对我们编写的请求;即:.jsp 不会进入spring的 DispatcherServlet类 。
< url-pattern > /* 会匹配 *.jsp,会出现返回 jsp视图 时再次进入spring的DispatcherServlet 类,导致找不到对应的controller所以报404错。
4、在resource目录下添加springmvc-servlet.xml配置文件,配置的形式与Spring容器配置基本类似,为了支持基于注解的IOC,设置了自动扫描包的功能,具体配置信息如下:
 a. 添加 处理映射器
 b. 添加 处理器适配器
 c. 添加 视图解析器
<beans xmlns="http://www.springframework.org/schema/beans"
      xmlns:xsi="http://www.w3.org/2001/XMLSchema-instance"
      xmlns:context="http://www.springframework.org/schema/context"
      xmlns:mvc="http://www.springframework.org/schema/mvc"
      xsi:schemaLocation="http://www.springframework.org/schema/beans
       http://www.springframework.org/schema/beans/spring-beans.xsd
       http://www.springframework.org/schema/context
       https://www.springframework.org/schema/context/spring-context.xsd
       http://www.springframework.org/schema/mvc
       https://www.springframework.org/schema/mvc/spring-mvc.xsd">


   <context:component-scan base-package="com.yang.controller"/>

   <mvc:default-servlet-handler />

   <mvc:annotation-driven />


   <bean class="org.springframework.web.servlet.view.InternalResourceViewResolver"
         id="internalResourceViewResolver">

       <property name="prefix" value="/WEB-INF/jsp/" />

       <property name="suffix" value=".jsp" />
   bean>

beans>
5、创建Controller
package com.yang.controller;

import org.springframework.stereotype.Controller;
import org.springframework.ui.Model;
import org.springframework.web.bind.annotation.RequestMapping;

@Controller
@RequestMapping("/HelloController")
public class HelloController {

    @RequestMapping("/hello")
    public String sayHello(Model model){
        //向模型中添加属性msg与值,可以在JSP页面中取出并渲染
        model.addAttribute("msg","hello,SpringMVC");
        //web-inf/jsp/hello.jsp
        return "hello";
    }
}
@Controller是为了让Spring IOC容器初始化时自动扫描到;
@RequestMapping是为了映射请求路径,这里因为类与方法上都有映射所以访问时应该是/HelloController/hello;
方法中声明Model类型的参数是为了把Action中的数据带到视图中;
方法返回的结果是视图的名称hello,加上配置文件中的前后缀变成WEB-INF/jsp/hello.jsp。
6、创建视图层
在WEB-INF/ jsp目录中创建hello.jsp , 视图可以直接取出并展示从Controller带回的信息;
可以通过EL表示取出Model中存放的值,或者对象;
<%--
  Created by IntelliJ IDEA.
  User: WL20190720
  Date: 2021-12-06
  Time: 9:17
  To change this template use File | Settings | File Templates.
--%>
<%@ page contentType="text/html;charset=UTF-8" language="java" %>
<html>
<head>
    <title>Titletitle>
head>
<body>
${msg}
body>
html>
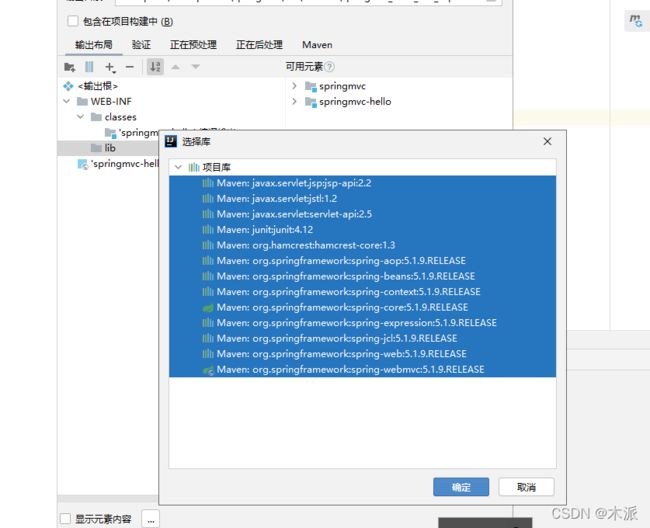
7、配置Tomcat运行
打开项目结构,添加lib文件夹,选择所有依赖添加到lib文件夹

配置tomcat,在部署中添加工件


开启服务器 , 访问 对应的请求路径!

运行成功!
可能遇到的问题:访问出现404,排查步骤:
- 查看控制台输出,看一下是不是缺少了什么jar包。如果jar包存在,显示无法输出,就在IDEA的项目发布中,添加lib依赖!重启Tomcat
即可解决!
小结
实现步骤其实非常的简单:
- 新建一个web项目
- 导入相关jar包
- 编写web.xml , 注册DispatcherServlet
- 编写springmvc配置文件
- 接下来就是去创建对应的控制类 , controller
- 最后完善前端视图和controller之间的对应
- 测试运行调试.
使用springMVC必须配置的三大件:
处理器映射器、处理器适配器、视图解析器
通常,我们只需要手动配置视图解析器,而处理器映射器和处理器适配器只需要开启注解驱动即可,而省去了大段的xml配置
springMVC请求原理:

简要分析执行流程
-
DispatcherServlet表示前置控制器,是整个SpringMVC的控制中心。用户发出请求,DispatcherServlet接收请求并拦截请求。
我们假设请求的url为 :
http://localhost:8080/springmvc_hello/HelloController/hello如上url拆分成三部分:
http://localhost:8080服务器域名
springmvc_hello部署在服务器上的web站点
hello表示控制器
通过分析,如上url表示为:请求位于服务器localhost:8080上的SpringMVC站点的hello控制器。
-
HandlerMapping为处理器映射。DispatcherServlet调用HandlerMapping,HandlerMapping根据请求url查找Handler。
-
HandlerExecution表示具体的Handler,其主要作用是根据url查找控制器,如上url被查找控制器为:hello。
-
HandlerExecution将解析后的信息传递给DispatcherServlet,如解析控制器映射等。
-
HandlerAdapter表示处理器适配器,其按照特定的规则去执行Handler。
-
Handler让具体的Controller执行。
-
Controller将具体的执行信息返回给HandlerAdapter,如ModelAndView。
-
HandlerAdapter将视图逻辑名或模型传递给DispatcherServlet。
-
DispatcherServlet调用视图解析器(ViewResolver)来解析HandlerAdapter传递的逻辑视图名。
-
视图解析器将解析的逻辑视图名传给DispatcherServlet。
-
DispatcherServlet根据视图解析器解析的视图结果,调用具体的视图。
-
最终视图呈现给用户。