Linux驱动开发(二)---驱动与设备的分离设计
前言
《Linux驱动开发(一)—环境搭建与hello world》
继续宣传一下韦老师的视频
70天30节Linux驱动开发快速入门系列课程【实战教学、技术讨论、直播答疑】
![]()
分离设计
参考韦东山老师的代码。
那开始的话,我们写的程序,如果要驱动一个LED,可能会写成下面的样子,
#include 这么写没任何问题,干净独立,不牵扯任何东西

不过造成驱动每个LED,都需要开发一个模块,在led_write中操作指定的GPIO。
由此我们就衍生出了一种仿照单片机HAL库的做法,将模块成两部分:
一部分就是类似去HAL库的部分,我们称之为driver部分;
一部分就如同我们调用的部分,我们称之为device部分;
看一个韦老师的例子:
driver部分
#include deivce部分
#include 每一部分编译为一个ko文件。二者没有加载先后的要求,一旦都加载成功,两部分功能都会挂载到一个统一的虚拟总线上,并且通过匹配规则关联起来,最终会执行到下面driver结构中的probe函数
static struct platform_driver hello_driver =
{
	.probe      = hello_probe,
	.remove     = hello_remove,
	.driver     =
	{
		.name   = "100ask_led",
	},
};
probe函数如下
static int hello_probe(struct platform_device *pdev)
它的参数,正好就是设备结构
static struct platform_device hello_dev =
{
	.name = "100ask_led",
	.dev =
	{
		.release = hello_dev_release,
	},
};
我们就把这个结构,理解为传入参数,再简单一点,我们就可以认为
| driver部分就是执行函数,device部分就是传入参数 |
| driver部分根据device部分的参数,对不同的资源进行控制 |
参数传递
参数通过platform_device传递到probe函数中,
struct platform_device {
	const char	*name;
	int		id;
	bool		id_auto;
	struct device	dev;
	u32		num_resources;
	struct resource	*resource;

	const struct platform_device_id	*id_entry;
	char *driver_override; /* Driver name to force a match */

	/* MFD cell pointer */
	struct mfd_cell *mfd_cell;

	/* arch specific additions */
	struct pdev_archdata	archdata;
};
其中的resource用来传递具体参数,内部包含了各种类型的数据,字符串类型的,在ioprot.h中详细列举了flags,desc的定义,用来传递不同类型的参数。
struct resource {
	resource_size_t start;
	resource_size_t end;
	const char *name;
	unsigned long flags;
	unsigned long desc;
	struct resource *parent, *sibling, *child;
};
我们可以通过定义的方式进行传递
static struct resource resources[] = {
    {
            .start = (3<<8)|(1),
            .flags = IORESOURCE_IRQ,
    },
};
static struct platform_device led_dev = {
        .name = "100ask_led",
		.num_resources = ARRAY_SIZE(resources),
		.resource = resources,
        .dev = {
                .release = led_dev_release,
         },
};
然后我们在probe函数中就可以通过下面的方法,得到传递过来的参数
	struct resource *res;
	res = platform_get_resource(pdev, IORESOURCE_IRQ, i++);
	if (!res)
		return -EINVAL;
	/* 记录引脚 */
	minor = g_ledcnt;
	leds_desc[minor].pin = res->start;
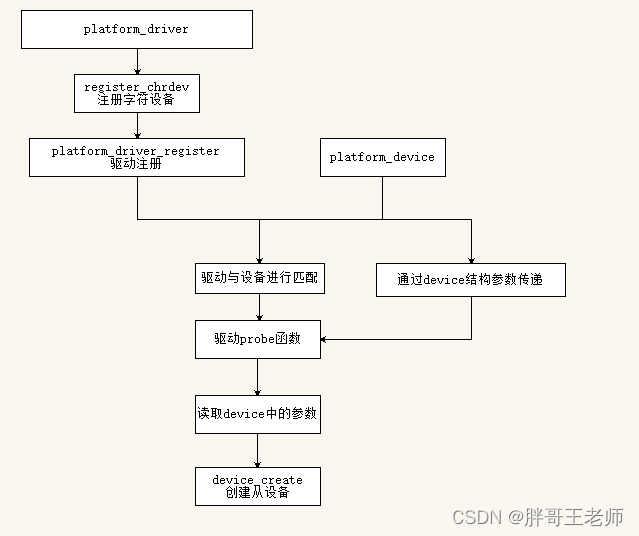
整体的执行过程大概如下图所示

之后就和前一章的内容一样,在创建从设备之后,用户侧打开从设备,读写从设备的操作就会继续关联上struct file_operations中定义的读写操作了。

驱动与设备的匹配
驱动driver的结构如下
static struct platform_driver hello_driver =
{
	.probe      = hello_probe,
	.remove     = hello_remove,
	.driver     =
	{
		.name   = "100ask_led",
	},
};
那么如何让设备去加载这个驱动呢,最简单的就是名字一致的匹配
static struct platform_device hello_dev =
{
	.name = "100ask_led",
	.dev =
	{
		.release = hello_dev_release,
	},
};
二者都是100ask_led,自然可以匹配上,1对1。
如果要是多个设备用一个驱动,那么就不能这么写了,因为如果device中.name一样,就无法重复加载了。
解决办法有几种:
override
在device中通过.driver_override 参数指定强制匹配的驱动
static struct platform_device led_dev = {
        .name = "100ask_led1",
        .dev = {
                .release = led_dev_release,
         },
		.driver_override = "100ask_led",
};
就可以强制匹配一个驱动100ask_led。这就是属于设备点名要这个驱动,别的都不好使

id_table
可以在驱动中指定一个设备列表
static const struct platform_device_id led_id_table[] = {
	{"hellodevice1",   1},
	{"hellodevice2", 2},
	{"hellodevice3", 3},
	{ },
};

static struct platform_driver led_driver = {
    .probe      = led_probe,
    .remove     = led_remove,
    .driver     = {
        .name   = "100ask_led",
    },
    .id_table = led_id_table,
};
然后在device中的名字,使用上面id_table中的名字,就可以匹配上了
static struct platform_device led_dev = {
        .name = "hellodevice1",
        .dev = {
                .release = led_dev_release,
         },
};
两种做法就好像是:
- 设备主动去调用某个驱动,驱动不认识设备,设备主动找驱动
- 驱动官方认证设备,驱动就认可这个设备。
platform_driver_register
platform_device_register
分析的时候要注意分清主次,分析关键部分就行,否则,很容易生气,因为看不懂

结束语
一晃疫情就三年了。

也不知道什么时候能放开手脚出去转转,夏天都会想去海边玩玩,现在各个景区也在开始放开政策,吸引外地游客过去,不过目前居住地还在不包含在范围内,哎……

自己种的西红柿开始红了,大城市还很难买到自然变红的西红柿,味道确实不太一样。
所以生活还是要多一些耐心,等待也许会换来值得。


