本章概要
- 启动系统任务
- 整合 Servlet、Filter 和 Listener
- 路径映射
启动系统任务
有一些特殊的任务需要在系统启动时执行,例如配置文件加载,数据库初始化等操作。如果没有使用 Spring Boot ,这些问题可以在 Listener 中解决。Spring Boot 对此提供了两种解决方案 CommandLineRunner 和 ApplicationRunner。两者基本一致,差别主要体现在参数上。
CommandLineRunner
Spring Boot 项目在启动时会遍历所有 CommandLineRunner 的实现类并调用其中的 run 方法,如果整个系统中有多个 CommandLineRunner 的实现类,那么可以使用 @Oder 注解对这些实现类的调用顺序进行排序。
在一个 Spring Boot Web 项目中(Spring Boot 项目引入 Web 依赖)添加两个 CommandLineRunner,分别如下:
@Component
@Order(1)
public class MyCommandLineRunner1 implements CommandLineRunner {
    @Override
    public void run(String... args) throws Exception {
        System.out.println("Runner1>>>"+ Arrays.toString(args));
    }
}
@Component
@Order(2)
public class MyCommandLineRunner2 implements CommandLineRunner {
    @Override
    public void run(String... args) throws Exception {
        System.out.println("Runner2>>>"+Arrays.toString(args));
    }
}
代码解释:
- @Order(1) 注解用来描述 CommandLineRunner 的执行顺序,数字越小越先执行。
- run 方法中是调用的核心逻辑,参数是系统启动时传入的参数,即入口类中 main 方法的参数(在调用 SpringApplication.run 方法时被传入 Spring Boot 项目中)
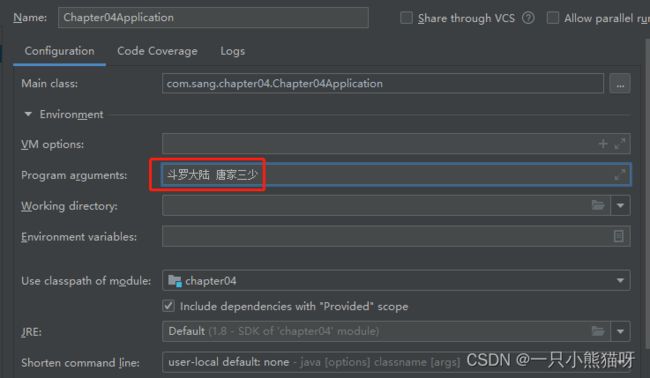
在系统启动时,配置传入的参数,以 IDEA 为例,配置方式如下:
步骤01:单击右上角的编辑启动配置,如图:
步骤02:在打开的新页面中编辑 Program arguments:
启动项目,启动日志如图:
ApplicationRunner
在一个Spring Boot Web 项目中信件两个 ApplicationRunner,代码如下:
@Component
@Order(2)
public class MyApplicationRunner1 implements ApplicationRunner {
    @Override
    public void run(ApplicationArguments args) throws Exception {
        List nonOptionArgs = args.getNonOptionArgs();
        System.out.println("1-nonOptionArgs>>>" + nonOptionArgs);
        Set optionNames = args.getOptionNames();
        for (String optionName : optionNames) {
            System.out.println("1-key:" + optionName + ";value:" +
                    args.getOptionValues(optionName));
        }
    }
}
@Component
@Order(1)
public class MyApplicationRunner2 implements ApplicationRunner {
    @Override
    public void run(ApplicationArguments args) throws Exception {
        List nonOptionArgs = args.getNonOptionArgs();
        System.out.println("2-nonOptionArgs>>>" + nonOptionArgs);
        Set optionNames = args.getOptionNames();
        for (String optionName : optionNames) {
            System.out.println("2-key:" + optionName + ";value:" +
                    args.getOptionValues(optionName));
        }
    }
}
代码解释:
- @Order 注解依然是用来描述执行顺序的,数字越小越优先执行
- @不同于 CommandLineRunner 中的 run 方法的 String 数组参数,这里 run 方法的参数是一个 ApplicationArguments 对象,如果想从 ApplicationArguments 对象中获取入口类中的 main 方法接收的参数,调用 ApplicationArguments 中的 getNonOptionArgs 方法即可。ApplicationArguments 中的getOptionNames方法用来获取项目启动命令中参数的 key ,例如将本项目打成 jar 包,运行 java -jar xxx.jar -name=Michael 命令来启动项目,此时 getOptionNames方法获取到的就是 name ,而 getOptionValues 方法则是获取相应的 value。
打包程序,执行如下命令启动项目:
java -jar chapter04-0.0.1-SNAPSHOT.jar --name=Michael --age=99 斗罗大陆 唐家三少
日志如下:
整合Servlet与Filter和Listener
一般情况下,使用Spring 、 Spring MVC 这些框架后,基本上就告别 Servlet、Filter 、 Listerer 了,但是有时在整合一些第三方框架时,可能还是不得不使用 Servlet ,比如在整合某报表插件时就需要使用 Servlet。Spring Boot 中对于整合这些基本的 Web 组件也提供了很好的支持。
在一个 Spring Boot Web 项目中添加如下三个组件:
@WebServlet("/my")
public class MyServlet extends HttpServlet {
@Override
protected void doGet(HttpServletRequest req, HttpServletResponse resp){
doPost(req,resp);
}
@Override
protected void doPost(HttpServletRequest req, HttpServletResponse resp){
System.out.println("name>>>"+req.getParameter("name"));
}
}
@WebFilter("/*")
public class MyFilter implements Filter {
    @Override
    public void init(FilterConfig filterConfig){
        System.out.println("MyFilter>>>init");
    }
    @Override
    public void doFilter(ServletRequest request, ServletResponse response, FilterChain chain) throws IOException, ServletException {
        System.out.println("MyFilter>>>doFilter");
        chain.doFilter(request,response);
    }
    @Override
    public void destroy() {
        System.out.println("MyFilter>>>destroy");
    }
}
@WebListener
public class MyListener implements ServletRequestListener {
    @Override
    public void requestDestroyed(ServletRequestEvent sre) {
        System.out.println("MyListener>>>requestDestroyed");
    }
    @Override
    public void requestInitialized(ServletRequestEvent sre) {
        System.out.println("MyListener>>>requestInitialized");
    }
}
代码解释:
- 定义了三个基本的组件,分别使用 @WebServlet 、@WebFilter、@WebListener 三个注解进行标记
- 这里以 ServletRequestListener 为例,但是对于其他的 Listener ,例如 HttpSessionListener、ServletContextListener 等也是支持的
在项目入口类上添加 @ServletComponentScan 注解,实现对 Servlet、Filter 、Listener 的扫码,如下:
@SpringBootApplication
@ServletComponentScan
public class Chapter04Application {
    public static void main(String[] args) {
        SpringApplication.run(Chapter04Application.class, args);
    }
}
最后启动项目,浏览器输入"http://localhost:8081/my?name=Michael",可以看到相关日志,如下:MyListener>>>requestInitialized
MyFilter>>>doFilter
name>>>Michael
MyListener>>>requestDestroyed
路径映射
一般情况下,使用了页面模板后,用户需要通过控制器才能访问页面。有一些页面需要在控制器中加载数据,然后渲染才能显示出来;还有一些页面在控制器中不需要加载数据,只是完成简单的跳转,对于这种页面,可以直接配置路径映射。例如,有两个 Thymeleaf 做模板的页面 login.html 和 index.html ,直接在 addViewControllers 方法配置映射关系即可:
@Configuration
public class WebMvcConfig implements WebMvcConfigurer {
    @Override
    public void addViewControllers(ViewControllerRegistry registry){
        registry.addViewController("/login").setViewName("login");
        registry.addViewController("/index").setViewName("index");
    }
}
到此这篇关于SpringBoot Web开发之系统任务启动与路径映射和框架整合的文章就介绍到这了,更多相关SpringBoot 框架整合内容请搜索脚本之家以前的文章或继续浏览下面的相关文章希望大家以后多多支持脚本之家!


