Vue3实战总结(二)
Vue3.0做项目过程中问题小总结
setup函数
axios
请求倒计时和超时
超时:在create设置timeout,当超过指定时间,请求依然没有响应,为请求超时
引入接口调用
拦截器
import axios from 'axios'


// 创建axios
 const service = axios.create({
    //  baseURL:'https://some-domain.com/api/',
    //  timeout:1000,
 });
//  添加请求拦截器
service.interceptors.request.use(function(config){
    // 在发送请求前做些什么
    return config
},function(error){
    return Promise.reject(error)
});

// 添加相应拦截器

service.interceptors.response.use(function(respone){
    return respone;
},function(error){
    return Promise.reject(error)
})

export default service;
注意:使用export default 和export的区别
拦截器作用过程
跨域配置
在vue.config.js找到devServer添加proxy配置如下:
proxy: {
      "/api": {
        target: process.env.VUE_APP_BASE_API || "http://127.0.0.1:8080",
        changeOrigin: true,
        pathRewrite: {
          /* 重写路径,当我们在浏览器中看到请求的地址为:http://localhost:8080/api/core/getData/userInfo 时
              实际上访问的地址是:http://121.121.67.254:8185/core/getData/userInfo,因为重写了 /api
             */
          "^/api": ""
        }
      }
    }
“/api"与”^/api"的区别
''^/api"重写路径:
重写路径,当我们在浏览器中看到请求的地址为:http://localhost:8080/api/core/getData/userInfo 时
	              实际上访问的地址是:http://121.121.67.254:8185/core/getData/userInfo,因为重写了 /api
登陆定时器
环境变量和模式
-
环境变量
替换项目根目录中的下列文件来指定环境变量:
.env                # 在所有的环境中被载入
.env.local          # 在所有的环境中被载入,但会被 git 忽略
.env.[mode]         # 只在指定的模式中被载入
.env.[mode].local   # 只在指定的模式中被载入,但会被 git 忽略
被载入的变量将会对 vue-cli-service 的所有命令、插件和依赖可用。
环境加载属性
为一个特定模式准备的环境文件 (例如 .env.production) 将会比一般的环境文件 (例如 .env) 拥有更高的优先级。
此外,Vue CLI 启动时已经存在的环境变量拥有最高优先级,并不会被 .env 文件覆写。
在客户端侧代码中使用环境变量
只有以 VUE_APP_ 开头的变量会被 webpack.DefinePlugin 静态嵌入到客户端侧的包中。你可以在应用的代码中这样访问它们:
console.log(process.env.VUE_APP_SECRET)
在构建过程中,process.env.VUE_APP_SECRET 将会被相应的值所取代。
在 VUE_APP_SECRET=secret 的情况下,它会被替换为 "secret"。
除了 VUE_APP_* 变量之外,在你的应用代码中始终可用的还有两个特殊的变量:
 - NODE_ENV - 会是 "development"、"production" 或 "test"中的一个。具体的值取决于应用运行的模式。
 - BASE_URL - 会和 vue.config.js 中的 publicPath选项相符,即你的应用会部署到的基础路径。
-
模式
默认情况下,一个 Vue CLI 项目有三个模式:
- development 模式用于 vue-cli-service serve
- production 模式用于vue-cli-service build 和 vue-cli-service test:e2e
- test 模式用于vue-cli-service test:unit
注意模式不同于 NODE_ENV,一个模式可以包含多个环境变量。也就是说,每个模式都会将 NODE_ENV 的值设置为模式的名称——比如在 development 模式下 NODE_ENV 的值会被设置为 “development”。
可以通过为 .env 文件增加后缀来设置某个模式下特有的环境变量。比如,如果你在项目根目录创建一个名为 .env.development 的文件,那么在这个文件里声明过的变量就只会在 development 模式下被载入。
可以通过传递 --mode 选项参数为命令行覆写默认的模式。例如,如果你想要在构建命令中使用开发环境变量,请在你的 package.json 脚本中加入:
"dev-build": "vue-cli-service build --mode development",
Promise
<script>
        let promise = new Promise((resolve,reject)=>{
            resolve()
        })

        promise.then(response=>{

        }).catch(error=>{

        })
        /**应用上
         * resolve对应then回调
         * reject对应catch回调
        */
        // 链式
        function promise1(status){
            return new Promise((resolve,reject)=>{
                if(status){
                    console.log(1+"成功")
                    resolve('success')
                }
                if(!status){
                    console.log(1+"失败")
                    reject('fail')
                }
            })
        }
        function promise2(status){
            return new Promise((resolve,reject)=>{
                if(status){
                    console.log(2+"成功")
                    resolve('success')
                }
                if(!status){
                    console.log(2+"失败")
                    reject('fail')
                }
            })
        }
        promise1(true).then(response=>{
            console.log(response)
            return promise2(true)
        }).then(response=>{
            console.log(response)
        }).catch(error=>{
            console.log(error)
        })


        //  all方法,数组内有promise必须全部成功,才会执行then回调
        Promise.all([promise1(true),promise2(true)]).then(response =>{
            console.log('success');
        }).catch(error=>{
            console.log('fail')
        })
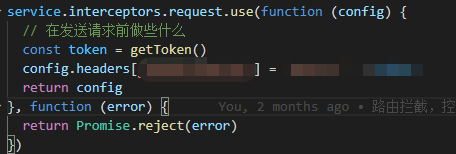
请求头拦截,Request Header添加参数
后台主要布局Layout
Main的布局
config.scss修改样式
路由
获取路由列表,并渲染生成控制菜单
使用root.$router.optios.routes从路由页面获取路由目录,并且通过v-for循环渲染
注意,在渲染的过程中,使用template做最外层嵌套,:key不可以绑定在template上,

路由跳转
router-link
this.$router.push
- 不带参数
- query传参
明文传参,页面刷新之后依然在 - params传参
密文传参,页面刷新之后,参数会消失
修改ElementUI样式
全局定义一份element.scss,对个别的组件样式进行修改
使用ElementUI
安装element-ui
cnpm i element-ui --save
然后在main.js文件引入
import ElementUI from 'element-ui'
import 'element-ui/lib/theme-chalk/index.css'
Vue.use(ElementUI)
布局
<el-row>
  <el-col :span="24"><div class="grid-content bg-purple-dark">div>el-col>
el-row>
<el-row>
  <el-col :span="12"><div class="grid-content bg-purple">div>el-col>
  <el-col :span="12"><div class="grid-content bg-purple-light">div>el-col>
el-row>
使用Vue.component
父子组件回调emit
 因为prop传数据为单向数据流,只能父级传到自己,不能反向,所以要使用回调emit反向修改数据
 子组件:
使用dialog,封装为一个组件使用
封装
<template>
    <div>
        <el-dialog title="收货地址" :visible.sync="dialogFormVisible">
            <el-form :model="form">
                <el-form-item label="活动名称" :label-width="formLabelWidth">
                <el-input v-model="form.name" autocomplete="off">el-input>
                el-form-item>
                <el-form-item label="活动区域" :label-width="formLabelWidth">
                <el-select v-model="form.region" placeholder="请选择活动区域">
                    <el-option label="区域一" value="shanghai">el-option>
                    <el-option label="区域二" value="beijing">el-option>
                el-select>
                el-form-item>
            el-form>
            <div slot="footer" class="dialog-footer">
                <el-button @click="dialogFormVisible = false">取 消el-button>
                <el-button type="primary" @click="dialogFormVisible = false">确 定el-button>
            div>
            el-dialog>
    div>
template>
<script>
import { reactive, ref, watch } from '@vue/composition-api'
export default {
  name: 'dialogDetail',
  setup () {
    const form = reactive({
      name: '',
      region: '',
      date1: '',
      date2: '',
      delivery: false,
      type: [],
      resource: '',
      desc: ''
    })

    const dialogFormVisible = ref(true)

    const formLabelWidth = ref('7.5rem' /* 120/16 */)
    return {
      form,
      dialogFormVisible,
      formLabelWidth
    }
  }
}
script>
父子传值
父组件给子组件传值,使用属性绑定,但是不能反向修改(子组件修改父组件)。使用watch监听传入子组件的值,并修改。
子组件修改父组件的值,使用emit回调,回调父组件的close绑定,从而改变值
![]()


