Tensorflow制作自己数据集并用CNN训练自己的数据集
学习完用MNIST数据集训练简单的MLP、自编码器、CNN后,我想着自己能不能做一个数据集,并用卷积神经网络训练,所以在网上查了一下资料,发现可以使用标准的TFrecords格式,参考见最后面的链接。但是,我也遇到了问题,制作好的TFrecords的数据集,运行的时候报错,网上没有找到相关的方法。后来我自己找了个方法解决了。
1. 准备数据
我准备的是猫和狗两个类别的图片,分别存放在D盘data/train文件夹下,如下图:
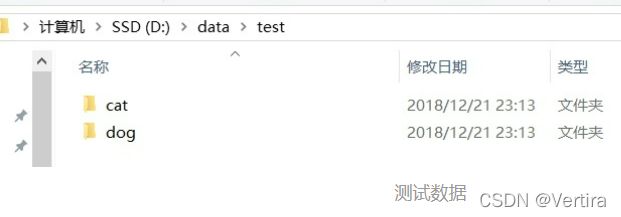
测试数据放在D盘data/test文件夹下,如下图:
2. 制作tfrecords文件
代码起名为make_own_data.py
tfrecord会根据你选择输入文件的类,自动给每一类打上同样的标签。注意:要分别给训练和测试数据制作一个tfrecords文件。
代码如下:
# -*- coding: utf-8 -*-
"""
@author:
"""
import os
import tensorflow as tf
from PIL import Image
import matplotlib.pyplot as plt
import numpy as np

#cwd='./data/train/'
cwd='./data/test/'
classes={'dog','cat'}  #人为设定2类
#writer= tf.python_io.TFRecordWriter("dog_and_cat_train.tfrecords") #要生成的文件
writer= tf.python_io.TFRecordWriter("dog_and_cat_test.tfrecords") #要生成的文件

for index,name in enumerate(classes):
    class_path=cwd+name+'/'
    for img_name in os.listdir(class_path):
        img_path=class_path+img_name #每一个图片的地址

        img=Image.open(img_path)
        img= img.resize((128,128))
        print(np.shape(img))
        img_raw=img.tobytes()#将图片转化为二进制格式
        example = tf.train.Example(features=tf.train.Features(feature={
            "label": tf.train.Feature(int64_list=tf.train.Int64List(value=[index])),
            'img_raw': tf.train.Feature(bytes_list=tf.train.BytesList(value=[img_raw]))
        })) #example对象对label和image数据进行封装
        writer.write(example.SerializeToString())  #序列化为字符串

writer.close()
这样就‘狗’和‘猫’的图片打上了两类数据0和1,并且文件储存为dog_and_cat_train.tfrecords,你会发现自己的python代码所在的文件夹里有了这个文件。
3. 读取tfrecords文件
将图片和标签读出,图片reshape为128x128x3。
读取代码单独作为一个文件,起名为ReadMyOwnData.py
代码如下:
#!/usr/bin/env python2
# -*- coding: utf-8 -*-
"""
Created on Fri Dec 15 22:55:47 2017
tensorflow : read my own dataset
@author: caokai
"""
import numpy as np
import tensorflow as tf

def read_and_decode(filename): # 读入tfrecords
    filename_queue = tf.train.string_input_producer([filename],shuffle=True)#生成一个queue队列

    reader = tf.TFRecordReader()
    _, serialized_example = reader.read(filename_queue)#返回文件名和文件
    features = tf.parse_single_example(serialized_example,
                                       features={
                                           'label': tf.FixedLenFeature([], tf.int64),
                                           'img_raw' : tf.FixedLenFeature([], tf.string),
                                       })#将image数据和label取出来

    img = tf.decode_raw(features['img_raw'], tf.uint8)
    img = tf.reshape(img, [128, 128, 3])  #reshape为128*128的3通道图片
    img = tf.cast(img, tf.float32) * (1. / 255) - 0.5 #在流中抛出img张量
    label = tf.cast(features['label'], tf.int32) #在流中抛出label张量

    return img, label
以上代码已经亲测成功!!!!!!!
下面的代码是tensorflow1.0的 我的是2.0 我没有测试。
4. 使用卷积神经网络训练
这一部分Python代码起名为dog_and_cat_train.py
4.1 定义好卷积神经网络的结构
要把我们读取文件的ReadMyOwnData导入,这边权重初始化使用的是tf.truncated_normal,两次卷积操作,两次最大池化,激活函数ReLU,全连接层,最后y_conv是softmax输出的二类问题。损失函数用交叉熵,优化算法Adam。
卷积部分代码如下:
#!/usr/bin/env python2
# -*- coding: utf-8 -*-
"""
Created on Fri Dec 15 17:44:58 2017

@author: caokai
"""
import tensorflow as tf
import numpy as np
import ReadMyOwnData

epoch = 15
batch_size = 20

def one_hot(labels,Label_class):
    one_hot_label = np.array([[int(i == int(labels[j])) for i in range(Label_class)] for j in range(len(labels))])
    return one_hot_label

#initial weights
def weight_variable(shape):
    initial = tf.truncated_normal(shape, stddev = 0.02)
    return tf.Variable(initial)
#initial bias
def bias_variable(shape):
    initial = tf.constant(0.0, shape=shape)
    return tf.Variable(initial)

#convolution layer
def conv2d(x,W):
    return tf.nn.conv2d(x, W, strides=[1,1,1,1], padding='SAME')

#max_pool layer
def max_pool_4x4(x):
    return tf.nn.max_pool(x, ksize=[1,4,4,1], strides=[1,4,4,1], padding='SAME')

x = tf.placeholder(tf.float32, [batch_size,128,128,3])
y_ = tf.placeholder(tf.float32, [batch_size,2])

#first convolution and max_pool layer
W_conv1 = weight_variable([5,5,3,32])
b_conv1 = bias_variable([32])
h_conv1 = tf.nn.relu(conv2d(x, W_conv1) + b_conv1)
h_pool1 = max_pool_4x4(h_conv1)

#second convolution and max_pool layer
W_conv2 = weight_variable([5,5,32,64])
b_conv2 = bias_variable([64])
h_conv2 = tf.nn.relu(conv2d(h_pool1, W_conv2) + b_conv2)
h_pool2 = max_pool_4x4(h_conv2)

#变成全连接层,用一个MLP处理
reshape = tf.reshape(h_pool2,[batch_size, -1])
dim = reshape.get_shape()[1].value
W_fc1 = weight_variable([dim, 1024])
b_fc1 = bias_variable([1024])
h_fc1 = tf.nn.relu(tf.matmul(reshape, W_fc1) + b_fc1)

#dropout
keep_prob = tf.placeholder(tf.float32)
h_fc1_drop = tf.nn.dropout(h_fc1, keep_prob)

W_fc2 = weight_variable([1024,2])
b_fc2 = bias_variable([2])
y_conv = tf.nn.softmax(tf.matmul(h_fc1_drop, W_fc2) + b_fc2)

#损失函数及优化算法
cross_entropy = tf.reduce_mean(-tf.reduce_sum(y_ * tf.log(y_conv), reduction_indices=[1]))
train_step = tf.train.AdamOptimizer(0.001).minimize(cross_entropy)

correct_prediction = tf.equal(tf.argmax(y_conv,1),tf.argmax(y_,1))
accuracy = tf.reduce_mean(tf.cast(correct_prediction,tf.float32))


img, label = ReadMyOwnData.read_and_decode("dog_and_cat_train.tfrecords")
img_test, label_test = ReadMyOwnData.read_and_decode("dog_and_cat_test.tfrecords")

#使用shuffle_batch可以随机打乱输入
img_batch, label_batch = tf.train.shuffle_batch([img, label],
                                                batch_size=batch_size, capacity=2000,
                                                min_after_dequeue=1000)
img_test, label_test = tf.train.shuffle_batch([img_test, label_test],
                                                batch_size=batch_size, capacity=2000,
                                                min_after_dequeue=1000)
init = tf.initialize_all_variables()
t_vars = tf.trainable_variables()
print(t_vars)
with tf.Session() as sess:
    sess.run(init)
    coord = tf.train.Coordinator()
    threads=tf.train.start_queue_runners(sess=sess,coord=coord)
    batch_idxs = int(2314/batch_size)
    for i in range(epoch):
        for j in range(batch_idxs):
            val, l = sess.run([img_batch, label_batch])
            l = one_hot(l,2)
            _, acc = sess.run([train_step, accuracy], feed_dict={x: val, y_: l, keep_prob: 0.5})
            print("Epoch:[%4d] [%4d/%4d], accuracy:[%.8f]" % (i, j, batch_idxs, acc) )
    val, l = sess.run([img_test, label_test])
    l = one_hot(l,2)
    print(l)
    y, acc = sess.run([y_conv,accuracy], feed_dict={x: val, y_: l, keep_prob: 1})
    print(y)
    print("test accuracy: [%.8f]" % (acc))

    coord.request_stop()
    coord.join(threads)
4.2 训练
训练过程中显示训练误差,最后会显示在测试集上的误差。
参考:
Tensorflow制作并用CNN训练自己的数据集 - 知乎学习完用MNIST数据集训练简单的MLP、自编码器、CNN后,我想着自己能不能做一个数据集,并用卷积神经网络训练,所以在网上查了一下资料,发现可以使用标准的TFrecords格式,参考见最后面的链接。但是,我也遇到了问…![]() https://zhuanlan.zhihu.com/p/36979787
https://zhuanlan.zhihu.com/p/36979787


