Vuepress码云部署及自动跳转404
介绍
VuePress 由两部分组成:一个以 Vue 驱动的主题系统的简约静态网站生成工具,和一个为编写技术文档而优化的默认主题。它是为了支持 Vue 子项目的文档需求而创建的。
由 VuePress 生成的每个页面,都具有相应的预渲染静态 HTML,它们能提供出色的加载性能,并且对 SEO 友好。然而,页面加载之后,Vue 就会将这些静态内容,接管为完整的单页面应用程序(SPA)。当用户在浏览站点时,可以按需加载其他页面。
部署
以下指南假设你将文档放置在项目的 docs 目录中,并使用默认的编译输出位置。
GitHub 页面
将 .vuepress/config.js 中的 base 设置为你的仓库名称。例如,如果你的仓库是 https://github.com/foo/bar ,则已部署的页面将在 https://foo.github.io/bar 上可用。在这种情况下,你应该将base设置为 “/bar/” 。
在你的项目中,运行:
# 构建
vuepress build docs
# 导航到构建输出目录
cd docs/.vuepress/dist
git init
git add -A
git commit -m 'deploy'
推到你仓库的的 gh-page 分支
将 / 替换为你的信息
git push -f [email protected]:/.git master:gh-pages
你可以在 CI 设置中运行此脚本以启用每次推送时的自动部署
码云页面-Gitee Pages
config.js的设置和GitHub页面设置的方法是一致的
项目打包完成后将 docs-.vuepress-dist 中的所有文件上传到码云
开启码云的Gitee Pages服务
注:我上线后出现了首页自动跳转404的问题,是因为码云 Gitee Pages 服务的网站地址均为小写,将config.js中的 base 部分全部改成小写就能解决vuepress跳转404的问题
Vuepress的简单使用
VuePress 由两部分组成:第一部分是一个极简静态网站生成器 (opens new window),它包含由 Vue 驱动的主题系统和插件 API,另一个部分是为书写技术文档而优化的默认主题,它的诞生初衷是为了支持 Vue 及其子项目的文档需求。
安装
VuePress 需要 Node.js (opens new window)>= 8.6
本文会帮助你从头搭建一个简单的 VuePress 文档。如果你想在一个现有项目中使用 VuePress 管理文档,从步骤 3 开始。
1.创建并进入一个新目录
mkdir vuepress-starter && cd vuepress-starter
2.初始化
npm init
3.将 VuePress 安装为本地依赖
我们已经不再推荐全局安装 VuePress
npm install -D vuepress
注意
如果你的现有项目依赖了 webpack 3.x,我们推荐使用 Yarn (opens new window)而不是 npm 来安装 VuePress。因为在这种情形下,npm 会生成错误的依赖树。
4.创建你的第一篇文档
mkdir docs && echo '# Hello VuePress' > docs/README.md
5.在 package.json 中添加一些 scripts(opens new window)
这一步骤是可选的,但我们推荐你完成它。在下文中,我们会默认这些 scripts 已经被添加。
{
  "scripts": {
    "docs:dev": "vuepress dev docs",
    "docs:build": "vuepress build docs"
  }
}
6.在本地启动服务器
npm run docs:dev
VuePress 会在 http://localhost:8080 启动一个热重载的开发服务器。
现在,你应该已经有了一个简单可用的 VuePress 文档。
首先来到config.json修改自己所需要的文件
// .vuepress/config.js
module.exports = {
  title:'《Ts教程》',
  dest:'docs',
  markdown: {
   lineNumbers: true
  },
  head: [
    ['link', {  rel: 'icon', href: '/logo.png' }]
  ],
  sidebarDepth: 2,
  themeConfig: {
    logo:'/logo.png',
    nav: [
      // { text: '和作者做同事', link: '/join_us' },
      { text: 'OpenHarmony仓库', link: 'https://gitee.com/openharmony/' },
      { text: '视频教程', link: 'https://space.bilibili.com/480883651' },
      { text: '关于我', link: 'http://jianguojs.cn/' },
    ],
    sidebar: [
      {
        title:"序",
        path:"/preface"
      },
      {
        title:"第一章:起步",
        path:"/chapter1/index",
        collapsable: false,
        children:[
          '/chapter1/mobile_development_intro',
          '/chapter1/flutter_intro',
          '/chapter1/install_flutter',
          '/chapter1/dart'
        ]
      },


    ]
  }
}
然后修改summary.md,等文件,
要运行的话
npm run dev就可以了
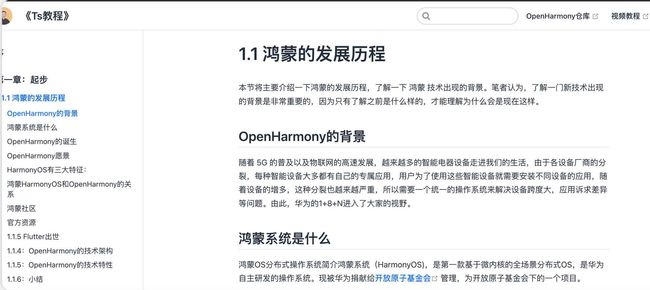
运行效果:
以上为个人经验,希望能给大家一个参考,也希望大家多多支持脚本之家。
