并不简单的翻页时钟(一):样式篇(Flex布局、line-height、data-set用法、css before after伪元素)
目录
并不简单的翻页时钟
我以为的翻页时钟
实际上的翻页时钟
关键的知识点
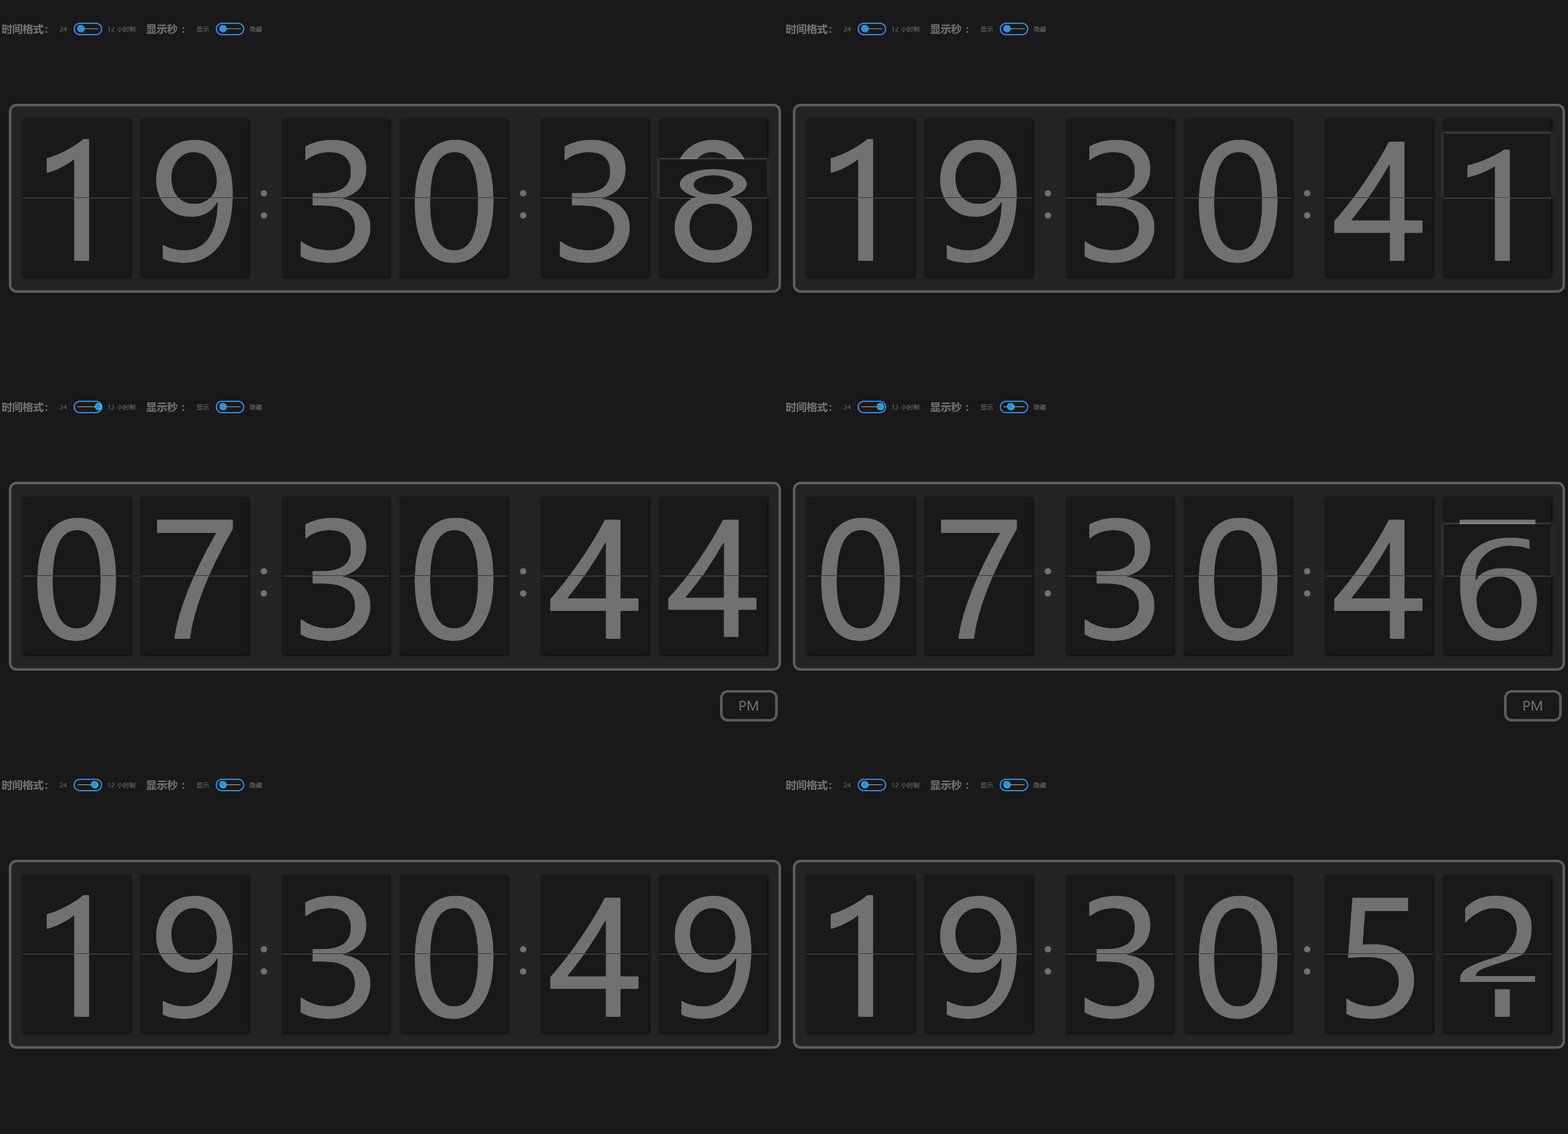
效果展示
代码解析
HTML
CSS
详解CSS
1.display:flex 元素居中
2.:before 、:after伪元素
3.line-height=0的神奇
4.animation动画
github:https://github.com/taozhuowei/StoreMyToys/tree/master/FlipClock
并不简单的翻页时钟
我以为的翻页时钟
翻页时钟=翻页(transform:rotateX)+ 时钟
实际上的翻页时钟
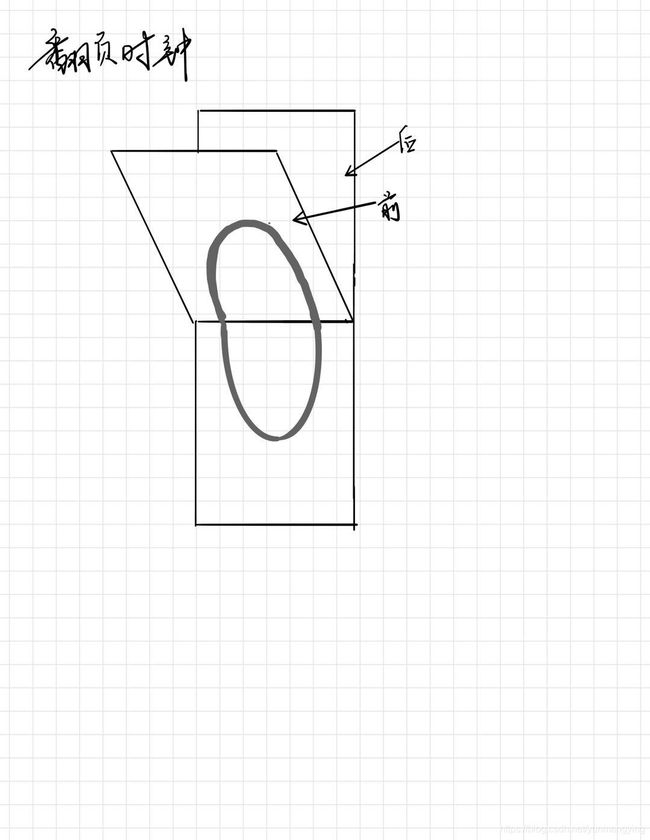
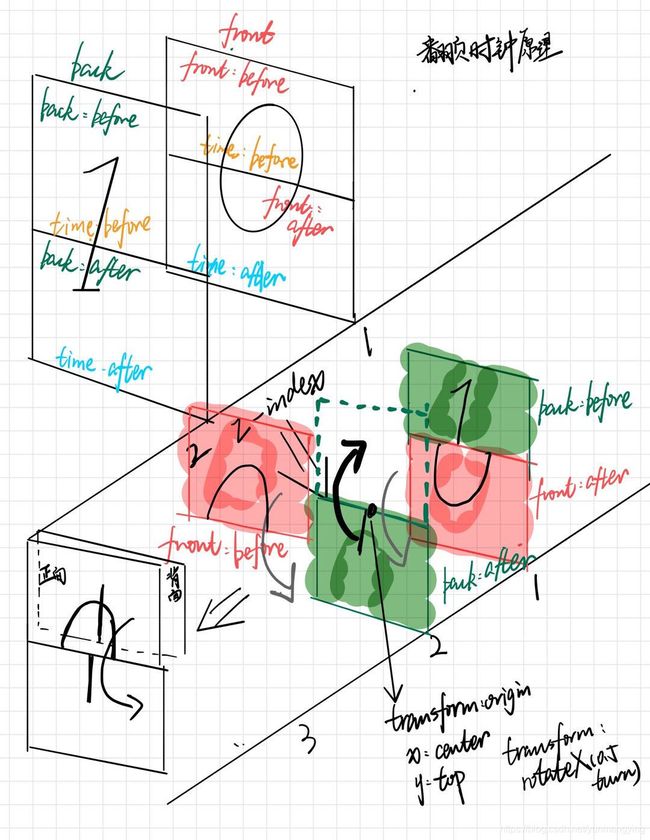
翻页时钟=前边的上半部分显示当前时间的上半部分+前边的下半部分显示当前时间的下半部分+后边的上半部分显示下一秒的时间的上半部分+后边的下半部分显示下一秒时间的下半部分
好的我承认,这不是句人话。所以我画了个图
有点简洁,但足够理解翻页时钟大概是个什么样子。
但要把它做出来,还需要费一番功夫。
关键的知识点
- html中的data-set
- css line-height=0的用处
- css flex弹性布局
- css :after :before伪元素
- css transform
- css backface-visibility
- css animation动画
效果展示
ScreenToGif这软件真的挺好用...
代码解析
HTML
    FlipClock——翻页时钟


    时间格式:
    24


    12 小时制

    显示秒 :
     显示


    隐藏


    :


    :


    AM
HTML部分不是重头戏,唯一与以往不同的则是data-number这个attribute的出现。
那么这个data-number是什么呢?
它是HTML5中出现的新特性,叫做data-set自定义属性。它可以存放一个值,便于获取。
那在这个翻页时钟中它的作用就是让css和js获取他的值,然后把时间的数字按位置传给他
CSS
*{margin: 0 ; padding: 0}
body{background: #191919;overflow: hidden;}


/*时钟设置选项*/
#option{
    position: absolute;     top: 30px;
    display: flex;  justify-content: center;    align-items: center;
    line-height: 50px;  text-align: center;
    height: 50px;
    font-size: 20px;     color: #717171;
}
#option h6{
    display: inline;
    font-size: 20px;
    margin-left: 20px;
}
#option span{font-size: 12px; margin-left: 10px}
/**
*更改checkbox样式
 */
/*隐藏默认的checkbox复选框*/
#option input[type=checkbox]{visibility: hidden;}
/*滑动背景*/
.checkButton{
    position: relative;
    display: inline-block;
    width: 50px;    height: 20px;
    border-radius: 15px;    border: 2px solid #3b84dd;
    background: #191919;
}
/*滑轨*/
.checkButton:after{
    position: absolute; left: 5px;    top: 9px;
    z-index: 1;/*隐藏在滑块下*/
    content: '';
    width:40px ;    height: 1px;
    background: white;
}
/*滑块*/
#option  label{
    position: absolute;     left: 5px;
    z-index: 2;/*显示在滑块上*/
    width: 10px;    height: 10px;
    margin-top: 3px;
    border-radius: 100%;    border: 1px solid #25f7ff;
    background: #3b84dd;
    box-shadow: 1px 1px 3px #25f7ff;
    animation: bounceBack 1s forwards ease-in-out;
}
/*!!!!!必须使用+选择器选择相邻的兄弟元素之后才能操作后边的元素*/
#option input[type=checkbox]:checked+.checkButton label{
   animation: bounce 1s forwards ease-in-out;
}
@keyframes bounce {
    0%{left: 5px}
    90%{left: 40px}
    100%{left: 35px}
}
@keyframes bounceBack {
    0%{left: 35px}
    90%{left: 0}
    100%{left: 5px}
}


/*弹性盒容器*/
#flexContainer{
    display: flex;   /*子元素的布局方式在父元素设置*/
    justify-content: center; /*水平居中*/
    align-items: center;/*垂直居中*/
    width: 100%;    height: 100vh;
    /*设置高度后align-items才生效*/
    /*1vh=1%屏幕高度*/
    background: #191919
}
/**
*时钟背景
 */
#clockContainer{
    display: flex; justify-content: center; align-items: center;
    width: 95%;     height: 350px;
    border: 5px solid #5d5d5d;  border-radius: 15px;
    background: #242424;
}
/**
*翻页数字容器
 */
.flipNumber{
    position:relative;   box-sizing: border-box;
    width: 14%;   height: 300px;    margin-left: 1.4%;
    text-align: center;     font-size: 300px;      line-height: 300px;
    background: #ffffff;
    box-shadow: 1px 1px 5px black;
}
/**
*时间分隔符
 */
.divide{
    width: 2%;  height: 100px;  line-height: 100px;
    margin-left: 1%;    font-size: 6rem;
    color:#717171;    text-align: center;
}

/**
*页样式,用前后伪元素实现翻页的样式
*前后伪元素的值为.time中data-number属性的值
*before是上半页,after是下半页
*伪元素一个:是css2写法,两个::是css3写法
 */
.time::before, .time::after{
    content: attr(data-number);
    position: absolute;     left: 0;    right: 0;
    overflow: hidden;
    color: #717171;     background: #191919;
    perspective: 100px;      -webkit-perspective: 160px;
}
.time::before{
    top:0;   bottom: 50%;
    border-bottom: 1px solid #717171;/*转轴*/
}
.time::after{
    top:50%;    bottom: 0;
    line-height: 0;
}
/*翻转前*/
.flipNumber .front::after , .flipNumber .back::before{z-index: 1;}
.flipNumber .back::after{
    z-index: 2;
    transform-origin: center top;    -webkit-transform-origin: center top;
    transform: rotateX(0.5turn);/*转半圈*/     -webkit-transform: rotateX(0.5turn);
}
.flipNumber .front::before{z-index: 3;}

/*翻转后*/
.flipNumber.running .front::before{
    transform-origin: center bottom;    -webkit-transform-origin: center bottom;
    animation: frontFlipDown 0.6s ease-in-out;      -webkit-animation: frontFlipDown 0.6s ease-in-out;
    box-shadow: 0 -2px 6px rgba(255, 255, 255, 0.3);
    backface-visibility: hidden;/*隐藏背面*/     -webkit-backface-visibility: hidden;
}
.flipNumber.running .back::after{
    animation: backFlipDown 0.6s ease-in-out;   -webkit-animation: backFlipDown 0.6s ease-in-out;
}

/*十二小时制下提示上下午*/
#twelve{
    display: none;
    position: absolute;     bottom: 100px;      right: 40px;
    width: 100px;   height: 50px;   line-height: 50px;
    text-align: center;
    border: 5px solid #5d5d5d;  border-radius: 15px;
    font-size:25px;     color: #717171;
}


/**
*动画
*/
@keyframes frontFlipDown {
    to{transform:rotateX(0.5turn)}
}
@keyframes backFlipDown {
    to{transform: rotateX(0)}
}

@-webkit-keyframes frontFlipDown {
    to {-webkit-transform: rotateX(0.5turn);}
}
@-webkit-keyframes backFlipDown {
    to {-webkit-transform: rotateX(0);}
}
一般的项目CSS往往只是起到修改样式,很少着墨去详细讲它。
而翻页时钟不一般,所谓翻页时钟=翻页+时钟。
翻页就是CSS , 而时钟则是JavaScript
这篇文章我们先不讨论JavaScript,重点聚焦这个CSS
详解CSS
1.display:flex 元素居中
/*弹性盒容器*/
#flexContainer{
    display: flex;   /*子元素的布局方式在父元素设置*/
    justify-content: center; /*水平居中*/
    align-items: center;/*垂直居中*/
    width: 100%;    height: 100vh;
    /*设置高度后align-items才生效*/
    /*1vh=1%屏幕高度*/
}
/**
*时钟背景
 */
#clockContainer{
    display: flex; justify-content: center; align-items: center;
}
/**
*翻页数字容器
 */
.flipNumber{

}在上面这段代码中(无关的代码被我删了),flexContainer、clockContainer 和 flipNumber 三个盒子为父子关系(爷孙?)。
flex的一个直观的特性是,明明是规定子元素的布局,样式却要写在父元素里面(像极了为你好的父亲......)
那么,如何实现居中呢?只需两步
1.justify-content :规定元素(子元素)在弹性容器(父容器)内的主线(x轴)上的对齐方式,center为水平居中
2.align-content:规定元素在弹性容器内的垂直轴(y轴)上的对齐方式,center为垂直居中
简单两步,水平垂直居中就搞定了,而垂直居中不仅可以写在父元素内,也可以将align-self写在子元素内规定自己的对齐方式
这里再简单介绍一下出现的 vh 单位 ,viewheight ,即屏幕高度,也就是铺满整个屏幕,很好理解。
2.:before 、:after伪元素
在css3中,这两个伪元素被写作 ::before 和 ::after 便于和伪类进行区分 ,一个:有助于浏览器兼容性
我们首先先回顾一下HTML中的结构
这一段是小时的第一位(从左到右数)的HTML结构。
我们注意到他们的data-number分别是0和1。0是当前时间,1是接下来的时间(下一秒),在文章后续也用0代表现在,1代表下一秒。
在HTML中,0和1共有time类,而0单独设置了front ,1单独设置了back,很好理解,一前一后。
我们来看CSS
.time::before, .time::after{
    content: attr(data-number);
    position: absolute;     left: 0;    right: 0;
    overflow: hidden;
    color: #717171;     background: #191919;
    perspective: 100px;      -webkit-perspective: 160px;
}
.time::before{
    top:0;   bottom: 50%;
    border-bottom: 1px solid #717171;/*转轴*/
}
.time::after{
    top:50%;    bottom: 0;
}
首先,创建伪类,content设置为data-number这个attribute的值(派上用场了),绝对定位并让其与本体完全重合。
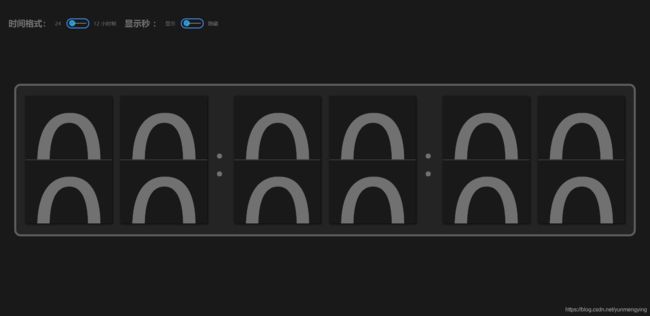
效果似乎不太理想,而且应该在后边的1跑到了前边。(由于后渲染的1又是绝对定位的缘故)另外,这个1,似乎有些奇怪。
不要急,我们继续调整。改变一下他们的层级(z-index)
/*翻转前*/
.flipNumber .front::after , .flipNumber .back::before{z-index: 1;}
.flipNumber .back::after{
    z-index: 2;
    transform-origin: center top;    -webkit-transform-origin: center top;
}
.flipNumber .front::before{z-index: 3;}

/*翻转后*/
.flipNumber.running .front::before{
    transform-origin: center bottom;    -webkit-transform-origin: center bottom;
    animation: frontFlipDown 0.6s ease-in-out;      -webkit-animation: frontFlipDown 0.6s ease-in-out;
    box-shadow: 0 -2px 6px rgba(255, 255, 255, 0.3);
    backface-visibility: hidden;/*隐藏背面*/     -webkit-backface-visibility: hidden;
}
.flipNumber.running .back::after{
    animation: backFlipDown 0.6s ease-in-out;   -webkit-animation: backFlipDown 0.6s ease-in-out;
}
然后,他长这样
这个时候,耐心已经所剩无几,不过不要紧,干就完了!
这个时候我们应该把1的下半部分翻上去
.flipNumber .back::after{
    z-index: 2;
    transform-origin: center top;    -webkit-transform-origin: center top;
    transform: rotateX(0.5turn);/*转半圈*/     -webkit-transform: rotateX(0.5turn);
}
添加一句transform:rotateX(0.5turn)就好了。(0.5turn表示转半圈)
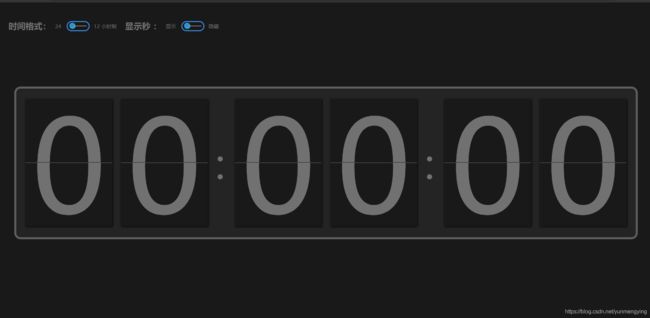
现在层级关系对了,可是这个错位的0并不是我们想要的。
于是,让我们请出下一个主角。
3.line-height=0的神奇
在之前的实践中,line-height往往用来实现文字的居中对齐。没曾想到,他还可以等于0。并且还辣么的好用。
让我们加上line-height=0,看看效果
可是,为什么呢?
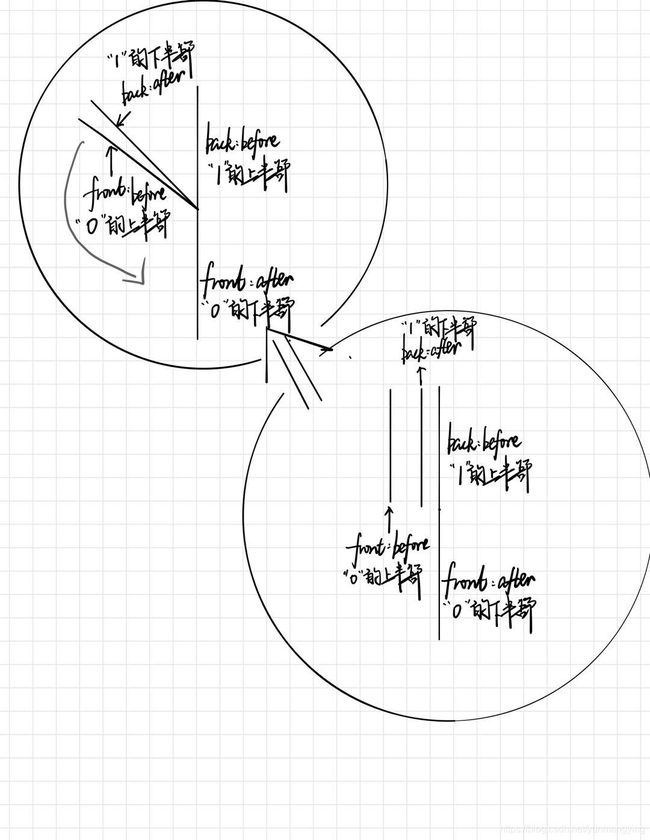
我们在这里不从字面意义上把它理解为行高,而是将他理解为设置基线(元素的中心水平线)的位置。
当line-height=0时,基线的位置在盒子的顶部,那么留在盒子里的自然就是元素的下半部分了。
为了方便理解上面几点的位置关系,我又献上了我粗糙的画风
侧视图
好吧,可能你更懵了。不如,试试折个纸,这样理解的会更快
我就不废纸了,我们继续说。
4.animation动画
如果要我说最喜欢CSS3的哪个新特性,那答案一定是CSS的动画。(虽然我做的还不咋地......)
但是让时钟翻个页,倒也不难
/**
*动画
*/
@keyframes frontFlipDown {
    to{transform:rotateX(0.5turn)}
}
@keyframes backFlipDown {
    to{transform: rotateX(0)}
}

@-webkit-keyframes frontFlipDown {
    to {-webkit-transform: rotateX(0.5turn);}
}
@-webkit-keyframes backFlipDown {
    to {-webkit-transform: rotateX(0);}
}
在需要动画的元素里写 animation :动画名 持续时长; 就可以为元素简单的绑定一个动画,你还可以设置动画结束后和开始前的状态,动画的速度等细节。
之后,用@keyframes 动画名就可以开始创作动画了。
最常规的写法是包含from和to的。也可以使用百分比来控制动画的关键帧。
可是问题又来了。时钟翻页的时候,前边0的上半部翻下来还是可以看见,这可不好。
不怕,山人自有妙计。
5.backface-visibility:hidden
字面意思及其清晰,懂英文的一看,不用我说就能明白。
背部不可见。
一句搞定!
那么到此为止,样式部分就讲完了。(emmmm...关于那个按钮的部分我会单独出一篇文章)
欢迎关注,等待下一篇的JavaScript部分以及后续....
(网课害人,更新遥遥无期)
喜欢的话,点个关注。
如有纰漏,欢迎指正。
