pytorch学习笔记五:模型的创建
在上一节中整理了数据模块的知识点,在本节中主要围绕如何用pytorch构建一个模型来展开,最后用pytorch实现Alexnet网络结构的搭建。
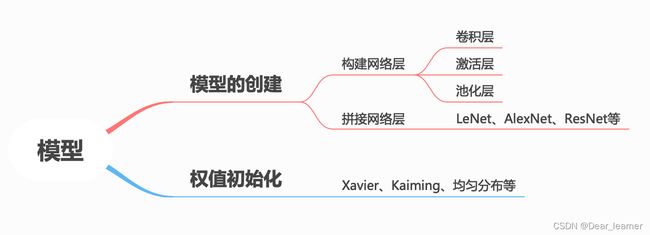
下面基于上面的框架来探索每一个模块的实现细节。
一、模型的创建

上面是LetNet的网络图,由边和节点组成,节点表示输入的数据大小,而边就是数据之间的运算。从上面的LetNet的网络中可以看出,网络接受一个输入,然后经过运算得到一个输出,在网络结构的内部,又分为多个子网络层进行拼接组成,这些子网络层之间的拼接 配合,最终得到我们想要的输出。
所以通过上面的分析,可以得到构建模型的两大要素:
● 构建子模块(比如网络结构中的卷积层、池化层、激活层、全连接层);
● 拼接子模块(将子模块按照一定的顺序拼接起来,最终得到想到的网络结构)。
以人民币的二分类任务来构建LetNet网络结构:
class LeNet(nn.Module):
    def __init__(self, classes):
        super(LeNet, self).__init__()

        self.conv1 = nn.Conv2d(3, 6, 5)
        self.conv2 = nn.Conv2d(6, 16, 5)
        self.fc1 = nn.Linear(16*5*5, 120)
        self.fc2 = nn.Linear(120, 84)
        self.fc3 = nn.Linear(84, classes)

    def forward(self, x):
        # layer1: conv2d -> relu -> max_pool
        x = F.relu(self.conv1(x))
        x = F.max_pool2d(x, 2)

        # layer2: conv2d -> relu -> max_pool
        x = F.relu(self.conv2(x))
        x = F.max_pool2d(x, 2)

        # layer3: fc1 -> relu
        x = x.view(x.size(0), -1)
        x = F.relu(self.fc1(x))

        # layer4: fc2 -> relu
        x = F.relu(self.fc2(x))

        # layer5:fc3
        x = self.fc3(x)

        return x

    def initialize_weights(self):
        for m in self.modules():
            if isinstance(m, nn.Conv2d):
                nn.init.xavier_normal_(m.weight.data)
                if m.bias is not None:
                    m.bias.data.zero_()
            elif isinstance(m, nn.BatchNorm2d):
                m.weight.data.fill_(1)
                m.bias.data.zero_()
            elif isinstance(m, nn.Linear):
                nn.init.normal_(m.weight.data, 0, 0.1)
                m.bias.data.zero_()
从上面的代码里可看出,LeNet类继承了nn.Module,并且在__init__方法中实现了各个子模块的构建,所以构建模型的第一个要素—— 构建子模块在这里体现。
那子模块的拼接是怎么实现的呢?——LetNet类里面的forward方法,下面来调试代码,看如何调用forward方法来实现子模块的拼接操作。
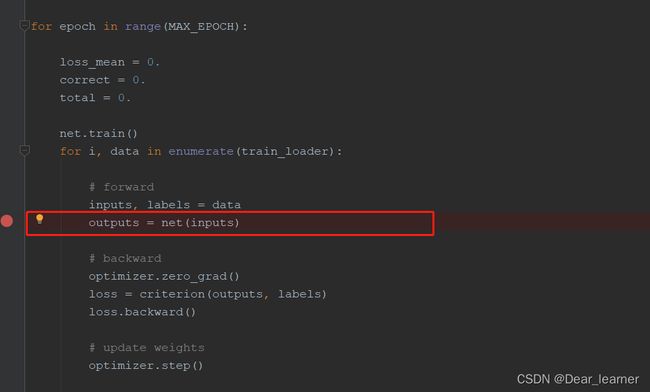
主程序模型训练部分,在outputs = net(inputs)处打上断点,因为这里是模型开始训练的部分,此处也是模型开始正向传播的过程,debug如下:
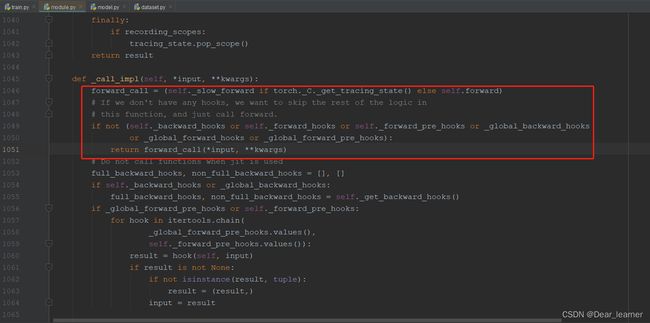
程序进入module.py文件中的__call_impl函数,这是因为类LetNet继承了nn.Module。在这里会实现调用forward方法,把各个子模块拼接起来。
在构造模型中继承了 nn.Module 类,所有的网络层都是继承于这个类的。所以下面来详细了解一下nn.Module类。
二、nn.Module 类
1、nn.Module的简介

torch.nn: 这是 Pytorch 的神经网络模块,这里的 Module 就是它的子模块之一,另外还有几个与 Module 并列的子模块。其中nn.Module的自定义为:
class Module(object):
    def __init__(self):
        torch._C._log_api_usage_once("python.nn_module")

        self.training = True
        self._parameters = OrderedDict()
        self._buffers = OrderedDict()
        self._non_persistent_buffers_set = set()
        self._backward_hooks = OrderedDict()
        self._forward_hooks = OrderedDict()
        self._forward_pre_hooks = OrderedDict()
        self._state_dict_hooks = OrderedDict()
        self._load_state_dict_pre_hooks = OrderedDict()
        self._modules = OrderedDict()

    def register_parameter(self, name: str, param: Optional[Parameter]) -> None:
    def add_module(self, name: str, module: Optional['Module']) -> None:
    def get_parameter(self, target: str) -> "Parameter":
    def apply(self: T, fn: Callable[['Module'], None]) -> T:
    def cuda(self: T, device: Optional[Union[int, device]] = None) -> T:
    def cpu(self: T) -> T:
    def state_dict(self, destination=None, prefix='', keep_vars=False):
    def load_state_dict(self, state_dict: 'OrderedDict[str, Tensor]',
                        strict: bool = True):
    def named_parameters(self, prefix: str = '',
                         recurse: bool = True) -> Iterator[Tuple[str, Parameter]]:
    def children(self) -> Iterator['Module']:
    def named_children(self) -> Iterator[Tuple[str, 'Module']]:
    def modules(self) -> Iterator['Module']:
    def named_modules(self, memo: Optional[Set['Module']] = None,
                      prefix: str = '', remove_duplicate: bool = True):
    def train(self: T, mode: bool = True) -> T:
    def eval(self: T) -> T:
    ...
"""
还有一些其他的函数
"""
在nn.Module自定义中的属性:
● parameters:存储管理 nn.Parameter 类;
● modules:存储管理nn.Modules类;
● buffers:存储管理缓冲属性,如BN层中的running_mean;
● ***_hook:存储管理钩子函数
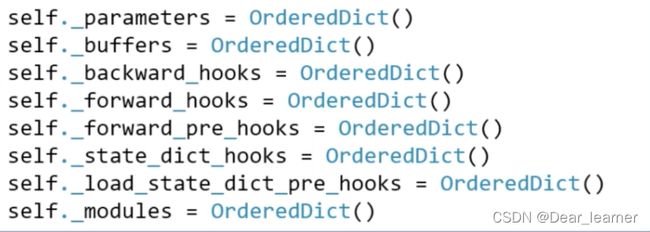
在构造网络结构是需要继承 nn.Module 类,并重新构造 __init__和forward两个方法,但需要注意的有:
● 一般将网络中具有可学习参数的层(如卷积层、全连接层)放在构造函数 __init__中,当然也可以把不具有参数的层也放在里面;
● 一般把不具有可学习参数的层(如ReLU、dropout、BatchNormanation层)可放在构造函数中,也可不放在构造函数中,如果不放在构造函数__init__里面,则在forward方法里面可以使用nn.functional来代替;
● forward方法是必须要重写的,它是实现模型的功能,实现各个层之间的连接关系的核心。
例如:
1、将所有的层都放在构造函数 __init__中,然后在forward中将这些层按顺序连接起来。
import torch.nn as nn

class MyNet(nn.Module):
    def __init__(self):
        super(MyNet, self).__init__()

        self.conv1 = nn.Conv2d(3, 32, 3, 1, 1)
        self.relu1 = nn.ReLU()
        self.max_pooling1 = nn.MaxPool2d(2, 1)

        self.conv2 = nn.Conv2d(32, 32, 3, 1, 1)
        self.relu2 = nn.ReLU()
        self.max_pooling2 = nn.MaxPool2d(2, 1)

        self.dense1 = nn.Linear(32*3*3, 128)
        self.dense2 = nn.Linear(128, 10)

    def forward(self, x):
        x = self.conv1(x)
        x = self.relu1(x)
        x = self.max_pooling1(x)
        x = self.conv2(x)
        x = self.relu2(x)
        x = self.max_pooling2(x)
        x = self.dense1(x)
        x = self.dense2(x)
        return x

model = MyNet()
print(model)
输出结果:

2、将没有训练参数的层放到forward中,所以这些层没有出现在model中,但是在运行关系是在forward中通过torch.nn.function实现,如下:
import torch.nn.functional as F

class MyNet(nn.Module):
    def __init__(self):
        super(MyNet, self).__init__()

        self.conv1 = nn.Conv2d(3, 32, 3, 1, 1)
        self.conv2 = nn.Conv2d(3, 32, 3, 1, 1)

        self.dense1 = nn.Linear(32 * 3 * 3, 128)
        self.dense2 = nn.Linear(128, 10)

    def forward(self, x):
        x = self.conv1(x)
        x = F.relu(x)
        x = F.max_pool2d(x)
        x = self.conv2(x)
        x = F.relu(x)
        x = F.max_pool2d(x)
        x = self.dense1(x)
        x = self.dense2(x)
        return x

model = MyNet()
print(model)
输出结果:

从上面两个示例中可看出,在构造函数__init__中的层是这个模型的“固有属性”。
2、nn.Module的实现
2.1 通过Sequential来包装层
即将几个层包装成一个大的层(块),然后直接调用包装成后的层。Sequential的定义如下:
class Sequential(Module): # 继承Module
    def __init__(self, *args):  # 重写了构造函数
    def _get_item_by_idx(self, iterator, idx):
    def __getitem__(self, idx):
    def __setitem__(self, idx, module):
    def __delitem__(self, idx):
    def __len__(self):
    def __dir__(self):
    def forward(self, input):  # 重写关键方法forward
补充:
Sequential三种实现方式如下:
1、最简单的序贯模型
import torch.nn as nn

model = nn.Sequential(
                      nn.Conv2d(3, 24, 3),
                      nn.ReLU(),
                      nn.Conv2d(24, 5, 3),
                      nn.ReLU())
print(model)
输出结果:
Sequential(
  (0): Conv2d(3, 24, kernel_size=(3, 3), stride=(1, 1))
  (1): ReLU()
  (2): Conv2d(24, 5, kernel_size=(3, 3), stride=(1, 1))
  (3): ReLU()
)
从上面的输出结果可以看出,模型的每一层没有名称,默认是0,1,2,3来命名的。
2、给每一层添加名称
import torch.nn as nn
from collections import OrderedDict
model = nn.Sequential(OrderedDict([
                  ('conv1', nn.Conv2d(1,20,5)),
                  ('relu1', nn.ReLU()),
                  ('conv2', nn.Conv2d(20,64,5)),
                  ('relu2', nn.ReLU())
                ]))

print(model)
print(model[2]) # 通过索引获取第几个层
"""
输出结果:
Sequential(
  (conv1): Conv2d(1, 20, kernel_size=(5, 5), stride=(1, 1))
  (relu1): ReLU()
  (conv2): Conv2d(20, 64, kernel_size=(5, 5), stride=(1, 1))
  (relu2): ReLU()
)
Conv2d(20, 64, kernel_size=(5, 5), stride=(1, 1))
"""
从上面的输出结果可以看出,每一层的输出都有了名称,但是并不能通过名称来获取层,依然要通过索引来获取,即model[2]是正确的,而model[‘conv2’]是错误的。这其实能从Sequential的定义可以看出,只支持index访问。
3、Sequential的第三种实现方式
import torch.nn as nn
from collections import OrderedDict

model = nn.Sequential()
model.add_module("conv1",nn.Conv2d(1,20,5))
model.add_module('relu1', nn.ReLU())
model.add_module('conv2', nn.Conv2d(20,64,5))
model.add_module('relu2', nn.ReLU())

print(model)
print(model[2]) # 通过索引获取第几个层

”“”
输出结果:
Sequential(
  (conv1): Conv2d(1, 20, kernel_size=(5, 5), stride=(1, 1))
  (relu1): ReLU()
  (conv2): Conv2d(20, 64, kernel_size=(5, 5), stride=(1, 1))
  (relu2): ReLU()
)
Conv2d(20, 64, kernel_size=(5, 5), stride=(1, 1))
“”“
add_module方法是Sequential继承了父类Module的方法。
因为sequential的可以通过上面三种方式实现,对层的包装也可以通过三种方式来实现
方式一:
import torch.nn as nn
from collections import OrderedDict
class MyNet(nn.Module):
    def __init__(self):
        super(MyNet, self).__init__()
        self.conv_block = nn.Sequential(
            nn.Conv2d(3, 32, 3, 1, 1),
            nn.ReLU(),
            nn.MaxPool2d(2))
        self.dense_block = nn.Sequential(
            nn.Linear(32 * 3 * 3, 128),
            nn.ReLU(),
            nn.Linear(128, 10)
        )
    # 在这里实现层之间的连接关系,其实就是所谓的前向传播
    def forward(self, x):
        conv_out = self.conv_block(x)
        res = conv_out.view(conv_out.size(0), -1)
        out = self.dense_block(res)
        return out

model = MyNet()
print(model)

'''运行结果为:
MyNet(
  (conv_block): Sequential(
    (0): Conv2d(3, 32, kernel_size=(3, 3), stride=(1, 1), padding=(1, 1))
    (1): ReLU()
    (2): MaxPool2d(kernel_size=2, stride=2, padding=0, dilation=1, ceil_mode=False)
  )
  (dense_block): Sequential(
    (0): Linear(in_features=288, out_features=128, bias=True)
    (1): ReLU()
    (2): Linear(in_features=128, out_features=10, bias=True)
  )
)
'''
方式二:
import torch.nn as nn
from collections import OrderedDict
class MyNet(nn.Module):
    def __init__(self):
        super(MyNet, self).__init__()
        self.conv_block = nn.Sequential(
            OrderedDict(
                [
                    ("conv1", nn.Conv2d(3, 32, 3, 1, 1)),
                    ("relu1", nn.ReLU()),
                    ("pool", nn.MaxPool2d(2))
                ]
            ))

        self.dense_block = nn.Sequential(
            OrderedDict([
                ("dense1", nn.Linear(32 * 3 * 3, 128)),
                ("relu2", nn.ReLU()),
                ("dense2", nn.Linear(128, 10))
            ])
        )

    def forward(self, x):
        conv_out = self.conv_block(x)
        res = conv_out.view(conv_out.size(0), -1)
        out = self.dense_block(res)
        return out

model = MyNet()
print(model)

'''运行结果为:
MyNet(
  (conv_block): Sequential(
    (conv1): Conv2d(3, 32, kernel_size=(3, 3), stride=(1, 1), padding=(1, 1))
    (relu1): ReLU()
    (pool): MaxPool2d(kernel_size=2, stride=2, padding=0, dilation=1, ceil_mode=False)
  )
  (dense_block): Sequential(
    (dense1): Linear(in_features=288, out_features=128, bias=True)
    (relu2): ReLU()
    (dense2): Linear(in_features=128, out_features=10, bias=True)
  )
)
'''
方式三:
import torch.nn as nn
from collections import OrderedDict
class MyNet(nn.Module):
    def __init__(self):
        super(MyNet, self).__init__()
        self.conv_block=torch.nn.Sequential()
        self.conv_block.add_module("conv1",torch.nn.Conv2d(3, 32, 3, 1, 1))
        self.conv_block.add_module("relu1",torch.nn.ReLU())
        self.conv_block.add_module("pool1",torch.nn.MaxPool2d(2))

        self.dense_block = torch.nn.Sequential()
        self.dense_block.add_module("dense1",torch.nn.Linear(32 * 3 * 3, 128))
        self.dense_block.add_module("relu2",torch.nn.ReLU())
        self.dense_block.add_module("dense2",torch.nn.Linear(128, 10))

    def forward(self, x):
        conv_out = self.conv_block(x)
        res = conv_out.view(conv_out.size(0), -1)
        out = self.dense_block(res)
        return out

model = MyNet()
print(model)

'''运行结果为:
MyNet(
  (conv_block): Sequential(
    (conv1): Conv2d(3, 32, kernel_size=(3, 3), stride=(1, 1), padding=(1, 1))
    (relu1): ReLU()
    (pool1): MaxPool2d(kernel_size=2, stride=2, padding=0, dilation=1, ceil_mode=False)
  )
  (dense_block): Sequential(
    (dense1): Linear(in_features=288, out_features=128, bias=True)
    (relu2): ReLU()
    (dense2): Linear(in_features=128, out_features=10, bias=True)
  )
)
'''
3、nn.Module中几个常见方法的使用
Sequenrtial类实现了整数索引,故而可以使用model[index] 这样的方式获取一个层,但是Module类并没有实现整数索引,不能够通过整数索引来获得层,那该怎么办呢?它提供了几个主要的方法,如下:
def children(self):

def named_children(self):

def modules(self):

def named_modules(self, memo=None, prefix=''):

'''
注意:这几个方法返回的都是一个Iterator迭代器,故而通过for循环访问,当然也可以通过next
'''
以上面构建的网络为例子说明如下:
1、model.children()方法
import torch.nn as nn
from collections import OrderedDict
class MyNet(nn.Module):
    def __init__(self):
        super(MyNet, self).__init__()
        self.conv_block=torch.nn.Sequential()
        self.conv_block.add_module("conv1",torch.nn.Conv2d(3, 32, 3, 1, 1))
        self.conv_block.add_module("relu1",torch.nn.ReLU())
        self.conv_block.add_module("pool1",torch.nn.MaxPool2d(2))

        self.dense_block = torch.nn.Sequential()
        self.dense_block.add_module("dense1",torch.nn.Linear(32 * 3 * 3, 128))
        self.dense_block.add_module("relu2",torch.nn.ReLU())
        self.dense_block.add_module("dense2",torch.nn.Linear(128, 10))

    def forward(self, x):
        conv_out = self.conv_block(x)
        res = conv_out.view(conv_out.size(0), -1)
        out = self.dense_block(res)
        return out

model = MyNet()

for i in model.children():
    print(i)
    print(type(i)) # 查看每一次迭代的元素到底是什么类型,实际上是 Sequential 类型,所以有可以使用下标index索引来获取每一个Sequenrial 里面的具体层

#运行结果为:
Sequential(
  (conv1): Conv2d(3, 32, kernel_size=(3, 3), stride=(1, 1), padding=(1, 1))
  (relu1): ReLU()
  (pool1): MaxPool2d(kernel_size=2, stride=2, padding=0, dilation=1, ceil_mode=False)
)
<class 'torch.nn.modules.container.Sequential'>
Sequential(
  (dense1): Linear(in_features=288, out_features=128, bias=True)
  (relu2): ReLU()
  (dense2): Linear(in_features=128, out_features=10, bias=True)
)
<class 'torch.nn.modules.container.Sequential'>
2、model.named_children
for i in model.named_children():
    print(i)


 #输出结果:
 ('conv_block', Sequential(
  (conv1): Conv2d(3, 32, kernel_size=(3, 3), stride=(1, 1), padding=(1, 1))
  (relu1): ReLU()
  (pool1): MaxPool2d(kernel_size=2, stride=2, padding=0, dilation=1, ceil_mode=False)
))
('dense_block', Sequential(
  (dense1): Linear(in_features=288, out_features=128, bias=True)
  (relu2): ReLU()
  (dense2): Linear(in_features=128, out_features=10, bias=True)
))
总结:
(1)model.children()和model.named_children()方法返回的是迭代器iterator;
(2)model.children():每一次迭代返回的每一个元素实际上是 Sequential 类型,而Sequential类型又可以使用下标index索引来获取每一个Sequenrial 里面的具体层,比如conv层、dense层等;
(3)model.named_children():每一次迭代返回的每一个元素实际上是 一个元组类型,元组的第一个元素是名称,第二个元素就是对应的层或者是Sequential。
3、model.modules()方法
for i in model.modules():
    print(i)
    print("==================================================")
# 输出结果:
MyNet(
  (conv_block): Sequential(
    (conv1): Conv2d(3, 32, kernel_size=(3, 3), stride=(1, 1), padding=(1, 1))
    (relu1): ReLU()
    (pool1): MaxPool2d(kernel_size=2, stride=2, padding=0, dilation=1, ceil_mode=False)
  )
  (dense_block): Sequential(
    (dense1): Linear(in_features=288, out_features=128, bias=True)
    (relu2): ReLU()
    (dense2): Linear(in_features=128, out_features=10, bias=True)
  )
)
==================================================
Sequential(
  (conv1): Conv2d(3, 32, kernel_size=(3, 3), stride=(1, 1), padding=(1, 1))
  (relu1): ReLU()
  (pool1): MaxPool2d(kernel_size=2, stride=2, padding=0, dilation=1, ceil_mode=False)
)
==================================================
Conv2d(3, 32, kernel_size=(3, 3), stride=(1, 1), padding=(1, 1))
==================================================
ReLU()
==================================================
MaxPool2d(kernel_size=2, stride=2, padding=0, dilation=1, ceil_mode=False)
==================================================
Sequential(
  (dense1): Linear(in_features=288, out_features=128, bias=True)
  (relu2): ReLU()
  (dense2): Linear(in_features=128, out_features=10, bias=True)
)
==================================================
Linear(in_features=288, out_features=128, bias=True)
==================================================
ReLU()
==================================================
Linear(in_features=128, out_features=10, bias=True)
==================================================
4、model.named_modules()方法
for i in model.named_modules():
print(i)
print("==================================================")
# 输出结果:
('', MyNet(
(conv_block): Sequential(
(conv1): Conv2d(3, 32, kernel_size=(3, 3), stride=(1, 1), padding=(1, 1))
(relu1): ReLU()
(pool1): MaxPool2d(kernel_size=2, stride=2, padding=0, dilation=1, ceil_mode=False)
)
(dense_block): Sequential(
(dense1): Linear(in_features=288, out_features=128, bias=True)
(relu2): ReLU()
(dense2): Linear(in_features=128, out_features=10, bias=True)
)
))
==================================================
('conv_block', Sequential(
(conv1): Conv2d(3, 32, kernel_size=(3, 3), stride=(1, 1), padding=(1, 1))
(relu1): ReLU()
(pool1): MaxPool2d(kernel_size=2, stride=2, padding=0, dilation=1, ceil_mode=False)
))
==================================================
('conv_block.conv1', Conv2d(3, 32, kernel_size=(3, 3), stride=(1, 1), padding=(1, 1)))
==================================================
('conv_block.relu1', ReLU())
==================================================
('conv_block.pool1', MaxPool2d(kernel_size=2, stride=2, padding=0, dilation=1, ceil_mode=False))
==================================================
('dense_block', Sequential(
(dense1): Linear(in_features=288, out_features=128, bias=True)
(relu2): ReLU()
(dense2): Linear(in_features=128, out_features=10, bias=True)
))
==================================================
('dense_block.dense1', Linear(in_features=288, out_features=128, bias=True))
==================================================
('dense_block.relu2', ReLU())
==================================================
('dense_block.dense2', Linear(in_features=128, out_features=10, bias=True))
==================================================
总结:
(1)model.modules()和model.named_modules()方法返回的是迭代器iterator;
(2)model的modules()方法和named_modules()方法都会将整个模型的所有构成(包括包装层、单独的层、自定义层等)由浅入深依次遍历出来,只不过modules()返回的每一个元素是直接返回的层对象本身,而named_modules()返回的每一个元素是一个元组,第一个元素是名称,第二个元素才是层对象本身。
(3)如何理解children和modules之间的这种差异性。注意pytorch里面不管是模型、层、激活函数、损失函数都可以当成是Module的拓展,所以modules和named_modules会层层迭代,由浅入深,将每一个自定义块block、然后block里面的每一个层都当成是module来迭代。而children就比较直观,就表示的是所谓的“孩子”,所以没有层层迭代深入。
三、模型容器Containers
在模型的搭建过程中,还有一个非常重要的概念就是containers,先来看一下containers的整体框架:

1、nn.Sequential
nn.Sequential是nn.Module中的容器,用于按顺序包装一组网络层,在上面中已经详细说明了nn.Sequential的用法,下面debug看一下具体的实现过程
class LeNetSequential(nn.Module):
    def __init__(self, classes):
        super(LeNetSequential, self).__init__()
        self.features = nn.Sequential(
            nn.Conv2d(3, 6, 5),
            nn.ReLU(),
            nn.MaxPool2d(kernel_size=2, stride=2),
            nn.Conv2d(6, 16, 5),
            nn.ReLU(),
            nn.MaxPool2d(kernel_size=2, stride=2),)

        self.classifier = nn.Sequential(
            nn.Linear(16*5*5, 120),
            nn.ReLU(),
            nn.Linear(120, 84),
            nn.ReLU(),
            nn.Linear(84, classes),)

    def forward(self, x):
        x = self.features(x)
        x = x.view(x.size()[0], -1)
        x = self.classifier(x)
        return x
net = LeNetSequential(classes=2)
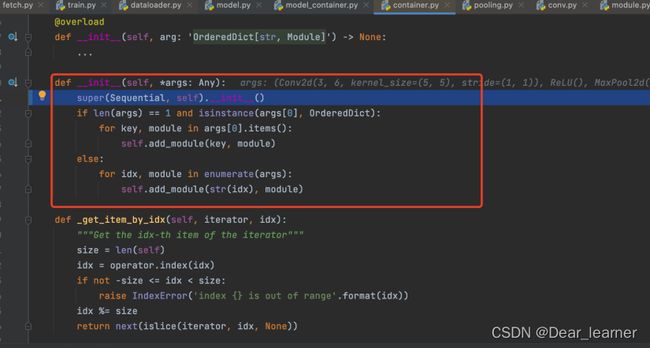
程序进入container.py文件的Sequential类中,在__init__中可以看到先是判断添加的层是否是有序字典,然后将nn.Sequential中的有序层依次加入到module中,模型的构建在此完成,继续debug,可看到模型的拼接是在container.py中的forward()中实现。

总结:
使用nn.Sequential按顺序包装一组网络层时:
● 顺序性:各层网络之间严格按照顺序构建;
● 自带forward():自带forward里,通过for循环依次执行前向传播过程。
2、nn.ModuleList
nn.ModuleList 是 nn.module 的容器,用于包装一组网络层,以迭代的方式调用网络层,主要方法:
- append():在ModuleList后面添加网络层;
- extend():拼接两个 ModuleList;
- insert():指定在 ModuleList 中位置插入网络层
类似于python中的list操作,不过元素换成了网络层,具体实例如下:
使用 ModuleList 来循环迭代的实现一个 20 个全连接层的网络的构建。
class ModuleList(nn.Module):
    def __init__(self):
        super(ModuleList, self).__init__()
        self.linears = nn.ModuleList([nn.Linear(10, 10) for i in range(20)])

    def forward(self, x):
        for i, linear in enumerate(self.linears):
            x = linear(x)
        return x
model = ModuleList()
print(model)
# 输出结果
ModuleList(
  (linears): ModuleList(
    (0): Linear(in_features=10, out_features=10, bias=True)
    (1): Linear(in_features=10, out_features=10, bias=True)
    (2): Linear(in_features=10, out_features=10, bias=True)
    (3): Linear(in_features=10, out_features=10, bias=True)
    (4): Linear(in_features=10, out_features=10, bias=True)
    (5): Linear(in_features=10, out_features=10, bias=True)
    (6): Linear(in_features=10, out_features=10, bias=True)
    (7): Linear(in_features=10, out_features=10, bias=True)
    (8): Linear(in_features=10, out_features=10, bias=True)
    (9): Linear(in_features=10, out_features=10, bias=True)
    (10): Linear(in_features=10, out_features=10, bias=True)
    (11): Linear(in_features=10, out_features=10, bias=True)
    (12): Linear(in_features=10, out_features=10, bias=True)
    (13): Linear(in_features=10, out_features=10, bias=True)
    (14): Linear(in_features=10, out_features=10, bias=True)
    (15): Linear(in_features=10, out_features=10, bias=True)
    (16): Linear(in_features=10, out_features=10, bias=True)
    (17): Linear(in_features=10, out_features=10, bias=True)
    (18): Linear(in_features=10, out_features=10, bias=True)
    (19): Linear(in_features=10, out_features=10, bias=True)
  )
)
3、nn.ModuleDict
nn.ModuleDict 是nn.Module的容器,用于包装一组网络层,以索引的方式调用网络层,主要方法有:
- clear():清空ModuleDict;
- items():返回可迭代的键值对;
- keys():返回字典的键;
- values():返回字典的值;
- pop():返回一对键值,并从字典中删除。
class ModuleDict(nn.Module):
    def __init__(self):
        super(ModuleDict, self).__init__()
        self.choices = nn.ModuleDict({
            'conv': nn.Conv2d(10, 10, 3),
            'pool': nn.MaxPool2d(3)
        })

        self.activations = nn.ModuleDict({
            'relu': nn.ReLU(),
            'prelu': nn.PReLU()
        })

    def forward(self, x, choice, act):
        x = self.choices[choice](x)
        x = self.activations[act](x)
        return x
四、AlexNet网络的实现
AlexNet:2012年以高出第二名10多个百分点的准确率获得ImageNet分类任务冠军,开创了卷积神经网络的新时代,AlexNet特点如下:
● 采用ReLU:替换饱和激活函数,减轻梯度消失
● 采用LRN(Local Response Normalization):对数据归一化,减轻梯度消失
● Dropout:提高全连接层的鲁棒性,增加网络的泛化能力
● Data Augmentation:TenCrop,色彩修改
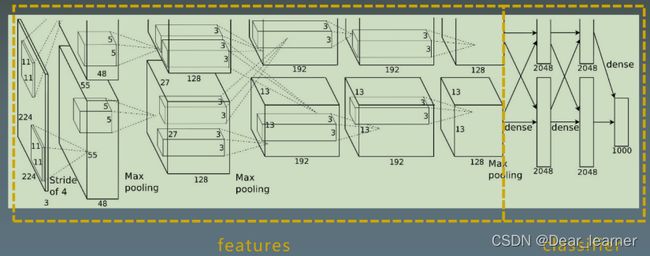
网络结构图如下:
实现过程:
# pytorch中AlexNet的实现

alexnet = torchvision.models.AlexNet()

# 实现过程
class AlexNet(nn.Module):

    def __init__(self, num_classes=1000):
        super(AlexNet, self).__init__()
        self.features = nn.Sequential(
            nn.Conv2d(3, 64, kernel_size=11, stride=4, padding=2),
            nn.ReLU(inplace=True),
            nn.MaxPool2d(kernel_size=3, stride=2),
            nn.Conv2d(64, 192, kernel_size=5, padding=2),
            nn.ReLU(inplace=True),
            nn.MaxPool2d(kernel_size=3, stride=2),
            nn.Conv2d(192, 384, kernel_size=3, padding=1),
            nn.ReLU(inplace=True),
            nn.Conv2d(384, 256, kernel_size=3, padding=1),
            nn.ReLU(inplace=True),
            nn.Conv2d(256, 256, kernel_size=3, padding=1),
            nn.ReLU(inplace=True),
            nn.MaxPool2d(kernel_size=3, stride=2),
        )
        self.avgpool = nn.AdaptiveAvgPool2d((6, 6))
        self.classifier = nn.Sequential(
            nn.Dropout(),
            nn.Linear(256 * 6 * 6, 4096),
            nn.ReLU(inplace=True),
            nn.Dropout(),
            nn.Linear(4096, 4096),
            nn.ReLU(inplace=True),
            nn.Linear(4096, num_classes),
        )

    def forward(self, x):
        x = self.features(x)
        x = self.avgpool(x)
        x = torch.flatten(x, 1)
        x = self.classifier(x)
        return x

