Java 并发一文读懂
目录
线程实现方式
方式一:实现 Runnable 接口
方式二:实现 Callable 接口
方式三:继承 Thread 类
演示功能代码
实现接口 VS 继承 Thread
线程机制
Executor(线程执行容器)
Executor(线程执行容器)实现
CachedThreadPool 实例
FixedThreadPool实例
SingleThreadExecutor实例
演示功能代码
Daemon(守护线程)
Daemon(守护线程)实现方式
演示功能代码:
sleep(休眠)
演示功能代码:
yield(线程让步)
演示功能代码:
线程中断
InterruptedException
演示功能代码:
interrupted() 线程中断方法
演示功能代码:
Executor 中断操作
演示功能代码:
Executor 指定线程中断
演示功能代码:
线程互斥同步
synchronized
同步一个代码块
演示功能代码:
同步一个方法
同步一个类
演示功能代码:
同步一个静态方法
ReentrantLock
演示功能代码:
synchronized与ReentrantLock比较
推荐选择
线程协作
join()
演示功能代码:
wait() notify() notifyAll()
演示功能代码
wait() 和 sleep() 的区别
await() signal() signalAll()
演示功能代码
线程状态
新建(NEW)
可运行(RUNABLE)
阻塞(BLOCKED)
无限期等待(WAITING)
限期等待(TIMED_WAITING)
死亡(TERMINATED)
J.U.C - AQS
CountDownLatch
执行图
演示功能代码
CyclicBarrier
构造函数
执行图
演示功能代码
Semaphore
演示功能代码
J.U.C - 其它组件
FutureTask
演示功能代码:
BlockingQueue
使用 BlockingQueue 实现生产者消费者模式优化
ForkJoin
演示功能代码:
线程不安全示例
Java 内存模型
主内存与工作内存
内存间交互操作
内存模型三大特性
原子性
可见性
有序性
先行发生原则
单一线程原则
管程锁定规则
volatile 变量规则
线程启动规则
线程加入规则
线程中断规则
对象终结规则
传递性
线程安全
不可变
演示功能代码:
互斥同步
非阻塞同步
CAS
AtomicInteger
ABA
无同步方案
栈封闭
线程本地存储(Thread Local Storage)
演示功能代码:
可重入代码(Reentrant Code)
锁优化
自旋锁
锁消除
锁粗化
轻量级锁
偏向锁
多线程开发良好的实践
线程实现方式
方式一:实现 Runnable 接口
Runnable 接口实例
static class RunnableImpl implements Runnable{
		@Override
		public void run() {
			// TODO Auto-generated method stub
			System.out.println("线程实现之Runnable 接口");
		}

	}
方式二:实现 Callable 接口
温馨提示:Callable 存在返回值,返回值通过 FutureTask 进行封装。
Callable 接口实例
	static class CallableImpl implements Callable{

		@Override
		public Boolean call() throws Exception {
			// TODO Auto-generated method stub
			System.out.println("线程实现之Callable 接口");
			return true;
		}

	}
方式三:继承 Thread 类
Thread 类实例
/**
	 * 温馨提示:继承Thread类,覆写run方法
	 * @author zzg
	 *
	 */
	static class ThreadImpl extends Thread{

		@Override
		public void run() {
			// TODO Auto-generated method stub
			super.run();
			System.out.println("线程实现之Thread 类");
		}
	}
演示功能代码
package com.zzg.test;

import java.util.concurrent.Callable;
import java.util.concurrent.ExecutionException;
import java.util.concurrent.FutureTask;

public class RunnableTest {
	public static void main(String[] args) {
		Thread runnableImpl = new Thread(new RunnableImpl());
		runnableImpl.start();

		Thread threadImpl = new ThreadImpl();
		threadImpl.start();

		CallableImpl callableImpl = new CallableImpl();
	    FutureTask task = new FutureTask<>(callableImpl);
	    Thread callableImplThread = new Thread(task);
	    callableImplThread.start();
	    try {
			System.out.println("是否执行成功" + task.get());
		} catch (InterruptedException e) {
			// TODO Auto-generated catch block
			e.printStackTrace();
			System.out.println("Callable 线程实现执行失败");
		} catch (ExecutionException e) {
			// TODO Auto-generated catch block
			e.printStackTrace();
			System.out.println("Callable 线程实现执行失败");
		}
	}

	static class RunnableImpl implements Runnable{
		@Override
		public void run() {
			// TODO Auto-generated method stub
			System.out.println("线程实现之Runnable 接口");
		}

	}

	/**
	 * 温馨提示:继承Thread类,覆写run方法
	 * @author zzg
	 *
	 */
	static class ThreadImpl extends Thread{

		@Override
		public void run() {
			// TODO Auto-generated method stub
			super.run();
			System.out.println("线程实现之Thread 类");
		}
	}

	static class CallableImpl implements Callable{

		@Override
		public Boolean call() throws Exception {
			// TODO Auto-generated method stub
			System.out.println("线程实现之Callable 接口");
			return true;
		}

	}

}
实现接口 VS 继承 Thread
实现接口会更好一些,因为:
- Java 不支持多重继承,因此继承了 Thread 类就无法继承其它类,但是可以实现多个接口;
- 类可能只要求可执行就行,继承整个 Thread 类开销过大。
线程机制
Executor(线程执行容器)
Executor 管理多个异步任务的执行,而无需程序员显式地管理线程的生命周期。这里的异步是指多个任务的执行互不干扰,不需要进行同步操作。
Executor(线程执行容器)实现
主要有三种 Executor:
- CachedThreadPool:一个任务创建一个线程;
- FixedThreadPool:所有任务只能使用固定大小的线程;
- SingleThreadExecutor:相当于大小为 1 的 FixedThreadPool。
CachedThreadPool 实例
/**
	 * CachedThreadPool 线程池调用
	 */
	public static void cachedThreadPoolTest(){
		 ExecutorService executorService = Executors.newCachedThreadPool();
		    for (int i = 0; i < 5; i++) {
		        executorService.execute(new RunnableImpl("CachedThreadPool"));
		    }
		    executorService.shutdown();
	}
FixedThreadPool实例
/**
	 * FixedThreadPool 线程池调用
	 */
	public static void fixedThreadPoolTest(){
		 ExecutorService executorService = Executors.newFixedThreadPool(5);
		    for (int i = 0; i < 5; i++) {
		        executorService.execute(new RunnableImpl("FixedThreadPool"));
		    }
		    executorService.shutdown();
	}
SingleThreadExecutor实例
/**
	 * SingleThreadExecutor 线程池调用
	 */
	public static void singleThreadExecutorTest(){
		 ExecutorService executorService = Executors.newSingleThreadExecutor();
		    for (int i = 0; i < 5; i++) {
		        executorService.execute(new RunnableImpl("SingleThreadExecutor"));
		    }
		    executorService.shutdown();
	}
演示功能代码
package com.zzg.test;

import java.util.concurrent.ExecutorService;
import java.util.concurrent.Executors;

public class ExecutorTest {

	public static void main(String[] args) {
		// TODO Auto-generated method stub
		cachedThreadPoolTest();
		fixedThreadPoolTest();
		singleThreadExecutorTest();
	}

	/**
	 * CachedThreadPool 线程池调用
	 */
	public static void cachedThreadPoolTest(){
		 ExecutorService executorService = Executors.newCachedThreadPool();
		    for (int i = 0; i < 5; i++) {
		        executorService.execute(new RunnableImpl("CachedThreadPool"));
		    }
		    executorService.shutdown();
	}

	/**
	 * FixedThreadPool 线程池调用
	 */
	public static void fixedThreadPoolTest(){
		 ExecutorService executorService = Executors.newFixedThreadPool(5);
		    for (int i = 0; i < 5; i++) {
		        executorService.execute(new RunnableImpl("FixedThreadPool"));
		    }
		    executorService.shutdown();
	}

	/**
	 * SingleThreadExecutor 线程池调用
	 */
	public static void singleThreadExecutorTest(){
		 ExecutorService executorService = Executors.newSingleThreadExecutor();
		    for (int i = 0; i < 5; i++) {
		        executorService.execute(new RunnableImpl("SingleThreadExecutor"));
		    }
		    executorService.shutdown();
	}

	static class RunnableImpl implements Runnable{
		private String name;

		public String getName() {
			return name;
		}

		public void setName(String name) {
			this.name = name;
		}

		public RunnableImpl(String name) {
			super();
			this.name = name;
		}

		@Override
		public void run() {
			// TODO Auto-generated method stub
			System.out.println("线程执行容器之"+this.name+"线程实现Runnabe接口");
		}

	}

}
Daemon(守护线程)
守护线程是程序运行时在后台提供服务的线程,不属于程序中不可或缺的部分。
温馨提示
- 当所有非守护线程结束时,程序也就终止,同时会杀死所有守护线程。
- main() 属于非守护线程。
Daemon(守护线程)实现方式
在线程启动之前使用 setDaemon() 方法可以将一个线程设置为守护线程。
演示功能代码:
package com.zzg.test;

public class DaemonTest {

	public static void main(String[] args) {
		// TODO Auto-generated method stub
		Thread thread = new Thread(new RunnableImpl());
		// 设置thread 线程为守护线程
		thread.setDaemon(true);
		// 守护线程启动
		thread.start();

	}

	static class RunnableImpl implements Runnable{

		@Override
		public void run() {
			// TODO Auto-generated method stub
			System.out.println("线程实现之Runnable 接口");
		}

	}

}
sleep(休眠)
Thread.sleep(millisec) 方法会休眠当前正在执行的线程,millisec 单位为毫秒。
重点注意:sleep() 可能会抛出 InterruptedException,因为异常不能跨线程传播回 main() 中,因此必须在本地进行处理。线程中抛出的其它异常也同样需要在本地进行处理。
演示功能代码:
package com.zzg.test;

import java.text.SimpleDateFormat;
import java.util.Date;

public class SleepTest {

	public static void main(String[] args) {
		// TODO Auto-generated method stub
		Thread thread = new Thread(new RunnableImpl());
		// 线程启动
		thread.start();
	}

	static class RunnableImpl implements Runnable{

		@Override
		public void run() {
			// TODO Auto-generated method stub
			SimpleDateFormat format = new SimpleDateFormat("yyyy-MM-dd hh:mm:ss");
			System.out.println("线程开始执行时间" + format.format(new Date()));
			try {
				Thread.sleep(3000);
			} catch (InterruptedException e) {
				// TODO Auto-generated catch block
				e.printStackTrace();
			}
			System.out.println("线程开始结束时间" + format.format(new Date()));
		}

	}

}
yield(线程让步)
Thread.yield() 的调用声明了当前线程已经完成了生命周期中最重要的部分,可以切换给其它线程来执行。该方法只是对线程调度器的一个建议,而且也只是建议具有相同优先级的其它线程可以运行。
演示功能代码:
package com.zzg.test;

import java.text.SimpleDateFormat;
import java.util.Date;

import com.digipower.test.SleepTest.RunnableImpl;

public class YieldTest {

	public static void main(String[] args) {
		Thread thread = new Thread(new RunnableImpl("normal Runnable"));
		Thread yieLdThread = new Thread(new YieldRunnableImpl("yidld Runnable"));
		// 设置线程等级
		//yieLdThread.setPriority(Thread.MAX_PRIORITY);
		// 线程启动
		yieLdThread.start();
		thread.start();
	}

	static class RunnableImpl implements Runnable{

		private String name;

		public String getName() {
			return name;
		}

		public void setName(String name) {
			this.name = name;
		}

		public RunnableImpl(String name) {
			super();
			this.name = name;
		}

		@Override
		public void run() {
			// TODO Auto-generated method stub
			SimpleDateFormat format = new SimpleDateFormat("yyyy-MM-dd hh:mm:ss");
			System.out.println(this.name + ",线程执行时间" + format.format(new Date()));

			try {
				Thread.sleep(3000);
			} catch (InterruptedException e) {
				// TODO Auto-generated catch block
				e.printStackTrace();
			}

			System.out.println(this.name + ",线程结束时间" + format.format(new Date()));
		}

	}

	static class YieldRunnableImpl implements Runnable{

		private String name;

		public String getName() {
			return name;
		}

		public void setName(String name) {
			this.name = name;
		}

		public YieldRunnableImpl(String name) {
			super();
			this.name = name;
		}

		@Override
		public void run() {
			// TODO Auto-generated method stub
			SimpleDateFormat format = new SimpleDateFormat("yyyy-MM-dd hh:mm:ss");
			System.out.println(this.name + ",线程执行时间" + format.format(new Date()));
			// 线程让步
			Thread.yield();

			try {
				Thread.sleep(3000);
			} catch (InterruptedException e) {
				// TODO Auto-generated catch block
				e.printStackTrace();
			}

			System.out.println(this.name + ",线程结束时间" + format.format(new Date()));
		}

	}


}
线程中断
一个线程执行完毕之后会自动结束,如果在运行过程中发生异常也会提前结束。
InterruptedException
通过调用一个线程的 interrupt() 来中断该线程,如果该线程处于阻塞、限期等待或者无限期等待状态,那么就会抛出 InterruptedException,从而提前结束该线程。但是不能中断 I/O 阻塞和 synchronized 锁阻塞。
演示功能代码:
代码片段说明:在 main() 中启动一个线程之后再中断它,由于线程中调用了 Thread.sleep() 方法,因此会抛出一个 InterruptedException,从而提前结束线程,不执行之后的语句。
package com.zzg.test;

import java.text.SimpleDateFormat;
import java.util.Date;

public class InterruptedExceptionTest {

	public static void main(String[] args) {
		Thread thread = new Thread(new RunnableImpl("interrupted Runnable"));
		thread.start();
		// 调用线程中断方法
		thread.interrupt();
		SimpleDateFormat format = new SimpleDateFormat("yyyy-MM-dd hh:mm:ss");
		System.out.println("Main run" + format.format(new Date()));

	}

	static class RunnableImpl implements Runnable {

		private String name;

		public String getName() {
			return name;
		}

		public void setName(String name) {
			this.name = name;
		}

		public RunnableImpl(String name) {
			super();
			this.name = name;
		}

		@Override
		public void run() {
			// TODO Auto-generated method stub
			SimpleDateFormat format = new SimpleDateFormat("yyyy-MM-dd hh:mm:ss");
			System.out.println(this.name + ",线程执行时间" + format.format(new Date()));

			try {
				Thread.sleep(3000);
			} catch (InterruptedException e) {
				// TODO Auto-generated catch block
				e.printStackTrace();
				// 终止线程继续运行
				return;
			}

			System.out.println(this.name + ",线程结束时间" + format.format(new Date()));
		}

	}
}
运行结果:
interrupted Runnable,线程执行时间2022-03-18 05:29:05
Main run2022-03-18 05:29:05
java.lang.InterruptedException: sleep interrupted
	at java.lang.Thread.sleep(Native Method)
	at com.digipower.test.InterruptedExceptionTest$RunnableImpl.run(InterruptedExceptionTest.java:42)
	at java.lang.Thread.run(Thread.java:745)
interrupted() 线程中断方法
问题描述:如果一个线程的 run() 方法执行一个无限循环,并且没有执行 sleep() 等会抛出 InterruptedException 的操作,那么调用线程的 interrupt() 方法就无法使线程提前结束。
问题解决办法:在线程中设置中断标记,此时调用 interrupted() 方法会返回 true。因此可以在循环体中使用 interrupted() 方法来判断线程是否处于中断状态,从而提前结束线程。
演示功能代码:
package com.zzg.test;

import java.text.SimpleDateFormat;
import java.util.Date;

public class InterruptedTest {

	public static void main(String[] args) {
		// TODO Auto-generated method stub
		Thread thread = new ThreadImpl("Interrupted  Runnabel");
		thread.start();

		// 主线程休眠
		try {
			Thread.sleep(500);
		} catch (InterruptedException e) {
			// TODO Auto-generated catch block
			e.printStackTrace();
		}
		// 调用线程的中断方法
		thread.interrupt();
		// 主线程执行完毕
		System.out.println("Main Run");
	}

	static class ThreadImpl extends Thread {

		private String threadNam;


		public String getThreadNam() {
			return threadNam;
		}

		public void setThreadNam(String threadNam) {
			this.threadNam = threadNam;
		}

		public ThreadImpl(String threadNam) {
			super();
			this.threadNam = threadNam;
		}

		@Override
		public void run() {
			// TODO Auto-generated method stub
			SimpleDateFormat format = new SimpleDateFormat("yyyy-MM-dd hh:mm:ss");
			System.out.println(this.threadNam + ",线程执行时间" + format.format(new Date()));

			 while (!interrupted()) {
				 System.out.println("我没有收到中断信息");
	         }


			System.out.println("我进入了中断线程的条件中,将要结束run方法");
			System.out.println(this.threadNam + ",线程结束时间" + format.format(new Date()));
		}

	}

}
Executor 中断操作
调用 Executor 的 shutdown() 方法会等待线程都执行完毕之后再关闭,但是如果调用的是 shutdownNow() 方法,则相当于调用每个线程的 interrupt() 方法。
演示功能代码:
package com.zzg.test;

import java.text.SimpleDateFormat;
import java.util.Date;
import java.util.concurrent.ExecutorService;
import java.util.concurrent.Executors;

public class ExecutorInterruptTest {

	public static void cachedThreadPoolTest(){
		 ExecutorService executorService = Executors.newCachedThreadPool();
		    for (int i = 0; i < 5; i++) {
		        executorService.execute(new RunnableImpl("CachedThreadPool"));
		    }
		   // 立即中断线程池中的线程
		    executorService.shutdownNow();
		   // 线程池中的线程全部执行完毕后,执行线程池关闭操作。
		   // executorService.shutdown();
	}

	public static void main(String[] args) {
		// TODO Auto-generated method stub
		cachedThreadPoolTest();
	}


	static class RunnableImpl implements Runnable{
		private String name;

		public String getName() {
			return name;
		}

		public void setName(String name) {
			this.name = name;
		}

		public RunnableImpl(String name) {
			super();
			this.name = name;
		}

		@Override
		public void run() {
			// TODO Auto-generated method stub
			System.out.println("线程执行容器之"+this.name+"线程实现Runnabe接口");
			try {
				Thread.sleep(3000);
			} catch (InterruptedException e) {
				// TODO Auto-generated catch block
				e.printStackTrace();
				System.out.println("线程执行中断操作");
				return;
			}
			SimpleDateFormat format = new SimpleDateFormat("yyyy-MM-dd HH:mm:ss");
			System.out.println("线程正常执行完毕" + format.format(new Date()));
		}

	}

}
Executor 指定线程中断
如果只想中断 Executor 中的一个线程,可以通过使用 submit() 方法来提交一个线程,它会返回一个 Future 对象,通过调用该对象的 cancel(true) 方法就可以中断线程。
演示功能代码:
package com.zzg.test;

import java.text.SimpleDateFormat;
import java.util.Date;
import java.util.concurrent.ExecutorService;
import java.util.concurrent.Executors;
import java.util.concurrent.Future;

public class ExecutorInterruptTest {

	public static void cachedThreadPoolTest(){
		 ExecutorService executorService = Executors.newCachedThreadPool();
		    for (int i = 0; i < 5; i++) {
		        executorService.execute(new RunnableImpl("CachedThreadPool"));
		    }
		   // 立即中断线程池中的线程
		    executorService.shutdownNow();
		   // 线程池中的线程全部执行完毕后,执行线程池关闭操作。
		   // executorService.shutdown();
	}

	public static void cachedThreadPoolTestInterrupt(){
		 ExecutorService executorService = Executors.newCachedThreadPool();
		    for (int i = 0; i < 5; i++) {
		    	Future future = executorService.submit(new RunnableImpl("CachedThreadPool" + i));
		    	if(i == 3){
		    		// 中断满足条件的线程
		    		future.cancel(true);
		    	}
		    }
		   // 立即中断线程池中的线程
		   // executorService.shutdownNow();
		   // 线程池中的线程全部执行完毕后,执行线程池关闭操作。
		   executorService.shutdown();
	}

	public static void main(String[] args) {
		// TODO Auto-generated method stub
		// cachedThreadPoolTest();
		cachedThreadPoolTestInterrupt();
	}


	static class RunnableImpl implements Runnable{
		private String name;

		public String getName() {
			return name;
		}

		public void setName(String name) {
			this.name = name;
		}

		public RunnableImpl(String name) {
			super();
			this.name = name;
		}

		@Override
		public void run() {
			// TODO Auto-generated method stub
			System.out.println("线程执行容器之"+this.name+"线程实现Runnabe接口");
			try {
				Thread.sleep(3000);
			} catch (InterruptedException e) {
				// TODO Auto-generated catch block
				e.printStackTrace();
				System.out.println("线程执行中断操作");
				return;
			}
			SimpleDateFormat format = new SimpleDateFormat("yyyy-MM-dd HH:mm:ss");
			System.out.println("线程正常执行完毕" + format.format(new Date()));
		}

	}

}
线程互斥同步
Java 提供了两种锁机制来控制多个线程对共享资源的互斥访问,第一个是 JVM 实现的 synchronized,而另一个是 JDK 实现的 ReentrantLock。
synchronized
同步一个代码块
语法:
public void func() {
    synchronized (this) {
        // ...
    }
}功能说明:它只作用于同一个对象,如果调用两个对象上的同步代码块,就不会进行同步。
演示功能代码:
package com.zzg.test;

import java.text.SimpleDateFormat;
import java.util.Date;
import java.util.concurrent.ExecutorService;
import java.util.concurrent.Executors;

public class SynchronizedBlockTest {

	public static void cachedThreadPoolTest(){
		 ExecutorService executorService = Executors.newCachedThreadPool();

		 SynchronizedObject object = new SynchronizedObject();
		    for (int i = 0; i < 5; i++) {
		        executorService.execute(new Synchronizedhread(object, "SynchronizedBlockThread" + i));
		    }

		   // 线程池中的线程全部执行完毕后,执行线程池关闭操作。
		   executorService.shutdown();
	}

	public static void main(String[] args) {
		// TODO Auto-generated method stub
		cachedThreadPoolTest();
	}

	static class SynchronizedObject{
		public void printNUmber(){
			synchronized (this) {
				for (int i = 0; i < 20; i++) {
					String name = Thread.currentThread().getName();
	                System.out.println(name +"正在输出数字" + i);
	                // 当前正在执行的线程进行休眠,锁不会释放
	                try {
						Thread.sleep(1000);
					} catch (InterruptedException e) {
						// TODO Auto-generated catch block
						e.printStackTrace();
						// 出现异常,立即中止当前循环
						break;
					}
	                System.out.println(name +"数字输出完毕" );
	            }
			}
		}
	}

	static class Synchronizedhread extends Thread{
		private SynchronizedObject object;

		private String threadName;

		public String getThreadName() {
			return threadName;
		}

		public void setThreadName(String threadName) {
			this.threadName = threadName;
		}

		public SynchronizedObject getObject() {
			return object;
		}

		public void setObject(SynchronizedObject object) {
			this.object = object;
		}

		public Synchronizedhread(SynchronizedObject object, String threadName) {
			super();
			this.object = object;
			this.setName(threadName);
		}

		@Override
		public void run() {
			// TODO Auto-generated method stub
			super.run();
			SimpleDateFormat format = new SimpleDateFormat("yyyy-MM-dd HH:mm:ss");
			System.out.println(this.getName() + "线程:开始启动" + format.format(new Date()));
			// 执行同步对象方法
			this.object.printNUmber();
			System.out.println(this.getName()  + "线程:运行结束" + format.format(new Date()));
		}


	}

}
同步一个方法
语法:
public synchronized void func () {
    // ...
}功能说明:它和同步代码块一样,作用于同一个对象。
同步一个类
语法:
public void func() {
    synchronized (SynchronizedExample.class) {
        // ...
    }
}功能说明:作用于整个类,也就是说两个线程调用同一个类的不同对象上的这种同步语句,也会进行同步。
演示功能代码:
package com.digipower.test;

import java.text.SimpleDateFormat;
import java.util.Date;
import java.util.concurrent.ExecutorService;
import java.util.concurrent.Executors;

public class SynchronizedClassTest {
	public static void cachedThreadPoolTest(){
		 ExecutorService executorService = Executors.newCachedThreadPool();


		    for (int i = 0; i < 5; i++) {
		    	SynchronizedObject object = new SynchronizedObject();
		        executorService.execute(new Synchronizedhread(object, "SynchronizedBlockThread" + i));
		    }

		   // 线程池中的线程全部执行完毕后,执行线程池关闭操作。
		   executorService.shutdown();
	}

	public static void main(String[] args) {
		// TODO Auto-generated method stub
		cachedThreadPoolTest();
	}

	static class SynchronizedObject{
		public void printNUmber(){
			synchronized (SynchronizedObject.class) {
				for (int i = 0; i < 10; i++) {
					String name = Thread.currentThread().getName();
	                System.out.println(name +"正在输出数字" + i);
	                // 当前正在执行的线程进行休眠,锁不会释放
	                try {
						Thread.sleep(1000);
					} catch (InterruptedException e) {
						// TODO Auto-generated catch block
						e.printStackTrace();
						// 出现异常,立即中止当前循环
						break;
					}
	                System.out.println(name +"数字输出完毕" );
	            }
			}
		}
	}

	static class Synchronizedhread extends Thread{
		private SynchronizedObject object;

		private String threadName;

		public String getThreadName() {
			return threadName;
		}

		public void setThreadName(String threadName) {
			this.threadName = threadName;
		}

		public SynchronizedObject getObject() {
			return object;
		}

		public void setObject(SynchronizedObject object) {
			this.object = object;
		}

		public Synchronizedhread(SynchronizedObject object, String threadName) {
			super();
			this.object = object;
			this.setName(threadName);
		}

		@Override
		public void run() {
			// TODO Auto-generated method stub
			super.run();
			SimpleDateFormat format = new SimpleDateFormat("yyyy-MM-dd HH:mm:ss");
			System.out.println(this.getName() + "线程:开始启动" + format.format(new Date()));
			// 执行同步对象方法
			this.object.printNUmber();
			System.out.println(this.getName()  + "线程:运行结束" + format.format(new Date()));
		}


	}
}
同步一个静态方法
语法:
public synchronized static void fun() {
    // ...
}功能说明:作用于整个类。
ReentrantLock
ReentrantLock 是 java.util.concurrent(J.U.C)包中的锁。
演示功能代码:
package com.zzg.test;

import java.text.SimpleDateFormat;
import java.util.Date;
import java.util.concurrent.ExecutorService;
import java.util.concurrent.Executors;
import java.util.concurrent.locks.Lock;
import java.util.concurrent.locks.ReentrantLock;

public class ReentrantLockTest {

	public static void cachedThreadPoolTest(){
		 ExecutorService executorService = Executors.newCachedThreadPool();


		    for (int i = 0; i < 5; i++) {
		    	ReentrantLockObject object = new ReentrantLockObject();
		        executorService.execute(new Synchronizedhread(object,  "" + i));
		    }

		   // 线程池中的线程全部执行完毕后,执行线程池关闭操作。
		   executorService.shutdown();
	}

	public static void main(String[] args) {
		// TODO Auto-generated method stub
		cachedThreadPoolTest();
	}

	static class ReentrantLockObject {
		private Lock lock = new ReentrantLock();

		public void func() {
			lock.lock();
			try {
				for (int i = 0; i < 10; i++) {
					String name = Thread.currentThread().getName();
	                System.out.println(name +"正在输出数字" + i);
	                System.out.println(name +"数字输出完毕" );
				}
			} finally {
				lock.unlock(); // 确保释放锁,从而避免发生死锁。
			}
		}
	}

	static class Synchronizedhread extends Thread{
		private ReentrantLockObject object;

		private String threadName;

		public String getThreadName() {
			return threadName;
		}

		public void setThreadName(String threadName) {
			this.threadName = threadName;
		}

		public ReentrantLockObject getObject() {
			return object;
		}

		public void setObject(ReentrantLockObject object) {
			this.object = object;
		}

		public Synchronizedhread(ReentrantLockObject object, String threadName) {
			super();
			this.object = object;
			this.setName("ReentrantLockThread"+threadName);
		}

		@Override
		public void run() {
			// TODO Auto-generated method stub
			super.run();
			SimpleDateFormat format = new SimpleDateFormat("yyyy-MM-dd HH:mm:ss");
			System.out.println(this.getName() + "线程:开始启动" + format.format(new Date()));
			// 执行同步对象方法
			this.object.func();
			System.out.println(this.getName()  + "线程:运行结束" + format.format(new Date()));
		}


	}

}
synchronized与ReentrantLock比较
1. 锁的实现
synchronized 是 JVM 实现的,而 ReentrantLock 是 JDK 实现的。
2. 性能
新版本 Java 对 synchronized 进行了很多优化,例如自旋锁等,synchronized 与 ReentrantLock 大致相同。
3. 等待可中断
当持有锁的线程长期不释放锁的时候,正在等待的线程可以选择放弃等待,改为处理其他事情。
ReentrantLock 可中断,而 synchronized 不行。
4. 公平锁
公平锁是指多个线程在等待同一个锁时,必须按照申请锁的时间顺序来依次获得锁。
synchronized 中的锁是非公平的,ReentrantLock 默认情况下也是非公平的,但是也可以是公平的。
5. 锁绑定多个条件
一个 ReentrantLock 可以同时绑定多个 Condition 对象。
推荐选择
除非需要使用 ReentrantLock 的高级功能,否则优先使用 synchronized。这是因为 synchronized 是 JVM 实现的一种锁机制,JVM 原生地支持它,而 ReentrantLock 不是所有的 JDK 版本都支持。并且使用 synchronized 不用担心没有释放锁而导致死锁问题,因为 JVM 会确保锁的释放。
线程协作
当多个线程可以一起工作去解决某个问题时,如果某些部分必须在其它部分之前完成,那么就需要对线程进行协调。
join()
在线程中调用另一个线程的 join() 方法,会将当前线程挂起,而不是忙等待,直到目标线程结束。自身才会再次执行。
演示功能代码:
演示功能说明:b 线程优先启动,但是因为在 b 线程中调用了 a 线程的 join() 方法,b 线程会等待 a 线程结束才继续执行,因此最后能够保证 a 线程的输出先于 b 线程的输出。
package com.zzg.test;

public class ThreadJoinTest {

	public static void main(String[] args) {
		// TODO Auto-generated method stub
		ThreadA a = new ThreadA();
		ThreadB b = new ThreadB(a);
		// 设置线程B,执行级别最高
		b.setPriority(Thread.MAX_PRIORITY);
		a.start();
		b.start();
	}

	static class ThreadA extends Thread {

		@Override
		public void run() {
			// TODO Auto-generated method stub
			super.run();
			System.out.println("线程A开始执行");
			try {
				Thread.sleep(3000);
			} catch (InterruptedException e) {
				// TODO Auto-generated catch block
				e.printStackTrace();
				// 线程出现异常,终止代码继续执行
				System.out.println("线程A出现中断异常");
				return;
			}
			System.out.println("线程A执行完毕");
		}

	}

	static class ThreadB extends Thread {
		private ThreadA a;

		public ThreadA getA() {
			return a;
		}

		public void setA(ThreadA a) {
			this.a = a;
		}

		public ThreadB(ThreadA a) {
			super();
			this.a = a;
		}

		@Override
		public void run() {
			// TODO Auto-generated method stub
			super.run();
			System.out.println("线程B开始执行");
			try {
				a.join();
			} catch (InterruptedException e) {
				e.printStackTrace();
				// 线程异常中断,终止代码继续执行。
				System.out.println("线程B出现中断异常");
				return;
			}
			System.out.println("线程B执行完毕");
		}

	}

}
wait() notify() notifyAll()
调用 wait() 使得线程等待某个条件满足,线程在等待时会被挂起,当其他线程的运行使得这个条件满足时,其它线程会调用 notify() 或者 notifyAll() 来唤醒挂起的线程。
它们都属于 Object 的一部分,而不属于 Thread。
只能用在同步方法或者同步控制块中使用,否则会在运行时抛出 IllegalMonitorStateException。
使用 wait() 挂起期间,线程会释放锁。这是因为,如果没有释放锁,那么其它线程就无法进入对象的同步方法或者同步控制块中,那么就无法执行 notify() 或者 notifyAll() 来唤醒挂起的线程,造成死锁。
演示功能代码
package com.zzg.test;

/**
 * 多线程模式之生产与消费者模式
 *
 * @author zzg
 *
 */
public class WaitNotifyTest {

	private static Integer count = 0;
	private static final Integer FULL = 5;
	private static Object lock = "lock";

	public static void main(String[] args) {
		// TODO Auto-generated method stub
		Thread product = new Thread(new Product());
		Thread comsumer = new Thread(new Consumer());

		product.start();
		comsumer.start();

	}

	static class Product implements Runnable{

		@Override
		public void run() {
			// TODO Auto-generated method stub
			 for (int i = 0; i < 5; i++)
	         {
	             try {
	                 Thread.sleep(1000);
	             } catch (InterruptedException e1) {
	                 // TODO Auto-generated catch block
	                 e1.printStackTrace();
	                 System.out.println("生成线程在A代码段出现中断异常");
	             }
	             synchronized (lock)
	             {
	            	 System.out.println("生产count 属性值:" + count);
	                 while (count == FULL)
	                 {
	                         try {
	                        	 System.out.println("生产线程释放锁");
	                             lock.wait();
	                         } catch (InterruptedException e) {
	                             // TODO Auto-generated catch block
	                             e.printStackTrace();
	                             System.out.println("生成线程在B代码段出现中断异常");
	                         }
	                 }
	                 count++;
	                 System.out.println(Thread.currentThread().getName() + "produce:: " + count);
	                 lock.notifyAll();
	                 System.out.println("生产线程唤醒消费线程");
	             }
	         }
		}

	}

	static class Consumer implements Runnable{

		@Override
		public void run() {
			for(int i =0; i < 5; i++){
				// 当前线程执行休眠
				try {
					Thread.sleep(1000);
				} catch (InterruptedException e) {
					// TODO Auto-generated catch block
					e.printStackTrace();
					System.out.println("当前消费者线程在A代码段出现中断异常");
				}
				// 线程公用lock对象
				synchronized (lock) {
					// 判断lock对象 调用wait 和notifyAll 方法判断条件
					while(count ==0){
						try {
							System.out.println("消费者线程释放锁");
							lock.wait();
						} catch (InterruptedException e) {
							// TODO Auto-generated catch block
							e.printStackTrace();
							System.out.println("当前消费者线程在B代码段出现中断异常");
						}
					}
					 count--;
	                 System.out.println(Thread.currentThread().getName()+ "consume:: " + count);
	                 lock.notifyAll();
	                 System.out.println("消费者线程唤醒生产者线程");
				}

			}

		}

	}

}
wait() 和 sleep() 的区别
- wait() 是 Object 的方法,而 sleep() 是 Thread 的静态方法;
- wait() 会释放锁,sleep() 不会。
await() signal() signalAll()
java.util.concurrent 类库中提供了 Condition 类来实现线程之间的协调,可以在 Condition 上调用 await() 方法使线程等待,其它线程调用 signal() 或 signalAll() 方法唤醒等待的线程。
相比于 wait() 这种等待方式,await() 可以指定等待的条件,因此更加灵活。
演示功能代码
package com.zzg.test;

import java.util.concurrent.locks.Condition;
import java.util.concurrent.locks.Lock;
import java.util.concurrent.locks.ReentrantLock;

/**
 * 多线程模式之生产与消费者模式
 *
 * @author zzg
 *
 */
public class AwaitSignalTest {

	private static Lock lock = new ReentrantLock();
    private static Condition condition = lock.newCondition();

	private static Integer count = 0;
	private static final Integer FULL = 5;

	public static void main(String[] args) {
		// TODO Auto-generated method stub
		Thread product = new Thread(new Product());
		Thread comsumer = new Thread(new Consumer());

		product.start();
		comsumer.start();
	}

	static class Product implements Runnable{

		@Override
		public void run() {
			// TODO Auto-generated method stub
			 for (int i = 0; i < 5; i++)
	         {
	             try {
	                 Thread.sleep(1000);
	             } catch (InterruptedException e1) {
	                 // TODO Auto-generated catch block
	                 e1.printStackTrace();
	                 System.out.println("生成线程在A代码段出现中断异常");
	             }
	             lock.lock();
	             try{
	            	 System.out.println("生产count 属性值:" + count);
	                 while (count == FULL)
	                 {
	                         try {
	                        	 System.out.println("生产线程释放锁");
	                        	 condition.await();
	                         } catch (InterruptedException e) {
	                             // TODO Auto-generated catch block
	                             e.printStackTrace();
	                             System.out.println("生成线程在B代码段出现中断异常");
	                         }
	                 }
	                 count++;
	                 System.out.println(Thread.currentThread().getName() + "produce:: " + count);
	                 condition.signalAll();
	                 System.out.println("生产线程唤醒消费线程");
	             }finally {
	            	 lock.unlock();
	             }
	         }
		}

	}

	static class Consumer implements Runnable{

		@Override
		public void run() {
			for(int i =0; i < 5; i++){
				// 当前线程执行休眠
				try {
					Thread.sleep(1000);
				} catch (InterruptedException e) {
					// TODO Auto-generated catch block
					e.printStackTrace();
					System.out.println("当前消费者线程在A代码段出现中断异常");
				}
				// 线程公用lock对象
				 lock.lock();
				 try{
					// 判断lock对象 调用wait 和notifyAll 方法判断条件
					while(count ==0){
						try {
							System.out.println("消费者线程释放锁");
							condition.await();
						} catch (InterruptedException e) {
							// TODO Auto-generated catch block
							e.printStackTrace();
							System.out.println("当前消费者线程在B代码段出现中断异常");
						}
					}
					 count--;
	                 System.out.println(Thread.currentThread().getName()+ "consume:: " + count);
	                 condition.signalAll();
	                 System.out.println("消费者线程唤醒生产者线程");
				}finally{
					lock.unlock();
				}

			}

		}

	}

}
线程状态
一个线程只能处于一种状态,并且这里的线程状态特指 Java 虚拟机的线程状态,不能反映线程在特定操作系统下的状态。
新建(NEW)
创建后尚未启动。
可运行(RUNABLE)
正在 Java 虚拟机中运行。但是在操作系统层面,它可能处于运行状态,也可能等待资源调度(例如处理器资源),资源调度完成就进入运行状态。所以该状态的可运行是指可以被运行,具体有没有运行要看底层操作系统的资源调度。
阻塞(BLOCKED)
请求获取 monitor lock 从而进入 synchronized 函数或者代码块,但是其它线程已经占用了该 monitor lock,所以出于阻塞状态。要结束该状态进入从而 RUNABLE 需要其他线程释放 monitor lock。
无限期等待(WAITING)
等待其它线程显式地唤醒。
阻塞和等待的区别在于,阻塞是被动的,它是在等待获取 monitor lock。而等待是主动的,通过调用 Object.wait() 等方法进入。
| 进入方法 | 退出方法 |
|---|---|
| 没有设置 Timeout 参数的 Object.wait() 方法 | Object.notify() / Object.notifyAll() |
| 没有设置 Timeout 参数的 Thread.join() 方法 | 被调用的线程执行完毕 |
| LockSupport.park() 方法 | LockSupport.unpark(Thread) |
限期等待(TIMED_WAITING)
无需等待其它线程显式地唤醒,在一定时间之后会被系统自动唤醒。
| 进入方法 | 退出方法 |
|---|---|
| Thread.sleep() 方法 | 时间结束 |
| 设置了 Timeout 参数的 Object.wait() 方法 | 时间结束 / Object.notify() / Object.notifyAll() |
| 设置了 Timeout 参数的 Thread.join() 方法 | 时间结束 / 被调用的线程执行完毕 |
| LockSupport.parkNanos() 方法 | LockSupport.unpark(Thread) |
| LockSupport.parkUntil() 方法 | LockSupport.unpark(Thread) |
调用 Thread.sleep() 方法使线程进入限期等待状态时,常常用“使一个线程睡眠”进行描述。调用 Object.wait() 方法使线程进入限期等待或者无限期等待时,常常用“挂起一个线程”进行描述。睡眠和挂起是用来描述行为,而阻塞和等待用来描述状态。
死亡(TERMINATED)
可以是线程结束任务之后自己结束,或者产生了异常而结束。
J.U.C - AQS
java.util.concurrent(J.U.C)大大提高了并发性能,AQS 被认为是 J.U.C 的核心。
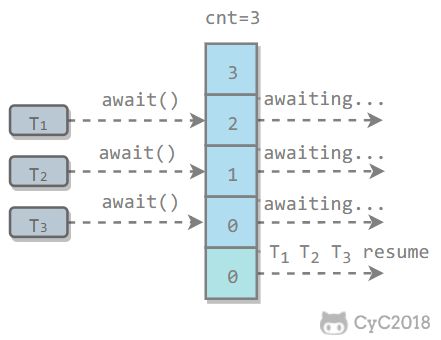
CountDownLatch
用来控制一个或者多个线程等待多个线程。
维护了一个计数器 cnt,每次调用 countDown() 方法会让计数器的值减 1,减到 0 的时候,那些因为调用 await() 方法而在等待的线程就会被唤醒。
执行图

演示功能代码
package com.zzg.test;

import java.text.SimpleDateFormat;
import java.util.Date;
import java.util.concurrent.CountDownLatch;
import java.util.concurrent.ExecutorService;
import java.util.concurrent.Executors;

public class CountDownLatchTest {

	public static final CountDownLatch latch = new CountDownLatch(5);

	public static void cachedThreadPoolTest(){
		 ExecutorService executorService = Executors.newCachedThreadPool();
		    for (int i = 0; i < 5; i++) {
		        executorService.execute(new RunnableImpl(latch, "CountDownLatchThreadPool"+i));
		    }
		    try {
				latch.await();
			} catch (InterruptedException e) {
				// TODO Auto-generated catch block
				e.printStackTrace();
				System.out.println("CountDownLatch 等待时出现线程中断异常");
			}
		   // 线程池中的线程全部执行完毕后,执行线程池关闭操作。
		   executorService.shutdown();
	}

	public static void main(String[] args) {
		// TODO Auto-generated method stub
		cachedThreadPoolTest();
		System.out.println("Main run");
	}

	static class RunnableImpl implements Runnable{
		private CountDownLatch countDownLatch;
		private String name;

		public CountDownLatch getCountDownLatch() {
			return countDownLatch;
		}

		public void setCountDownLatch(CountDownLatch countDownLatch) {
			this.countDownLatch = countDownLatch;
		}

		public String getName() {
			return name;
		}

		public void setName(String name) {
			this.name = name;
		}

		public RunnableImpl(CountDownLatch countDownLatch, String name) {
			super();
			this.countDownLatch = countDownLatch;
			this.name = name;
		}

		@Override
		public void run() {
			// TODO Auto-generated method stub
			// 计数器的值减 1
			this.countDownLatch.countDown();

			System.out.println("线程执行容器之"+this.name+"线程实现Runnabe接口");
			try {
				Thread.sleep(3000);
			} catch (InterruptedException e) {
				// TODO Auto-generated catch block
				e.printStackTrace();
				System.out.println("线程执行中断操作");
				return;
			}


			SimpleDateFormat format = new SimpleDateFormat("yyyy-MM-dd HH:mm:ss");
			System.out.println("线程正常执行完毕" + format.format(new Date()));
		}

	}


}
CyclicBarrier
用来控制多个线程互相等待,只有当多个线程都到达时,这些线程才会继续执行。
和 CountdownLatch 相似,都是通过维护计数器来实现的。线程执行 await() 方法之后计数器会减 1,并进行等待,直到计数器为 0,所有调用 await() 方法而在等待的线程才能继续执行。
CyclicBarrier 和 CountdownLatch 的一个区别是,CyclicBarrier 的计数器通过调用 reset() 方法可以循环使用,所以它才叫做循环屏障。
CyclicBarrier 有两个构造函数,其中 parties 指示计数器的初始值,barrierAction 在所有线程都到达屏障的时候会执行一次。
构造函数
public CyclicBarrier(int parties, Runnable barrierAction) {
    if (parties <= 0) throw new IllegalArgumentException();
    this.parties = parties;
    this.count = parties;
    this.barrierCommand = barrierAction;
}

public CyclicBarrier(int parties) {
    this(parties, null);
}
执行图
演示功能代码
package com.zzg.test;

import java.text.SimpleDateFormat;
import java.util.Date;
import java.util.concurrent.BrokenBarrierException;
import java.util.concurrent.CyclicBarrier;
import java.util.concurrent.ExecutorService;
import java.util.concurrent.Executors;

public class CyclicBarrierTest {

	public static final CyclicBarrier cyclicBarrier = new CyclicBarrier(5);

	public static void cachedThreadPoolTest(){
		 ExecutorService executorService = Executors.newCachedThreadPool();
		    for (int i = 0; i < 5; i++) {
		        executorService.execute(new RunnableImpl(cyclicBarrier, "CyclicBarrierThreadPool"+i));
		    }

		   // 线程池中的线程全部执行完毕后,执行线程池关闭操作。
		   executorService.shutdown();
	}

	public static void main(String[] args) {
		// TODO Auto-generated method stub
		cachedThreadPoolTest();
		System.out.println("Main run");
	}

	static class RunnableImpl implements Runnable{
		private CyclicBarrier cyclicBarrier;
		private String name;


		public CyclicBarrier getCyclicBarrier() {
			return cyclicBarrier;
		}

		public void setCyclicBarrier(CyclicBarrier cyclicBarrier) {
			this.cyclicBarrier = cyclicBarrier;
		}

		public String getName() {
			return name;
		}

		public void setName(String name) {
			this.name = name;
		}

		public RunnableImpl(CyclicBarrier cyclicBarrier, String name) {
			super();
			this.cyclicBarrier = cyclicBarrier;
			this.name = name;
		}

		@Override
		public void run() {
			// TODO Auto-generated method stub
			// 计数器的值减 1
			try {
				this.cyclicBarrier.await();
			} catch (InterruptedException e1) {
				// TODO Auto-generated catch block
				e1.printStackTrace();
				System.out.println("CyclicBarrier 线程池出现中断异常");
			} catch (BrokenBarrierException e1) {
				// TODO Auto-generated catch block
				e1.printStackTrace();
				System.out.println("CyclicBarrier 线程池出现其他线程出现中断异常,导致屏蔽异常的产生");
			}

			System.out.println("线程执行容器之"+this.name+"线程实现Runnabe接口");
			try {
				Thread.sleep(3000);
			} catch (InterruptedException e) {
				// TODO Auto-generated catch block
				e.printStackTrace();
				System.out.println("线程执行中断操作");
				return;
			}


			SimpleDateFormat format = new SimpleDateFormat("yyyy-MM-dd HH:mm:ss");
			System.out.println("线程正常执行完毕" + format.format(new Date()));
		}

	}

}
Semaphore
Semaphore 类似于操作系统中的信号量,可以控制对互斥资源的访问线程数。
演示功能代码
功能代码说明:以下代码模拟了对某个服务的并发请求,每次只能有 5 个客户端同时访问。
package com.digipower.test;

import java.text.SimpleDateFormat;
import java.util.Date;
import java.util.concurrent.CyclicBarrier;
import java.util.concurrent.ExecutorService;
import java.util.concurrent.Executors;
import java.util.concurrent.Semaphore;

import com.digipower.test.CyclicBarrierTest.RunnableImpl;

public class SemaphoreTest {

	public static final Semaphore semaphore = new Semaphore(5);

	public static void cachedThreadPoolTest(){
		 ExecutorService executorService = Executors.newCachedThreadPool();
		    for (int i = 0; i < 5; i++) {
		        executorService.execute(new RunnableImpl(semaphore, "semaphoreThreadPool"+i));
		    }

		   // 线程池中的线程全部执行完毕后,执行线程池关闭操作。
		   executorService.shutdown();
	}

	public static void main(String[] args) {
		cachedThreadPoolTest();
		System.out.println("Main run");
	}

	static class RunnableImpl implements Runnable{
		private Semaphore semaphore ;
		private String name;

		public Semaphore getSemaphore() {
			return semaphore;
		}

		public void setSemaphore(Semaphore semaphore) {
			this.semaphore = semaphore;
		}

		public String getName() {
			return name;
		}

		public void setName(String name) {
			this.name = name;
		}

		public RunnableImpl(Semaphore semaphore, String name) {
			super();
			this.semaphore = semaphore;
			this.name = name;
		}

		@Override
		public void run() {
			// TODO Auto-generated method stub
			try {
			semaphore.acquire();
            System.out.print(semaphore.availablePermits() + " ");

			System.out.println("线程执行容器之"+this.name+"线程实现Runnabe接口");

			Thread.sleep(3000);

			SimpleDateFormat format = new SimpleDateFormat("yyyy-MM-dd HH:mm:ss");
			System.out.println("线程正常执行完毕" + format.format(new Date()));
			} catch (InterruptedException e) {
				// TODO Auto-generated catch block
				e.printStackTrace();
				System.out.println("线程执行中断操作");
				return;
			}finally {
                semaphore.release();
            }


		}

	}

}
J.U.C - 其它组件
FutureTask
在介绍 Callable 时我们知道它可以有返回值,返回值通过 Future
public class FutureTaskimplements RunnableFuture public interface RunnableFuture extends Runnable, Future
FutureTask 可用于异步获取执行结果或取消执行任务的场景。当一个计算任务需要执行很长时间,那么就可以用 FutureTask 来封装这个任务,主线程在完成自己的任务之后再去获取结果。
演示功能代码:
package com.zzg.test;

import java.util.concurrent.Callable;
import java.util.concurrent.ExecutionException;
import java.util.concurrent.FutureTask;

public class FutureTaskTest {

	public static void main(String[] args) throws InterruptedException, ExecutionException {
		// TODO Auto-generated method stub
		FutureTask futureTask = new FutureTask(new Callable() {
            @Override
            public Integer call() throws Exception {
                int result = 0;
                for (int i = 0; i < 100; i++) {
                    Thread.sleep(10);
                    result += i;
                }
                return result;
            }
        });

        Thread computeThread = new Thread(futureTask);
        computeThread.start();

        System.out.println("运算结果:" + futureTask.get());
	}

}
BlockingQueue
java.util.concurrent.BlockingQueue 接口有以下阻塞队列的实现:
- FIFO 队列 :LinkedBlockingQueue、ArrayBlockingQueue(固定长度)
- 优先级队列 :PriorityBlockingQueue
提供了阻塞的 take() 和 put() 方法:如果队列为空 take() 将阻塞,直到队列中有内容;如果队列为满 put() 将阻塞,直到队列有空闲位置。
使用 BlockingQueue 实现生产者消费者模式优化
package com.zzg.test;

import java.util.concurrent.ArrayBlockingQueue;
import java.util.concurrent.BlockingQueue;

public class BlockingQueueTest {

	private static BlockingQueue queue = new ArrayBlockingQueue<>(5);
	public static void main(String[] args) {
		// TODO Auto-generated method stub
		Thread product = new Thread(new Product());
		Thread consumer = new Thread(new Consumer());
		product.start();
		consumer.start();
	}

	static class Product implements Runnable{

		@Override
		public void run() {
			// TODO Auto-generated method stub
			 for (int i = 0; i < 5; i++)
	         {
	             try {
	                 Thread.sleep(1000);
	             } catch (InterruptedException e1) {
	                 // TODO Auto-generated catch block
	                 e1.printStackTrace();
	                 System.out.println("生成线程在A代码段出现中断异常");
	             }
	             String name = "Product" + i;
	             try {
					queue.put(name);
				} catch (InterruptedException e) {
					// TODO Auto-generated catch block
					e.printStackTrace();
					System.out.println("Product 线程出现中断异常");
				}
	             System.out.println(Thread.currentThread().getName() + "produce:: " + name);

	         }
		}

	}

	static class Consumer implements Runnable{

		@Override
		public void run() {
			for(int i =0; i < 5; i++){
				// 当前线程执行休眠
				try {
					Thread.sleep(1000);
				} catch (InterruptedException e) {
					// TODO Auto-generated catch block
					e.printStackTrace();
					System.out.println("当前消费者线程在A代码段出现中断异常");
				}
				String product = null;
				try {
					 product = queue.take();
				} catch (InterruptedException e) {
					// TODO Auto-generated catch block
					e.printStackTrace();
					System.out.println("Consumer 线程出现中断异常");
				}
				 System.out.println(Thread.currentThread().getName() + "consumer:: " + product);


			}

		}

	}


}
ForkJoin
主要用于并行计算中,和 MapReduce 原理类似,都是把大的计算任务拆分成多个小任务并行计算。
演示功能代码:
package com.zzg.test;

import java.util.concurrent.ExecutionException;
import java.util.concurrent.ForkJoinPool;
import java.util.concurrent.Future;
import java.util.concurrent.RecursiveTask;

public class ForkJoinTest {

	public static void main(String[] args) throws InterruptedException, ExecutionException {
		 	ForkJoinExample example = new ForkJoinExample(1, 10000);
		    ForkJoinPool forkJoinPool = new ForkJoinPool();
		    Future result = forkJoinPool.submit(example);
		    System.out.println("运行结果:" + result.get());
	}

	static class ForkJoinExample extends RecursiveTask {

	    private final int threshold = 5;
	    private int first;
	    private int last;

	    public ForkJoinExample(int first, int last) {
	        this.first = first;
	        this.last = last;
	    }

	    @Override
	    protected Integer compute() {
	        int result = 0;
	        if (last - first <= threshold) {
	            // 任务足够小则直接计算
	            for (int i = first; i <= last; i++) {
	                result += i;
	            }
	        } else {
	            // 拆分成小任务
	            int middle = first + (last - first) / 2;
	            ForkJoinExample leftTask = new ForkJoinExample(first, middle);
	            ForkJoinExample rightTask = new ForkJoinExample(middle + 1, last);
	            leftTask.fork();
	            rightTask.fork();
	            result = leftTask.join() + rightTask.join();
	        }
	        return result;
	    }
	}

}
ForkJoin 使用 ForkJoinPool 来启动,它是一个特殊的线程池,线程数量取决于 CPU 核数。
public class ForkJoinPool extends AbstractExecutorService
ForkJoinPool 实现了工作窃取算法来提高 CPU 的利用率。每个线程都维护了一个双端队列,用来存储需要执行的任务。工作窃取算法允许空闲的线程从其它线程的双端队列中窃取一个任务来执行。窃取的任务必须是最晚的任务,避免和队列所属线程发生竞争。例如下图中,Thread2 从 Thread1 的队列中拿出最晚的 Task1 任务,Thread1 会拿出 Task2 来执行,这样就避免发生竞争。但是如果队列中只有一个任务时还是会发生竞争。

线程不安全示例
如果多个线程对同一个共享数据进行访问而不采取同步操作的话,那么操作的结果是不一致的。
以下代码演示了 1000 个线程同时对 cnt 执行自增操作,操作结束之后它的值有可能小于 1000。
package com.zzg.test;

import java.util.concurrent.CountDownLatch;
import java.util.concurrent.ExecutorService;
import java.util.concurrent.Executors;

public class ThreadUnsafeTest {

	public static final CountDownLatch latch = new CountDownLatch(1000);

	public static void cachedThreadPoolTest(){
		 ThreadUnsafe unsafe = new ThreadUnsafe();
		 ExecutorService executorService = Executors.newCachedThreadPool();
		    for (int i = 0; i < 1000; i++) {
		        executorService.execute(new RunnableImpl(unsafe, latch));
		    }
		    try {
				latch.await();
			} catch (InterruptedException e) {
				// TODO Auto-generated catch block
				e.printStackTrace();
				System.out.println("CountDownLatch 等待时出现线程中断异常");
			}
		   // 线程池中的线程全部执行完毕后,执行线程池关闭操作。
		   executorService.shutdown();
		   System.out.println(unsafe.get());
	}

	public static void main(String[] args) {
		// TODO Auto-generated method stub
		cachedThreadPoolTest();
	}

	static class ThreadUnsafe{
		 private int cnt = 0;

		    public void add() {
		        cnt++;
		    }

		    public int get() {
		        return cnt;
		    }
	}


	static class RunnableImpl implements Runnable{

		private ThreadUnsafe unsaafe;

		private CountDownLatch countDownLatch;

		public ThreadUnsafe getUnsaafe() {
			return unsaafe;
		}

		public void setUnsaafe(ThreadUnsafe unsaafe) {
			this.unsaafe = unsaafe;
		}

		public CountDownLatch getCountDownLatch() {
			return countDownLatch;
		}

		public void setCountDownLatch(CountDownLatch countDownLatch) {
			this.countDownLatch = countDownLatch;
		}

		public RunnableImpl(ThreadUnsafe unsaafe, CountDownLatch countDownLatch) {
			super();
			this.unsaafe = unsaafe;
			this.countDownLatch = countDownLatch;
		}

		@Override
		public void run() {
			// TODO Auto-generated method stub
			this.unsaafe.add();
			// 计数器的值减 1
			this.countDownLatch.countDown();
		}

	}

}
Java 内存模型
Java 内存模型试图屏蔽各种硬件和操作系统的内存访问差异,以实现让 Java 程序在各种平台下都能达到一致的内存访问效果。
主内存与工作内存
处理器上的寄存器的读写的速度比内存快几个数量级,为了解决这种速度矛盾,在它们之间加入了高速缓存。
加入高速缓存带来了一个新的问题:缓存一致性。如果多个缓存共享同一块主内存区域,那么多个缓存的数据可能会不一致,需要一些协议来解决这个问题。

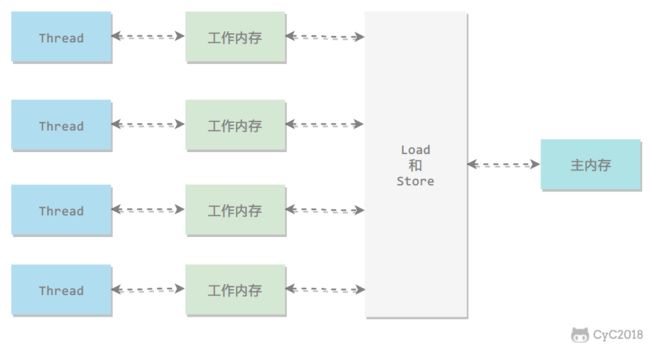
所有的变量都存储在主内存中,每个线程还有自己的工作内存,工作内存存储在高速缓存或者寄存器中,保存了该线程使用的变量的主内存副本拷贝。
线程只能直接操作工作内存中的变量,不同线程之间的变量值传递需要通过主内存来完成。
内存间交互操作
Java 内存模型定义了 8 个操作来完成主内存和工作内存的交互操作。

- read:把一个变量的值从主内存传输到工作内存中
- load:在 read 之后执行,把 read 得到的值放入工作内存的变量副本中
- use:把工作内存中一个变量的值传递给执行引擎
- assign:把一个从执行引擎接收到的值赋给工作内存的变量
- store:把工作内存的一个变量的值传送到主内存中
- write:在 store 之后执行,把 store 得到的值放入主内存的变量中
- lock:作用于主内存的变量
- unlock
内存模型三大特性
原子性
Java 内存模型保证了 read、load、use、assign、store、write、lock 和 unlock 操作具有原子性,例如对一个 int 类型的变量执行 assign 赋值操作,这个操作就是原子性的。但是 Java 内存模型允许虚拟机将没有被 volatile 修饰的 64 位数据(long,double)的读写操作划分为两次 32 位的操作来进行,即 load、store、read 和 write 操作可以不具备原子性。
有一个错误认识就是,int 等原子性的类型在多线程环境中不会出现线程安全问题。前面的线程不安全示例代码中,cnt 属于 int 类型变量,1000 个线程对它进行自增操作之后,得到的值为 997 而不是 1000。
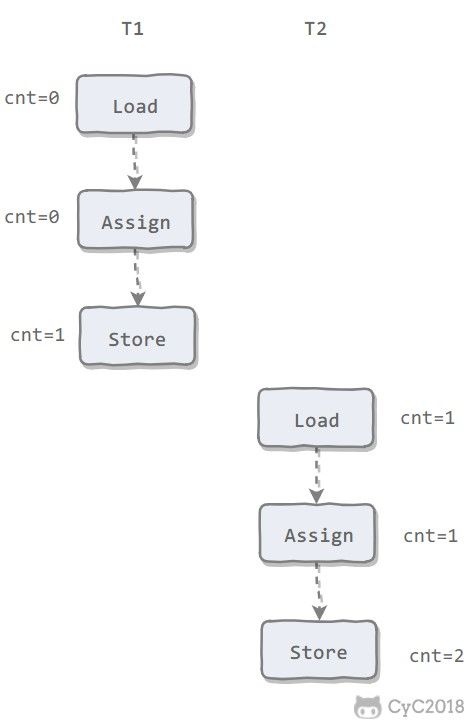
为了方便讨论,将内存间的交互操作简化为 3 个:load、assign、store。
下图演示了两个线程同时对 cnt 进行操作,load、assign、store 这一系列操作整体上看不具备原子性,那么在 T1 修改 cnt 并且还没有将修改后的值写入主内存,T2 依然可以读入旧值。可以看出,这两个线程虽然执行了两次自增运算,但是主内存中 cnt 的值最后为 1 而不是 2。因此对 int 类型读写操作满足原子性只是说明 load、assign、store 这些单个操作具备原子性。

AtomicInteger 能保证多个线程修改的原子性。
使用 AtomicInteger 重写之前线程不安全的代码之后得到以下线程安全实现:
package com.digipower.test;

import java.util.concurrent.CountDownLatch;
import java.util.concurrent.ExecutorService;
import java.util.concurrent.Executors;
import java.util.concurrent.atomic.AtomicInteger;

public class AtomicIntegerTest {
	public static final CountDownLatch latch = new CountDownLatch(1000);

	public static void cachedThreadPoolTest(){
		 ThreadUnsafe unsafe = new ThreadUnsafe();
		 ExecutorService executorService = Executors.newCachedThreadPool();
		    for (int i = 0; i < 1000; i++) {
		        executorService.execute(new RunnableImpl(unsafe, latch));
		    }
		    try {
				latch.await();
			} catch (InterruptedException e) {
				// TODO Auto-generated catch block
				e.printStackTrace();
				System.out.println("CountDownLatch 等待时出现线程中断异常");
			}
		   // 线程池中的线程全部执行完毕后,执行线程池关闭操作。
		   executorService.shutdown();
		   System.out.println(unsafe.get());
	}

	public static void main(String[] args) {
		// TODO Auto-generated method stub
		cachedThreadPoolTest();
	}

	static class ThreadUnsafe{
		 private AtomicInteger cnt = new AtomicInteger();

		    public void add() {
		    	 cnt.incrementAndGet();;
		    }

		    public int get() {
		        return cnt.get();
		    }
	}


	static class RunnableImpl implements Runnable{

		private ThreadUnsafe unsaafe;

		private CountDownLatch countDownLatch;

		public ThreadUnsafe getUnsaafe() {
			return unsaafe;
		}

		public void setUnsaafe(ThreadUnsafe unsaafe) {
			this.unsaafe = unsaafe;
		}

		public CountDownLatch getCountDownLatch() {
			return countDownLatch;
		}

		public void setCountDownLatch(CountDownLatch countDownLatch) {
			this.countDownLatch = countDownLatch;
		}

		public RunnableImpl(ThreadUnsafe unsaafe, CountDownLatch countDownLatch) {
			super();
			this.unsaafe = unsaafe;
			this.countDownLatch = countDownLatch;
		}

		@Override
		public void run() {
			// TODO Auto-generated method stub
			this.unsaafe.add();
			// 计数器的值减 1
			this.countDownLatch.countDown();
		}

	}
}
除了使用原子类之外,也可以使用 synchronized 互斥锁来保证操作的原子性。它对应的内存间交互操作为:lock 和 unlock,在虚拟机实现上对应的字节码指令为 monitorenter 和 monitorexit。
package com.zzg.test;

import java.util.concurrent.CountDownLatch;
import java.util.concurrent.ExecutorService;
import java.util.concurrent.Executors;

public class ThreadSafe {

	public static final CountDownLatch latch = new CountDownLatch(1000);

	public static void cachedThreadPoolTest(){
		 ThreadUnsafe unsafe = new ThreadUnsafe();
		 ExecutorService executorService = Executors.newCachedThreadPool();
		    for (int i = 0; i < 1000; i++) {
		        executorService.execute(new RunnableImpl(unsafe, latch));
		    }
		    try {
				latch.await();
			} catch (InterruptedException e) {
				// TODO Auto-generated catch block
				e.printStackTrace();
				System.out.println("CountDownLatch 等待时出现线程中断异常");
			}
		   // 线程池中的线程全部执行完毕后,执行线程池关闭操作。
		   executorService.shutdown();
		   System.out.println(unsafe.get());
	}

	public static void main(String[] args) {
		// TODO Auto-generated method stub
		cachedThreadPoolTest();
	}

	static class ThreadUnsafe{
		 private int cnt = 0;

		    public synchronized void add() {
		        cnt++;
		    }

		    public synchronized int get() {
		        return cnt;
		    }
	}


	static class RunnableImpl implements Runnable{

		private ThreadUnsafe unsaafe;

		private CountDownLatch countDownLatch;

		public ThreadUnsafe getUnsaafe() {
			return unsaafe;
		}

		public void setUnsaafe(ThreadUnsafe unsaafe) {
			this.unsaafe = unsaafe;
		}

		public CountDownLatch getCountDownLatch() {
			return countDownLatch;
		}

		public void setCountDownLatch(CountDownLatch countDownLatch) {
			this.countDownLatch = countDownLatch;
		}

		public RunnableImpl(ThreadUnsafe unsaafe, CountDownLatch countDownLatch) {
			super();
			this.unsaafe = unsaafe;
			this.countDownLatch = countDownLatch;
		}

		@Override
		public void run() {
			// TODO Auto-generated method stub
			this.unsaafe.add();
			// 计数器的值减 1
			this.countDownLatch.countDown();
		}

	}

}
可见性
可见性指当一个线程修改了共享变量的值,其它线程能够立即得知这个修改。Java 内存模型是通过在变量修改后将新值同步回主内存,在变量读取前从主内存刷新变量值来实现可见性的。
主要有三种实现可见性的方式:
- volatile
- synchronized,对一个变量执行 unlock 操作之前,必须把变量值同步回主内存。
- final,被 final 关键字修饰的字段在构造器中一旦初始化完成,并且没有发生 this 逃逸(其它线程通过 this 引用访问到初始化了一半的对象),那么其它线程就能看见 final 字段的值。
对前面的线程不安全示例中的 cnt 变量使用 volatile 修饰,不能解决线程不安全问题,因为 volatile 并不能保证操作的原子性。
有序性
有序性是指:在本线程内观察,所有操作都是有序的。在一个线程观察另一个线程,所有操作都是无序的,无序是因为发生了指令重排序。在 Java 内存模型中,允许编译器和处理器对指令进行重排序,重排序过程不会影响到单线程程序的执行,却会影响到多线程并发执行的正确性。
volatile 关键字通过添加内存屏障的方式来禁止指令重排,即重排序时不能把后面的指令放到内存屏障之前。
也可以通过 synchronized 来保证有序性,它保证每个时刻只有一个线程执行同步代码,相当于是让线程顺序执行同步代码。
先行发生原则
上面提到了可以用 volatile 和 synchronized 来保证有序性。除此之外,JVM 还规定了先行发生原则,让一个操作无需控制就能先于另一个操作完成。
单一线程原则
在一个线程内,在程序前面的操作先行发生于后面的操作。

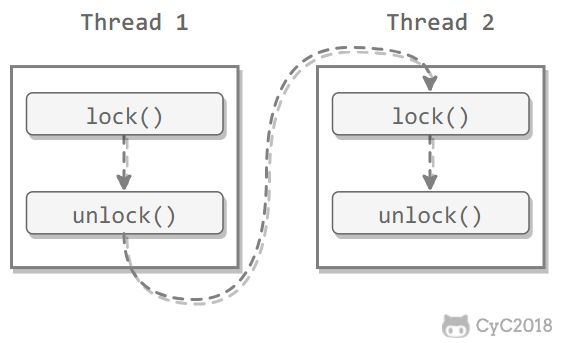
管程锁定规则
一个 unlock 操作先行发生于后面对同一个锁的 lock 操作。
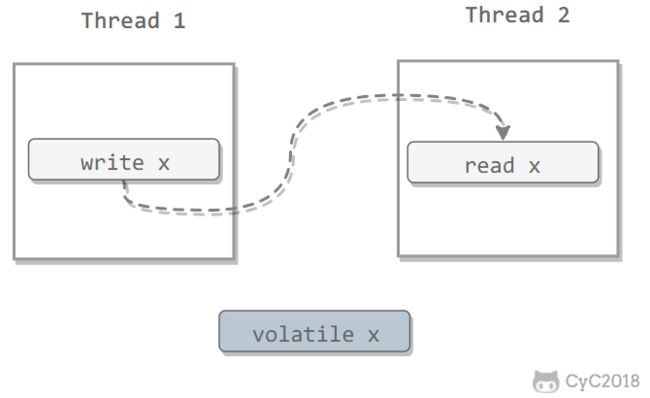
volatile 变量规则
对一个 volatile 变量的写操作先行发生于后面对这个变量的读操作。
线程启动规则
Thread 对象的 start() 方法调用先行发生于此线程的每一个动作。

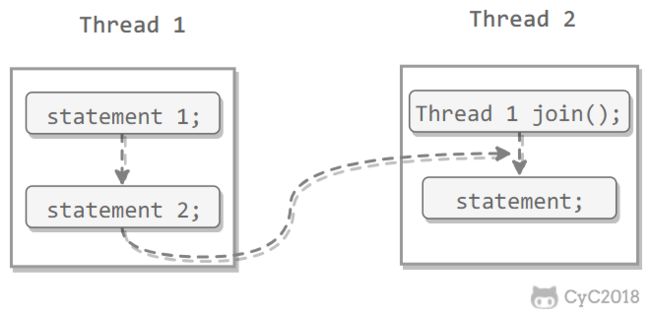
线程加入规则
Thread 对象的结束先行发生于 join() 方法返回。
线程中断规则
对线程 interrupt() 方法的调用先行发生于被中断线程的代码检测到中断事件的发生,可以通过 interrupted() 方法检测到是否有中断发生。
对象终结规则
一个对象的初始化完成(构造函数执行结束)先行发生于它的 finalize() 方法的开始。
传递性
如果操作 A 先行发生于操作 B,操作 B 先行发生于操作 C,那么操作 A 先行发生于操作 C。
线程安全
多个线程不管以何种方式访问某个类,并且在主调代码中不需要进行同步,都能表现正确的行为。
线程安全有以下几种实现方式:
不可变
不可变(Immutable)的对象一定是线程安全的,不需要再采取任何的线程安全保障措施。只要一个不可变的对象被正确地构建出来,永远也不会看到它在多个线程之中处于不一致的状态。多线程环境下,应当尽量使对象成为不可变,来满足线程安全。
不可变的类型:
- final 关键字修饰的基本数据类型
- String
- 枚举类型
- Number 部分子类,如 Long 和 Double 等数值包装类型,BigInteger 和 BigDecimal 等大数据类型。但同为 Number 的原子类 AtomicInteger 和 AtomicLong 则是可变的。
对于集合类型,可以使用 Collections.unmodifiableXXX() 方法来获取一个不可变的集合。
演示功能代码:
package com.zzg.test;

import java.util.Collections;
import java.util.HashMap;
import java.util.Map;

public class ImmutableMapTest {

	public static void main(String[] args) {
		// TODO Auto-generated method stub
		Map map = new HashMap();
		map.put("key", "value");
		// 使用 Collections.unmodifiableXXX() 方法来获取一个不可变的集合
		Map immutableMap = Collections.unmodifiableMap(map);
		// java8 遍历输出Map内容
		immutableMap.forEach((k,v)->{
			System.out.println("map key值" + k);
			System.out.println("map value值" + v.toString());
		});
	}

}
温馨提示:Collections.unmodifiableXXX() 先对原始的集合进行拷贝,如果对集合进行修改的方法都直接抛出异常。
源码定义
public V put(K key, V value) {
    throw new UnsupportedOperationException();
}
演示功能代码:
package com.zzg.test;

import java.util.Collections;
import java.util.HashMap;
import java.util.Map;

public class ImmutableMapTest {

	public static void main(String[] args) {
		// TODO Auto-generated method stub
		Map map = new HashMap();
		map.put("key", "value");
		// 使用 Collections.unmodifiableXXX() 方法来获取一个不可变的集合
		Map immutableMap = Collections.unmodifiableMap(map);
		// java8 遍历输出Map内容
		immutableMap.forEach((k,v)->{
			System.out.println("map key值" + k);
			System.out.println("map value值" + v.toString());
		});

		// 针对一个不可变的集合,进行新增修改删除操作,会提示异常
		immutableMap.put("1", "1");
	}

}
Exception in thread "main" java.lang.UnsupportedOperationException
	at java.util.Collections$UnmodifiableMap.put(Collections.java:1457)
	at com.zzg.test.ImmutableMapTest.main(ImmutableMapTest.java:22)
互斥同步
synchronized 和 ReentrantLock。
非阻塞同步
互斥同步最主要的问题就是线程阻塞和唤醒所带来的性能问题,因此这种同步也称为阻塞同步。
互斥同步属于一种悲观的并发策略,总是认为只要不去做正确的同步措施,那就肯定会出现问题。无论共享数据是否真的会出现竞争,它都要进行加锁(这里讨论的是概念模型,实际上虚拟机会优化掉很大一部分不必要的加锁)、用户态核心态转换、维护锁计数器和检查是否有被阻塞的线程需要唤醒等操作。
随着硬件指令集的发展,我们可以使用基于冲突检测的乐观并发策略:先进行操作,如果没有其它线程争用共享数据,那操作就成功了,否则采取补偿措施(不断地重试,直到成功为止)。这种乐观的并发策略的许多实现都不需要将线程阻塞,因此这种同步操作称为非阻塞同步。
CAS
乐观锁需要操作和冲突检测这两个步骤具备原子性,这里就不能再使用互斥同步来保证了,只能靠硬件来完成。硬件支持的原子性操作最典型的是:比较并交换(Compare-and-Swap,CAS)。CAS 指令需要有 3 个操作数,分别是内存地址 V、旧的预期值 A 和新值 B。当执行操作时,只有当 V 的值等于 A,才将 V 的值更新为 B。
AtomicInteger
J.U.C 包里面的整数原子类 AtomicInteger 的方法调用了 Unsafe 类的 CAS 操作。
演示功能代码:使用 AtomicInteger 执行自增操作。
private AtomicInteger cnt = new AtomicInteger();

public void add() {
    cnt.incrementAndGet();
}
以下代码是 incrementAndGet() 的源码,它调用了 Unsafe 的 getAndAddInt() 。
public final int incrementAndGet() {
    return unsafe.getAndAddInt(this, valueOffset, 1) + 1;
}
以下代码是 getAndAddInt() 源码,var1 指示对象内存地址,var2 指示该字段相对对象内存地址的偏移,var4 指示操作需要加的数值,这里为 1。通过 getIntVolatile(var1, var2) 得到旧的预期值,通过调用 compareAndSwapInt() 来进行 CAS 比较,如果该字段内存地址中的值等于 var5,那么就更新内存地址为 var1+var2 的变量为 var5+var4。
可以看到 getAndAddInt() 在一个循环中进行,发生冲突的做法是不断的进行重试。
public final int getAndAddInt(Object var1, long var2, int var4) {
    int var5;
    do {
        var5 = this.getIntVolatile(var1, var2);
    } while(!this.compareAndSwapInt(var1, var2, var5, var5 + var4));

    return var5;
}
ABA
如果一个变量初次读取的时候是 A 值,它的值被改成了 B,后来又被改回为 A,那 CAS 操作就会误认为它从来没有被改变过。
J.U.C 包提供了一个带有标记的原子引用类 AtomicStampedReference 来解决这个问题,它可以通过控制变量值的版本来保证 CAS 的正确性。大部分情况下 ABA 问题不会影响程序并发的正确性,如果需要解决 ABA 问题,改用传统的互斥同步可能会比原子类更高效。
无同步方案
要保证线程安全,并不是一定就要进行同步。如果一个方法本来就不涉及共享数据,那它自然就无须任何同步措施去保证正确性。
栈封闭
多个线程访问同一个方法的局部变量时,不会出现线程安全问题,因为局部变量存储在虚拟机栈中,属于线程私有的。
public class StackTest{
static class StackClosedExample {
    public void add100() {
        int cnt = 0;
        for (int i = 0; i < 100; i++) {
            cnt++;
        }
        System.out.println(cnt);
    }
}

public static void main(String[] args) {
    StackClosedExample example = new StackClosedExample();
    ExecutorService executorService = Executors.newCachedThreadPool();
    executorService.execute(() -> example.add100());
    executorService.execute(() -> example.add100());
    executorService.shutdown();
}
}
线程本地存储(Thread Local Storage)
如果一段代码中所需要的数据必须与其他代码共享,那就看看这些共享数据的代码是否能保证在同一个线程中执行。如果能保证,我们就可以把共享数据的可见范围限制在同一个线程之内,这样,无须同步也能保证线程之间不出现数据争用的问题。
符合这种特点的应用并不少见,大部分使用消费队列的架构模式(如“生产者-消费者”模式)都会将产品的消费过程尽量在一个线程中消费完。其中最重要的一个应用实例就是经典 Web 交互模型中的“一个请求对应一个服务器线程”(Thread-per-Request)的处理方式,这种处理方式的广泛应用使得很多 Web 服务端应用都可以使用线程本地存储来解决线程安全问题。
可以使用 java.lang.ThreadLocal 类来实现线程本地存储功能。
演示功能代码:
功能代码说明:以下代码,one中设置 threadLocal 为 1,而 two设置 threadLocal 为 2。过了一段时间之后,one读取 threadLocal 依然是 1,不受 two的影响。
package com.zzg.test;

public class ThreadLocalTest {

	public static void main(String[] args) {
		// TODO Auto-generated method stub
		ThreadLocal local = new ThreadLocal();

		Thread one =new Thread(()->{
			// ThreadLocal 设置值
			local.set(1);
			// 当前线程休眠5秒
			try {
				Thread.sleep(5000);
			} catch (Exception e) {
				// TODO Auto-generated catch block
				e.printStackTrace();
				System.out.println("当前线程出现中断异常");
			}
			System.out.println("获取当前Thread的ThreadLocal存储值:" + local.get());
			// 当前线程移除ThreadLocal设置值
			local.remove();

		});

		Thread two =new Thread(()->{
			// ThreadLocal 设置值
			local.set(2);
			// 当前线程移除ThreadLocal设置值
			local.remove();
		});

		one.start();
		two.start();

	}

}
为了加深ThreadLocal的理解,请看如下流程图
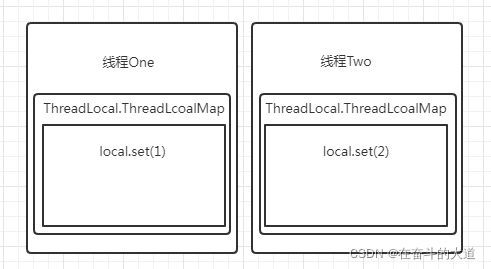
每个 Thread 都有一个 ThreadLocal.ThreadLocalMap 对象。
/* ThreadLocal values pertaining to this thread. This map is maintained
 * by the ThreadLocal class. */
ThreadLocal.ThreadLocalMap threadLocals = null;
当调用一个 ThreadLocal 的 set(T value) 方法时,先得到当前线程的 ThreadLocalMap 对象,然后将 ThreadLocal->value 键值对插入到该 Map 中。
public void set(T value) {
    Thread t = Thread.currentThread();
    ThreadLocalMap map = getMap(t);
    if (map != null)
        map.set(this, value);
    else
        createMap(t, value);
}
get() 方法类似。
public T get() {
    Thread t = Thread.currentThread();
    ThreadLocalMap map = getMap(t);
    if (map != null) {
        ThreadLocalMap.Entry e = map.getEntry(this);
        if (e != null) {
            @SuppressWarnings("unchecked")
            T result = (T)e.value;
            return result;
        }
    }
    return setInitialValue();
}
ThreadLocal 从理论上讲并不是用来解决多线程并发问题的,因为根本不存在多线程竞争。
在一些场景 (尤其是使用线程池) 下,由于 ThreadLocal.ThreadLocalMap 的底层数据结构导致 ThreadLocal 有内存泄漏的情况,应该尽可能在每次使用 ThreadLocal 后手动调用 remove(),以避免出现 ThreadLocal 经典的内存泄漏甚至是造成自身业务混乱的风险。
可重入代码(Reentrant Code)
这种代码也叫做纯代码(Pure Code),可以在代码执行的任何时刻中断它,转而去执行另外一段代码(包括递归调用它本身),而在控制权返回后,原来的程序不会出现任何错误。
可重入代码有一些共同的特征,例如不依赖存储在堆上的数据和公用的系统资源、用到的状态量都由参数中传入、不调用非可重入的方法等。
锁优化
锁优化主要是指 JVM 对 synchronized 的优化。
自旋锁
互斥同步进入阻塞状态的开销都很大,应该尽量避免。在许多应用中,共享数据的锁定状态只会持续很短的一段时间。自旋锁的思想是让一个线程在请求一个共享数据的锁时执行忙循环(自旋)一段时间,如果在这段时间内能获得锁,就可以避免进入阻塞状态。
自旋锁虽然能避免进入阻塞状态从而减少开销,但是它需要进行忙循环操作占用 CPU 时间,它只适用于共享数据的锁定状态很短的场景。
在 JDK 1.6 中引入了自适应的自旋锁。自适应意味着自旋的次数不再固定了,而是由前一次在同一个锁上的自旋次数及锁的拥有者的状态来决定。
锁消除
锁消除是指对于被检测出不可能存在竞争的共享数据的锁进行消除。
锁消除主要是通过逃逸分析来支持,如果堆上的共享数据不可能逃逸出去被其它线程访问到,那么就可以把它们当成私有数据对待,也就可以将它们的锁进行消除。
对于一些看起来没有加锁的代码,其实隐式的加了很多锁。例如下面的字符串拼接代码就隐式加了锁:
public static String concatString(String s1, String s2, String s3) {
    return s1 + s2 + s3;
}
String 是一个不可变的类,编译器会对 String 的拼接自动优化。在 JDK 1.5 之前,会转化为 StringBuffer 对象的连续 append() 操作:
public static String concatString(String s1, String s2, String s3) {
    StringBuffer sb = new StringBuffer();
    sb.append(s1);
    sb.append(s2);
    sb.append(s3);
    return sb.toString();
}
每个 append() 方法中都有一个同步块。虚拟机观察变量 sb,很快就会发现它的动态作用域被限制在 concatString() 方法内部。也就是说,sb 的所有引用永远不会逃逸到 concatString() 方法之外,其他线程无法访问到它,因此可以进行消除。
锁粗化
如果一系列的连续操作都对同一个对象反复加锁和解锁,频繁的加锁操作就会导致性能损耗。
上一节的示例代码中连续的 append() 方法就属于这类情况。如果虚拟机探测到由这样的一串零碎的操作都对同一个对象加锁,将会把加锁的范围扩展(粗化)到整个操作序列的外部。对于上一节的示例代码就是扩展到第一个 append() 操作之前直至最后一个 append() 操作之后,这样只需要加锁一次就可以了。
轻量级锁
JDK 1.6 引入了偏向锁和轻量级锁,从而让锁拥有了四个状态:无锁状态(unlocked)、偏向锁状态(biasble)、轻量级锁状态(lightweight locked)和重量级锁状态(inflated)。
以下是 HotSpot 虚拟机对象头的内存布局,这些数据被称为 Mark Word。其中 tag bits 对应了五个状态,这些状态在右侧的 state 表格中给出。除了 marked for gc 状态,其它四个状态已经在前面介绍过了。

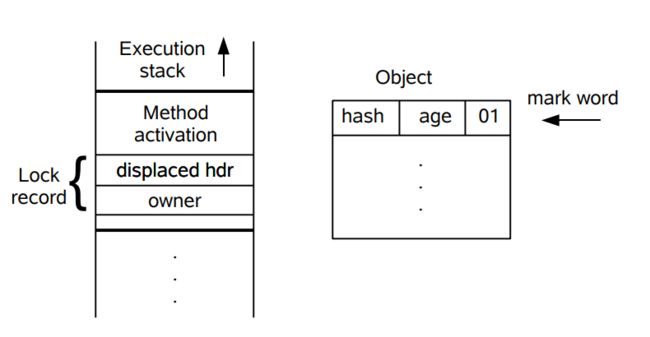
下图左侧是一个线程的虚拟机栈,其中有一部分称为 Lock Record 的区域,这是在轻量级锁运行过程创建的,用于存放锁对象的 Mark Word。而右侧就是一个锁对象,包含了 Mark Word 和其它信息。
轻量级锁是相对于传统的重量级锁而言,它使用 CAS 操作来避免重量级锁使用互斥量的开销。对于绝大部分的锁,在整个同步周期内都是不存在竞争的,因此也就不需要都使用互斥量进行同步,可以先采用 CAS 操作进行同步,如果 CAS 失败了再改用互斥量进行同步。
当尝试获取一个锁对象时,如果锁对象标记为 0 01,说明锁对象的锁未锁定(unlocked)状态。此时虚拟机在当前线程的虚拟机栈中创建 Lock Record,然后使用 CAS 操作将对象的 Mark Word 更新为 Lock Record 指针。如果 CAS 操作成功了,那么线程就获取了该对象上的锁,并且对象的 Mark Word 的锁标记变为 00,表示该对象处于轻量级锁状态。
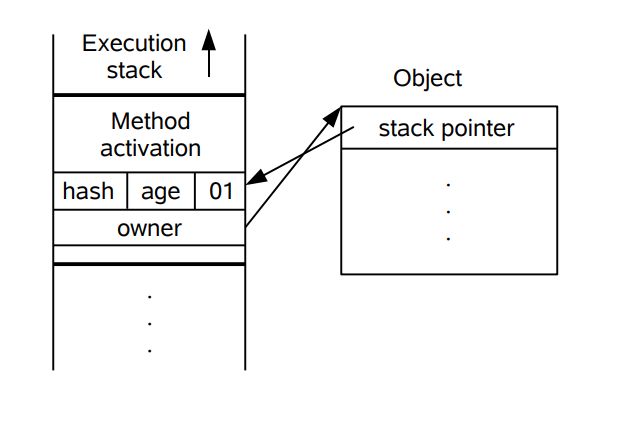
如果 CAS 操作失败了,虚拟机首先会检查对象的 Mark Word 是否指向当前线程的虚拟机栈,如果是的话说明当前线程已经拥有了这个锁对象,那就可以直接进入同步块继续执行,否则说明这个锁对象已经被其他线程线程抢占了。如果有两条以上的线程争用同一个锁,那轻量级锁就不再有效,要膨胀为重量级锁。
偏向锁
偏向锁的思想是偏向于让第一个获取锁对象的线程,这个线程在之后获取该锁就不再需要进行同步操作,甚至连 CAS 操作也不再需要。
当锁对象第一次被线程获得的时候,进入偏向状态,标记为 1 01。同时使用 CAS 操作将线程 ID 记录到 Mark Word 中,如果 CAS 操作成功,这个线程以后每次进入这个锁相关的同步块就不需要再进行任何同步操作。
当有另外一个线程去尝试获取这个锁对象时,偏向状态就宣告结束,此时撤销偏向(Revoke Bias)后恢复到未锁定状态或者轻量级锁状态

多线程开发良好的实践
-
给线程起个有意义的名字,这样可以方便找 Bug。
-
缩小同步范围,从而减少锁争用。例如对于 synchronized,应该尽量使用同步块而不是同步方法。
-
多用同步工具少用 wait() 和 notify()。首先,CountDownLatch, CyclicBarrier, Semaphore 和 Exchanger 这些同步类简化了编码操作,而用 wait() 和 notify() 很难实现复杂控制流;其次,这些同步类是由最好的企业编写和维护,在后续的 JDK 中还会不断优化和完善。
-
使用 BlockingQueue 实现生产者消费者问题。
-
多用并发集合少用同步集合,例如应该使用 ConcurrentHashMap 而不是 Hashtable。
-
使用本地变量和不可变类来保证线程安全。
-
使用线程池而不是直接创建线程,这是因为创建线程代价很高,线程池可以有效地利用有限的线程来启动任务。
本文参考Git地址:https://github.com/CyC2018/CS-Notes/blob/master/notes/Java%20%E5%B9%B6%E5%8F%91.md#%E6%97%A0%E5%90%8C%E6%AD%A5%E6%96%B9%E6%A1%88