机器学习笔记 - YOLOv7 论文简述与推理
一、概述
YOLO 系列对象检测模型已经取得了长足的进步。 YOLOv7 是这个著名的基于锚的单次目标检测器系列的最新成员。 它带来了一系列改进,包括最先进的准确性和速度。
以 COCO 数据集为基准,YOLOv7 tiny 模型实现了 35% 以上的 mAP,YOLOv7(正常)模型实现了 51% 以上的 mAP。
论文地址
https://arxiv.org/pdf/2207.02696v1.pdf![]() https://arxiv.org/pdf/2207.02696v1.pdf YOLOv7 是 YOLO 系列中最先进的新型物体检测器。根据 YOLOv7 论文,它是迄今为止最快、最准确的实时物体检测器。YOLOv7 通过将其性能提升一个档次建立了一个重要的基准。从YOLOv4开始,在极短的时间内,我们看到YOLO家族的新成员不断涌现。每个版本都引入了一些新的东西来提高性能。
https://arxiv.org/pdf/2207.02696v1.pdf YOLOv7 是 YOLO 系列中最先进的新型物体检测器。根据 YOLOv7 论文,它是迄今为止最快、最准确的实时物体检测器。YOLOv7 通过将其性能提升一个档次建立了一个重要的基准。从YOLOv4开始,在极短的时间内,我们看到YOLO家族的新成员不断涌现。每个版本都引入了一些新的东西来提高性能。
二、一般的 YOLO 架构
最初YOLO架构基于FCNN(全连接神经网络)。然而,基于 Transformer 的版本最近也被添加到了 YOLO 系列中。暂时先关注基于 FCNN(全卷积神经网络)的 YOLO 目标检测器。
YOLO 框架具有三个主要组件。
Backbone主要提取图像的基本特征,并通过Neck将它们馈送到Head。Neck收集由Backbone提取的特征图并创建特征金字塔。最后,头部由具有最终检测的输出层组成。下表显示了 YOLOv4、YOLOv4 和 YOLOv5 的架构。
三、YOLOv7 架构
YOLOv7 通过引入多项架构改革提高了速度和准确性。与 Scaled YOLOv4 类似,YOLOv7 主干不使用 ImageNet 预训练的主干。相反,模型完全使用 COCO 数据集进行训练。
1、YOLOv7论文中的E-ELAN
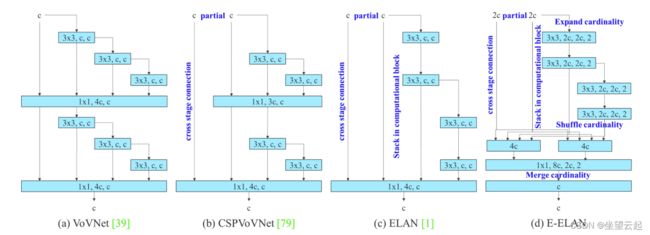
E-ELAN 是 YOLOv7 主干中的计算块。简单来说,E-ELAN 架构使框架能够更好地学习。它基于 ELAN 计算块。
2、YOLOv7 中的复合模型缩放
不同的应用需要不同的模型。虽然有些人需要高度准确的模型,但有些人优先考虑速度。执行模型缩放以适应这些要求并使其适合各种计算设备。
在缩放模型大小时,会考虑以下参数。
分辨率(输入图像的大小)、宽度(通道数)、深度(层数)、阶段(特征金字塔的数量)
NAS(Network Architecture Search)是一种常用的模型缩放方法。研究人员使用它来迭代参数以找到最佳比例因子。但是,像 NAS 这样的方法会进行参数特定的缩放。在这种情况下,比例因子是独立的。
YOLOv7 论文的作者表明,它可以通过复合模型缩放方法进一步优化。在这里,对于基于连接的模型,宽度和深度是连贯地缩放的。
3、YOLOv7 中Bag of Freebies
重新参数化是训练后用于改进模型的一种技术。它增加了训练时间,但提高了推理结果。有两种类型的重新参数化用于最终确定模型,模型级和模块级集成。
模型级别的重新参数化可以通过以下两种方式完成。
使用不同的训练数据但相同的设置,训练多个模型。然后平均它们的权重以获得最终模型。
取不同时期模型权重的平均值。
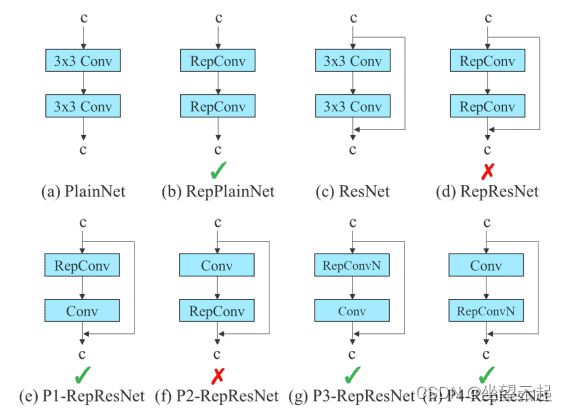
最近,模块级别的重新参数化在研究中获得了很大的关注。在这种方法中,模型训练过程被分成多个模块。输出被集成以获得最终模型。YOLOv7 论文中的作者展示了执行模块级集成的最佳方法(如下所示)。
在上图中,E-ELAN 计算块的 3×3 卷积层被替换为 RepConv 层。通过切换或替换 RepConv、3×3 Conv 和 Identity 连接的位置来进行实验。上面显示的残余旁路箭头是一个身份连接。它只不过是一个 1×1 的卷积层。
三、YOLOv7 实验和结果
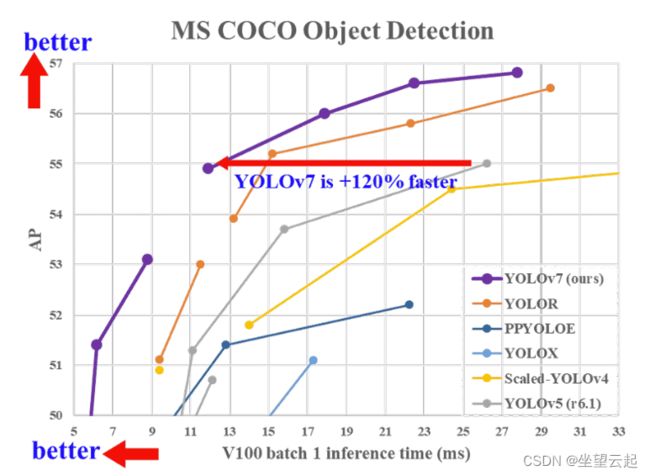
所有 YOLOv7 模型在 5 FPS 到 160 FPS 范围内的速度和精度都超过了之前的物体检测器。下图说明了 YOLOv7 模型与其他模型相比的平均精度 (AP) 和速度。
四、基于YOLOv7的推理
1、在视频上推理
克隆 YOLOv7 GitHub 存储库
git clone https://github.com/WongKinYiu/yolov7.git然后,您可以使用detect.py脚本对您选择的视频进行推理。您还需要从此处下载yolov7-tiny.pt和yolov7.pt预训练模型。
使用不同模型在视频上进行推理的命令。
python detect.py --source ../inference_data/video_1.mp4 --weights yolov7-tiny.pt --name video_tiny_1 --view-img

python detect.py --source ../inference_data/video_1.mp4 --weights yolov7.pt --name video_1 --view-img2、YOLOv7 姿态估计
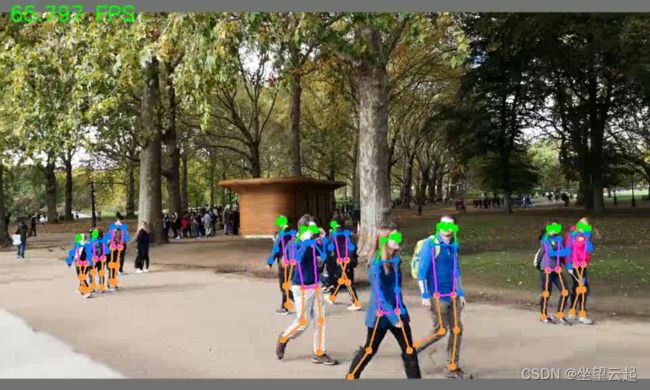
YOLOv7 是 YOLO 系列中第一个包含人体姿态估计模型的模型。
下载预训练的姿态估计模型。
wget https://github.com/WongKinYiu/yolov7/releases/download/v0.1/yolov7-w6-pose.pt自定义脚本来使用预训练模型运行姿势估计推理。让我们在 yolov7 目录中的yolov7_keypoint.py脚本中编写代码。
import matplotlib.pyplot as plt
import torch
import cv2
import numpy as np
import time

from torchvision import transforms
from utils.datasets import letterbox
from utils.general import non_max_suppression_kpt
from utils.plots import output_to_keypoint, plot_skeleton_kpts

device = torch.device("cuda:0" if torch.cuda.is_available() else "cpu")
weigths = torch.load('yolov7-w6-pose.pt')
model = weigths['model']
model = model.half().to(device)
_ = model.eval()

video_path = '../inference_data/video_4.mp4'
导入所有需要的模块并加载预训练的yolov7-w6-pose.pt模型,并为源视频的路径初始化一个video_path变量。如果在自己的视频上运行推理,则更改 video_path。
从磁盘读取视频并创建VideoWriter对象以将生成的视频保存在磁盘上。
cap = cv2.VideoCapture(video_path)
if (cap.isOpened() == False):
  print('Error while trying to read video. Please check path again')

# Get the frame width and height.
frame_width = int(cap.get(3))
frame_height = int(cap.get(4))

# Pass the first frame through `letterbox` function to get the resized image,
# to be used for `VideoWriter` dimensions. Resize by larger side.
vid_write_image = letterbox(cap.read()[1], (frame_width), stride=64, auto=True)[0]
resize_height, resize_width = vid_write_image.shape[:2]

save_name = f"{video_path.split('/')[-1].split('.')[0]}"
# Define codec and create VideoWriter object .
out = cv2.VideoWriter(f"{save_name}_keypoint.mp4",
                    cv2.VideoWriter_fourcc(*'mp4v'), 30,
                    (resize_width, resize_height))


frame_count = 0 # To count total frames.
total_fps = 0 # To get the final frames per second.
最后,使用一个循环遍历视频中的每一帧。
while(cap.isOpened):
  # Capture each frame of the video.
  ret, frame = cap.read()
  if ret:
      orig_image = frame
      image = cv2.cvtColor(orig_image, cv2.COLOR_BGR2RGB)
      image = letterbox(image, (frame_width), stride=64, auto=True)[0]
      image_ = image.copy()
      image = transforms.ToTensor()(image)
      image = torch.tensor(np.array([image.numpy()]))
      image = image.to(device)
      image = image.half()

      # Get the start time.
      start_time = time.time()
      with torch.no_grad():
          output, _ = model(image)
        # Get the end time.
      end_time = time.time()
      # Get the fps.
      fps = 1 / (end_time - start_time)
      # Add fps to total fps.
      total_fps += fps
      # Increment frame count.
      frame_count += 1

      output = non_max_suppression_kpt(output, 0.25, 0.65, nc=model.yaml['nc'], nkpt=model.yaml['nkpt'], kpt_label=True)
      output = output_to_keypoint(output)
      nimg = image[0].permute(1, 2, 0) * 255
      nimg = nimg.cpu().numpy().astype(np.uint8)
      nimg = cv2.cvtColor(nimg, cv2.COLOR_RGB2BGR)
      for idx in range(output.shape[0]):
          plot_skeleton_kpts(nimg, output[idx, 7:].T, 3)

          # Comment/Uncomment the following lines to show bounding boxes around persons.
          xmin, ymin = (output[idx, 2]-output[idx, 4]/2), (output[idx, 3]-output[idx, 5]/2)
          xmax, ymax = (output[idx, 2]+output[idx, 4]/2), (output[idx, 3]+output[idx, 5]/2)
          cv2.rectangle(
              nimg,
              (int(xmin), int(ymin)),
              (int(xmax), int(ymax)),
              color=(255, 0, 0),
              thickness=1,
              lineType=cv2.LINE_AA
          )

      # Write the FPS on the current frame.
      cv2.putText(nimg, f"{fps:.3f} FPS", (15, 30), cv2.FONT_HERSHEY_SIMPLEX,
                  1, (0, 255, 0), 2)
      # Convert from BGR to RGB color format.
      cv2.imshow('image', nimg)
      out.write(nimg)
      # Press `q` to exit.
      if cv2.waitKey(1) & 0xFF == ord('q'):
          break
  else:
      break
# Release VideoCapture().
cap.release()
# Close all frames and video windows.
cv2.destroyAllWindows()
# Calculate and print the average FPS.
avg_fps = total_fps / frame_count
print(f"Average FPS: {avg_fps:.3f}")
运行脚本


