(12)yolov5+deepsort 应用实例之跟中目标起始时间并记录结果图像
yolov5+deepsort 应用实例之跟中目标起始时间并记录结果图像
简介:
- 众所周知,yolov5+deepsort 通过YOLO单阶段检测器来
检测目标位置和预测类别,而deepsort通过卡尔曼滤波实现由当前状态到下一状态的预测,两者结合是实现了多目标的跟踪效果,即赋予单个目标以id,只要目标在图像或者动态视频中的话,其id保持不变,故而可以一直观测其位置。- 本文内容大概如下:
– 1.讲解YOLOv5检测器基本原理及代码实现
– 2.讲解Deepsort基本原理及代码实现
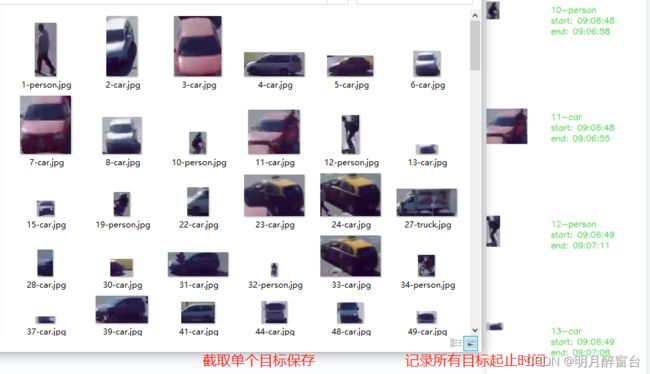
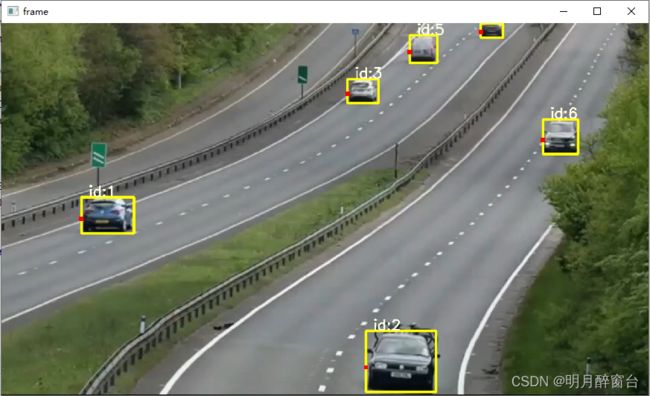
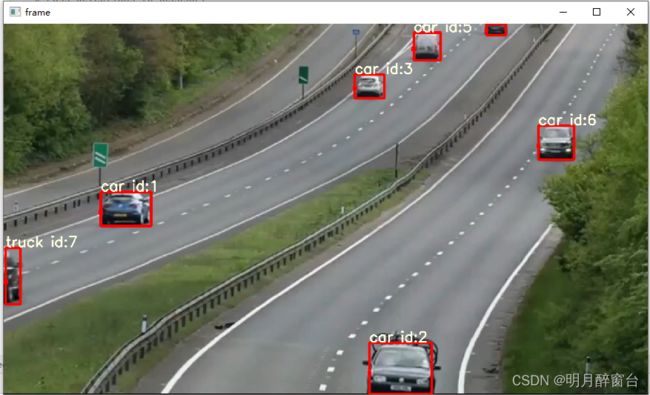
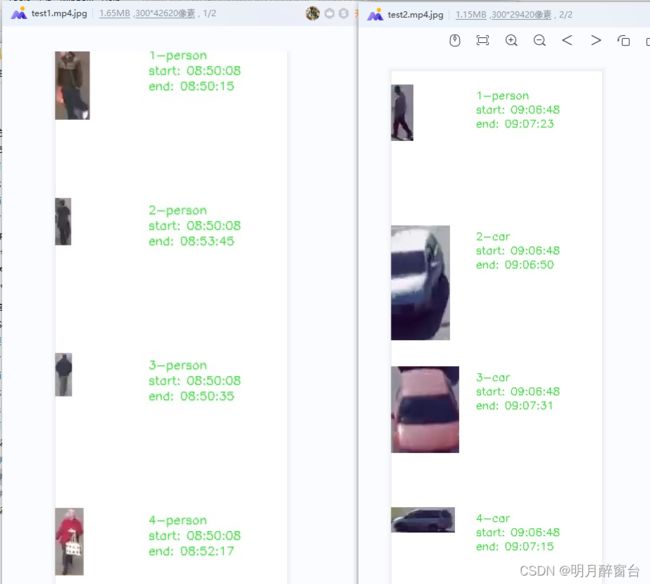
– 3.讲解多目标出现的起止时间如何记录及单个结果保存到最终的一幅图像上。最后放个实现效果在下边,可以先看下 -->>
1.YOLOv5单阶段检测器
-
在进行目标检测 时,可以直接调用yolo的接口进行预测,但是要实现其他功能(姿态检测、目标跟踪)等,一般会将检测器用于过程的前边,先通过检测器将类别和位置预测出来,再进行下一步的特征提取或者将特征提取出来与检测器的结果相结合去使用。
-
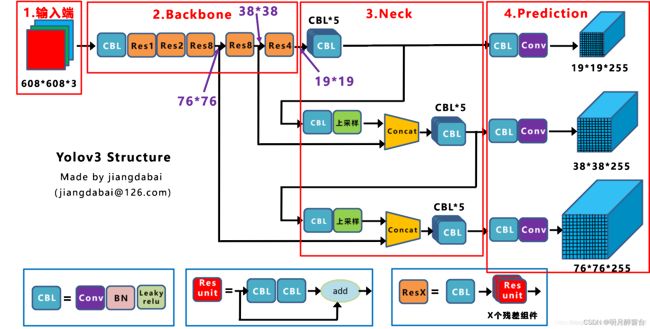
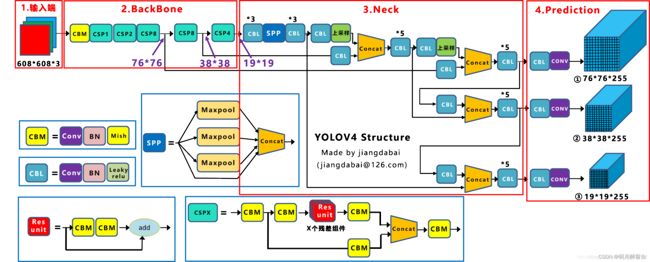
有想详细了解网络模型原理的可以看这篇文章:深入浅出Yolo系列之Yolov3&Yolov4&Yolov5&Yolox核心基础知识完整讲解
-
在此只是浅讲以下yolov5的应用情况,
yolov5的模型搭建源码数量太大,后边打算单独写一篇博客总结,下边时检测器应用实现:
yolo.py搭建yolo网络模型,执行.py可以查看模型结构,输出如下:

detector.py 将yolov5模型封装成类以便调用:
import torch
import numpy as np
from models.experimental import attempt_load
from utils.general import non_max_suppression, scale_coords
from utils.datasets import letterbox
from utils.torch_utils import select_device


OBJ_LIST = ['person','car','bus', 'truck'] #检测类别标签

class Detector(object):
    def __init__(self, weight_path, imgSize=640, threshould=0.3, stride=1):
        super(Detector, self).__init__()
        self.init_model(weight_path)
        self.img_size = imgSize
        self.threshold = threshould
        self.stride = stride

    def init_model(self, weight_path): #初始化模型参数
        self.weights = weight_path
        self.device = '0' if torch.cuda.is_available() else 'cpu'
        self.device = select_device(self.device)
        model = attempt_load(self.weights, map_location=self.device)
        model.to(self.device).eval()
        model.half()
        self.m = model
        self.names = model.module.names if hasattr(
            model, 'module') else model.names

    def preprocess(self, img): #图像预处理
        img0 = img.copy()
        img = letterbox(img, new_shape=self.img_size)[0]
        img = img[:, :, ::-1].transpose(2, 0, 1)
        img = np.ascontiguousarray(img)
        img = torch.from_numpy(img).to(self.device)
        img = img.half()  # 半精度
        img /= 255.0  # 图像归一化
        if img.ndimension() == 3:
            img = img.unsqueeze(0)
        return img0, img

    def detect(self, im):  #目标检测接口
        im0, img = self.preprocess(im)
        pred = self.m(img, augment=False)[0]
        pred = pred.float()
        pred = non_max_suppression(pred, self.threshold, 0.4)
        pred_boxes = []
        for det in pred:
            if det is not None and len(det):
                det[:, :4] = scale_coords(
                    img.shape[2:], det[:, :4], im0.shape).round()
                for *x, conf, cls_id in det:
                    lbl = self.names[int(cls_id)]
                    if not lbl in OBJ_LIST:
                        continue
                    x1, y1 = int(x[0]), int(x[1])
                    x2, y2 = int(x[2]), int(x[3])
                    pred_boxes.append(
                        (x1, y1, x2, y2, lbl, conf))
        return im, pred_boxes   #此处返回图像及预测框、标签、置信度
2.Deepsort算法
多目标跟踪的步骤:
- 获取原始视频帧 利用目标检测器对视频帧中的目标进行检测
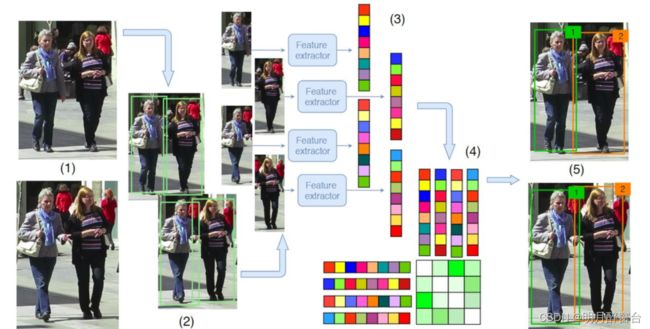
- 将检测到的目标的框中的特征提取出来,该特征包括表观特征(方便特征对比避免ID switch)和运动特征(运动特征方便卡尔曼滤波对其进行预测)
- 计算前后两帧目标之前的匹配程度(利用匈牙利算法和级联匹配)
- 数据关联,为每个追踪到的目标分配ID。
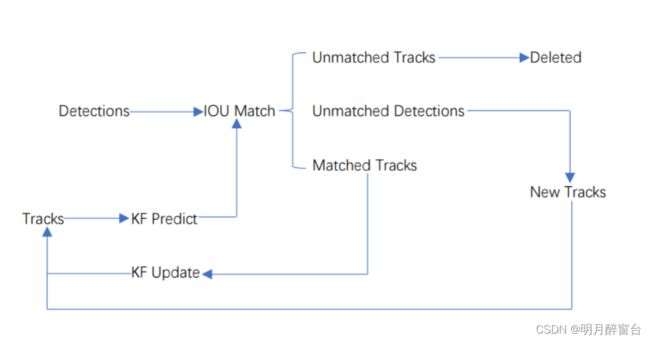
- Deepsort的前身是sort算法,sort算法的核心是卡尔曼滤波算法和匈牙利算法。
- 卡尔曼滤波分为两个过程:预测和更新。预测过程:当一个小车经过移动后,且其初始定位和移动过程都是高斯分布时,则最终估计位置分布会更分散,即更不准确;更新过程:当一个小车经过传感器观测定位,且其初始定位和观测都是高斯分布时,则观测后的位置分布会更集中,即更准确。。详细算法原理可参考:卡尔曼滤波算法
- 匈牙利算法的作用:解决无权重二分图的最大匹配问题的算法,将检测框与卡尔曼最优估计的框做一个最优匹配。具体算法实现可参考:匈牙利匹配算法_学习笔记_Python编程实现
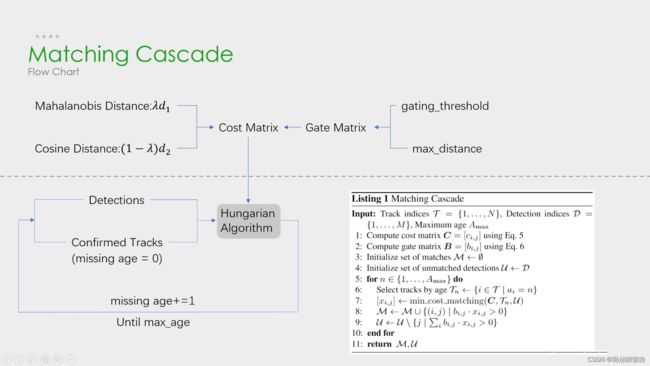
从上图可以看出,Deep SORT算法在SORT算法的基础上增加了级联匹配(Matching Cascade)+新轨迹的确认(confirmed),它在IOU Match之前做了一次额外的级联匹配,利用了外观特征和马氏距离。总体流程为:
- 卡尔曼滤波器预测轨迹
tracks - 使用匈牙利算法将预测得到的轨迹
tracks和当前帧中的detections进行匹配(级联匹配和IOU匹配) - 卡尔曼滤波更新
- 级联匹配流程图里上半部分就是特征提取和相似度估计,也就是算这个分配问题的代价函数。主要由两部分组成:代表运动模型的马氏距离和代表外观模型的Re-ID特征。
- 级联匹配流程图里下半部分数据关联作为流程的主体。为什么叫级联匹配,主要是它的匹配过程是一个循环。从missing age=0的轨迹(即每一帧都匹配上,没有丢失过的)到missing age=30的轨迹(即丢失轨迹的最大时间30帧)挨个的和检测结果进行匹配。也就是说,对于没有丢失过的轨迹赋予优先匹配的权利,而丢失的最久的轨迹最后匹配。
- 依托文件:
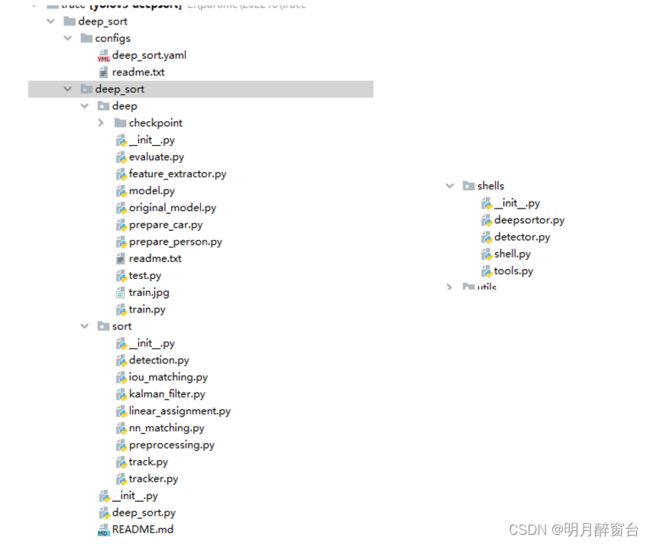
deep_sort模块由deep和sort两个构成,shells里的deepsort.py为deepsort的使用接口,其封装算法实现如下:
from math import sqrt
from deep_sort.utils.parser import get_config
from deep_sort.deep_sort import DeepSort

class Deepsortor:   #跟踪器
    def __init__(self, configFile):
        cfg = get_config()
        cfg.merge_from_file(configFile)
        self.deepsort = DeepSort(cfg.DEEPSORT.REID_CKPT,
                            max_dist=cfg.DEEPSORT.MAX_DIST, min_confidence=cfg.DEEPSORT.MIN_CONFIDENCE,
                            nms_max_overlap=cfg.DEEPSORT.NMS_MAX_OVERLAP,
                            max_iou_distance=cfg.DEEPSORT.MAX_IOU_DISTANCE,
                            max_age=cfg.DEEPSORT.MAX_AGE, n_init=cfg.DEEPSORT.N_INIT, nn_budget=cfg.DEEPSORT.NN_BUDGET,
                            use_cuda=True)

    def update(self, xywhs, confss, image,labbs):   #更新跟踪id估计,主接口
        bboxes2draw = []
        # Pass detections to deepsort
        outputs = self.deepsort.update(xywhs, confss, image)
        for value in list(outputs):
            x1, y1, x2, y2, track_id = value
            bboxes2draw.append(
               (x1, y1, x2, y2, '', track_id)
            )
        return image, bboxes2draw
3.多目标跟踪实现
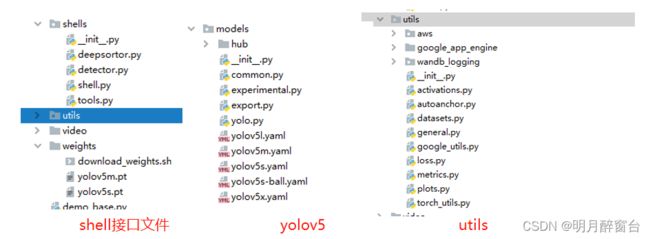
在算法实现时,将yolov5和deepsort算法组合归纳到shell模块以便调用:

shell.py提供检测器+跟踪器的总接口调用:
import torch

from shells.deepsortor import Deepsortor
from shells.detector import Detector
from shells import tools

class Shell(object):
    def __init__(self, deepsort_config_path, yolo_weight_path):
        self.deepsortor = Deepsortor(configFile=deepsort_config_path)
        self.detector = Detector(yolo_weight_path, imgSize=640, threshould=0.3, stride=1)
        self.frameCounter = 0

    def update(self, im):
        retDict = {
            'frame': None,
            'list_of_ids': None,
            'obj_bboxes': []
        }

        self.frameCounter += 1

        # yolov5
        _, bboxes = self.detector.detect(im)
        bbox_xywh = []
        confs = []
        labs=[]
        if len(bboxes):
            # Adapt detections to deep sort input format
            for x1, y1, x2, y2, lab, conf in bboxes:
                obj = [
                    int((x1 + x2) / 2), int((y1 + y2) / 2),
                    x2 - x1, y2 - y1
                ]
                bbox_xywh.append(obj)
                confs.append(conf)
                labs.append([lab,int(x1),int(y1)])
            xywhs = torch.Tensor(bbox_xywh)
            confss = torch.Tensor(confs)

            im, obj_bboxes = self.deepsortor.update(xywhs, confss, im,labs)

            # 绘制 deepsort 结果
            image = tools.plot_bboxes(im, obj_bboxes)
            retDict['frame'] = image
            retDict['obj_bboxes'] = obj_bboxes
        return retDict
而tools.py主要负责绘制结果:
import cv2
import numpy as np

def plot_bboxes(image, bboxes, line_thickness=None):
    # Plots one bounding box on image img
    tl = line_thickness or round(
        0.002 * (image.shape[0] + image.shape[1]) / 2) + 1  # line/font thickness
    list_pts = []
    point_radius = 4

    for (x1, y1, x2, y2, cls_id, pos_id) in bboxes:
        if cls_id in ['person','car','bus', 'truck']:#'car', 'bus', 'truck'
            color = (0, 0, 255)
        else:
            color = (0, 255, 255)

        # check whether hit line
        check_point_x = x1
        check_point_y = int(y1 + ((y2 - y1) * 0.6))

        c1, c2 = (x1, y1), (x2, y2)
        cv2.rectangle(image, c1, c2, color, thickness=tl, lineType=cv2.LINE_AA)
        tf = max(tl - 1, 1)  # font thickness
        # print("cls_id",cls_id)
        cv2.putText(image, '{} id:{}'.format(cls_id, pos_id), (c1[0], c1[1] - 2), 0, tl / 3,
                    [225, 255, 255], thickness=tf, lineType=cv2.LINE_AA)

        list_pts.append([check_point_x - point_radius, check_point_y - point_radius])
        list_pts.append([check_point_x - point_radius, check_point_y + point_radius])
        list_pts.append([check_point_x + point_radius, check_point_y + point_radius])
        list_pts.append([check_point_x + point_radius, check_point_y - point_radius])

        ndarray_pts = np.array(list_pts, np.int32)
        cv2.fillPoly(image, [ndarray_pts], color=(0, 0, 255))
        list_pts.clear()
    return image
测试跟踪效果:
import os
os.environ['KMP_DUPLICATE_LIB_OK'] = 'True'

from shells.shell import Shell
import imutils
import cv2

#VIDEO_PATH = './video/traffic.mp4'
VIDEO_PATH = './video/test2.mp4'
RESULT_PATH = './out/result.mp4'

DEEPSORT_CONFIG_PATH = "./deep_sort/configs/deep_sort.yaml"
YOLOV5_WEIGHT_PATH = './weights/yolov5s.pt'
def main():
    det = Shell(DEEPSORT_CONFIG_PATH, YOLOV5_WEIGHT_PATH)

    videoWriter = None
    cap = cv2.VideoCapture(VIDEO_PATH)
    fps = int(cap.get(5))
    t = int(1000/fps)
    while True:
        _, frame = cap.read()
        if not _: break

        result = det.update(frame)
        #result属性:frame \ list_of_ids \ obj_bboxes
        img_result = result['frame']
        trace=result['obj_bboxes']
        id=[]
        if len(trace)>0:
            for i in range(len(trace)):
                id.append(trace[i][5])
        print(id)

        img_result = imutils.resize(img_result, height=500)
        # if videoWriter is None:
        #     fourcc = cv2.VideoWriter_fourcc('m', 'p', '4', 'v')  # opencv3.0
        #     videoWriter = cv2.VideoWriter(RESULT_PATH, fourcc, fps, (img_result.shape[1], img_result.shape[0]))
        # videoWriter.write(img_result)

        cv2.imshow("frame", img_result)
        key = cv2.waitKey(t)
        if key == ord('q'): break

    cv2.destroyAllWindows()
    # videoWriter.release()
    cap.release()

if __name__ == '__main__':
    main()
4.多目标起止时间记录实现
- 记录起始时间这块实现就是简单的逻辑,先定义一个总的id容器、总start_time列表、总end_time列表,遍历每一帧时新建单独的id容器,如果出现新的id,合并到总id,并记录开始时间,如果id已存在,则更新end_time。
- 更改deepsort.py添加标签显示:
 #按最小距离获得最佳label
    def getLabelIndex(self,labbs,pt):
        min_d=1000
        _index=0
        _n=0
        for i in range(len(labbs)):
            lab,x,y = labbs[i]
            _dist= sqrt((x-pt[0])*(x-pt[0])+(y-pt[1])*(y-pt[1]))
            if(_dist<min_d):
                min_d=_dist
                _index=i
        return _index

    def update(self, xywhs, confss, image,labbs):
        bboxes2draw = []
        # Pass detections to deepsort
        outputs = self.deepsort.update(xywhs, confss, image)
        #滤波后的目标个数和标签个数可能不一样,可大可小
        #print(len(outputs), " - ", len(xywhs))
        #print(len(outputs)," - ",len(labbs))
        _len=len(outputs) if len(outputs)<len(labbs) else len(labbs)
        _outputs=list(outputs)
        #最小距离分配标签
        for i in range(_len):
            x1, y1, x2, y2, track_id, n = _outputs[i]
            _id =self.getLabelIndex(labbs,[x1,y1])
            #print(_id)
            bboxes2draw.append(
                #(x1, y1, x2, y2, labbs[_id][0], track_id)
                (x1, y1, x2, y2,"", track_id)
            )
            #print(_outputs[i])
            #print(labbs[i])
        # for value in list(outputs):
        #     x1, y1, x2, y2, track_id = value
        #     bboxes2draw.append(
        #         (x1, y1, x2, y2, '', track_id)
        #     )

        return image, bboxes2draw
更改主函数:
'''
func:记录每个目标 出现的起止时间,并记录在图像上
writer: yohn
e-mail:[email protected]
'''

import os
import time

import numpy as np

os.environ['KMP_DUPLICATE_LIB_OK'] = 'True'
import datetime
from shells.shell import Shell
import imutils
import cv2

#VIDEO_PATH = './video/traffic.mp4'
num=3
VIDEO_PATH = './video/test'+str(num)+'.mp4'
savepath1 = './res'+str(num)+'/'

DEEPSORT_CONFIG_PATH = "./deep_sort/configs/deep_sort.yaml"
YOLOV5_WEIGHT_PATH = './weights/yolov5m.pt'

def main():
    det = Shell(DEEPSORT_CONFIG_PATH, YOLOV5_WEIGHT_PATH)

    videoWriter = None
    cap = cv2.VideoCapture(VIDEO_PATH)
    fps = int(cap.get(5))
    t = int(1000/fps)

    # 总时间 t
    total_starttime =[]
    tota_endtime = []
    # 总目标 id
    total_id = []
    total_m=[] #所有信息
    num_frame=0
    while True:
        _, frame = cap.read()
        if not _: break
        mask = frame.copy()
        #print(mask.shape)

        result = det.update(frame)
        #result属性:frame = {'list_of_ids', 'obj_bboxes'}
        img_result = result['frame']
        trace=result['obj_bboxes']
        #print(num_frame," - ", trace)
        #保存当前帧id
        id=[]
        mes=[]
        if len(trace)>0:
            for i in range(len(trace)):
                id.append(trace[i][5])
                mes.append(trace[i])
        #print(id)
        if num_frame==0:
            total_id=id
            start_time = datetime.datetime.now()
            start_str = start_time.strftime('%H:%M:%S')
            for i in range(len(id)):
                total_starttime.append(start_str)
                print(total_starttime[i])
            #print(total_starttime)
        else: #合并去重
            for i in range(len(id)):
                cur_time = datetime.datetime.now()  # 获取时间
                cur_str = cur_time.strftime('%H:%M:%S')
                #如果出现新目标,则合并id
                if id[i] not in total_id:
                    total_id.append(id[i])
                    total_m.append(mes[i])
                    #将时间添加到初始记录
                    total_starttime.append((cur_str))
                    tota_endtime.append((cur_str))
                    #截图保存单个目标
                    x1,y1,x2,y2,_lab,_id = mes[i]
                    roi=mask[y1:y2,x1:x2]
                    # cv2.namedWindow(_lab,cv2.WINDOW_NORMAL)
                    # cv2.imshow(_lab,roi)
                    # cv2.waitKey(0)
                    save_name=savepath1+str(_id)+"-"+_lab+".jpg"
                    cv2.imwrite(save_name,roi)
                    # result=np.vstack([result,paste])
                    # save_res = savepath2 +  + "res.jpg"
                    # cv2.imwrite(save_res,result)

                else:  #如果旧目标再次出现
                    index = total_id.index(id[i])
                    #改变最终时间为当前时间
                    tota_endtime[index]=cur_str
                #print("frame",i,"   start_time: ",total_starttime[i],"   end_time: ",tota_endtime[i])
        #print(total_id)

        num_frame=num_frame + 1
        cv2.namedWindow("frame",cv2.WINDOW_NORMAL)
        cv2.imshow("frame", img_result)
        if(num_frame>=3000):
            break
        key = cv2.waitKey(t)
        if key == ord('q'): break

    cv2.destroyAllWindows()
    # videoWriter.release()
    cap.release()

    #将所有结果图拼接成一个长图
    bigimg = np.zeros([20, 300, 3], np.uint8)
    bigimg[:] = 255
    print(bigimg.shape)
    for i in range(len(total_m)):
        paste = np.zeros([200, 300, 3], np.uint8)
        paste[:] = 255
        x1,y1,x2,y2,lab_,id_=total_m[i]
        _name=str(id_)+"-"+lab_
        roi=cv2.imread(savepath1+_name+".jpg")
        paste[0:y2 - y1, 0:x2 - x1] = roi
        cv2.putText(paste, _name, (120, 20), cv2.FONT_HERSHEY_SIMPLEX, 0.5, (0, 255, 0), 1)
        cv2.putText(paste, "start: " +str(total_starttime[i]), (120, 40), cv2.FONT_HERSHEY_SIMPLEX, 0.5, (0, 255, 0), 1)
        cv2.putText(paste, "end: "+str(tota_endtime[i]), (120, 60), cv2.FONT_HERSHEY_SIMPLEX, 0.5, (0, 255, 0), 1)
        bigimg=np.vstack([bigimg,paste])
        # cv2.namedWindow("123", cv2.WINDOW_NORMAL)
        # cv2.imshow("123", bigimg)
        # cv2.waitKey(0)
    cv2.imwrite(VIDEO_PATH+".jpg",bigimg)


if __name__ == '__main__':
    main()
