direct_sparse
cmakelists:
cmake_minimum_required( VERSION 2.8 )
project( directMethod )

set( CMAKE_BUILD_TYPE Release )
set( CMAKE_CXX_FLAGS "-std=c++11 -O3" )

# 添加cmake模块路径
list( APPEND CMAKE_MODULE_PATH ${PROJECT_SOURCE_DIR}/cmake_modules )

find_package( OpenCV )
include_directories( ${OpenCV_INCLUDE_DIRS} )

find_package( G2O )
include_directories( ${G2O_INCLUDE_DIRS} )

include_directories( "/usr/include/eigen3" )

set( G2O_LIBS
    g2o_core g2o_types_sba g2o_solver_csparse g2o_stuff g2o_csparse_extension
)

add_executable( direct_sparse direct_sparse.cpp )
target_link_libraries( direct_sparse ${OpenCV_LIBS} ${G2O_LIBS} )

add_executable( direct_semidense direct_semidense.cpp )
target_link_libraries( direct_semidense ${OpenCV_LIBS} ${G2O_LIBS} )
程序:
#include
#include ( _vertices[0] );
Eigen::Vector3d xyz_trans = vtx->estimate().map ( x_world_ ); // q in book
//取出q的x和y值
double x = xyz_trans[0];
double y = xyz_trans[1];
//这里将z值取出为倒数和倒数的平方,因为后面构造jacobian_uv_ksai时,涉及到z值都是用的倒数和倒数平方,所以这里就直接取倒数了
double invz = 1.0/xyz_trans[2];
double invz_2 = invz*invz;
//进一步取得像素坐标,用于后面求取像素梯度
float u = x*fx_*invz + cx_;
float v = y*fy_*invz + cy_;
//整个雅克比矩阵不多说,分两部分,一部分是像素坐标对变换部分偏导,一部分是像素梯度部分偏导,两部分乘在一起,书上P195页
// jacobian from se3 to u,v
//像素坐标对变换部分偏导
// NOTE that in g2o the Lie algebra is (\omega, \epsilon), where \omega is so(3) and \epsilon the translation
//g2o中李代数表示为(旋转,平移)
Eigen::Matrix<double, 2, 6> jacobian_uv_ksai;
jacobian_uv_ksai ( 0,0 ) = - x*y*invz_2 *fx_;
jacobian_uv_ksai ( 0,1 ) = ( 1+ ( x*x*invz_2 ) ) *fx_;
jacobian_uv_ksai ( 0,2 ) = - y*invz *fx_;
jacobian_uv_ksai ( 0,3 ) = invz *fx_;
jacobian_uv_ksai ( 0,4 ) = 0;
jacobian_uv_ksai ( 0,5 ) = -x*invz_2 *fx_;
jacobian_uv_ksai ( 1,0 ) = - ( 1+y*y*invz_2 ) *fy_;
jacobian_uv_ksai ( 1,1 ) = x*y*invz_2 *fy_;
jacobian_uv_ksai ( 1,2 ) = x*invz *fy_;
jacobian_uv_ksai ( 1,3 ) = 0;
jacobian_uv_ksai ( 1,4 ) = invz *fy_;
jacobian_uv_ksai ( 1,5 ) = -y*invz_2 *fy_;
//像素梯度部分偏导
Eigen::Matrix<double, 1, 2> jacobian_pixel_uv;
//这里注意一下像素梯度的求法,像素梯度是一个平面二维向量,第一个为u方向,第二个为v方向
//这里由于各个像素点其实是离散值,其实求的是差分,前一个像素灰度值减后一个像素灰度值,除以2,即认为是这个方向上的梯度
jacobian_pixel_uv ( 0,0 ) = ( getPixelValue ( u+1,v )-getPixelValue ( u-1,v ) ) /2;
jacobian_pixel_uv ( 0,1 ) = ( getPixelValue ( u,v+1 )-getPixelValue ( u,v-1 ) ) /2;
//总的雅克比矩阵,将上面的两部分偏导乘起来。
_jacobianOplusXi = jacobian_pixel_uv*jacobian_uv_ksai;
}
// dummy read and write functions because we don't care...
virtual bool read ( std::istream& in ) {}
virtual bool write ( std::ostream& out ) const {}
protected:
// get a gray scale value from reference image (bilinear interpolated)
//取得变换后的图中对应像素坐标处的灰度值,这里并不是返回一张图像的灰度值,而是就是写死了,就是类构造里传入的那张图
inline float getPixelValue ( float x, float y )
{
//这里先说一下各个参数的类型:
//image_为Mat*类型,图像指针,所以调用data时用->符号,
//data为图像矩阵首地址,支持数组形式访问,data[]就是访问到像素的值了,此处为像素的灰度值,类型为uchar
//关于step有点复杂,data[]中括号的式子有点复杂,总的意思就是y行乘上每行内存数,定位到行,然后在加上x,定位到像素
//step具体解释在最后面有一些资料
//image_->data[int(y)*image_->step + int(x)]这一步读到了x,y处的灰度值,类型为uchar,
//但是后面由于线性插值,需要定位这个像素的位置,而不是他的灰度值,所以取其地址,赋值给data_ptr,记住它的位置,后面使用
uchar* data_ptr = & image_->data[int(y)*image_->step + int(x)];
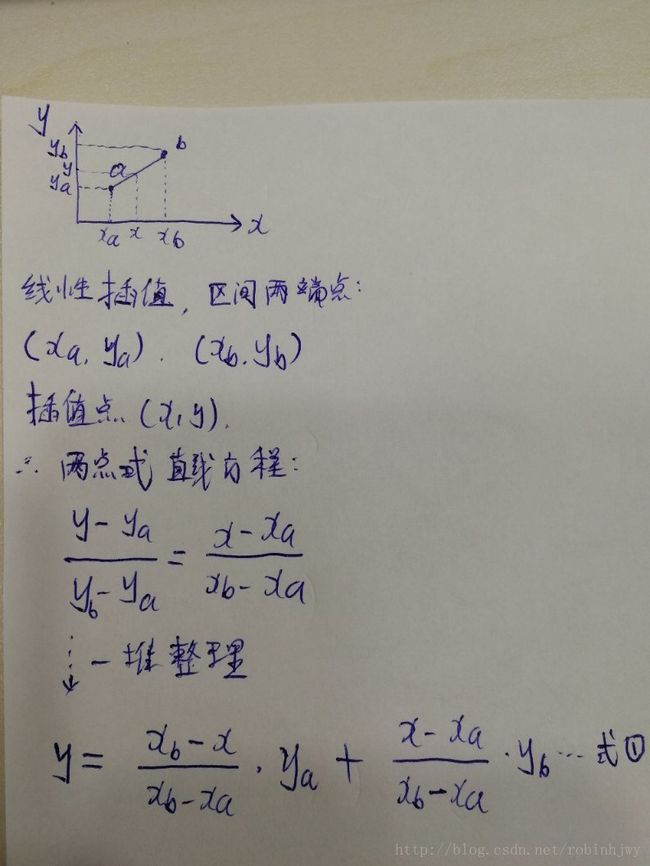
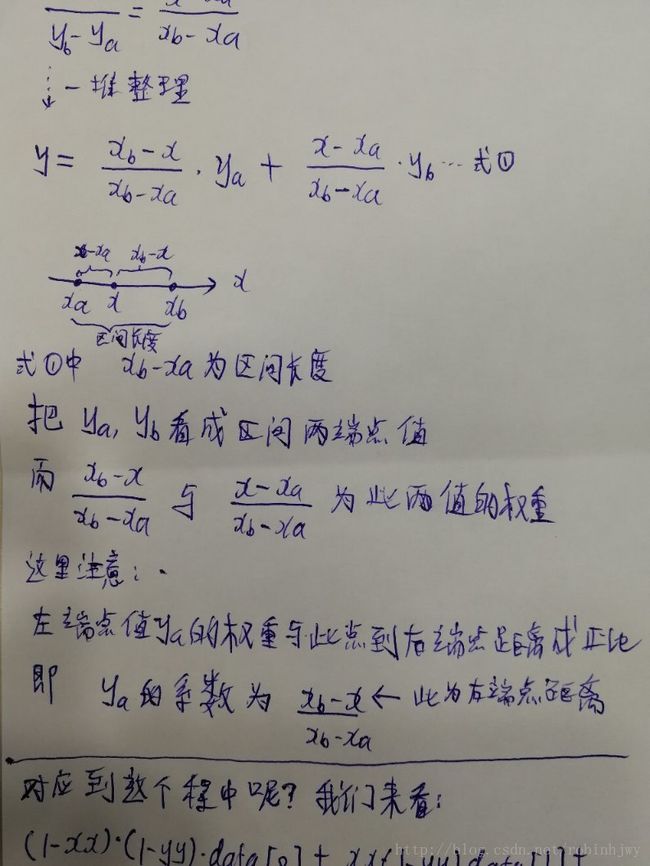
//由于x,y这里有可能带小数,但是像素位置肯定是整数,所以,问题来了,(1.2, 4.5)像素坐标处的灰度值为多少呢?OK,线性插值!
//说一下floor(),std中的cmath函数。向下取整,返回不大于x的整数。例floor(4.9)=4
//xx和yy,就是取到小数部分。例:x=4.9的话,xx=x-floor(x)就为0.9。y同理
float xx = x - floor ( x );
float yy = y - floor ( y );
//这整个return一个float值包含了线性插值,二维线性差值,这里后文有具体高清无码解释
return float (
(1-xx) * ( 1-yy ) * data_ptr[0] +
xx* ( 1-yy ) * data_ptr[1] +
( 1-xx ) *yy*data_ptr[ image_->step ] +
xx*yy*data_ptr[image_->step+1]
);
}
//这里说一下自定义边类型时的成员变量怎么来,不是随便写,而是误差需要哪些变量算出来,就定义哪些。
//这里需要世界坐标系下的空间点坐标,相机内参,和第二帧图
//这里说一下这个第二帧图:空间点经RT,经内参投影到第二帧图(image_)上,在这个image_上找像素的灰度值,这个灰度值是估计值
//而测量值在前一帧上,也就是上面的_measurement,在main()函数中直接赋值给到。
public:
Eigen::Vector3d x_world_; // 3D point in world frame
float cx_=0, cy_=0, fx_=0, fy_=0; // Camera intrinsics
cv::Mat* image_ = nullptr; // reference image
};
int main ( int argc, char** argv )
{
//同样,是防呆
if ( argc != 2 )
{
cout<<"usage: useLK path_to_dataset"<return 1;
}
srand ( ( unsigned int ) time ( 0 ) );
//这里一些就是读入数据用的,在LK那篇中有介绍
//从argv[1]中读取data文件夹路径
string path_to_dataset = argv[1];
//找到文件夹中的associate.txt文件
string associate_file = path_to_dataset + "/associate.txt";
//读入到文件输入流
ifstream fin ( associate_file );
string rgb_file, depth_file, time_rgb, time_depth;
cv::Mat color, depth, gray;
//这里就是那个测量值数组,应该就是一堆灰度值
vector0.f,cx,0.f,fy,cy,0.f,0.f,1.0f;
//位姿,这里构造为单位阵
Eigen::Isometry3d Tcw = Eigen::Isometry3d::Identity();
//这里的prev_color就是指第一帧,因为整个程序中,只在第一帧中对它赋值了,之后再也没动过
//也就是还是整个过程的参考帧就只有第一帧,而不是循环流动用当前帧的上一帧做参考帧
cv::Mat prev_color;
// 我们以第一个图像为参考,对后续图像和参考图像做直接法
for ( int index=0; index<10; index++ )
{
cout<<"*********** loop "<" ************"<//从输入流中把文件名读进这四个变量
fin>>time_rgb>>rgb_file>>time_depth>>depth_file;
//通过上面的文件名读取文件,彩色图和深度图。
color = cv::imread ( path_to_dataset+"/"+rgb_file );
depth = cv::imread ( path_to_dataset+"/"+depth_file, -1 );
//空指针说明这一帧有损坏,直接跳过
if ( color.data==nullptr || depth.data==nullptr )
continue;
//cvtColor()函数转换图像颜色空间,前一张图,后一张图,转换方式.看定义:
//CV_EXPORTS_W void cvtColor( InputArray src, OutputArray dst, int code, int dstCn = 0 );
cv::cvtColor ( color, gray, cv::COLOR_BGR2GRAY );
if ( index ==0 )
{
// 对color图的第一帧提取FAST特征点
vector detector = cv::FastFeatureDetector::create();
detector->detect ( color, keypoints );
//遍历color图第一帧中的特征点数组,进行筛选和在深度图和灰度图上定位深度值和灰度值
for ( auto kp:keypoints )
{
// 邻近边缘处的点,去掉
if ( kp.pt.x < 20 || kp.pt.y < 20 || ( kp.pt.x+20 ) >color.cols || ( kp.pt.y+20 ) >color.rows )
continue;
//int cvRound (double value); 对一个double型的数进行四舍五入,并返回一个整型数
//寻找关键点位置上,深度图上的深度值
ushort d = depth.ptr ( cvRound ( kp.pt.y ) ) [ cvRound ( kp.pt.x ) ];
//深度值为0说明深度没测量到,去掉
if ( d==0 )
continue;
//深度值找到后,进一步反投影得到空间点3d坐标
Eigen::Vector3d p3d = project2Dto3D ( kp.pt.x, kp.pt.y, d, fx, fy, cx, cy, depth_scale );
//寻找关键点位置上,灰度图上的灰度值
float grayscale = float ( gray.ptr ( cvRound ( kp.pt.y ) ) [ cvRound ( kp.pt.x ) ] );
//最后这里,得到了三维坐标和对应的灰度值,一个测量值就搞定了,被推进measurements数组,
//最终第一帧所有关键点对应空间中点的坐标和灰度值,被压入measurements数组
//整个过程第一帧就是世界坐标系下拍到的空间点,通过像素位置和相机内参求得世界坐标系下坐标,通过灰度图求得灰度
//后面求取光度误差时,其实就只要这两个数据
measurements.push_back ( Measurement ( p3d, grayscale ) );
}
//第一帧,赋值给前一张变量prev_color
prev_color = color.clone();
//第一帧只做如上操作,直接continue跳过
continue;
}
// 使用直接法计算相机运动
//整个程序中,只在第一帧被写入,其他地方均是调用,所以后续的帧均是以第一帧为参考帧去估计位姿,并不是以前一帧
//因为这个函数循环执行时,measurements是不变的,只有不断读入的&gray灰度图是变化的。
poseEstimationDirect ( measurements, &gray, K, Tcw );
cout<<"Tcw="<// plot the feature points
//构建一张图画出后续的帧跟第一帧对比的效果,图片的高度为帧的两倍高,上面摆下作为参考的第一帧,下面为当前帧
cv::Mat img_show ( color.rows*2, color.cols, CV_8UC3 );
prev_color.copyTo ( img_show ( cv::Rect ( 0,0,color.cols, color.rows ) ) );
color.copyTo ( img_show ( cv::Rect ( 0,color.rows,color.cols, color.rows ) ) );
//两张图摆完之后画上直接法跟踪的关键点和连线
//遍历测量数组measurements,挨个空间点进行操作(measurements中含有空间点三维坐标的)
for ( Measurement m:measurements )
{
//这里是随机选20%的关键点在图上显示,rand()生成0-RAND_MAX之间的一个数,如果这个数比RAND_MAX/5大就continue掉,不画了。
//RAND_MAX/5=RAND_MAX*20%,也就是说每个点有20%的概率被留下,所以最终也即是随机选了20%的点
if ( rand() > RAND_MAX/5 )
continue;
//取得空间点世界坐标系下坐标,
Eigen::Vector3d p = m.pos_world;
//求一下这个空间点在第一帧的像素坐标,所以这个坐标每张显示图中上半部分都一样
Eigen::Vector2d pixel_prev = project3Dto2D ( p ( 0,0 ), p ( 1,0 ), p ( 2,0 ), fx, fy, cx, cy );
//空间点乘上估计的位姿
Eigen::Vector3d p2 = Tcw*m.pos_world;
//在新帧中找像素位置
Eigen::Vector2d pixel_now = project3Dto2D ( p2 ( 0,0 ), p2 ( 1,0 ), p2 ( 2,0 ), fx, fy, cx, cy );
//如果跑出像素平面外了,就舍弃
if ( pixel_now(0,0)<0 || pixel_now(0,0)>=color.cols || pixel_now(1,0)<0 || pixel_now(1,0)>=color.rows )
continue;
//随机色使用,cv::Scalar(b,g,r),不然圈太多同一种颜色就混在一起了
float b = 255*float ( rand() ) /RAND_MAX;
float g = 255*float ( rand() ) /RAND_MAX;
float r = 255*float ( rand() ) /RAND_MAX;
//开始画跟踪的特征点圆和匹配直线
//cv::circle(),在哪张图上画,画在什么位置,半径大小,颜色,线宽
cv::circle ( img_show, cv::Point2d ( pixel_prev ( 0,0 ), pixel_prev ( 1,0 ) ), 8, cv::Scalar ( b,g,r ), 2 );
//注意这里的pixel_now其实是摆在img_show下半部分的,所以求出来坐标后还要加上上半部分的高度,也就是color.rows
cv::circle ( img_show, cv::Point2d ( pixel_now ( 0,0 ), pixel_now ( 1,0 ) +color.rows ), 8, cv::Scalar ( b,g,r ), 2 );
//cv::line(),在哪张图上画线,起始点坐标,终止点坐标,颜色,线宽
//同样也是注意下半部分的pixel_now要往下错color.rows个高度
cv::line ( img_show, cv::Point2d ( pixel_prev ( 0,0 ), pixel_prev ( 1,0 ) ), cv::Point2d ( pixel_now ( 0,0 ), pixel_now ( 1,0 ) +color.rows ), cv::Scalar ( b,g,r ), 1 );
}
//最后输出图像,至此,一帧的直接法估计位姿和跟踪关键点,输出跟踪画面一系列工作才完成,循环进行下一帧
cv::imshow ( "result", img_show );
cv::waitKey ( 0 );
}
return 0;
}
//这个函数,就是用直接法求相机位姿,
//measurements为包含了很多测量点的数组,测量点有空间坐标和对应灰度值信息,
//Measurement应该就是P193页图8-3的P和I1(p1),这个归到测量值里面,因为P193页式(8.10)来看,测量值-估计值,那么前一张图的光度,就是测量值
//cv::Mat* gray为一张灰度图,这张图就是第二帧。但并不是估计值,而是通过位姿估计出来一个像素坐标,用这个坐标在这张图上去查找估计值(也就是坐标对应的光度)。
//相机内参和输出位姿。注意这里位姿表示形式为:Eigen::Isometry3d&
bool poseEstimationDirect ( const vector< Measurement >& measurements, cv::Mat* gray, Eigen::Matrix3f& K, Eigen::Isometry3d& Tcw )
{
// 初始化g2o
typedef g2o::BlockSolver6,1>> DirectBlock; // 求解的向量是6*1的
DirectBlock::LinearSolverType* linearSolver = new g2o::LinearSolverDense< DirectBlock::PoseMatrixType > ();
DirectBlock* solver_ptr = new DirectBlock ( linearSolver );
// g2o::OptimizationAlgorithmGaussNewton* solver = new g2o::OptimizationAlgorithmGaussNewton( solver_ptr ); // G-N
g2o::OptimizationAlgorithmLevenberg* solver = new g2o::OptimizationAlgorithmLevenberg ( solver_ptr ); // L-M
g2o::SparseOptimizer optimizer;
optimizer.setAlgorithm ( solver );
optimizer.setVerbose( true );
//添加顶点,就一个g2o::VertexSE3Expmap*类型位姿顶点
g2o::VertexSE3Expmap* pose = new g2o::VertexSE3Expmap();
pose->setEstimate ( g2o::SE3Quat ( Tcw.rotation(), Tcw.translation() ) );
pose->setId ( 0 );
optimizer.addVertex ( pose );
// 添加边,边是光度误差,一帧图上有好多像素就对应好多误差,也就有好多边
int id=1;
for ( Measurement m: measurements )
{
EdgeSE3ProjectDirect* edge = new EdgeSE3ProjectDirect (
m.pos_world,
K ( 0,0 ), K ( 1,1 ), K ( 0,2 ), K ( 1,2 ), gray
);
//这些边(误差)对应的顶点都是ID为0的那一个pose顶点
edge->setVertex ( 0, pose );
//这里看出来了,测量值就是第一帧中的灰度值,对应边类型定义中computeError()函数中的_measurement变量,直接取的第一帧空间点的灰度值
//所以也就是说,整个过程测量值只有第一帧的灰度值,后面的每一帧根据位姿找出像素点,再找到灰度值,都是估计值,
//进一步说一下,书上(8.10)是测量值减去估计值,而这里computeError()函数中的_error(0,0)=getPixelValue ( u,v )-_measurement;
//很明显是估计值减去测量值,所以在雅克比矩阵_jacobianOplusXi中,并没有书上式(8.16)的负号,因为误差定义反过来了。
edge->setMeasurement ( m.grayscale );
//信息矩阵设置为单位阵,表征每个边的权重都一样
edge->setInformation(Eigen::Matrix<double,1,1>::Identity());
//依次增加,给边设置一个ID
edge->setId ( id++ );
//添加进优化器
optimizer.addEdge ( edge );
}
cout<<"edges in graph: "<//开始优化
optimizer.initializeOptimization();
optimizer.optimize ( 30 );
Tcw = pose->estimate();
}
关于step,贴两个网址:
http://blog.csdn.net/zang141588761/article/details/50340709
http://blog.csdn.net/zhupananhui/article/details/21459743
关于二维线性差值,贴两张图:


