Android ViewTree and DecorView
图形用户界面(GUI)是Android应用程序开发不可或缺的一部分。其不仅能为用户提供输入,还能够根据(用户)执行的动作,提供相应的反馈。因此,作为开发人员,能够理解UI(用户界面)是如何创建以及跟新的,就显得尤为重要。
ViewTree
View 和 ViewGroup 是Android UI的基本组件, 而ViewGroup作为容器,可以包含一组View, 并且ViewGroup其本身就是View的扩展。看源码:
public abstract class ViewGroup extends View implements ViewParent, ViewManager{}
而各种不同的Widgets 像TextView, Button 等等 也是View的扩展,只不过是放在各种Layout里,比如LinearLayout, RelativeLayout。而Layout却是ViewGroup的子类。所以说一个ViewTree只不过是各种Views和ViewGroups放在一个Layout里组成的树形结构。
有例子才有真相。通过Eclipse的Outline窗口,我们可以看下下面这个树状布局。
XML Code:
<?xml version="1.0" encoding="utf-8"?>
<RelativeLayout xmlns:android="http://schemas.android.com/apk/res/android"
    android:id="@+id/RelativeLayout1"
    android:layout_width="fill_parent"
    android:layout_height="fill_parent" >

    <View
        android:id="@+id/WhiteView"
        android:layout_width="200dp"
        android:layout_height="300dp"
        android:layout_marginLeft="20dp"
        android:background="#ffffff" />

    <TextView
        android:id="@+id/RedText"
        android:layout_width="fill_parent"
        android:layout_height="wrap_content"
        android:layout_centerInParent="true"
        android:text="@string/hello"
        android:textColor="#ff0000" />

    <LinearLayout
        android:layout_width="wrap_content"
        android:layout_height="wrap_content"
        android:layout_above="@+id/GrayView"
        android:layout_alignLeft="@+id/GrayView"
        android:layout_marginBottom="25dp"
        android:background="#0000ff"
        android:orientation="vertical" >

        <TextView
            android:id="@+id/GreenText"
            android:layout_width="wrap_content"
            android:layout_height="wrap_content"
            android:text="TextView"
            android:textColor="#00ff00"
            android:textStyle="bold" />

        <Button
            android:id="@+id/Button1"
            android:layout_width="wrap_content"
            android:layout_height="wrap_content"
            android:text="Button in LinearLayout" />
    </LinearLayout>

    <View
        android:id="@+id/RedView"
        android:layout_width="100dp"
        android:layout_height="100dp"
        android:layout_alignParentRight="true"
        android:layout_above="@+id/GrayView"
        android:layout_marginRight="10dp"
        android:layout_marginBottom="-10dp"
        android:background="#ff0000" />

    <View
        android:id="@+id/GrayView"
        android:layout_width="200dp"
        android:layout_height="300dp"
        android:layout_alignParentBottom="true"
        android:layout_alignParentRight="true"
        android:layout_marginRight="20dp"
        android:background="#cccccc" />

</RelativeLayout>
当我们在Activity里,用setContentView()去设置这个view,然后运行,我们可以看到如下图:
仔细观察XML文件,以及页面渲染的View,我们会发现:
1. ViewTree 是以一种自上而下的方式进行遍历实现。
2. Parent总是最先绘制的,其实才是Children,并且仍然遵循自上而下的方式。
所以在我们的例子中,RelativeLayout是最先绘制,接着是其孩子WhiteView,RedText 等等,
直到最终GrayView绘制,并且我们会看到后绘制的覆盖了部分先绘制的。
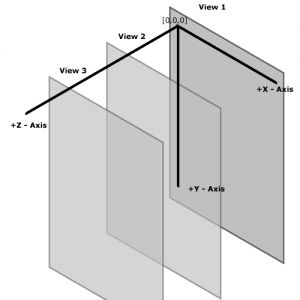
为了更方便观察这些Views是怎么绘制的,我们把手机屏幕看作下面的X,Y,Z的坐标系。屏幕的左上角作为[0,0,0],X轴向右,Y轴向下沿着屏幕的长度,Z轴延伸出屏幕。
 所以说,当我们遍历Tree的时候,这些Views基本上就是沿着Z轴排放。这里需要注意,当View有部分被遮挡时,Android就不会再绘制这被遮挡的部分。比如上图,灰色遮挡部分红色,Android绘图机制就不会再绘制那部分红色,所以我们看到的是直接遮挡,而不是颜色的混合。
现在我们知道了我们在XML里定义的Views是如何绘制的了,但是这还不够,我们可以借助一个非常有用的工具Heirarchyviewer去更深层细的观察页面布局。
Heirarchyviewer 在文件夹android-sdk/tools下,在命令行下找到这个文件夹,然后执行heirarchyviewer.bat 就可以了。
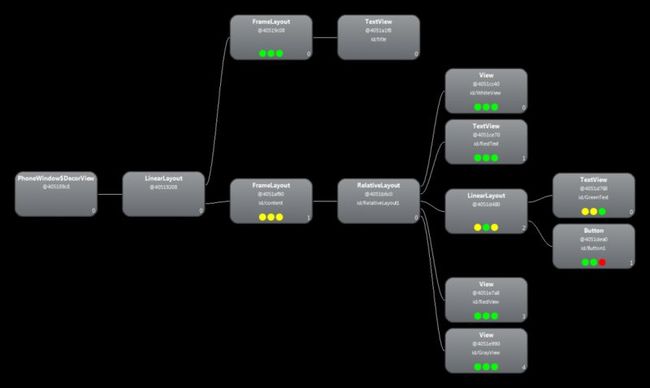
下图是Hierarchy Viewer的截图:
在Hierarchy Viewer里,列代表树的深度,而每一列里行的数量则表示每一层的深度。从图上我们能注意到RelativeLayout并不是Root级别的,而是id为content的FrameLayout的一个子元素。而实际山我们调用setContentView(View v)里的View v 就是这个content视图。
现在注意下跟content同级的FrameLayout有个子TextView,实际上它既是Activity的titleBar。那么我们删除这个TitleBar之后,View Tree又会变成什么样子呢?
方法:在manifest文件,然后修改application的主题如下:
android:theme="@android:style/Theme.Black.NoTitleBar.Fullscreen"
这样再打开Hierarchy Viewer,我们就能看到下图:
(注意:本人选用的Android是2.2的,要是用4.1的话,并不能得到下图,中间还会多一个Id为action_menu_bar_stub的ViewStub)
这时候我们看到content FrameLayout的父元素是PhoneWindow$DecorView。
DecorView
我们知道在Android中抽象类Window定义了最上层窗口的基本外观以及基本行为,她的实例将会被加到WindowManager中,提供一些标准的UI策略,像Background,Titlebar,以及Default key processing等等,当然这些属性是可以通过WindowManager.LayoutParams定制的。
而上面提到的PhoneWindow是Window抽象类的唯一实现,即android.policy.PhoneWindow。而DecorWindow是PhoneWindow的一个私有内部类,其实就是一个FrameLayout的扩展。
private final class DecorView extends FrameLayout implements RootViewSurfaceTaker {}
就是这个类构成了最上层应用程序视图。根据我们在Manifest中设置的Theme或者在PhoneWindow设置的Flags,来确定DecorView的Layout。所以在我们的例子中,第一张中我们有个简单的主题(在Manifest中)包含一个titlebar和contentview,于是PhoneWindow就生成了包含Title的LinearLayout,以及放置content的FrameLayout。而在第二张图中,我们去掉了titlebar主题,所以她就只生成了包含FrameLayout的DecorView了。
结论
最后我们来总结下,当一个Activity被启动的时候,这个视图树(View Tree)大体是如何创建的呢:
1. PhoneWindow根据Manifest的主题或者是特定的PhoneWindow设置去生成一个DevorView的布局,作为跟视图(Root View)。
2. Activity调用setContentView()方法把用户自定义的Layout XML文件作为内容视图(Content View), 当然其内部是调用PhoneWindow的setContentView()方法。
3. 经过上两步,UI视图就已经形成了,那么当UI每次被刷新的时候,View Tree就会像上面所说的那样被Traverse。
原文地址:http://www.shubhayu.com/android/android-viewtree-and-decorview
这里并不是逐文逐字的翻译,主要是根据自己的理解。另外,上面的链接我的Mcafee好像会报病毒(截图),点的时候注意点。


