VINS 细节系列 - 特征点三角化
一、原理
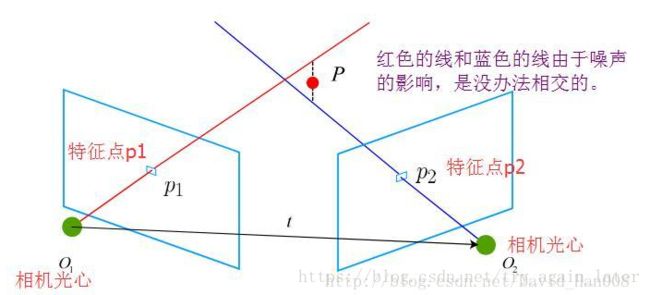
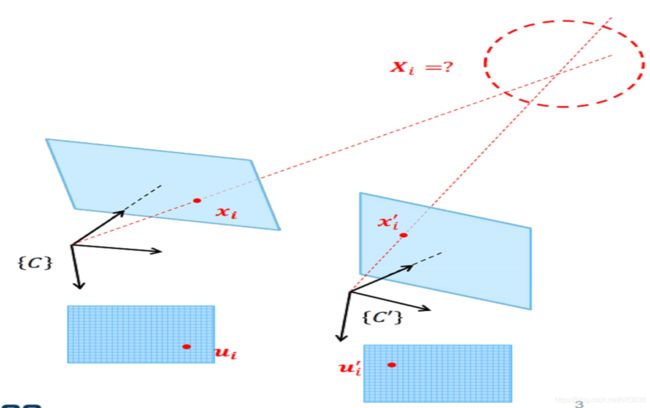
在得到运动之后,下一步我们需要用相机的运动估计特征点的空间位置。在单目 SLAM 中,仅通过单张
图像无法获得像素的深度信息,我们需要通过三角测量(Triangulation) 的方法来估计地图点的深度。
三角测量:通过在两处观察同一个点的夹角,从而确定该点的距离。
设 x 1 , x 2 为两个特征点的归一化坐标,那么它们满足:
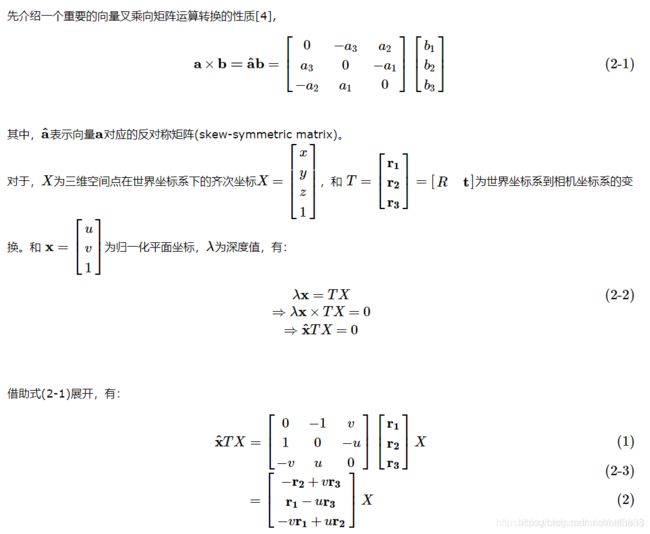
总结: 根据两帧间的转换关系和两帧中对应的特征点归一化坐标系,求尺度因子 (单目)
具体分析:
理解:
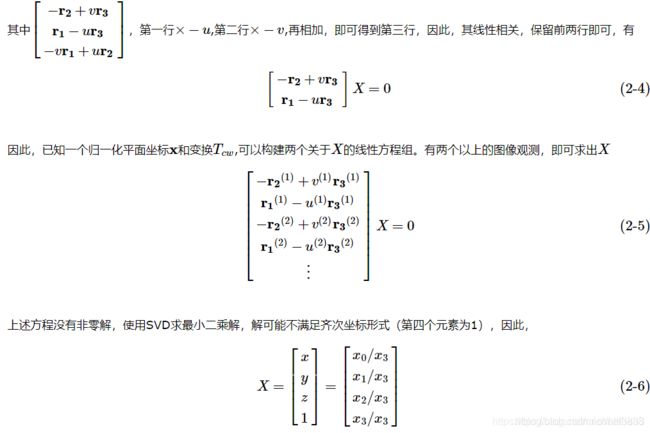
如公式 (2-5) 所示,相邻两个关键帧做三角化,每帧的位姿T和特征点在该帧上的像素坐标可以得到两个约束公式,故相邻两帧便可以得到4个约束公式,下面的程序也是这样写的!
相关论文连接
总结: 根据世界坐标系与相机坐标系的转换关系以及特征点的归一化坐标,求特征点世界坐标系下的位置(双目)
二、程序
先介绍上述理论对应的vins-fusion 中的代码,如下:
void FeatureManager::triangulatePoint(Eigen::Matrix &Pose0, Eigen::Matrix &Pose1,
                        Eigen::Vector2d &point0, Eigen::Vector2d &point1, Eigen::Vector3d &point_3d)
{
    Eigen::Matrix4d design_matrix = Eigen::Matrix4d::Zero();
    design_matrix.row(0) = point0[0] * Pose0.row(2) - Pose0.row(0);
    design_matrix.row(1) = point0[1] * Pose0.row(2) - Pose0.row(1);
    design_matrix.row(2) = point1[0] * Pose1.row(2) - Pose1.row(0);
    design_matrix.row(3) = point1[1] * Pose1.row(2) - Pose1.row(1);
    Eigen::Vector4d triangulated_point;
    triangulated_point =
              design_matrix.jacobiSvd(Eigen::ComputeFullV).matrixV().rightCols<1>();
    point_3d(0) = triangulated_point(0) / triangulated_point(3);
    point_3d(1) = triangulated_point(1) / triangulated_point(3);
    point_3d(2) = triangulated_point(2) / triangulated_point(3);
}
在介绍 VINS-fusion 程序里面对应的代码入口!
if (solver_flag == INITIAL)
    {
        //stereo + IMU initilization,双目初始化
        if(STEREO && USE_IMU)
        {
            f_manager.initFramePoseByPnP(frame_count, Ps, Rs, tic, ric);

            //三角化
            f_manager.triangulate(frame_count, Ps, Rs, tic, ric);
void FeatureManager::triangulate() 如下:
我用的是VINS-fusion程序, 里面的单目程序删除了!
void FeatureManager::triangulate(int frameCnt, Vector3d Ps[], Matrix3d Rs[], Vector3d tic[], Matrix3d ric[])
{
    for (auto &it_per_id : feature)
    {
        if (it_per_id.estimated_depth > 0)
            continue;//三角化过的点就不再计算了
      //一、双目
        if(STEREO && it_per_id.feature_per_frame[0].is_stereo)
        {
            //R0 t0为第i帧 左相机 坐标系的点 到 世界坐标系点的变换矩阵Rwc
            int imu_i = it_per_id.start_frame;
            Eigen::Matrix leftPose;
            Eigen::Vector3d t0 = Ps[imu_i] + Rs[imu_i] * tic[0];
            Eigen::Matrix3d R0 = Rs[imu_i] * ric[0];//Rw_bk * Rbk_ck = Rw_ck

            leftPose.leftCols<3>()  =  R0.transpose();
            leftPose.rightCols<1>() = -R0.transpose() * t0;

            //R1 t1为第i帧 右相机 坐标系的点 到 世界坐标系的变换矩阵
            Eigen::Matrix rightPose;
            Eigen::Vector3d t1 = Ps[imu_i] + Rs[imu_i] * tic[1];
            Eigen::Matrix3d R1 = Rs[imu_i] * ric[1];
            rightPose.leftCols<3>() = R1.transpose();
            rightPose.rightCols<1>() = -R1.transpose() * t1;

            //左 右 相机的归一化坐标
            Eigen::Vector2d point0, point1;
            Eigen::Vector3d point3d;
            point0 = it_per_id.feature_per_frame[0].point.head(2);
            point1 = it_per_id.feature_per_frame[0].pointRight.head(2);

          //理论部分:相机坐标系与世界坐标系的转换关系 + 归一化坐标 + 通过公式 = 世界坐标系下的3D点
            triangulatePoint(leftPose, rightPose, point0, point1, point3d);

          //世界坐标系的3D点,转换到相机坐标系,z便是深度! 体会这个意思
            Eigen::Vector3d localPoint;
            localPoint = leftPose.leftCols<3>() * point3d + leftPose.rightCols<1>();

            double depth = localPoint.z();
            if (depth > 0)
                it_per_id.estimated_depth = depth;
            else
                it_per_id.estimated_depth = INIT_DEPTH;

            continue;
        }//到此,滑窗内所有特征点的深度求出来了


       //二、单目部分
        it_per_id.used_num = it_per_id.feature_per_frame.size();
        if (it_per_id.used_num < 4)
            continue;

        int imu_i = it_per_id.start_frame, imu_j = imu_i - 1;

        Eigen::MatrixXd svd_A(2 * it_per_id.feature_per_frame.size(), 4);
        int svd_idx = 0;

        Eigen::Matrix P0;
        Eigen::Vector3d t0 = Ps[imu_i] + Rs[imu_i] * tic[0];
        Eigen::Matrix3d R0 = Rs[imu_i] * ric[0];
        P0.leftCols<3>() = Eigen::Matrix3d::Identity();
        P0.rightCols<1>() = Eigen::Vector3d::Zero();

        for (auto &it_per_frame : it_per_id.feature_per_frame)//遍历
        {
            imu_j++;
            //R t为第j帧相机坐标系到第i帧相机坐标系的变换矩阵,P为i到j的变换矩阵
            Eigen::Vector3d t1 = Ps[imu_j] + Rs[imu_j] * tic[0];
            Eigen::Matrix3d R1 = Rs[imu_j] * ric[0];
            Eigen::Vector3d t = R0.transpose() * (t1 - t0);
            Eigen::Matrix3d R = R0.transpose() * R1;


            Eigen::Matrix P;
            P.leftCols<3>() = R.transpose();
            P.rightCols<1>() = -R.transpose() * t;

            Eigen::Vector3d f = it_per_frame.point.normalized();
            svd_A.row(svd_idx++) = f[0] * P.row(2) - f[2] * P.row(0);
            svd_A.row(svd_idx++) = f[1] * P.row(2) - f[2] * P.row(1);

            if (imu_i == imu_j)
                continue;
        }

        //对A的SVD分解得到其最小奇异值对应的单位奇异向量(x,y,z,w),深度为z/w
        ROS_ASSERT(svd_idx == svd_A.rows());
        Eigen::Vector4d svd_V = Eigen::JacobiSVD(svd_A, Eigen::ComputeThinV).matrixV().rightCols<1>();

        double svd_method = svd_V[2] / svd_V[3];

        it_per_id.estimated_depth = svd_method;

        if (it_per_id.estimated_depth < 0.1)
        {
            it_per_id.estimated_depth = INIT_DEPTH;
        }

    }
} 疑问:为什么 “一、双目” 后面还会有“二、单目”,程序是不是错了!
答:不是的,我看的这个程序是VINS-fusion, 包括双目,单目程序,而我最近在研究双目的程序,故出现这样的情况;
再者,读取文件满足双目情况时,程序是不进入下面的单目的,因为双目中的 continue 存在的原因,遇到 continue 就会返回
for 循环重新开始,直到没有特征点,整个程序不再运行,自己看程序体会一下!
三、总结
1、纯旋转无法使用三角测量,由于对极约束永远满足,需要有平移,平移较大时,三角化测量将更精确。
2、多视几何的公式推导中,多次使用"共线向量叉乘等于0"的性质; 另一个常用的性质是"互相垂直的两个向量点乘为零";
程序读了很多遍,感觉每次都有收获,努力把这个程序完全搞懂!


