用WxPython做界面时, 如果数据操作时间比较长,会使 WxPython 界面处于假死状态,用户体验非常不好。
WxPython是利用pubsub来完成消息的传送。
下面提供一个 WxPython界面利用pubsub 展示进程工作的进度条的例子,实际使用, 只要修改
WorkThread 里的 run 内容 及 MainFrame 里的 updateDisplay 内容即可。
环境需求
Python 3.7.3
wxPython          4.0.6
Pypubsub          4.0.3
安装 pubsub
pip install pypubsub
# encoding: utf-8
"""
@author: 陈年椰子
@contact: [email protected]
@version: 1.0
@file: wxpub.py
@time: 2020/02/25
说明  WxPython 界面利用pubsub与线程通讯使用进度条的例子
import wxpub as wp
wp.test()
"""
import wx
from pubsub import pub
from time import sleep
import threading
import sys


# 线程调用耗时长代码
class WorkThread(threading.Thread):
    def __init__(self):
        """Init Worker Thread Class."""
        threading.Thread.__init__(self)
        self.breakflag = False
        self.start()

    def stop(self):
        self.breakflag = True

    # 耗时长的代码
    def workproc(self):
        sum_x = 0
        for i in range(1, 101):
            if self.breakflag:
                pub.sendMessage("update", mstatus='中断')
                sleep(2)
                break
            sum_x = sum_x + i
            sleep(0.1)
            pub.sendMessage("update", mstatus='计算{} , 合计 {}'.format(i, sum_x))
        return sum_x

    def run(self):
        """Run Worker Thread."""
        pub.sendMessage("update", mstatus='workstart')
        result = self.workproc()
        sleep(2)
        pub.sendMessage("update", mstatus='计算完成,结果 {}'.format(result))
        pub.sendMessage("update", mstatus='workdone')


class MainFrame(wx.Frame):
    """
    简单的界面
    """

    def __init__(self, *args, **kw):
        # ensure the parent's __init__ is called
        super(MainFrame, self).__init__(*args, **kw)

        # create a panel in the frame
        pnl = wx.Panel(self)

        # and put some text with a larger bold font on it
        self.st = wx.StaticText(pnl, label="分析工具 V 2019", pos=(25,25))
        font = self.st.GetFont()
        font.PointSize += 5
        font = font.Bold()

        self.st.SetFont(font)


        # create a menu bar
        self.makeMenuBar()

        self.gauge = wx.Gauge(self, range=100, size=(300, 20))
        self.gauge.SetBezelFace(3)
        self.gauge.SetShadowWidth(3)
        sizer = wx.BoxSizer(wx.VERTICAL)
        sizer.Add(self.st, 0, wx.BOTTOM | wx.ALIGN_CENTER_VERTICAL, 0)
        sizer.Add(self.gauge, 0, wx.BOTTOM | wx.ALIGN_CENTER_VERTICAL, 0)

        self.SetSizer(sizer)

        # and a status bar
        self.CreateStatusBar()
        self.SetStatusText("启动完成!")

        pub.subscribe(self.updateDisplay, "update")


    def makeMenuBar(self):
        """
        A menu bar is composed of menus, which are composed of menu items.
        This method builds a set of menus and binds handlers to be called
        when the menu item is selected.
        """

        # Make a file menu with Hello and Exit items
        fileMenu = wx.Menu()
        # The "\t..." syntax defines an accelerator key that also triggers
        # the same event
        # helloItem = fileMenu.Append(-1, "&Hello...\tCtrl-H",
        #         "Help string shown in status bar for this menu item")
        self.startItem = fileMenu.Append(-1, "开始",
                "开始计算")
        self.stopItem = fileMenu.Append(-1, "停止",
                                         "中断计算")
        fileMenu.AppendSeparator()
        self.exitItem = fileMenu.Append(-1, "退出",
                "退出")

        # Now a help menu for the about item
        helpMenu = wx.Menu()
        aboutItem = helpMenu.Append(-1, "关于",
                "WxPython 界面与线程通讯的例子")


        # Make the menu bar and add the two menus to it. The '&' defines
        # that the next letter is the "mnemonic" for the menu item. On the
        # platforms that support it those letters are underlined and can be
        # triggered from the keyboard.
        self.menuBar = wx.MenuBar()
        self.menuBar.Append(fileMenu, "工作")
        self.menuBar.Append(helpMenu, "信息")

        # Give the menu bar to the frame
        self.SetMenuBar(self.menuBar)
        self.stopItem.Enable(False)

        self.count = 0


        # Finally, associate a handler function with the EVT_MENU event for
        # each of the menu items. That means that when that menu item is
        # activated then the associated handler functin will be called.
        self.Bind(wx.EVT_MENU, self.OnStart, self.startItem)
        self.Bind(wx.EVT_MENU, self.OnStop, self.stopItem)
        self.Bind(wx.EVT_MENU, self.OnExit,  self.exitItem)
        self.Bind(wx.EVT_MENU, self.OnAbout, aboutItem)


    def OnExit(self, event):
        """Close the frame, terminating the application."""
        try:
            self.work.stop()
        except:
            pass
        self.Close(True)
        sys.exit()


    def OnStart(self, event):
        self.work = WorkThread()

    def OnStop(self, event):
        self.work.stop()


    def OnAbout(self, event):
        """Display an About Dialog"""
        wx.MessageBox("分析工具 v2019",
                      "关于",
                      wx.OK|wx.ICON_INFORMATION)

    def updateDisplay(self, mstatus):
        """
        Receives data from thread and updates the display
        """
        if mstatus.find("workstart") >= 0:
            self.SetStatusText('开始计算,代码不提供中断线程语句,请等待计算结束!')
            self.startItem.Enable(False)
            self.stopItem.Enable(True)
            self.exitItem.Enable(False)
        if mstatus.find("workdone") >= 0:
            self.SetStatusText('完成!')
            self.stopItem.Enable(False)
            self.startItem.Enable(True)
            self.exitItem.Enable(True)
        else:
            self.st.SetLabel(mstatus)
            if mstatus.find(",")>0 and mstatus.find("计算")>=0:
                mdata = mstatus.split(',')
                # 示范 , 实际使用需要传送进度
                # print(int(mdata[0].replace('计算','')))
                g_count = int(mdata[0].replace('计算',''))
                self.gauge.SetValue(g_count)


def test():
    app = wx.App()
    frm = MainFrame(None, title='分析工具')
    frm.Show()
    app.MainLoop()

if __name__=="__main__":
    test()
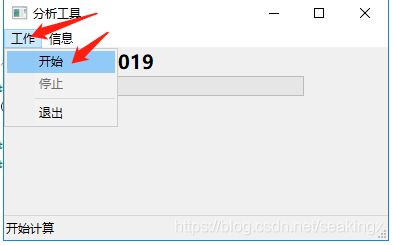
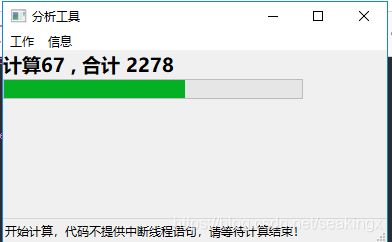
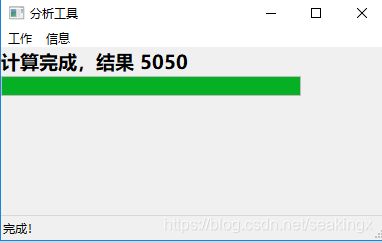
运行后, 点击 工作-开始
以上为个人经验,希望能给大家一个参考,也希望大家多多支持脚本之家。


