Dolphinscheduler 3.0 windows 部署手册
Dolphinscheduler作为国人开源的一款分布式ETL调度工具在2022年4月发布了最新的3.0版本,在健壮性和功能的丰富度上相较之前的版本都有了较大的提高。工作和实际生产中从稳定性的角度我们一般采用基于centOS或者其他版本Linux的集群部署或者K8S部署。因为工作中缺少合适的Linux环境的原因,为了熟悉Dolphinscheduler功能和代码,我尝试在3台windows服务器(Server A, Server B, Server C)上进行了Dolphinscheduler集群的部署,现将部署过程分享如下:
-
部署准备:
- 下载必备软件:
Dolphinscheduler 3.0 source code, 3.0版本对windows下shell(bat)的管理和进程管理上功能不全,如果直接用发布的binary版本部分功能不能支持。 另一方面,也可以通过源代码进行trouble shooting和学习Dolphinscheduler的调度原理。
OpenJDK 1.8.0, 我们采用的版本信息如下
openjdk version "1.8.0_342"
OpenJDK Runtime Environment Corretto-8.342.07.3 (build 1.8.0_342-b07)
OpenJDK 64-Bit Server VM Corretto-8.342.07.3 (build 25.342-b07, mixed mode)
MySQL社区版本,我们采用MySQL作为Dolphin元数据管理的数据库。
Zookeeper, 作为Dolphinscheduler节点间同步管理的工具。
Cygwin,作为一款windows下模拟Linux环境非常棒的工具,采用cygwin可以更方便的完成ssh服务配置,集群信任主机配置以及规避部分windows命令和shell的差异。
Python 2.7,作为支持DataX的基础。
DataX,作为跨平台的高效数据ETL工具。
- 安装基础环境
a. 在三台服务器上分别安装jdk环境,例如将jdk安装在c:\java\jdk1.8下,并设置系统环境变量JAVA_HOME=c:\java\jdk1.8以及PATH=%PATH%;%JAVA_HOME%\bin
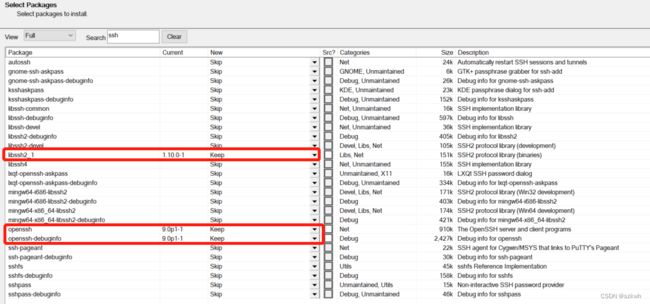
b. 在三台服务器上分别安装cygwin,并启动ssh服务和设置信任主机。
确保安装了ssh packages
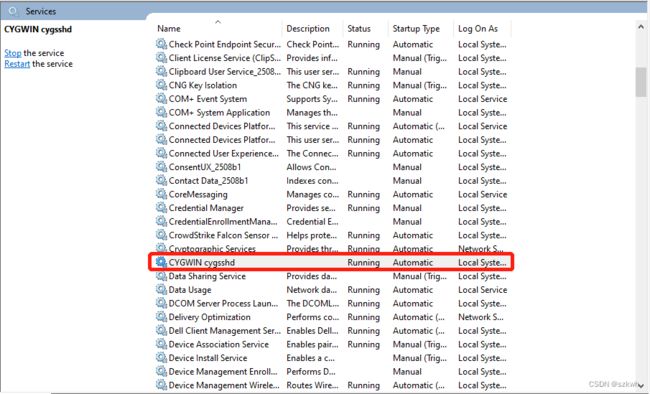
安装完成后在系统服务中查看确保cygsshd服务已经启动并且作为系统服务可以自启动
在三台机器的cygwin的home目录下执行ssh-keygen,生成id_rsa.pub公钥文件、authorized_keys等文件。将两台客户机(Server B, Server C)的公钥内容copy到master主机 (Server A) 的authorized_keys文件中 (网上有很多相关文章,不再赘述)。
c. 在master server(Server A)上解压并安装Zookeeper, 启动Zookeeper服务。
d. 在master server(不限制在master server,只要网络能够连通即可)上安装MySQL。参考Dolphinscheduler官方文档完成dolphinscheduler数据库的配置和用户的创建以及对文件dolphinscheduler_env.sh的修改。数据库的初始化在后续步骤进行。
- Dolphinscheduler代码修改
因当前Dolphinscheduler 3.0对windows并没有提供完整的支持,在shell执行过程中存在状态检测错误的情况。然而,Dolphinscheduler任务中的shell任务,Python任务都是以shell形式做嵌套执行的。所以,为了支持基本的任务执行需要对对应的代码进行修改并重新编译并将jar包部署到对应路径。主要修改的部分如下:
org.apache.dolphinscheduler.common.shell.AbstractShell.java的208行对执行状态的检测,跳过windows环境
if (!SystemUtils.IS_OS_WINDOWS && (exitCode != 0 || errMsg.length() > 0)) {
                throw new ExitCodeException(exitCode, errMsg.toString());
}
dolphinscheduler-common/src/main/resources/common.properties, 将sudo开关关闭:
sudo.enable=false修改shell解释执行代码,通过cygwin bash解释执行shell代码:
   private String buildCommand() throws Exception {
        // generate scripts
//        String fileName = String.format("%s/%s_node.%s",
//                taskExecutionContext.getExecutePath(),
//                taskExecutionContext.getTaskAppId(), OSUtils.isWindows() ? "bat" : "sh");
//Run shell under windows with Cygwin bash
        String fileName = String.format("%s/%s_node.sh",
                taskExecutionContext.getExecutePath(),
                taskExecutionContext.getTaskAppId());
        File file = new File(fileName);
        Path path = file.toPath();

        if (Files.exists(path)) {
            return fileName;
        }

        String script = shellParameters.getRawScript().replaceAll("\\r\\n", "\n");
        script = parseScript(script);
        shellParameters.setRawScript(script);

        logger.info("raw script : {}", shellParameters.getRawScript());
        logger.info("task execute path : {}", taskExecutionContext.getExecutePath());

        Set perms = PosixFilePermissions.fromString(RWXR_XR_X);
        FileAttribute> attr = PosixFilePermissions.asFileAttribute(perms);

        if (OSUtils.isWindows()) {
            Files.createFile(path);
        } else {
            if (!file.getParentFile().exists()) {
                file.getParentFile().mkdirs();
            }
            try {
                Files.createFile(path, attr);
            } catch (FileAlreadyExistsException ex) {
                // this is expected
            }
        }

        Files.write(path, shellParameters.getRawScript().getBytes(), StandardOpenOption.APPEND);
        if (SystemUtils.IS_OS_WINDOWS){
            return "bash /cygdrive/c"+fileName;
        }else {
            return fileName;
        }
} - 安装和启动Dolphinscheduler
a. 通过Intellij IDE完成对Dolphinscheduler源码的编译,将dolphinscheduler-dist\target路径下的apache-dolphinscheduler-3.0.1-SNAPSHOT-bin.tar.gz解压到目标路径。
b. 修改配置文件和shell脚本
修改tools/bin/upgrade-schema.sh,支持cygwin下的classpath路径,将最后一句
java $JAVA_OPTS \
  -cp "$DOLPHINSCHEDULER_HOME/tools/conf":"$DOLPHINSCHEDULER_HOME/tools/libs/*":"$DOLPHINSCHEDULER_HOME/tools/sql" \
  -Dspring.profiles.active=upgrade,${DATABASE} \
  org.apache.dolphinscheduler.tools.datasource.UpgradeDolphinScheduler
改为:
java $JAVA_OPTS \
  -classpath `cygpath $DOLPHINSCHEDULER_HOME/tools/conf:$DOLPHINSCHEDULER_HOME/tools/libs/*:$DOLPHINSCHEDULER_HOME/tools/sql` \
  -Dspring.profiles.active=upgrade,${DATABASE} \
  org.apache.dolphinscheduler.tools.datasource.UpgradeDolphinScheduler
同样,修改master-server/bin、worker-server/bin、api-server/bin、alert-server/bin下的start.sh文件,支持cygwin下的classpath路径。
以master-server为例,修改成:
java $JAVA_OPTS \
  -classpath `cygpath -wp $DOLPHINSCHEDULER_HOME/conf:$DOLPHINSCHEDULER_HOME/libs/*` \
  org.apache.dolphinscheduler.server.master.MasterServer
参考前序两例修改bin/remove-zk-node.sh, 变更对应的classpath部分,支持cygwin路径。
c. 参考Dolphinscheduler集群安装文档,修改bin/env/dolphinscheduler_env.sh和bin/env/install_env.sh文件。
d. 运行tools/bin/upgrade-schema.sh初始化metadata数据库。
e. 修改bin/dolphinscheduler-daemon.sh文件,支持windows下进程状态的侦测和杀停。因变更内容较多,整体展示如下:
#!/bin/bash
#
# Licensed to the Apache Software Foundation (ASF) under one or more
# contributor license agreements. See the NOTICE file distributed with
# this work for additional information regarding copyright ownership.
# The ASF licenses this file to You under the Apache License, Version 2.0
# (the "License"); you may not use this file except in compliance with
# the License. You may obtain a copy of the License at
#
# http://www.apache.org/licenses/LICENSE-2.0
#
# Unless required by applicable law or agreed to in writing, software
# distributed under the License is distributed on an "AS IS" BASIS,
# WITHOUT WARRANTIES OR CONDITIONS OF ANY KIND, either express or implied.
# See the License for the specific language governing permissions and
# limitations under the License.
#
usage="Usage: dolphinscheduler-daemon.sh (start|stop|status) "
# if no args specified, show usage
if [ $# -le 1 ]; then
echo $usage
exit 1
fi
startStop=$1
shift
command=$1
shift
echo "Begin $startStop $command......"
BIN_DIR=`dirname $0`
BIN_DIR=`cd "$BIN_DIR"; pwd`
DOLPHINSCHEDULER_HOME=`cd "$BIN_DIR/.."; pwd`
BIN_ENV_FILE="${DOLPHINSCHEDULER_HOME}/bin/env/dolphinscheduler_env.sh"
# Overwrite server dolphinscheduler_env.sh in path `/conf/dolphinscheduler_env.sh` when exists
# `bin/env/dolphinscheduler_env.sh` file. User could only change `bin/env/dolphinscheduler_env.sh` instead
# of each server's dolphinscheduler_env.sh when they want to start the server
function overwrite_server_env() {
local server=$1
local server_env_file="${DOLPHINSCHEDULER_HOME}/${server}/conf/dolphinscheduler_env.sh"
if [ -f "${BIN_ENV_FILE}" ]; then
echo "Overwrite ${server}/conf/dolphinscheduler_env.sh using bin/env/dolphinscheduler_env.sh."
cp "${BIN_ENV_FILE}" "${server_env_file}"
else
echo "Start server ${server} using env config path ${server_env_file}, because file ${BIN_ENV_FILE} not exists."
fi
}
export HOSTNAME=`hostname`
export DOLPHINSCHEDULER_LOG_DIR=$DOLPHINSCHEDULER_HOME/$command/logs
export STOP_TIMEOUT=5
if [ ! -d "$DOLPHINSCHEDULER_LOG_DIR" ]; then
mkdir $DOLPHINSCHEDULER_LOG_DIR
fi
pid=$DOLPHINSCHEDULER_HOME/$command/pid
cd $DOLPHINSCHEDULER_HOME/$command
if [ "$command" = "api-server" ]; then
log=$DOLPHINSCHEDULER_HOME/api-server/logs/$command-$HOSTNAME.out
elif [ "$command" = "master-server" ]; then
log=$DOLPHINSCHEDULER_HOME/master-server/logs/$command-$HOSTNAME.out
elif [ "$command" = "worker-server" ]; then
log=$DOLPHINSCHEDULER_HOME/worker-server/logs/$command-$HOSTNAME.out
elif [ "$command" = "alert-server" ]; then
log=$DOLPHINSCHEDULER_HOME/alert-server/logs/$command-$HOSTNAME.out
elif [ "$command" = "standalone-server" ]; then
log=$DOLPHINSCHEDULER_HOME/standalone-server/logs/$command-$HOSTNAME.out
else
echo "Error: No command named '$command' was found."
exit 1
fi
osType=`uname -a`
case $startStop in
(start)
echo starting $command, logging to $DOLPHINSCHEDULER_LOG_DIR
overwrite_server_env "${command}"
nohup /bin/bash "$DOLPHINSCHEDULER_HOME/$command/bin/start.sh" > $log 2>&1 &
echo $! > $pid
;;
(stop)
if [ -f $pid ]; then
TARGET_PID=`cat $pid|tr -cd "[:print:]\n"`
if [[ $osType =~ "WIN" ]];then
echo "Stopping $command with PID $TARGET_PID"
taskkill /F /T /PID $TARGET_PID
PROCESS_ID=`wmic process where "name='java.exe' and commandline like '%dolphinscheduler%' and commandline like '%${command}%'" get processid|findstr -v "ProcessId"|sed s/[[:space:]]//g`
else
if kill -0 $TARGET_PID > /dev/null 2>&1; then
echo stopping $command
pkill -P $TARGET_PID
sleep $STOP_TIMEOUT
if kill -0 $TARGET_PID > /dev/null 2>&1; then
echo "$command did not stop gracefully after $STOP_TIMEOUT seconds: killing with kill -9"
pkill -P -9 $TARGET_PID
fi
else
echo no $command to stop
fi
PROCESS_ID=`ps -ef | grep "$DOLPHINSCHEDULER_HOME" | grep "$CLASS" | grep -v "grep"`
fi
state="STOP"
# font color - red
state="[ \033[1;31m $state \033[0m ]"
if [ -n "$PROCESS_ID" ];then
state="RUNNING"
# font color - green
state="[ \033[1;32m $state \033[0m ]"
fi
echo -e "$command $state"
# rm -f $pid
else
echo no $command to stop
fi
;;
(status)
# more details about the status can be added later
echo $CLASS
if [[ $osType =~ "WIN" ]];then
PROCESS_ID=`wmic process where "name='java.exe' and commandline like '%dolphinscheduler%' and commandline like '%${command}%'" get processid|findstr -v "ProcessId"|sed s/[[:space:]]//g`
echo $PROCESS_ID > $pid
else
PROCESS_ID=`ps -ef | grep "$DOLPHINSCHEDULER_HOME" | grep "$CLASS" | grep -v "grep"|sed s/[[:space:]]//g`
fi
state="STOP"
# font color - red
state="[ \033[1;31m $state \033[0m ]"
if [ -n "$PROCESS_ID" ];then
state="RUNNING"
# font color - green
state="[ \033[1;32m $state \033[0m ]"
fi
echo -e "$command $state"
;;
(*)
echo $usage
exit 1
;;
esac
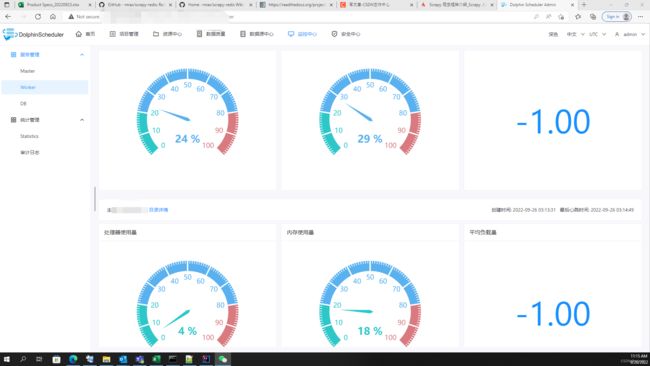
echo "End $startStop $command." 至此,已可启动Dolphinscheduler集群,启动前需要注意确保Zookeeper已经启动,观察cygwin路径下Dolphinscheduler部署路径对应的master-server/logs, worker-server/logs, alert-server/logs, api-server/logs日志正常即可,登录观察各个节点启动正常。